FREE DINNER EBOOK! Get your copy!
  • Cookie Policy
  • GDPR Policy
  • Disclaimer
  • Terms Of Use
  • Visit my other site: Fun Cookie Recipes
tasty trail blazer
  • Home
  • Dinner
  • Desserts
  • Drinks
  • Appetizers
  • Contact
  • About
  • Privacy Policy
  • Home
  • Dinner
  • Desserts
  • Drinks
  • Appetizers
  • Contact
  • About
  • Privacy Policy
  • Cookie Policy
  • GDPR Policy
  • Disclaimer
  • Terms Of Use
Visit my other site: Fun Cookie Recipes

HOME / CATEGORIES /

Latest

- 1 cup all-purpose flour - 1 teaspoon baking powder - 1/2 teaspoon baking soda - 1/2 teaspoon salt - 1 teaspoon ground cinnamon - 1/2 teaspoon ground nutmeg - 1/4 teaspoon ground ginger - 1/4 teaspoon ground cloves For the dry ingredients, I use all-purpose flour as the base. Baking powder and baking soda help the cupcakes rise. Salt brings out the flavor. The ground spices, like cinnamon, nutmeg, ginger, and cloves, add warmth and richness. - 1/2 cup unsalted butter, softened - 1 cup granulated sugar - 2 large eggs - 1/2 cup pumpkin puree - 1/2 cup brewed coffee (cooled) - 1 teaspoon vanilla extract In the wet ingredients, I start with softened unsalted butter. It mixes well with sugar to create a fluffy texture. Two large eggs add moisture and richness. Pumpkin puree gives a lovely flavor and helps keep the cupcakes moist. Brewed coffee adds depth, while vanilla extract gives a sweet touch. - 1/2 cup unsalted butter, softened - 2 cups powdered sugar - 1/4 cup pumpkin puree - 1 teaspoon vanilla extract - 1 teaspoon ground cinnamon For the frosting, I use softened unsalted butter again. It makes the frosting creamy. Powdered sugar sweetens and thickens the mix. Adding pumpkin puree keeps the flavor consistent with the cupcake. Vanilla extract and ground cinnamon finish it off, making it irresistible. - Preheat your oven to 350°F (175°C). - Line a cupcake tin with paper liners. - In a bowl, whisk together: - 1 cup all-purpose flour - 1 teaspoon baking powder - 1/2 teaspoon baking soda - 1/2 teaspoon salt - 1 teaspoon ground cinnamon - 1/2 teaspoon ground nutmeg - 1/4 teaspoon ground ginger - 1/4 teaspoon ground cloves This mix of dry ingredients will give your cupcakes that lovely spice flavor. - In a large bowl, beat together: - 1/2 cup unsalted butter (softened) - 1 cup granulated sugar Beat until it looks light and fluffy. This should take about 3 to 4 minutes. - Next, add in: - 2 large eggs (one at a time) - Mix in: - 1/2 cup pumpkin puree - 1/2 cup cooled brewed coffee - 1 teaspoon vanilla extract Make sure everything combines well for a great flavor. - Gradually add your dry mixture to the wet ingredients. Stir until just combined. Do not overmix; this will make your cupcakes tough. - Fill your cupcake liners about 2/3 full with batter. - Bake for 18 to 20 minutes. Check for doneness by inserting a toothpick. If it comes out clean, they are ready. - Let the cupcakes cool in the pan for 5 minutes. After that, transfer them to a wire rack to cool completely before frosting. Following these steps, you will have soft, flavorful pumpkin spice latte cupcakes ready to enjoy! To make sure your cupcakes have a soft, fluffy texture, use room temperature ingredients. This includes butter and eggs. They mix better and create air pockets. Avoid overmixing the batter. When you add dry ingredients to wet, stir just until combined. Overmixing can lead to tough cupcakes. For frosting, use a piping bag with a star tip for fun designs. Pipe a swirl or a simple dollop on top of each cupcake. Garnish with a sprinkle of cinnamon or a few coffee beans. This adds a nice touch and makes your cupcakes look beautiful. Pair your cupcakes with a warm cup of coffee or tea. The flavors of pumpkin spice and coffee work well together. For presentation, serve on a decorative cupcake stand. This makes your treat look even more inviting and special. {{image_2}} To make gluten-free pumpkin spice latte cupcakes, swap out the all-purpose flour. Use a gluten-free flour blend that measures cup-for-cup. I recommend blends that include xanthan gum for better texture. Keep in mind that not all blends work the same. You may need to test a few to find your favorite. For a vegan version, replace the eggs with flax eggs. Mix 1 tablespoon of flaxseed meal with 3 tablespoons of water for each egg. Let it sit until it thickens. Use coconut oil or vegan butter instead of regular butter. Choose non-dairy milk in place of brewed coffee if needed, but keep that coffee flavor strong. You can add chocolate chips to the batter for a sweet twist. Semi-sweet or dark chocolate chips work best. If you want to change up the spices, try adding a pinch of cardamom or allspice. These spices add depth to the pumpkin and coffee flavors. Feel free to experiment with what you love! To keep your pumpkin spice latte cupcakes fresh, follow these tips: - Store cupcakes in an airtight container. - Keep them at room temperature for short periods. - If you live in a humid place, refrigerate them. - Avoid stacking cupcakes to prevent squishing. - Place parchment paper between layers if stacking is necessary. Freezing cupcakes and frosting is simple. Here's how: - Allow cupcakes to cool completely. - Wrap each cupcake in plastic wrap tightly. - Place wrapped cupcakes in a freezer bag. - For frosting, store it in a separate airtight container. - You can freeze both for up to three months. Your cupcakes will stay fresh for different durations: - At room temperature, they last about 2-3 days. - In the fridge, they remain good for up to a week. - If frozen, they keep their taste for up to three months. Enjoy your delicious treats while they are fresh! You can tell if your cupcakes are done by checking a few signs: - The tops look golden brown. - They spring back when you touch them lightly. - A toothpick inserted in the center comes out clean. If you see wet batter on the toothpick, bake them a few more minutes. It's better to check early than to overbake! Yes, you can use instant coffee! Just mix 1 tablespoon of instant coffee with 1/2 cup of hot water. This will give you the brewed coffee flavor you need. Make sure it cools down before adding it to the batter. If you want a stronger coffee taste, you can add a bit more instant coffee. If you don't have pumpkin puree, there are great alternatives. Consider using: - Applesauce for a sweet touch. - Mashed bananas for a fruity flavor. - Sweet potato puree for a similar texture and taste. These options will keep your cupcakes moist and tasty! You learned how to make delicious cupcakes with our step-by-step guide. We covered the essential dry and wet ingredients, frosting, and tips to get the right texture. Remember, baking is a blend of art and science. Follow the instructions closely for best results. Don't hesitate to experiment with variations like gluten-free or vegan options. Proper storage keeps your treats fresh, and pairing them with drinks enhances their flavor. Enjoy baking these cupcakes and sharing them with others. Your kitchen will be a hub of warmth and joy!

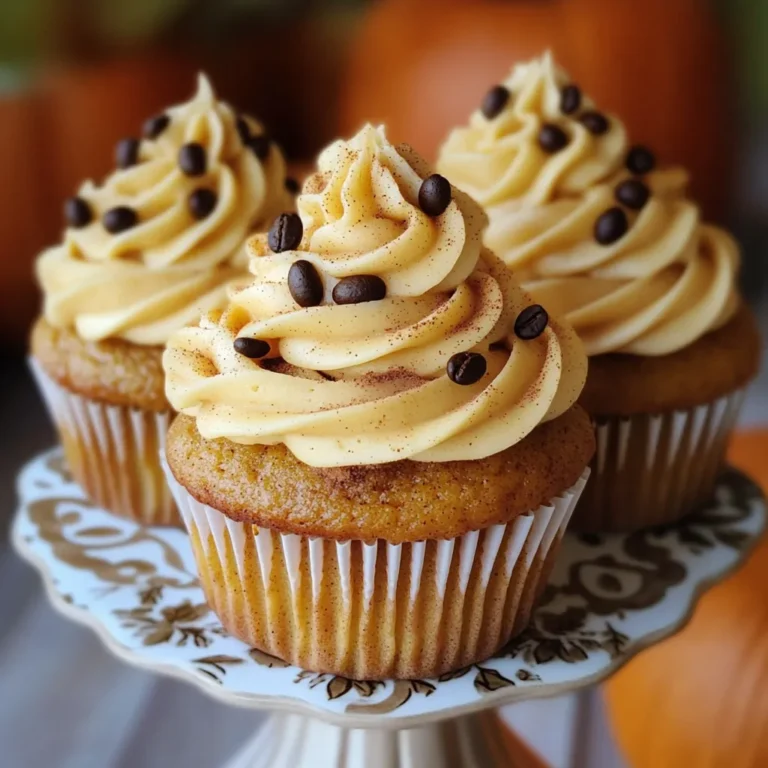
Pumpkin Spice Latte Cupcakes Irresistible Delight

To make Air Fryer Parmesan Crusted Chicken Breast, you will need the following ingredients: - 2 large chicken breasts - 1 cup grated Parmesan cheese - 1 cup breadcrumbs (preferably panko for extra crunch) - 1 teaspoon garlic powder - 1 teaspoon onion powder - 1 teaspoon Italian seasoning - 1/2 teaspoon paprika - 1/2 teaspoon salt - 1/4 teaspoon black pepper - 2 large eggs - 2 tablespoons olive oil These ingredients combine to create a flavorful and crispy dish. Using panko breadcrumbs gives a nice crunch, while Parmesan adds rich flavor. The seasonings elevate the taste, making each bite enjoyable. To start, dry the chicken breasts with paper towels. This helps the breading stick. If your chicken breasts are thick, slice them in half horizontally. This ensures even cooking. Next, season both sides with salt and black pepper. This adds flavor to the meat. Now, let’s make the breading station. In a shallow bowl, whisk two large eggs until smooth. In another bowl, combine the grated Parmesan cheese, breadcrumbs, garlic powder, onion powder, Italian seasoning, paprika, salt, and pepper. This mixture will give your chicken a nice crunch and flavor. For breading, dip each chicken breast into the egg mixture first. Let any excess egg drip off. After that, coat the chicken in the breadcrumb mixture. Press lightly so the crumbs stick well. Make sure each piece is fully covered. This helps create a great crust. Next, preheat your air fryer to 380°F (193°C). This should take about five minutes. While it heats, lightly spray the air fryer basket with cooking spray or brush it with olive oil. Place the breaded chicken breasts in a single layer in the basket. Avoid overcrowding; cook in batches if needed. Spray the tops with a bit more olive oil for extra crispiness. Cook the chicken for 12-15 minutes at 380°F (193°C). Flip the chicken halfway through for even cooking. The cheese should look golden, and the internal temperature should reach 165°F (75°C). Once done, remove the chicken and let it rest for 3-5 minutes. This helps keep the juices in. Slice the chicken and arrange on a platter. Garnish with fresh parsley and serve with a squeeze of lemon. Enjoy! To get that perfect crisp, oil is key. A light spray or brush of olive oil makes a big difference. It helps the Parmesan and breadcrumbs get golden and crunchy. Adjust cooking times based on the thickness of the chicken. Thicker pieces need a bit more time. Keep an eye on them to avoid overcooking. Add more flavor by mixing in extra seasonings. You can try cayenne for heat or lemon zest for brightness. These small changes make a big impact. For dips or sauces, classic options like ranch or marinara work great. A zesty honey mustard also pairs well with the chicken. Enjoy experimenting with flavors! {{image_2}} You can use chicken thighs instead of breasts. Thighs have more fat, giving a juicier bite. They also cook a little longer, so keep an eye on them. For cheese, try mozzarella or cheddar. Both add a different flavor profile and melt beautifully. For a gluten-free diet, use gluten-free breadcrumbs. They work just as well and keep the crunch. You can also use crushed nuts or ground oats for the breading. These options offer a unique twist and add depth to your dish. Pair your chicken with fresh salads or roasted veggies. A light side of mixed greens complements the richness of the chicken. You can also serve it with a tangy dipping sauce like marinara or a creamy ranch. These sauces add flavor and enhance your meal experience. To keep your Air Fryer Parmesan Crusted Chicken fresh, follow these tips: - Refrigeration: After cooling, place the chicken in an airtight container. Store in the fridge for up to 3 days. - Freezing: For longer storage, wrap the chicken tightly in plastic wrap or foil. Then, place it in a freezer-safe bag. This method helps avoid freezer burn. You can freeze it for up to 3 months. When you want to enjoy leftovers, proper reheating is key. Here are my favorite methods: - Oven Method: Preheat the oven to 375°F (190°C). Place the chicken on a baking sheet and cover it with foil. Heat for about 15-20 minutes. This keeps the chicken moist. - Air Fryer Method: Set your air fryer to 350°F (175°C). Reheat for about 5-7 minutes. This method helps maintain the crispiness of the crust. Avoid using the microwave, as it can make the chicken soggy. These methods help keep your chicken delicious for a second round! Cook the chicken at 380°F for 12 to 15 minutes. Flip it halfway for even cooking. Check that the internal temperature hits 165°F to ensure it's safe to eat. It is best to use thawed chicken breasts. Frozen chicken may not cook evenly and can result in a soggy coating. If you must use frozen, increase the cooking time and check for doneness. Great sauces include marinara, ranch, or garlic aioli. A squeeze of lemon adds zest too. Feel free to get creative with your favorite sauces! Yes, you can prepare the breading in advance. Store it in an airtight container in the fridge for up to two days. This saves time on a busy night. Preheating is recommended. It helps the chicken cook evenly and gives you a nice, crispy crust. Just five minutes at 380°F will do the trick. This blog post guides you through making delicious air-fried chicken. You learned about essential ingredients, preparation methods, and cooking steps. I shared tips for perfect crispiness and flavor boosts. You also found variations for different tastes, gluten-free options, and storage practices. Now, you can create a tasty meal with ease. Enjoy experimenting in your kitchen, and serve it with your favorite sides! Your air-fried chicken will impress everyone.

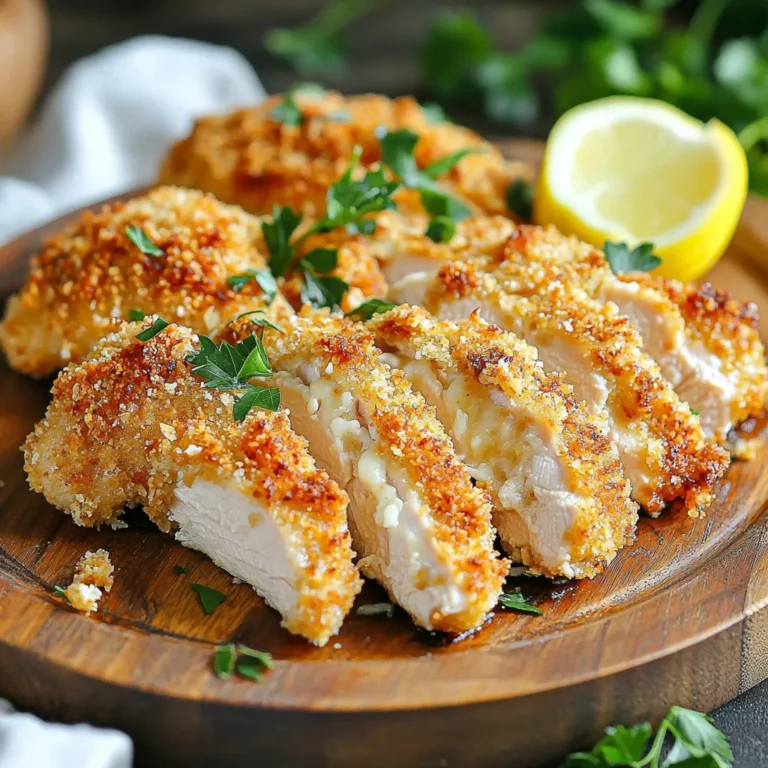
Air Fryer Parmesan Crusted Chicken Breast Recipe

To start, you'll need some basic dry ingredients. These create the foundation of our whoopie pies. - 2 cups all-purpose flour - 1 teaspoon baking powder - 1/2 teaspoon baking soda - 1/2 teaspoon salt - 1 teaspoon ground cinnamon - 1/2 teaspoon nutmeg These spices add warmth and flavor. The baking powder and soda help the pies rise. Next, we will focus on the wet ingredients. These bring moisture and sweetness to the cookies. - 1/2 cup unsalted butter, softened - 1 cup brown sugar, packed - 1 large egg - 1 teaspoon vanilla extract - 1 cup applesauce (unsweetened) The butter and brown sugar create a rich, sweet base. The applesauce keeps the cookies soft and adds apple flavor. Finally, we have the tasty fillings and toppings. These make the whoopie pies extra special. - 1/2 cup chopped green apples (like Granny Smith) - 1 cup caramel sauce (store-bought or homemade) - 1 cup cream cheese, softened - 1/4 cup powdered sugar - 1 teaspoon vanilla extract (for filling) The chopped apples add crunch. The cream cheese filling is smooth and creamy. Caramel sauce ties everything together with sweetness. Now, you’re ready to make the most delicious Caramel Apple Whoopie Pies! Each element adds to the flavor, making these treats hard to resist. 1. Preheat the oven and prepare baking sheets. Set your oven to 350°F (175°C). Line two baking sheets with parchment paper. This keeps the cookies from sticking and makes cleanup easy. 2. Whisk dry ingredients and mix wet ingredients. In a medium bowl, whisk together 2 cups of all-purpose flour, 1 teaspoon of baking powder, 1/2 teaspoon of baking soda, 1/2 teaspoon of salt, 1 teaspoon of ground cinnamon, and 1/2 teaspoon of nutmeg. Set this aside. In a large mixing bowl, cream 1/2 cup of softened unsalted butter and 1 cup of packed brown sugar until light and fluffy. Add in 1 large egg and 1 teaspoon of vanilla extract. Mix well, then stir in 1 cup of unsweetened applesauce. 3. Incorporate both mixtures and fold in apples. Gradually add the dry mix into the wet mix. Stir gently until just combined. Avoid overmixing to keep the cookies soft. Now, fold in 1/2 cup of chopped green apples. This adds nice texture and flavor. 4. Forming the whoopie pies. Use a tablespoon or a cookie scoop to drop the batter onto your lined baking sheets. Space each dollop about 2 inches apart. This gives them room to spread while baking. 5. Baking the cookies. Bake the cookies for 10-12 minutes. Look for lightly golden edges. Once done, let them cool on the sheets for about 5 minutes. Then, transfer them to a wire rack to cool completely. 6. Preparing the cream cheese filling. While the cookies cool, mix 1 cup of softened cream cheese with 1/4 cup of powdered sugar and 1 teaspoon of vanilla extract. Blend until smooth and well mixed. 7. Assembling the whoopie pies with caramel drizzle. Once the cookies are cool, spread a generous tablespoon of cream cheese filling on the flat side of one cookie. Drizzle with 1 cup of caramel sauce. Top with another cookie, flat side down. Repeat this for the rest of the cookies. For a final touch, drizzle more caramel over the assembled whoopie pies. Enjoy your sweet treat! To get the best texture for your cookies, start with softened butter. Cream it with brown sugar until light and fluffy. This step is key to a soft whoopie pie. Use a cookie scoop for even-sized cookies. Space them 2 inches apart on the baking sheet. This way, they have room to spread. Bake them until the edges turn golden, about 10-12 minutes. Let the cookies cool on the baking sheet for five minutes. This helps them set before moving them to a wire rack. Cooling them completely is important. It keeps the filling from melting. For a smooth filling, make sure your cream cheese is at room temperature. Beat it well with powdered sugar and vanilla until it’s creamy. If you want a sweeter filling, add a bit more powdered sugar. Taste it as you go. Adjust the sweetness to match your preference. To present your whoopie pies nicely, use a decorative platter. Drizzle extra caramel sauce over the top for a tasty look. You can also sprinkle chopped apples on top for color. A light dusting of powdered sugar adds a nice touch. Pair these treats with a warm drink. Hot apple cider or a cup of coffee works great. The flavors will blend well, making each bite even better. {{image_2}} To make your Caramel Apple Whoopie Pies even more fun, try adding spices! A pinch of ginger or allspice can boost flavor. You can also try other extracts, like almond, for a unique twist. Using different types of apples can change the taste too. Granny Smith apples add a tart bite, while Honeycrisp apples bring a sweet crunch. Mix and match to find your favorite combo! For gluten-free options, swap all-purpose flour with a gluten-free blend. Many blends work well in this recipe. Just make sure to check the package for the right ratios. If you want a vegan version, use plant-based butter and flax eggs instead of the regular egg. Applesauce keeps the whoopie pies moist. Use a dairy-free cream cheese for the filling. These swaps make it easy for anyone to enjoy this tasty treat! Store your Caramel Apple Whoopie Pies at room temperature. Place them in an airtight container. This keeps them fresh for about 2-3 days. If you stack them, put parchment paper between layers. This prevents sticking and keeps the filling intact. Avoid direct sunlight and heat, as they can dry out your pies. To save whoopie pies for later, freeze them. First, let the whoopie pies cool completely. Then, wrap each pie in plastic wrap. Place them in a freezer-safe bag. They can last up to 3 months in the freezer. When you want to enjoy them, take them out and let them thaw in the fridge overnight. For reheating, take a whoopie pie and remove the filling if you wish. Microwave it for about 10-15 seconds to warm it up. This helps the flavors pop. If you kept the filling, just warm it as well. Enjoy your delicious treat! Caramel Apple Whoopie Pies stay fresh for about 3 days at room temperature. Store them in an airtight container. For longer storage, keep them in the fridge for up to a week. If you freeze them, they can last up to 3 months. Just remember to wrap them well to prevent freezer burn. Yes, you can use store-bought caramel sauce! It saves time and still tastes great. Look for a thick sauce that has a rich flavor. Homemade caramel sauce can also add a special touch if you have the time to make it. The best apple for Caramel Apple Whoopie Pies is Granny Smith. Their tartness balances well with the sweet caramel and filling. Other crisp apples like Honeycrisp or Fuji can work too, but I prefer the tart punch of Granny Smith. To boost the caramel flavor, you can do a few things. First, add more caramel sauce to the filling. You can also mix in a bit of caramel into the batter. Lastly, drizzle extra caramel on top of each pie before serving. This adds a sweet and sticky layer that everyone loves! You've learned how to make delicious Caramel Apple Whoopie Pies. We discussed the key ingredients, from flour and sugar to tasty green apples and cream cheese. I detailed the step-by-step process, ensuring your cookies turn out perfect. You now have tips to enhance flavor and store them properly. In the end, don't be afraid to experiment. Try new flavors or tweak the recipe to suit your taste. Enjoy baking and sharing these treats with family and friends!

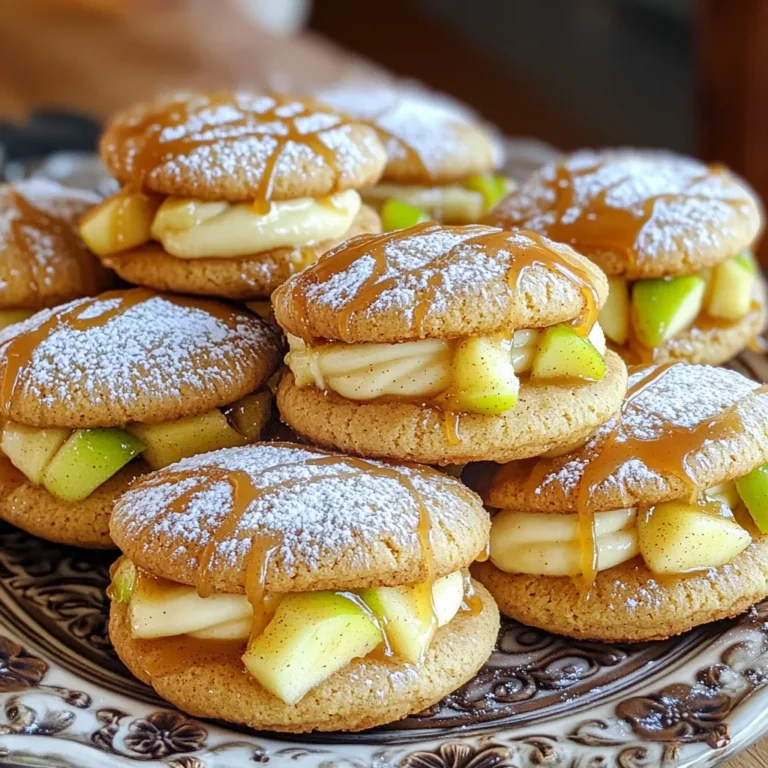
Caramel Apple Whoopie Pies Irresistible Dessert Delight

For the dry mix, you need: - 1 ½ cups all-purpose flour - 1 teaspoon baking powder - ½ teaspoon baking soda - ½ teaspoon salt - 1 teaspoon ground cinnamon - ½ teaspoon ground nutmeg - ½ cup granulated sugar - ½ cup brown sugar, packed These ingredients create the base of your muffins. The flour gives structure, while the baking powder and baking soda help them rise. The spices add warmth and flavor. Next, gather these wet ingredients: - ½ cup vegetable oil - 2 large eggs - 1 cup canned pumpkin puree - 1 teaspoon vanilla extract The oil keeps your muffins moist. Eggs help bind everything together. Pumpkin puree adds flavor and keeps the muffins soft. Vanilla enhances the overall taste. For the creamy center, use: - 4 oz cream cheese, softened - 2 tablespoons powdered sugar This filling is the star of the muffins. The cream cheese provides a rich, tangy taste. The powdered sugar sweetens the filling, balancing the spices in the muffins. These ingredients together make the perfect pumpkin cream cheese muffins. The mix of spices and creaminess creates a delightful treat. Enjoy making these muffins! Start by preheating your oven to 350°F (175°C). This step is key to getting your muffins just right. While the oven heats, line a muffin tin with paper liners or lightly grease it. This prevents the muffins from sticking. In a medium bowl, whisk together the dry ingredients. You need 1 ½ cups of all-purpose flour, 1 teaspoon of baking powder, ½ teaspoon of baking soda, ½ teaspoon of salt, 1 teaspoon of ground cinnamon, and ½ teaspoon of ground nutmeg. Set this bowl aside. Next, grab a large mixing bowl. Combine ½ cup of granulated sugar and ½ cup of packed brown sugar with ½ cup of vegetable oil. Beat in 2 large eggs, one at a time. Mix well after each egg. Now, stir in 1 cup of canned pumpkin puree and 1 teaspoon of vanilla extract until smooth. Gradually add the dry mixture into the wet mixture. Stir gently until just combined. Be careful not to overmix, as this can make the muffins tough. In a small bowl, mix 4 oz of softened cream cheese with 2 tablespoons of powdered sugar until smooth. This will be your cream cheese filling. Now, it’s time to assemble your muffins. Fill each muffin cup halfway with the pumpkin batter. Add a teaspoon of cream cheese filling in the center of each cup. Then, top with more pumpkin batter until the cups are about ¾ full. Bake your muffins in the preheated oven for 18-20 minutes. Check for doneness by inserting a toothpick into the center. If it comes out clean, they are ready! Let the muffins cool in the pan for about 5 minutes. After that, transfer them to a wire rack to cool completely. Enjoy your delicious pumpkin cream cheese muffins! To get the best texture for your muffins, use these tips. First, mix the dry ingredients well. This helps spread the leavening agents evenly. When mixing wet and dry ingredients, stir gently. Overmixing can lead to tough muffins. Aim for a lumpy batter; it’s okay if there are small flour pockets. The cream cheese filling adds moisture, keeping your muffins soft and fluffy. You’ll need a few tools to make these muffins. Here’s a quick list: - Mixing bowls - Whisk - Measuring cups and spoons - Muffin tin - Paper liners or cooking spray - Toothpick for testing doneness Using the right tools ensures smooth preparation and baking. Baking times may vary based on your oven and muffin size. Start checking for doneness at 18 minutes. Insert a toothpick into the center of a muffin. If it comes out clean, your muffins are ready! If not, bake them for a few more minutes. Always keep an eye on them to avoid overbaking. Adjusting baking time helps you achieve the perfect golden-brown tops. {{image_2}} You can change your muffins by adding nuts or chocolate chips. Walnuts or pecans add crunch and flavor. Just fold in about half a cup of chopped nuts before baking. If you love chocolate, try adding semi-sweet or dark chocolate chips. Use about half a cup and mix them in gently. Both options make these muffins even more delicious! If you want to make gluten-free muffins, swap the all-purpose flour with a gluten-free blend. Many brands work well, so check for one that fits your taste. Make sure it has xanthan gum to help with texture. This change lets everyone enjoy these muffins, no matter their diet. You can boost the flavor of your muffins with extra spices. Try adding a pinch of ginger or cloves for warmth. You can also mix in some vanilla bean paste for a rich taste. For more depth, add a splash of maple syrup or honey to the batter. These small changes can create a unique twist on the classic recipe! You can store your pumpkin cream cheese muffins at room temperature. Keep them in an airtight container. They will stay fresh for up to three days. If you want them to last longer, place them in the fridge. In the fridge, they can last up to a week. Just remember to let them come back to room temperature before you enjoy them. To freeze your muffins, first let them cool completely. Wrap each muffin tightly in plastic wrap. Then, place them in a freezer-safe bag or container. Label the bag with the date. You can freeze them for up to three months. When you’re ready to eat, simply thaw them in the fridge overnight or at room temperature for a few hours. Reheating is quick and easy. If you want a warm muffin, preheat your oven to 350°F (175°C). Place the muffins on a baking sheet. Heat for about 10 minutes. You can also use a microwave. Heat each muffin for about 15 seconds. Check to make sure it's warm all the way through. Enjoy your tasty treat! Yes, you can use fresh pumpkin. First, cook the pumpkin until soft. Then, mash it well. This will give a fresh taste. Just make sure to drain any extra water. Canned pumpkin is thicker and easier to use. Fresh pumpkin may need more time to prep. To stop muffins from sinking, avoid overmixing. Mix until just combined. Overmixing adds too much air. Also, make sure your baking powder and baking soda are fresh. Old leavening agents may not rise well. Lastly, fill the muffin cups correctly, about three-quarters full. You can add nuts or chocolate chips for extra flavor. Chopped walnuts or pecans work great. For a different taste, try adding spices like ginger or cloves. You could also use maple syrup instead of some sugar. These changes can make your muffins unique and fun! This blog post covered key parts of making delicious muffins. We talked about dry and wet ingredients, including a tasty cream cheese filling. You learned step-by-step instructions for mixing and baking. I shared tips to help you achieve the right texture. We explored easy variations, like adding nuts or spices. Lastly, I explained how to store your muffins properly. Use these methods to bake muffins that everyone will love. Happy baking!

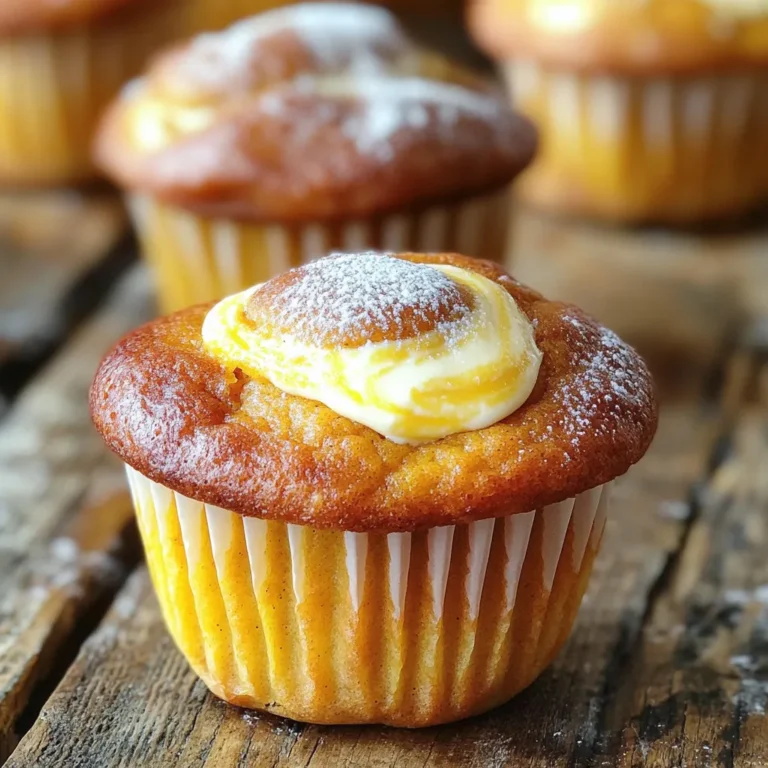
Pumpkin Cream Cheese Muffins Flavorful and Easy Treat

To make Thai red curry chicken, gather these ingredients: - 1 lb (450g) boneless chicken thighs, cut into bite-sized pieces - 1 can (13.5 oz) coconut milk - 3 tablespoons Thai red curry paste - 1 tablespoon fish sauce - 2 tablespoons brown sugar - 1 red bell pepper, sliced - 1 cup snap peas - 1 cup bamboo shoots, drained - 1 tablespoon fresh ginger, grated - 1 tablespoon garlic, minced - 2 tablespoons vegetable oil - Fresh basil leaves, for garnish - Lime wedges, for serving The magic of this dish lies in its rich flavors. The Thai red curry paste adds depth. It mixes spices and herbs like lemongrass, galangal, and chili. Coconut milk brings creaminess and balances the spice. Fish sauce adds umami, while brown sugar gives a hint of sweetness. Fresh ginger and garlic boost the aroma and taste. The vegetables add crunch and color, making each bite exciting. You can swap some ingredients if needed. For chicken, use boneless chicken breasts or tofu for a vegetarian option. If you don't have coconut milk, almond or soy milk can work but may change the flavor. You can use soy sauce instead of fish sauce for a plant-based option. If red bell peppers are out, try yellow or green peppers. Fresh ginger can be replaced with ground ginger, but use less. Gather your ingredients first. This makes cooking smooth and easy. You will need: - 1 lb boneless chicken thighs, cut into bite-sized pieces - 1 can coconut milk - 3 tablespoons Thai red curry paste - 1 tablespoon fish sauce - 2 tablespoons brown sugar - 1 red bell pepper, sliced - 1 cup snap peas - 1 cup bamboo shoots, drained - 1 tablespoon fresh ginger, grated - 1 tablespoon garlic, minced - 2 tablespoons vegetable oil - Fresh basil leaves, for garnish - Lime wedges, for serving Wash and slice the bell pepper. Grate the ginger and mince the garlic. This prep makes the cooking process quick. Start by heating the vegetable oil in a large skillet or wok over medium heat. Once hot, add the minced garlic and grated ginger. Cook for about 30 seconds until fragrant. This step adds great flavor. Next, add the chicken pieces to the skillet. Sauté them for about 5-7 minutes until they brown and nearly cook through. Then, stir in the Thai red curry paste. Make sure it coats the chicken evenly and cook for another minute. Pour in the coconut milk, fish sauce, and brown sugar. Stir well to mix and bring to a gentle simmer. This is where the magic happens! Once simmering, add the sliced red bell pepper, snap peas, and bamboo shoots. Cook for an additional 5-7 minutes. You want the veggies to be tender but still bright. Taste the curry. This is your chance to make it perfect! If it needs more salt, add more fish sauce. If it's too salty, add a bit more brown sugar. You can adjust it to fit your taste. After adjusting, remove the skillet from heat. Sprinkle fresh basil leaves on top. This adds a nice pop of color and flavor. Enjoy your meal! To get that rich taste, use fresh ingredients. Fresh ginger and garlic make a big difference. Choose high-quality coconut milk for creaminess. It adds depth to the dish. When adding the red curry paste, let it cook briefly. This helps release the flavors. Taste as you go. Adjust fish sauce and sugar to balance the dish. For a kick, add a bit of lime juice at the end. Don’t rush your cooking. Sautéing garlic and ginger too fast can burn them. This will make your curry taste bitter. Also, avoid overcooking the chicken. Cook it just until browned and nearly done. This keeps it juicy. Be careful with the vegetables; they should stay bright and crisp. If you add them too early, they can become mushy. A large skillet or wok works best for this recipe. Use a heavy-bottomed pan to ensure even cooking. A good wooden spoon helps to stir everything without scratching your pan. For grating ginger, a microplane is handy and quick. Finally, a sharp knife is key for easy chopping. Having the right tools makes cooking easier and more fun. {{image_2}} You can change the protein in this dish easily. Chicken thighs are great, but try shrimp or tofu. If you want beef, use thinly sliced flank steak. For a lighter option, choose turkey. Each protein adds a unique taste and texture. You can mix up the veggies too. Broccoli, carrots, or zucchini work well. Add them in with the other vegetables. Feel free to use frozen veggies if fresh ones aren't available. Just cook them until they're tender but still bright. To make this dish vegan or vegetarian, swap the chicken for tofu or chickpeas. Use vegetable broth instead of fish sauce. Find a vegan red curry paste to keep the flavors. Coconut milk is already vegan, so you're good to go! Store any leftover Thai red curry chicken in a sealed container. It keeps well in the fridge for up to three days. Let the curry cool down before placing it in the fridge. This helps keep the flavor fresh. To reheat the curry, place it in a saucepan over low heat. Stir often to avoid burning. You can also use the microwave. Heat in short intervals, stirring in between, until it’s warm throughout. Add a splash of coconut milk to revive the creaminess. You can freeze Thai red curry chicken for up to three months. Portion it into airtight containers or freezer bags. Make sure to remove as much air as possible. Thaw the curry in the fridge overnight before reheating. Yes, you can make this dish ahead of time. Cook the curry and let it cool. Store it in the fridge for up to three days. Reheat it gently on the stove before serving. This allows the flavors to blend even more, making it taste even better! You can serve this curry with several sides. Here are some great options: - Jasmine rice - Rice noodles - Quinoa - Steamed vegetables - Fresh salad These sides will soak up the delicious sauce and balance the meal. The spice level varies based on the curry paste you use. Thai red curry is generally mild to medium. If you like it hotter, add more curry paste or fresh chili. If you prefer less heat, use less paste. Adjust it to your taste! Yes, you can use different types of curry paste. Green or yellow curry paste works well too. Each paste has a unique flavor. Green is usually spicier, while yellow is milder. Feel free to explore and find your favorite! This article covered the key ingredients, cooking steps, and tips for making Thai red curry chicken. You learned about flavor components and substitutions. I shared easy steps for perfecting your dish and avoiding common mistakes. You also saw variations for proteins and vegetables, plus how to store leftovers. Cooking this dish can be fun and rewarding. Use these tips to enjoy great flavors and impress everyone at your table. Enjoy your time in the kitchen!

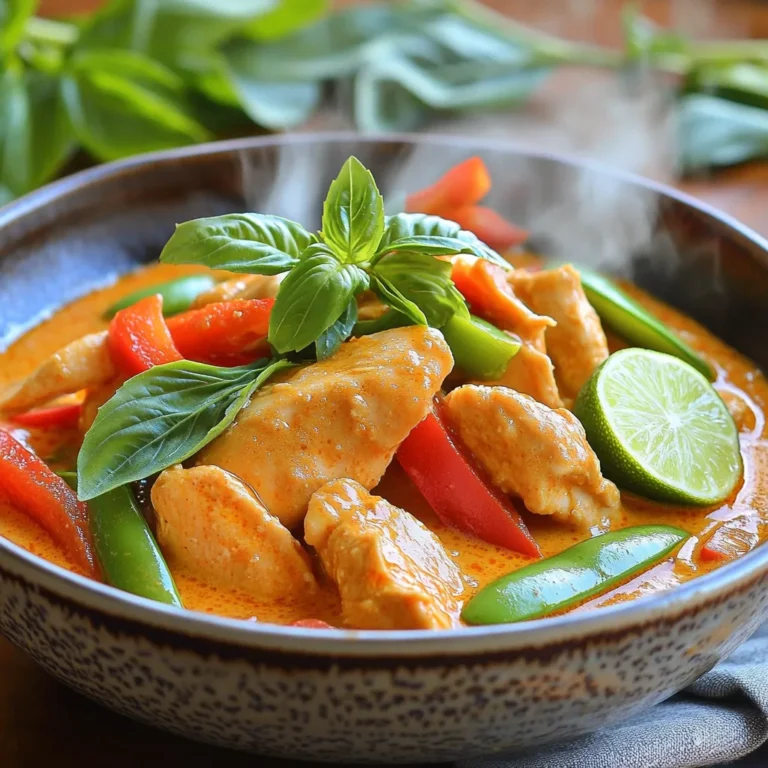
Thai Red Curry Chicken Better Than Takeout Delight

- 2 cups elbow macaroni - 1 lb ground beef or turkey - 1 can (15 oz) kidney beans, drained and rinsed - 1 can (15 oz) black beans, drained and rinsed - 1 tablespoon chili powder - 1 teaspoon cumin - 1 teaspoon garlic powder - 1 teaspoon onion powder - 1 can (14.5 oz) diced tomatoes - 1 can (15 oz) tomato sauce - 2 cups beef broth - Green onions - Sour cream - Jalapeños When I make Loaded Chili Mac and Cheese in my slow cooker, I start with the main ingredients. Elbow macaroni is the base. I use one pound of ground beef or turkey for good protein. Kidney beans and black beans add fiber and texture. These beans make the dish filling and hearty. Next, I focus on the seasonings and liquids. Chili powder gives it a warm kick. Cumin adds a nice depth of flavor. Garlic powder and onion powder bring in savory notes. Then, I add diced tomatoes and tomato sauce for moisture and sweetness. Beef broth makes everything rich and flavorful. Lastly, I think about the optional toppings. Green onions give a fresh crunch. A dollop of sour cream adds creaminess. Jalapeños can spice things up if you like heat. These toppings let you customize each bowl. Start by browning the ground beef or turkey. Heat a skillet to medium. Add the meat and cook until it's brown. This step gives your chili mac great flavor. Once it’s done, drain any extra fat. Now, transfer the cooked meat to your slow cooker. Next, it’s time to add the fun part! In the slow cooker, put in the elbow macaroni, kidney beans, and black beans. Don’t forget the diced tomatoes and tomato sauce; they add moisture and taste. Pour in the beef broth to keep everything nice and juicy. Now, let's season the mixture. Add chili powder, cumin, garlic powder, onion powder, salt, and pepper. Stir everything well until it's mixed. Cover your slow cooker and set it to low for 3-4 hours or high for 2-3 hours. Your macaroni should be nice and tender when it’s done. In the last 30 minutes of cooking, stir in the shredded cheddar cheese. This makes it creamy and cheesy. Once it melts, taste your chili mac and adjust the seasonings. If you want more flavor, add extra salt, pepper, or chili powder. Choosing the best cheese makes a big difference. I love using sharp cheddar for that rich flavor. It melts well and adds a nice bite. You can also mix in some Monterey Jack for extra creaminess. If you want meat alternatives, try ground turkey or lentils. Ground turkey is lean and still has great flavor. Lentils add a nice texture and soak up the spices well. To keep the pasta from overcooking, add it later in the process. If you add it too soon, it can become mushy. I suggest adding elbow macaroni in the last hour of cooking. For perfect cheese consistency, add cheese at the end. Stir it in when there’s only 30 minutes left. This keeps it creamy and smooth without clumping. Pair your chili mac with a fresh salad. A simple green salad with vinaigrette works well. You can also serve it with cornbread for a hearty meal. For presentation, serve in deep bowls. Top with green onions, sour cream, or jalapeños. This adds color and flavor. It makes your dish look even more inviting. {{image_2}} You can easily make a vegetarian version of Loaded Chili Mac and Cheese. Swap the ground beef or turkey for plant-based meat. Options like lentils, chickpeas, or a mix of your favorite veggies work great. Use the same spices for flavor. You can even add mushrooms for a hearty texture. This way, you keep the dish rich and filling without the meat. To change the spice level, adjust the chili powder. If you like it mild, use less chili powder. Try starting with half a tablespoon. For a spicy kick, add more chili powder. You can also include fresh jalapeños or hot sauce for extra heat. Always taste as you go to find your perfect spice level. Get creative by adding more ingredients. You can mix in veggies like bell peppers, corn, or spinach. These add color and nutrition. For extra protein, consider adding tofu or tempeh. You can also use different beans, like pinto or black-eyed peas. The more you add, the more flavors you build. Just remember to keep the balance so everything cooks nicely together. To store your Loaded Chili Mac and Cheese, let it cool first. Place it in an airtight container. Make sure to cool it to room temperature before sealing. This helps keep moisture inside. You can store it in the fridge for up to three days. When reheating, the best method is to use the stove. Place it in a pot over low heat. Stir it often to keep it from sticking. If it looks dry, add a splash of beef broth or water. This will help bring back the creamy texture. For freezing, let your chili mac cool completely. Use a freezer-safe container or bag. Leave some space at the top as it may expand. It can last in the freezer for up to three months. When ready to eat, thaw it overnight in the fridge. Then reheat it on the stove or in the microwave. Yes, you can use whole wheat macaroni. It adds fiber and makes the dish healthier. Whole wheat pasta has a nutty flavor. It pairs well with the chili and cheese. Just cook it a little less time than regular pasta. This way, it won’t get mushy in the slow cooker. To make this recipe gluten-free, swap the elbow macaroni for gluten-free pasta. Many brands offer great options. Check the labels to ensure they are gluten-free. You can also use gluten-free beans and tomato products. This way, you keep the rich flavor without gluten. Chili Mac and Cheese pairs well with many sides. A simple green salad adds freshness. You can also serve it with garlic bread for a hearty meal. Cornbread is another tasty option. Try topping with sliced jalapeños or green onions for extra flavor. This blog post covered a tasty chili mac and cheese recipe. We discussed key ingredients like macaroni, ground meat, and beans. I shared step-by-step instructions to help you create it perfectly. You learned tips for choosing ingredients and serving suggestions. Plus, I included variations for spice levels and vegetarian options. In closing, this dish is simple and fun to make. Enjoy experimenting with flavors and toppings. Happy cooking!

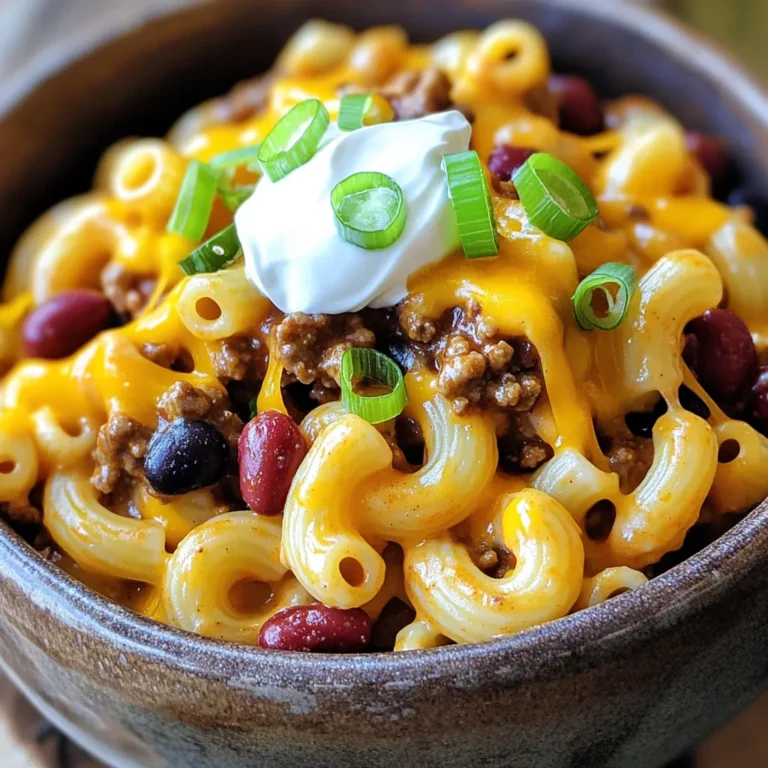
Loaded Chili Mac and Cheese Slow Cooker Delight

- 1 cup graham cracker crumbs - 1/2 cup creamy peanut butter - 1/4 cup honey or maple syrup - 1/4 teaspoon salt - 1 cup miniature marshmallows - 1/2 cup chocolate chips - 1/4 cup chopped nuts (optional) - 1/2 teaspoon vanilla extract When making Peanut Butter S’mores Bars, we need to gather our ingredients first. Each item plays a role in making this treat both tasty and fun. Graham cracker crumbs form the base. They give a sweet, crunchy texture. Creamy peanut butter adds richness and flavor. Honey or maple syrup acts as a natural sweetener and helps bind the mix. A hint of salt balances out the sweetness and enhances the flavors. Next, we add the miniature marshmallows. They provide that classic s'mores feel. Chocolate chips, whether milk or dark, add a creamy richness that melts in your mouth. You can also add chopped nuts for extra crunch, but it’s optional. Lastly, a splash of vanilla extract brings everything together with a lovely aroma. Make sure you have everything ready before you start. This will help keep the process smooth and fun. Enjoy the process and get ready for a delightful treat! Start by taking a large bowl. Add 1 cup of graham cracker crumbs. Then, scoop in 1/2 cup of creamy peanut butter. Next, pour in 1/4 cup of honey or maple syrup. Don’t forget a pinch of salt, about 1/4 teaspoon. Mix all these ingredients well. You want a sticky dough that holds together nicely. Now, grab an 8x8 inch baking dish. Line it with parchment paper. This step makes removal easy later. Once lined, take your graham mixture. Press it firmly and evenly into the bottom of the dish. Make sure it covers all corners. This will be your base layer for the bars. In a medium bowl, mix 1 cup of miniature marshmallows with 1/2 cup of chocolate chips. This can be milk or dark chocolate, based on what you like. Once mixed, sprinkle this yummy mix over the graham base. Lightly press down to secure it. This makes the top layer just right! Place the dish in the fridge for about 30 minutes. This will help the bars set and become firm. After chilling, lift the bars out using the parchment paper. Set them on a cutting board. Cut them into squares or rectangles. You can choose your preferred serving size. Enjoy your delightful treat! To ensure the right consistency of the base, mix the graham cracker crumbs and peanut butter well. You want a sticky dough. If it's too dry, add a touch more honey or peanut butter. For easy removal, line your dish with parchment paper. This simple step helps lift out the bars without breaking them. For extra fun, consider adding toppings like mini chocolate pieces or crushed nuts. You can also use different types of chocolate. Dark chocolate gives a rich taste, while milk chocolate adds sweetness. Feel free to mix and match to find your favorite combination. You can serve your Peanut Butter S’mores Bars chilled or at room temperature. Chilling makes them firmer and a bit cooler on a hot day. They pair well with milk, coffee, or even a scoop of vanilla ice cream for a special treat. Enjoying them with a warm drink balances the sweetness perfectly! {{image_2}} You can switch up the nut butter for fun. Almond butter or cashew butter works well too. Each nut butter adds a new taste. You might also try adding cinnamon or shredded coconut. These flavors will give the bars a unique twist. Want to make these bars gluten-free? Use gluten-free graham crackers. This simple swap keeps the bars tasty for everyone. If you need a vegan option, replace honey with maple syrup. You can also use vegan chocolate chips. These changes keep the treat plant-based and delicious. Get creative with mix-ins! Add dried fruits like raisins or cranberries for a chewy burst. You can include other candies like M&M’s for a pop of color. For crunch, mix in assorted nuts like almonds or pecans. Each bite can be a new flavor adventure! To keep your Peanut Butter S’mores Bars fresh, store them in an airtight container. This helps to keep them moist and flavorful. If you want to chill them, place the container in the fridge. Avoid leaving the bars out in the open; they can dry out quickly. These bars can last about one week in the fridge. If you want to keep them longer, you can freeze them. Wrap each bar in plastic wrap and place them in a freezer-safe bag. They stay fresh in the freezer for up to three months. When you want to eat them, just take them out and let them thaw at room temperature. To enjoy these bars after storing, heat them gently in the microwave. Use short bursts of time to avoid melting them too much. If you want to maintain their texture and flavor, do not overheat. For best taste, eat them chilled or at room temperature. Yes, you can make these bars ahead of time. I recommend storing them in the fridge for up to five days. This keeps them fresh and tasty for your family or friends. Just remember to cut the bars after they have chilled. This makes serving easy and fun! If you don’t have graham cracker crumbs, you can use digestive biscuits or vanilla wafers. Both will give a nice flavor and texture. You can also try crushed pretzels for a salty kick. Each option adds a unique twist to your bars. Absolutely! Using crunchy peanut butter adds a fun texture. The little bits of peanut give every bite a nice crunch. This change also boosts the peanut flavor in your bars. Just make sure to mix it well with the other ingredients. The bars are ready when they are firm to the touch. After about 30 minutes in the fridge, they should hold their shape. If you press lightly and they spring back, they’re perfect. You can then cut them into squares or rectangles. Enjoy your sweet treat! Making Peanut Butter S’mores Bars is simple and fun. We went through the key ingredients and step-by-step instructions to create a delicious treat. I shared tips to enhance texture and flavor, plus ways to serve them. You can also explore variations to fit your taste or dietary needs. These bars are easy to store and reheat. With the right care, they stay fresh and tasty. Enjoy experimenting with your own twists on this recipe!

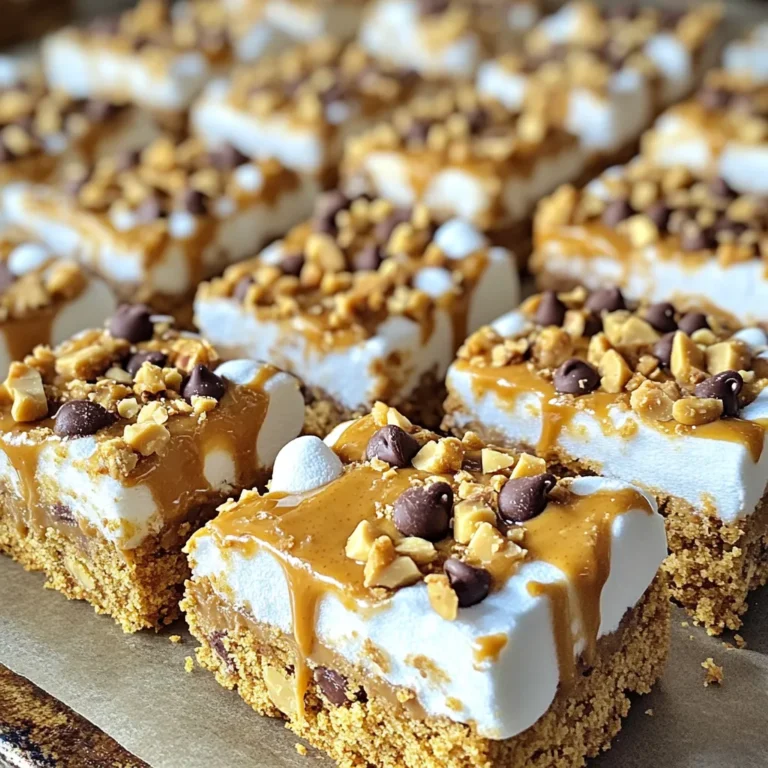
Peanut Butter S’mores Bars No Bake Delightful Treat

For this tasty dish, you need fresh veggies. Here’s what to gather: - 2 cups broccoli florets - 2 cups Brussels sprouts, halved - 1 red bell pepper, sliced - 1 yellow bell pepper, sliced - 1 medium zucchini, sliced - 1 medium red onion, cut into wedges - 10 cloves of garlic, unpeeled These veggies create a colorful mix. They provide great texture and taste. Now, let’s add flavor! You will need the following seasonings: - 3 tablespoons olive oil - 1 teaspoon dried oregano - 1 teaspoon dried thyme - 1 teaspoon smoked paprika - Salt and pepper to taste These seasonings make the veggies shine. The olive oil helps roast them and adds richness. The herbs give a nice aroma and depth. To finish your dish, consider these garnishes: - Fresh parsley, chopped Chopped parsley adds a pop of color and freshness. It brightens the dish and makes it look appealing. You can also squeeze a bit of lemon juice over the top for extra zest. First, set your oven to 425°F (220°C). This high heat helps the veggies get nice and crispy. Next, grab a large sheet pan. Line it with parchment paper. This makes cleanup a breeze. In a big mixing bowl, toss together the broccoli florets, Brussels sprouts, red and yellow bell peppers, zucchini, and red onion. Make sure they are mixed well. Add in the unpeeled garlic cloves for flavor. This garlic adds a rich taste as it roasts. Now, drizzle three tablespoons of olive oil over the veggies. Sprinkle one teaspoon each of dried oregano, dried thyme, and smoked paprika. Add salt and pepper to your liking. Toss everything together until the veggies are well coated with oil and seasonings. This step is key to making them flavorful. Spread the vegetable mix evenly on your prepared sheet pan. Keep them in a single layer. This helps them roast evenly. Place the pan in your preheated oven and roast for 25-30 minutes. Halfway through, take the pan out and toss the veggies. This ensures they brown nicely on all sides. Once they are tender and slightly caramelized, remove the pan from the oven. Let it cool for a few minutes. Now, carefully squeeze the roasted garlic out of its skin and mix it with the veggies. This adds a delicious garlic flavor. Finally, garnish with freshly chopped parsley before serving. Enjoy your roasted garlic herb veggie delight! To get the best roasted veggies, choose fresh, vibrant produce. Cut them into even pieces. This helps them cook at the same time. Spread them out on the pan in a single layer. If they are too crowded, they will steam instead of roast. The heat needs space to circulate. Toss them halfway through to ensure even cooking. Look for a light golden color on the edges. This means they're caramelizing perfectly. You can mix and match your veggies! Try carrots, sweet potatoes, or cauliflower. Each brings a new taste. For seasonings, add Italian herbs or a pinch of chili flakes. Want a twist? Use lemon zest or balsamic glaze. You can also switch olive oil for avocado oil. This adds a different flavor and healthy fats. Customize to fit your taste! Serve these veggies as a side dish or on a bed of grains. Quinoa or brown rice pairs well. For a light meal, add grilled chicken or shrimp. Top with a sprinkle of feta or goat cheese for creaminess. Drizzle with a bit of balsamic vinegar for a tangy kick. You can even serve them cold in a salad the next day. The flavors will blend beautifully! {{image_2}} After enjoying your roasted garlic herb veggies, you may have some left. To store them, let the veggies cool down first. Then, place them in an airtight container. This keeps them fresh. Store them in the fridge for up to four days. Make sure to label the container with the date. This helps you track how long they’ve been stored. When you’re ready to eat the leftovers, reheating is easy. You can use the oven or microwave. For the oven, preheat it to 350°F (175°C). Spread the veggies on a baking sheet. Heat them for about 10-15 minutes. This method keeps them crispy. If you prefer the microwave, place them in a microwave-safe dish. Heat them for 1-2 minutes. Stir halfway through to warm evenly. If you want to save your roasted garlic herb veggies for later, freezing works well. First, let them cool completely. Next, spread the veggies on a baking sheet in a single layer. Freeze them for about an hour. This prevents them from sticking together. After they freeze, transfer them to a freezer-safe bag or container. They can last up to three months in the freezer. When you’re ready to eat, just thaw them in the fridge overnight before reheating. This Roasted Garlic Herb Veggies Sheet Pan is both tasty and healthy. The entire recipe serves four. Each serving has about 180 calories. You get around 8 grams of fat, 25 grams of carbs, and 5 grams of protein. The olive oil adds healthy fats, while the veggies pack in fiber, vitamins, and minerals. - Broccoli: Great for your immune system and full of vitamins C and K. - Brussels Sprouts: High in fiber and good for heart health. They also contain antioxidants. - Bell Peppers: Rich in vitamins A and C, which help with skin health. - Garlic: Known for its anti-inflammatory properties and may boost heart health. - Zucchini: Low in calories and high in water, helping with hydration. These ingredients make this dish not just tasty, but also good for you. This dish is vegan and gluten-free. It fits well in many diets. If you need to watch your salt, you can adjust the amount of salt you add. You can also swap out any veggies you don’t like or have on hand. This recipe is flexible and can meet various dietary needs. Enjoy this colorful and healthy dish! You should roast your veggies for 25 to 30 minutes at 425°F. This time allows them to get tender and slightly caramelized. Remember to toss them halfway through cooking. This step helps them roast evenly and avoids burning. Keep an eye on them toward the end. They should be golden and soft when done. Yes, you can use many other veggies in this recipe. Carrots, cauliflower, or sweet potatoes fit well. You can even add asparagus or eggplant if you like. Just make sure to cut them into similar sizes for even cooking. The key is to use fresh, colorful vegetables that you enjoy. Roasted garlic herb veggies pair well with many dishes. They make a great side for grilled chicken or fish. You can also serve them with quinoa or rice for a hearty meal. Adding a squeeze of lemon over the veggies enhances their flavor. For a complete meal, try serving them with a light salad or some crusty bread. Roasting garlic herb veggies is simple and tasty. We covered main ingredients, seasonings, and optional garnishes. I shared steps for prepping, mixing, and roasting. You learned tips for perfect veggie cooking and ideas for serving. Don't forget storage tips for leftovers, plus reheat and freeze advice. Nutritional info shows health perks and calorie counts. Remember, you can switch veggies and seasonings for fun. Enjoy this easy and healthy dish often!

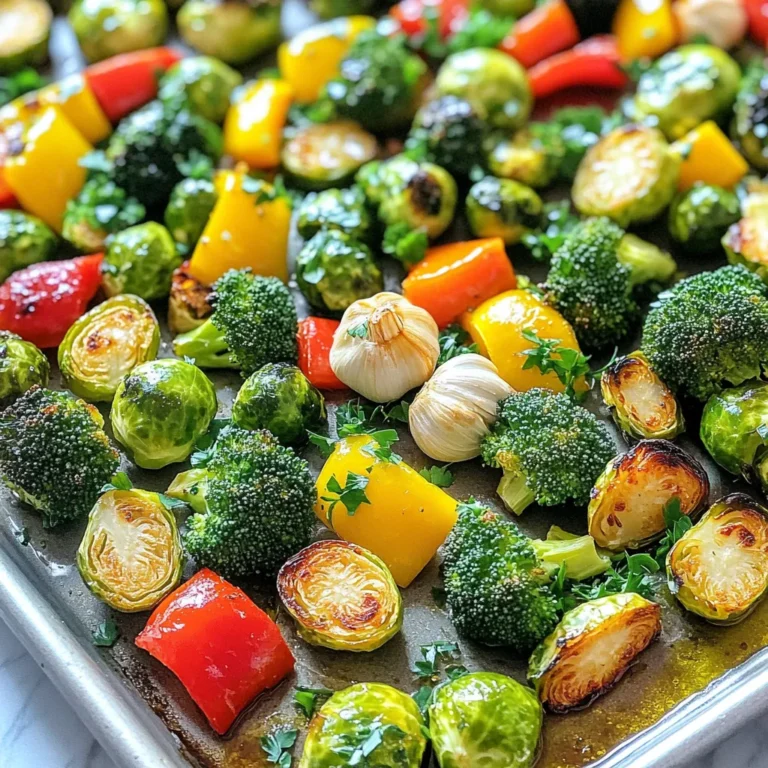
Roasted Garlic Herb Veggies Sheet Pan Delight

- 1 large head of cauliflower - 1 cup all-purpose flour (or gluten-free flour) - 1 tablespoon garlic powder - 1 tablespoon smoked paprika - 1 teaspoon cayenne pepper - Salt and pepper to taste - 1 cup BBQ sauce - Cooking spray or oil for air frying To make crispy BBQ cauliflower wings, you start with a large head of cauliflower. Cut it into bite-sized florets. This ensures each piece cooks evenly and gets crispy. Next, I use one cup of all-purpose flour. If you need a gluten-free option, substitute it with gluten-free flour. Now, let’s spice things up! I add garlic powder for flavor. Smoked paprika gives a nice depth, while cayenne pepper adds heat. Adjust the cayenne for your spice preference. Don't forget salt and pepper to taste. These seasonings make the wings pop! Finally, you'll need one cup of BBQ sauce. You can use store-bought or make your own. A light coat of cooking spray or oil helps in air frying. This step is key for crispy wings. First, rinse the large head of cauliflower under cool water. This removes any dirt or grit. Next, cut the cauliflower into bite-sized florets. Make sure the pieces are about the same size for even cooking. After cutting, pat the florets dry with a kitchen towel. This step is crucial since excess moisture can make the wings soggy. In a large mixing bowl, combine the dry ingredients. Use 1 cup of all-purpose flour, 1 tablespoon of garlic powder, 1 tablespoon of smoked paprika, 1 teaspoon of cayenne pepper, and some salt and pepper. Mix these well to ensure even seasoning. Now, slowly whisk in 1 cup of unsweetened almond milk. Keep whisking until the batter is smooth and well-combined. This will create a light coating for our cauliflower wings. Preheat your air fryer to 400°F (200°C). This step helps the wings cook evenly and get crispy. Lightly coat the air fryer basket with cooking spray or oil to prevent sticking. Dip each cauliflower floret into the batter, ensuring it is fully covered. Let any excess batter drip off before placing them in the air fryer. Arrange the coated cauliflower wings in a single layer in the basket. You may need to do this in batches. Cook the cauliflower wings for 12-15 minutes. Shake the basket halfway through for even cooking. The wings should turn golden and crispy. Once they are done, toss them in a large bowl with 1 cup of BBQ sauce until they are fully coated. Return the sauced wings to the air fryer in a single layer. Air fry them for an additional 5-7 minutes. This will help the sauce caramelize slightly. Once finished, remove the wings and let them cool for a minute before serving. To get that perfect crunch, drying the cauliflower is key. After rinsing, pat the florets dry with a towel. This step helps the batter stick and avoids sogginess. For cooking time and temperature, preheat your air fryer to 400°F (200°C). Cook the wings for 12-15 minutes, shaking the basket halfway. This ensures even cooking and a crisp finish. When it comes to seasoning, feel free to play around. You can add more smoked paprika for depth or adjust the cayenne for heat. If you want a twist, try adding a bit of honey or maple syrup to your BBQ sauce. For a homemade BBQ sauce, mix ketchup, brown sugar, vinegar, and your favorite spices. This will give your wings a unique taste. For a stunning presentation, serve your crispy wings on a large platter. Garnish with fresh parsley or green onions for color. Don't forget to add a small bowl of extra BBQ sauce for dipping! Pair these wings with crunchy celery or carrot sticks. Together, they make a great snack or party food. {{image_2}} You can play with the BBQ sauce for your wings. Try different flavors to make them unique. Some popular variations include: - Sweet and smoky BBQ sauce - Spicy chipotle BBQ sauce - Tangy apple cider BBQ sauce These sauces can switch up the taste. You can also mix honey or maple syrup with the sauce for sweetness. If you like heat, add hot sauce or red pepper flakes to your BBQ sauce. If you want to make these wings gluten-free, use gluten-free flour. Almond flour or coconut flour works well. For a dairy-free option, swap unsweetened almond milk with oat milk or soy milk. These changes keep the wings tasty and suitable for different diets. You can even use chickpea flour for a protein boost. If you don’t have an air fryer, you can bake the wings in the oven. Preheat your oven to 425°F (220°C). Place the coated cauliflower on a baking sheet lined with parchment paper. Bake for 20-25 minutes or until crispy, flipping halfway through. You can also fry the wings in oil for a crispy finish. Heat oil in a pan over medium heat and fry each floret until golden brown. This method gives a crunchy texture but takes more time and oil. These methods let you enjoy crispy BBQ cauliflower wings in different ways! To keep your crispy BBQ cauliflower wings fresh, store them in the fridge. Place them in an airtight container. This helps keep moisture out and flavor in. Try to eat them within three days for the best taste. If you plan to store them longer, freezing is a good option. When it’s time to enjoy leftovers, the best way to reheat them is in the air fryer. Set it to 350°F (175°C) and cook for about 5-7 minutes. This method keeps the wings crispy. You can also use an oven. Just set it to 350°F and bake for 10-15 minutes. To keep them crispy, avoid using the microwave. You can freeze these wings before or after cooking. If freezing before, coat the florets in batter. Lay them flat on a baking sheet and freeze until solid. Then transfer to a freezer-safe bag. If freezing after cooking, let them cool completely first. When you're ready to eat, thaw them in the fridge overnight. Reheat as mentioned above for the best results. Yes, you can use frozen cauliflower. However, fresh cauliflower gives a better texture. Frozen florets may become mushy when cooked. If you use frozen, thaw and pat them dry to remove excess moisture. This step helps keep them crispy in the air fryer. The spice level can be adjusted easily. The recipe includes cayenne pepper, which adds heat. If you want milder wings, reduce the cayenne to half a teaspoon or skip it altogether. For extra heat, add more cayenne or a splash of hot sauce to the BBQ sauce. Yes, this recipe works well for meal prep. You can make the cauliflower wings ahead of time and store them in the fridge. To reheat, air fry them again for a few minutes until crispy. This method keeps the flavor fresh and the texture crunchy. To summarize, we explored how to make crispy cauliflower wings. We covered the main ingredients, step-by-step instructions, and helpful tips for flavor and texture. You learned about sauce alternatives and storage options for leftovers too. These cauliflower wings are a tasty, healthy snack for any meal. Try different sauces and customize them to your taste. Enjoy experimenting with this easy recipe!

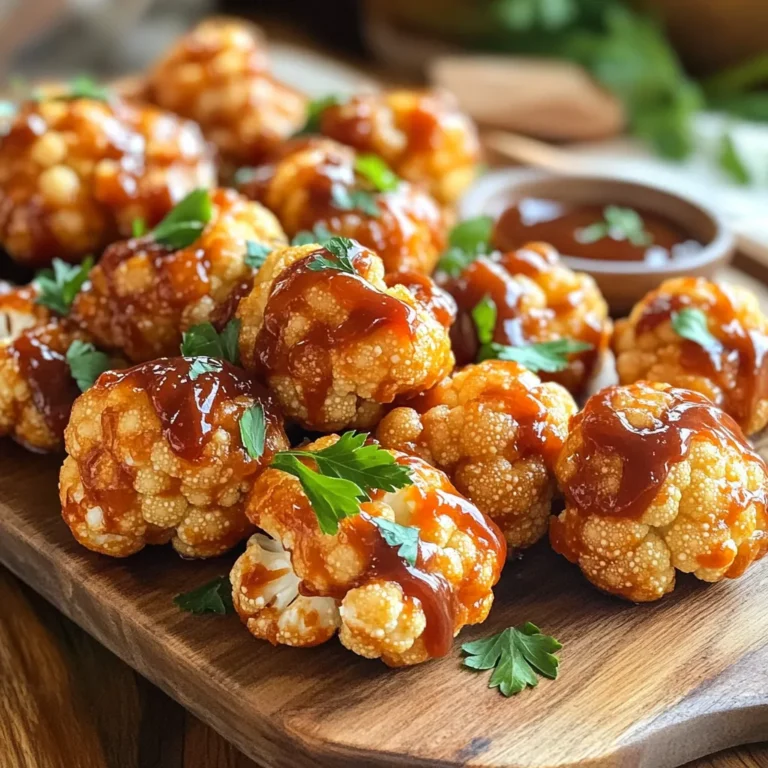
Crispy BBQ Cauliflower Wings Air Fryer Delight

- 12 oz penne pasta - 1 lb shrimp, peeled and deveined - 1 lb smoked sausage, sliced (Andouille or kielbasa) - 1 medium onion, diced - 1 bell pepper (any color), diced - 3 cloves garlic, minced - 1 can (14.5 oz) diced tomatoes, undrained - 4 cups chicken broth - 2 tablespoons Cajun seasoning - 1 teaspoon dried thyme - ½ teaspoon cayenne pepper (adjust to taste) - 2 tablespoons olive oil - Salt and pepper to taste - Fresh parsley, chopped (for garnish) You can swap the penne pasta with any shape you like. If you want a kick, use more cayenne pepper. For a veggie boost, add spinach or zucchini. - A large pot for cooking - A wooden spoon for stirring - A sharp knife for chopping - A cutting board for prep I recommend a pot that holds at least 6 quarts. This size gives you room for all the ingredients. It helps prevent spills when you stir. Start by prepping the shrimp and sausage. For shrimp, you want them peeled and deveined. Rinse them under cold water. Pat them dry with a paper towel. This keeps them from becoming too watery in the dish. For the sausage, slice it into even pieces. I like to cut them about half an inch thick. This way, they cook evenly. Next, it’s time to chop the veggies. Dice the onion and bell pepper into small pieces. Use a sharp knife for clean cuts. This helps them cook faster and blend well with the other flavors. Mince the garlic finely so it releases its flavor quickly. Now, let’s get cooking! Heat the olive oil in a large pot over medium heat. Once hot, add the sliced sausage. Sauté it for about five minutes until it turns brown. This adds great flavor to your dish. After the sausage cooks, toss in the diced onion and bell pepper. Cook this mix for three to four minutes. You want them soft but not mushy. Then, stir in the minced garlic and cook for just one minute. The smell will be amazing! Next, add the Cajun seasoning, dried thyme, cayenne pepper, salt, and pepper. Stir these spices into the mixture well. This step is key for that bold Cajun flavor. Now, it’s time for the shrimp! Add them to the pot and cook for two to three minutes. They should start turning pink. This shows they are nearly done. Pour in the diced tomatoes and chicken broth next. Bring the mix to a gentle boil. Then, add the penne pasta. Stir it well to ensure the pasta is submerged in the liquid. Reduce the heat to low and cover the pot. Let it simmer for 12 to 15 minutes. Stir occasionally to stop the pasta from sticking. The pasta should be al dente and soak up most of the liquid. After cooking, remove from heat and let it sit for a couple of minutes. Taste and adjust the seasoning if needed. Finally, serve hot with fresh parsley on top. This adds a nice pop of color and flavor! How can I adjust spice levels? To change the spice level, you can add more or less cayenne pepper. Start with a little. Taste the dish as you cook. You can always add more spice, but it’s hard to take it away. How do I balance flavors? To balance flavors, use salt and pepper wisely. Fresh herbs like parsley add brightness. A squeeze of lemon juice can also lift the dish. If it’s too spicy, add a bit of cream or sugar. What are the best practices to avoid overcooking shrimp? Cook shrimp just until they turn pink. This takes about 2-3 minutes. If you cook them too long, they become tough. Keep an eye on them as you cook. How can I prevent pasta from sticking? To stop pasta from sticking, stir it often while it cooks. Make sure to use enough liquid in the pot. If you find it sticks, add a splash of olive oil before serving. {{image_2}} You can switch up the sausage in this dish. Try Italian sausage for a milder taste. Chicken sausage is another great choice if you want a leaner option. For a spicy kick, use chorizo. Adding more veggies is smart. You can toss in spinach or kale for extra nutrients. Zucchini or mushrooms also work well. These veggies add color and taste to your pasta. If you need gluten-free options, use rice pasta or quinoa pasta. Both are tasty and work well in this recipe. To make it dairy-free, skip any cheese and use coconut milk instead for creaminess. For a low-carb version, replace pasta with spiralized zucchini or cauliflower rice. This keeps the dish light and healthy while still full of flavor. To keep your Cajun shrimp and sausage pasta fresh, store it in the fridge. Place the pasta in an airtight container. It stays good for up to three days. For longer storage, you can freeze it. Use a freezer-safe container or a heavy-duty freezer bag. Make sure to remove as much air as possible. Label it with the date. This way, you'll know how long it's been. When reheating your dish, keep it tasty. The best way is to use a skillet. Add a splash of water or broth to prevent it from drying out. Heat it over medium-low heat, stirring often. You can also use the microwave. Place the pasta in a microwave-safe bowl. Cover it with a damp paper towel to keep moisture in. Heat in short bursts, stirring in between. This helps to warm it evenly. Enjoy your delicious leftovers! How long does it take to cook shrimp in this recipe? Cooking shrimp takes about 2 to 3 minutes. They will turn pink when done. Be careful not to overcook them. This step is key to keeping shrimp juicy. Can this dish be made ahead of time? Yes, you can make this dish ahead of time. Just store it in the fridge for up to three days. When ready to eat, simply reheat it on the stove. Add a splash of broth to keep it moist. What can I substitute for Cajun seasoning? You can make your own blend. Mix paprika, garlic powder, onion powder, and black pepper. This will give you a similar flavor. You can also use Creole seasoning for a different kick. Is there a non-meat alternative for sausage? Yes, you can use plant-based sausage. Many brands offer tasty options without meat. You can also use mushrooms for a hearty texture. They absorb flavors well and add depth to the dish. This blog post covered all you need for Cajun shrimp and sausage pasta. You learned about the key ingredients, tools, and prep steps. We discussed cooking methods to get full flavor and prevent pasta from sticking. I shared tips for making the dish fit your diet. Lastly, you can store and reheat leftovers easily. Cajun shrimp and sausage pasta is a fun dish that you can adjust to your taste. Enjoy cooking it your way!

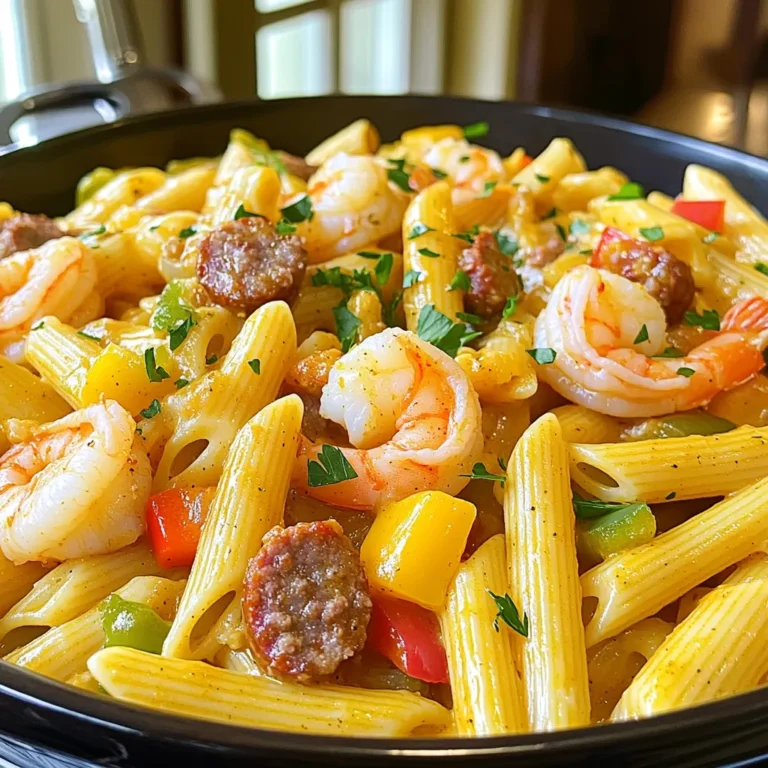
Cajun Shrimp and Sausage Pasta One Pot Delight

PREV 1 … 14 15 16 … 65 NEXT
tasty trail blazer

explore

DessertsDinnerAppetizersDrinks

Our Policies

  • Cookie Policy
  • Copyright Policy
  • Disclaimer
  • GDPR Policy
  • Terms Of Use
Back to Top
  • About
  • Contact Us
  • Privacy Policy
© 2025 tasty trail blazer