FREE DINNER EBOOK! Get your copy!
  • Cookie Policy
  • GDPR Policy
  • Disclaimer
  • Terms Of Use
  • Visit my other site: Fun Cookie Recipes
tasty trail blazer
  • Home
  • Dinner
  • Desserts
  • Drinks
  • Appetizers
  • Contact
  • About
  • Privacy Policy
  • Home
  • Dinner
  • Desserts
  • Drinks
  • Appetizers
  • Contact
  • About
  • Privacy Policy
  • Cookie Policy
  • GDPR Policy
  • Disclaimer
  • Terms Of Use
Visit my other site: Fun Cookie Recipes

HOME / CATEGORIES /

Latest

- 1 jar maraschino cherries (12-15 cherries) - 1 cup granulated sugar - 1 tablespoon corn syrup - 2 tablespoons water - 1 teaspoon vanilla extract - 1 cup semisweet chocolate chips - 2 tablespoons coconut oil (optional, for smoother chocolate) - Sea salt for garnish - Additional flavoring options To make chocolate-covered cherry cordials, you'll need a few tasty items. First, grab a jar of maraschino cherries. This jar usually has about 12 to 15 cherries. Next, you need sugar, corn syrup, and water. These will help create a sweet syrup. Don't forget the vanilla extract for extra flavor! For the chocolate coating, use semisweet chocolate chips. If you want smoother chocolate, add some coconut oil. This oil makes the chocolate melt nicely. For a fun touch, you can sprinkle sea salt on top of your finished cherries. You might also think about adding other flavoring options, like almond or orange extract, to change things up. {{ingredient_image_1}} To start, you need to dry the maraschino cherries well. Use paper towels to pat them dry. This step is key. If they are too wet, the syrup will not stick. Next, let's make the sugar syrup. In a medium saucepan, mix together 1 cup of granulated sugar, 1 tablespoon of corn syrup, and 2 tablespoons of water. Heat over medium until the sugar dissolves. Bring the mix to a gentle boil. Once it boils, lower the heat. Stir for 2-3 minutes until it thickens. Remove it from heat and add 1 teaspoon of vanilla extract. This will add great flavor to your cherries! Now, it’s time to coat the cherries. Let the syrup cool a bit. Take one cherry and dip it into the syrup. Make sure it is well-coated. Place it on wax paper to cool and harden. Repeat this for all cherries. While the cherries dry, melt 1 cup of semisweet chocolate chips. Do this in a microwave-safe bowl. Heat in 30-second intervals, stirring each time. If you want smoother chocolate, add 2 tablespoons of coconut oil. This is optional but helps a lot! Once the syrup on the cherries has hardened, dip each syrup-covered cherry into the melted chocolate. Make sure each cherry is fully covered. Let any extra chocolate drip off before placing them back on the wax paper. If you like, sprinkle a tiny pinch of sea salt on top. This adds a nice touch! Finally, chill the chocolate-covered cherries in the fridge for 30 minutes. This will help the chocolate set nicely. Enjoy your sweet treat! To make your chocolate coating smooth, consider using coconut oil. Adding just a bit of coconut oil to your melted chocolate helps it glide easily over the cherries. This makes the chocolate shiny and nice to eat. To avoid excess moisture in your cherries, dry them well with paper towels. This is key. If cherries are wet, the syrup won’t stick. You want a good coating to hold the chocolate. When it comes to serving, arrange the chocolate-covered cherries on a nice plate. You can drizzle any leftover chocolate over them for a fancy touch. This adds flair and makes them look special. If you plan to gift these treats, use a small candy box. Line it with parchment paper to keep the cherries safe. A little note or ribbon can make the gift even sweeter. Pro Tips Choose Quality Cherries: Opt for high-quality maraschino cherries to enhance the flavor of your cordials. Look for those that are bright red and have a firm texture for the best results. Perfect Chocolate Melting: When melting chocolate, do it in short bursts and stir often to prevent burning. Adding coconut oil can help achieve a glossy finish and smoother texture. Let Them Cool: Ensure the syrup-coated cherries are completely cooled and hardened before dipping them in chocolate. This helps the chocolate adhere better and prevents it from sliding off. Garnish Wisely: A sprinkle of sea salt not only adds a beautiful finishing touch but also enhances the chocolate flavor. Use it sparingly to avoid overpowering the sweetness. {{image_2}} You can add fun flavors to your chocolate-covered cherry cordials by using liqueurs or extracts. A splash of almond extract gives a nutty warmth. Try a hint of orange liqueur for a fresh twist. Vanilla extract is a classic that always works. Using different types of chocolate also makes a big difference. You can use dark chocolate for a rich taste. If you want something sweeter, white chocolate is perfect. Mix and match to find your favorite flavor! Don't be afraid to experiment with fillings! You can try different fruits like strawberries or raspberries. Chopped nuts can add a nice crunch. Go wild and create a cream-filled version. Simply whip some cream cheese with sugar and vanilla for a tasty filling. These variations let you customize every bite. Each option offers a new taste experience. Enjoy experimenting with flavors and fillings! To keep your chocolate-covered cherry cordials fresh, use an airtight container. Glass or plastic containers work well. If you stack them, place parchment paper between layers. This prevents sticking. Store the cherries in the refrigerator. They stay fresh longer when chilled. If you prefer room temperature, store them in a cool, dry place. However, they may not last as long at room temperature. Chocolate-covered cherry cordials usually last about two weeks in the fridge. After this time, they can lose their taste and texture. Look for signs of spoilage, such as: - Changes in texture or coating. - A sour smell or taste. - A sticky surface. If you notice any of these signs, it’s best to toss them out. Enjoy your sweet treats while they’re fresh! How do you prevent chocolate from cracking on the cherry? To stop cracking, ensure the cherries are dry. Any moisture can cause problems. After dipping in syrup, let the cherries cool completely. A smooth chocolate mix helps too. You can add coconut oil to the chocolate to keep it creamy and help it stick better. Can you freeze chocolate-covered cherries? Yes, you can freeze them. Just make sure they are in an airtight container. They will last longer this way. However, the texture may change after thawing. The chocolate might lose its snap, but they will still taste great. Where to buy chocolate-covered cherry cordials? You can find these treats at many grocery stores. Check the candy aisle or the specialty section. Online shops also sell them. Look for local candy shops, as they may offer fresh, handmade options. What brands offer the best quality? Some top brands are See’s Candies and Russell Stover. They make tasty chocolate-covered cherries. Look for brands that use real chocolate and natural ingredients for the best flavor. Always read the labels to ensure quality. In this post, we explored making chocolate-covered cherries step by step. We started with the main ingredients, like maraschino cherries and chocolate. Next, I shared ways to prepare, dip, and chill your cherries. Tips helped perfect the coating and present your treats beautifully. I also offered fun flavor variations and storage advice. Now you can create tasty chocolate-covered cherries at home. Enjoy experimenting with flavors and impressing your friends!

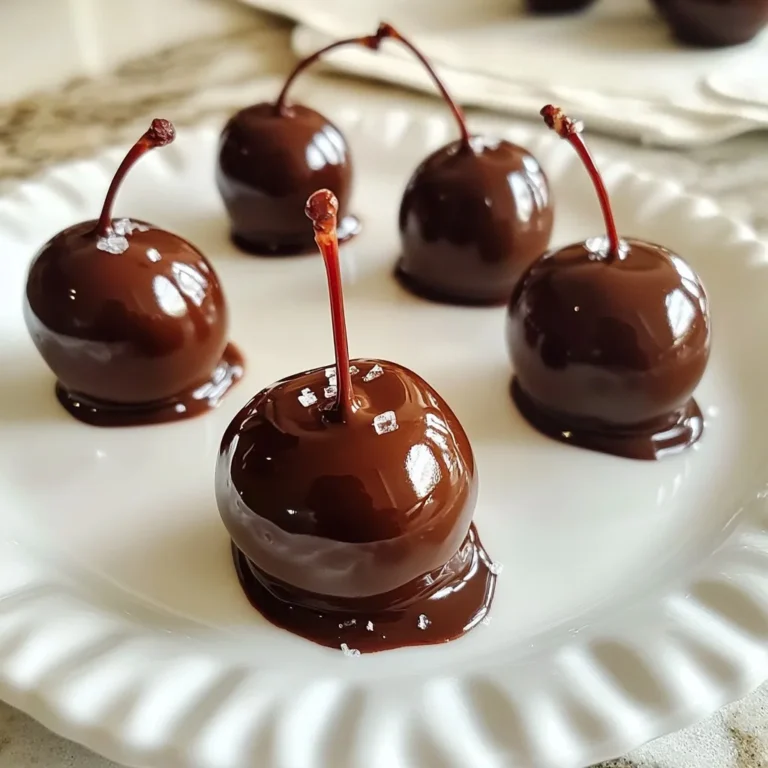
Chocolate Covered Cherry Cordials Simple and Sweet

To make these tasty brownies, you need some key items: - 1 cup unsalted butter (2 sticks) - 2 cups granulated sugar - 4 large eggs - 1 teaspoon vanilla extract - 1 cup all-purpose flour - 1 cup unsweetened cocoa powder - 1/2 teaspoon baking powder - 1/2 teaspoon salt - 1 cup mini pretzels - 1 cup chocolate chips - 1/2 cup caramel sauce (store-bought or homemade) - 1/2 teaspoon sea salt (flaked) Each ingredient plays a vital role. The butter adds richness. The sugar gives sweetness. Eggs bind everything together. Cocoa powder and flour create the brownie base. Want to mix it up? You can try these add-ins for more flavor: - Chopped nuts, like walnuts or pecans - Sea salt caramel candies for extra bites of caramel - A splash of coffee to deepen the chocolate flavor These add-ins can enhance the taste and texture of your brownies. No need to worry if you lack some items! Here are some easy swaps: - Use salted butter instead of unsalted. Just skip the added salt. - Swap granulated sugar with brown sugar for a deeper flavor. - Cocoa powder can be replaced with carob powder for a different taste. These substitutions will keep the brownies delicious while making use of what you have at home. {{ingredient_image_1}} Start by preheating your oven to 350°F (175°C). This step is key to getting your brownies just right. Next, grab a 9x13-inch baking pan. You can grease it with butter or oil. Alternatively, line it with parchment paper for easy removal later. Both methods work well, so pick what you prefer. In a medium saucepan, melt 1 cup of unsalted butter over low heat. Once it’s melted, take it off the heat. Stir in 2 cups of granulated sugar. Mix well until combined. Now, add 4 large eggs, one at a time. Make sure to mix well after each egg. Then, add 1 teaspoon of vanilla extract and stir again. In a separate bowl, whisk together 1 cup of all-purpose flour, 1 cup of unsweetened cocoa powder, 1/2 teaspoon of baking powder, and 1/2 teaspoon of salt. Gradually add this mix to your butter-sugar mixture. Stir until just combined. Avoid overmixing, as this can make your brownies tough. Finally, fold in 1 cup of mini pretzels and 1 cup of chocolate chips. This will give your brownies a delightful crunch. Pour half of the brownie batter into your prepared pan. Spread it evenly across the bottom. Next, drizzle half of your 1/2 cup of caramel sauce over the batter. Use a spatula or knife to gently swirl it in. Now, pour the remaining brownie batter on top and spread it evenly. Drizzle the rest of the caramel sauce on top. Don’t forget to generously sprinkle with 1/2 teaspoon of flaked sea salt. This adds a nice touch. Bake in your preheated oven for 25-30 minutes. Keep an eye on them! Check if they are set by inserting a toothpick in the center. It should come out with a few moist crumbs, not wet batter. Once baked, take them out of the oven. Let the brownies cool in the pan on a wire rack for at least 20-30 minutes. This will help them set and make slicing easier. To make the best brownies, you need to focus on mixing. Start with melted butter. It helps give the brownies a rich, fudgy texture. Mix the sugar in well, but don’t overmix the batter. Stir just until you see no more flour. This will keep your brownies soft and moist. Remember to fold in the chocolate chips and pretzels gently. This way, they won't break apart. For a deeper caramel taste, try using homemade caramel sauce. If you must use store-bought, pick a high-quality brand. The flavor will stand out. If you're feeling adventurous, add a bit of sea salt into the caramel. It enhances the sweet and salty combo. Don’t forget to sprinkle some sea salt on top before baking. This will add an extra layer of flavor. Cutting brownies can be a hassle, but I have a trick. Let them cool in the pan for about 30 minutes. Then, use a sharp knife. For clean cuts, dip the knife in hot water and wipe it dry. This helps avoid messy edges. If you want perfect squares, mark your cuts before slicing. This way, you can make them even and neat. Enjoy your delicious, salted caramel pretzel brownies! Pro Tips Use Room Temperature Ingredients: Ensure your eggs and butter are at room temperature for better incorporation and texture in your brownies. Don’t Overmix the Batter: Mix the batter until just combined to keep the brownies fudgy and soft, avoiding a tough texture. Swirl the Caramel Carefully: When drizzling caramel, use a toothpick or knife to create beautiful swirls without fully mixing it into the batter. Let Them Cool: Allow the brownies to cool completely in the pan before slicing to ensure clean cuts and a better structure. {{image_2}} You can add nuts for extra crunch. Chopped walnuts or pecans work well. Mix them in with the pretzels. This adds a nice texture. Nuts also enhance the flavor. You can use a 1/2 cup of nuts for balance. These brownies will feel even more decadent with this twist. You can make these brownies gluten-free easily. Swap the all-purpose flour with a gluten-free flour mix. Make sure it has a good binding agent. This keeps the brownies moist and chewy. You might want to check for gluten-free pretzels too. They provide that salty crunch we love. If you want to change the flavor, use different chips. White chocolate chips add a sweet touch. You can also try butterscotch chips for a rich flavor. Dark chocolate chips give a deeper taste. Use the same amount as the recipe calls for. This way, you keep the balance just right. After you bake these brownies, let them cool completely. This step is key to keeping them fresh. Store the brownies in an airtight container. They can sit at room temperature for up to four days. If you want them to last longer, you can refrigerate them for about a week. Just make sure to wrap them well. This helps keep the moisture in and the flavor strong. If you have extra brownies, freezing is a great option. Cut the brownies into squares before freezing. Wrap each square tightly in plastic wrap. Then, place them in a freezer-safe bag. They can stay frozen for about three months. To enjoy them later, just move them to the fridge overnight. You’ll have tasty brownies ready to go. To reheat your brownies, the oven is the best choice. Preheat it to 350°F (175°C). Place the brownies on a baking sheet. Heat for about 10 minutes. This warms them up nicely and keeps them soft. You can also microwave them. Place a brownie on a microwave-safe plate. Heat for about 10-15 seconds. This method is quick, but be careful not to overheat. Enjoy your warm, gooey brownies! Salted caramel pretzel brownies last about 3 to 5 days at room temperature. Store them in an airtight container to keep them fresh. If you want to keep them longer, you can refrigerate them for up to a week. Just remember to let them come back to room temperature before enjoying. Yes, you can make these brownies in advance! They are perfect for parties or events. Simply bake and cool them, then store in an airtight container. If you want to keep them fresh, wrap them tightly in plastic wrap. You can even freeze them for up to three months. Just thaw them in the fridge overnight before serving. If you don’t have caramel sauce, you can use dulce de leche as a substitute. It has a similar sweet and creamy texture. Another option is to make a quick homemade caramel by melting sugar with a bit of water. This will give you that delicious caramel flavor. Just be careful while making it, as melted sugar can be very hot! Salted caramel pretzel brownies bring together sweet and salty flavors. We explored key ingredients, optional add-ins, and substitutions to tailor this treat to your taste. I shared step-by-step instructions for achieving the perfect brownie. With tips to enhance texture and flavor, you can impress anyone. Variations like nutty or gluten-free options cater to different diets. Lastly, knowing how to store and reheat ensures you enjoy every bit. Now, you’re ready to bake these delicious brownies and share them!

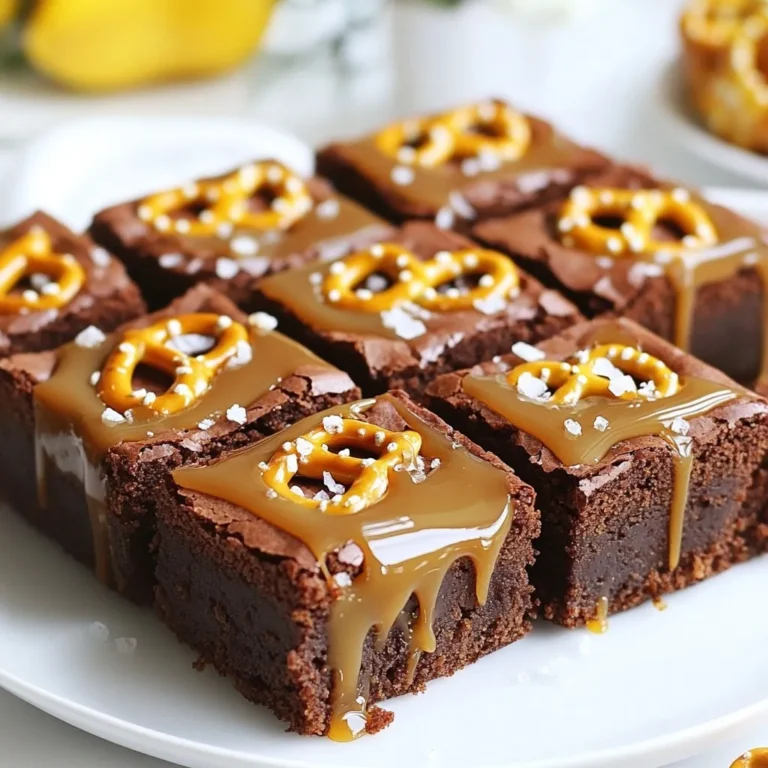
Salted Caramel Pretzel Brownies Decadent Delight Treat

- 1 pound Brussels sprouts - 2 tablespoons olive oil - 3 tablespoons honey - 2 tablespoons sriracha sauce - 1 tablespoon soy sauce - 1 teaspoon garlic powder - Salt and pepper to taste - 1 tablespoon sesame seeds - 2 green onions, sliced Gathering the right ingredients is key. First, grab 1 pound of Brussels sprouts. Look for fresh ones that are bright green. Then, you will need 2 tablespoons of olive oil. This helps the sprouts roast nicely. Next, get 3 tablespoons of honey for sweetness. You will also need 2 tablespoons of sriracha sauce for heat. For added flavor, use 1 tablespoon of soy sauce. This gives a nice umami touch. A teaspoon of garlic powder adds depth. Season with salt and pepper to your liking. To finish, prepare 1 tablespoon of sesame seeds and 2 sliced green onions for garnish. These not only add flavor, but they also make your dish look great. Enjoy every bite! {{ingredient_image_1}} First, you need to trim and halve the Brussels sprouts. Use a sharp knife to cut off the ends. Then, slice each sprout in half. This helps them cook evenly. Next, combine the halved sprouts with olive oil, salt, and pepper. Make sure they are well coated. This simple step adds great flavor. Now, spread the Brussels sprouts on a baking sheet. Arrange them in a single layer. This allows them to roast properly. Set your oven to 400°F. Roast them for 20-25 minutes. Halfway through, remember to toss them. This helps them brown evenly and get crispy. While the sprouts roast, let’s make the Honey Sriracha sauce. In a small bowl, whisk together honey, sriracha, soy sauce, and garlic powder. Mix until smooth. Once the Brussels sprouts are done roasting, drizzle this sauce over them. Toss gently to coat every sprout evenly. Return them to the oven for an extra 5-10 minutes. This caramelizes the sauce and enhances the flavor. To get that perfect crispiness, toss the Brussels sprouts halfway through cooking. This step ensures even browning. Crispy edges add great texture. When you coat them with sauce, make sure it’s even. A good layer helps achieve that delicious caramelization. Serve these vibrant Brussels sprouts on a nice platter. Sprinkle extra sesame seeds and green onions on top to make it pop. For a well-rounded meal, pair them with grilled chicken or tofu. This adds protein and complements the sweet and spicy flavors. If you want to swap out honey, try maple syrup or agave nectar. For a milder heat, use sweet chili sauce instead of Sriracha. You can also use tamari instead of soy sauce for a gluten-free option. These swaps keep the dish tasty while fitting different diets. Pro Tips Perfect Roasting: Ensure your Brussels sprouts are spread out in a single layer on the baking sheet to allow for even roasting and crispiness. Adjusting Heat: Tweak the amount of Sriracha in the sauce based on your heat preference; add more for extra spice or reduce for a milder flavor. Honey Alternatives: If you're looking for a vegan option, substitute honey with maple syrup or agave nectar for a similar sweetness. Garnish for Flavor: Don't skip the sesame seeds and green onions; they add not only visual appeal but also a nice crunch and flavor contrast to the dish. {{image_2}} You can change the taste of your Honey Sriracha Brussels sprouts easily. Adding balsamic vinegar gives a nice tang. It brightens the dish and adds depth. You can also try spices like cayenne pepper for heat. This will make the dish even more exciting and flavorful. You can cook Brussels sprouts in many ways. Air frying them is quicker and keeps them crisp. It cuts down on cooking time while still making them tasty. Stovetop sautéing is another option. This method gives a different texture and a nice, golden color. Seasonal veggies are great to add to your dish. Carrots, bell peppers, or sweet potatoes work well. They add color and more nutrition, making the meal better. You can also use holiday-inspired spices like cinnamon or nutmeg. This gives your dish a festive touch that can impress your guests. To keep your Honey Sriracha Brussels sprouts fresh, store them in the fridge. Use an airtight container. Make sure they cool down before sealing. They can last for about 3 to 4 days. After that, they may lose their crispiness and flavor. When reheating, aim to keep the sprouts crispy. You can use an oven or an air fryer. Heat them at 350°F for about 10 minutes. This method helps restore their crunch. If you're using a microwave, do it in short bursts. This prevents sogginess. Always use a microwave-safe bowl for this. If you want to save some for later, you can freeze them. First, let them cool completely. Then, place them in a freezer-safe container. You can also use freezer bags, but remove as much air as you can. They will stay good for about 2 to 3 months. To serve, thaw them overnight in the fridge. Then, reheat using your preferred method. This will help bring back their flavor and texture. Roasting Brussels sprouts takes about 20-25 minutes. This time helps them get tender. You want them crispy on the edges and soft inside. Toss them halfway through cooking for even browning. If you like them extra crispy, add a few more minutes. Yes! You can make this dish vegetarian or vegan easily. For a vegan option, replace honey with maple syrup or agave nectar. Both options work great in this recipe. You can also check the Sriracha sauce. Some brands contain fish sauce, so look for a vegan version. These Brussels sprouts complement many main dishes. Try them with grilled chicken or tofu for a complete meal. They also go well with rice or quinoa. Serve them alongside a fresh salad or roasted potatoes. This mix creates a colorful and tasty plate. This blog post covered how to make Honey Sriracha Brussels sprouts. We discussed the key ingredients, steps for roasting, and tips for perfect crispiness. You learned ways to customize flavors and cooking methods. Plus, you now know how to store leftovers and reheat them. Enjoy trying these recipes and impressing others with your tasty dish. Don’t forget to explore variations to keep it fresh! Happy cooking!

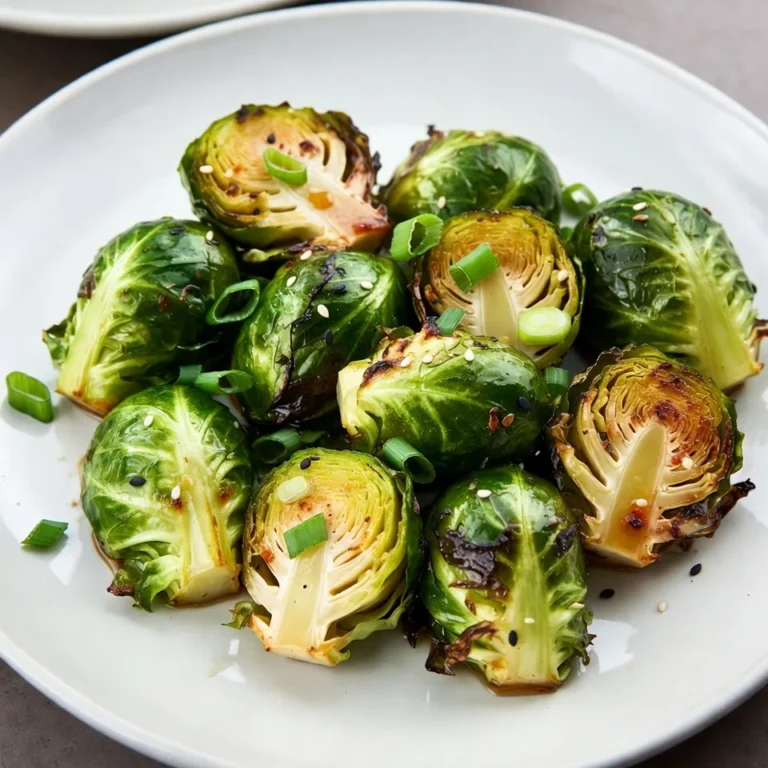
Honey Sriracha Brussels Sprouts Flavorful and Easy Dish

To make watermelon feta mint skewers, you need just a few fresh ingredients. Here’s what you will gather: - 3 cups watermelon, cut into 1-inch cubes - 1 cup feta cheese, crumbled - 1/2 cup fresh mint leaves - 2 tablespoons balsamic reduction - 1 tablespoon olive oil - Pinch of black pepper Each ingredient plays a key role in flavor. The watermelon gives a sweet and juicy bite. Feta cheese adds a creamy, salty touch. Fresh mint brings a burst of bright flavor. Balsamic reduction adds a tangy finish, while olive oil enriches the taste. A pinch of black pepper kicks it up a notch. These ingredients are simple yet powerful. They create a refreshing snack perfect for summer days. Plus, they are easy to find at any grocery store. You can mix and match these flavors to make your skewers unique! Enjoy the process! {{ingredient_image_1}} First, you need to cut the watermelon. Grab 3 cups of watermelon and chop it into 1-inch cubes. Make sure the cubes are even. This helps them stay on the skewers. Next, crumble 1 cup of feta cheese into a bowl. Feta adds a salty kick to the sweet watermelon. Now, wash 1/2 cup of fresh mint leaves. Choose the leaves that look bright and fresh. These leaves will add a nice, cool flavor to the skewers. Take wooden skewers and start threading the ingredients. Begin with a cube of watermelon. Next, add a few mint leaves. Then, spoon on some crumbled feta. Repeat this pattern until each skewer is full. You should make about 12 skewers. For even assembly, make sure each ingredient is spaced out. This helps with flavor and looks nice too. In a small bowl, mix 2 tablespoons of balsamic reduction with 1 tablespoon of olive oil. Whisk them together until combined. Drizzle this mixture lightly over the assembled skewers. It adds a delicious tang. Just before serving, sprinkle a pinch of black pepper over the skewers. This enhances the flavor and makes them pop. Serve these skewers chilled or at room temperature. They will taste amazing! To pick the best watermelon, look for a uniform shape. A round or oval shape is good. Check the color, too. The spot where it rests on the ground should be a creamy yellow. This shows it ripened on the vine. Tap the watermelon; a deep sound means it is ripe. Also, feel its weight. A heavy watermelon has more water and is juicier. To keep leftover skewers fresh, store them in an airtight container. Place a damp paper towel in the container. This helps keep the mint fresh. You can keep them in the fridge for up to two days. If you notice the watermelon getting soft, eat them soon. The flavors are best when fresh! For gatherings, arrange skewers on a nice platter. You can group them by color for a fun look. Drizzle extra balsamic reduction on top for flair. Garnish with whole mint leaves around the skewers. This adds a pop of color. You can also pair the skewers with cold drinks. Lemonade or iced tea works well. Enjoy the refreshing taste! Pro Tips Choose Ripe Watermelon: Look for a watermelon that feels heavy for its size and has a uniform shape. The field spot (the area that was resting on the ground) should be creamy yellow, indicating ripeness. Fresh Mint Matters: Use fresh mint leaves for the best flavor. If you want a stronger mint taste, gently bruise the leaves before adding them to the skewers to release more oils. Feta Cheese Alternatives: If you prefer a different cheese, goat cheese or queso fresco can be great substitutes for feta, offering a unique flavor profile while maintaining creaminess. Chill Before Serving: For the best experience, chill the skewers in the refrigerator for at least 30 minutes before serving. This enhances the refreshing qualities of the watermelon and mint. {{image_2}} You can easily switch the feta cheese for goat cheese. It adds a creamy touch. Try using fresh basil instead of mint. Basil gives a sweet twist. You can also mix in other fruits like strawberries or pineapple. These fruits add more color and taste. These skewers are gluten-free and vegetarian. If you want a vegan option, swap feta for a plant-based cheese. Just make sure the substitute melts well if you want a warm dish. This way, everyone can enjoy them! Consider adding a drizzle of honey for sweetness. It pairs well with the feta and watermelon. You could also sprinkle some chili flakes for heat. This adds a fun kick to the dish. Try using lemon zest for a fresh zing. These simple changes can make each bite even more exciting! To keep your watermelon feta mint skewers fresh, you need to cool them fast. Place the skewers in a shallow dish. Cover them with plastic wrap or a lid. This keeps them from drying out. Store them in the fridge. Try to eat them within two days for the best taste. You can freeze these skewers, but be careful. First, wrap each skewer in plastic wrap. This helps avoid freezer burn. Then, place them in a freezer bag. When you want to eat them, thaw in the fridge overnight. Avoid thawing at room temperature for safety. In the fridge, these skewers last about two days. After that, the watermelon will start to lose its crunch. The feta can also go bad. Always check for any off smells or colors before eating. Yes, you can make skewers in advance. To do this, prepare the watermelon and feta as usual. Assemble the skewers, but leave off the balsamic reduction and olive oil for now. Place the skewers in a sealed container in the fridge. They will stay fresh for up to 4 hours. When ready to serve, drizzle the dressing and add black pepper for the best flavor. These skewers pair well with a variety of dishes. You can serve them with grilled chicken or shrimp for protein. A fresh salad, like a simple green salad, also works well. For drinks, try a light white wine or a cool lemonade. These options enhance the bright flavors of the skewers. Yes, you can grill these skewers. Grilling adds a nice smoky taste. To grill, soak wooden skewers in water for 30 minutes to prevent burning. Then, place the assembled skewers on a hot grill for about 2-3 minutes per side. This quick cooking will warm the watermelon and slightly melt the feta. Enjoy the added flavor! This blog post shared a simple recipe for watermelon feta mint skewers. We explored the key ingredients and easy steps to prepare them. I provided tips for selecting ripe watermelon and storing leftovers. You can even customize skewers with different ingredients or flavors. Make these skewers a must-have at your next gathering. They look great and taste refreshing. Enjoy making a delicious, easy dish that impresses friends and family!

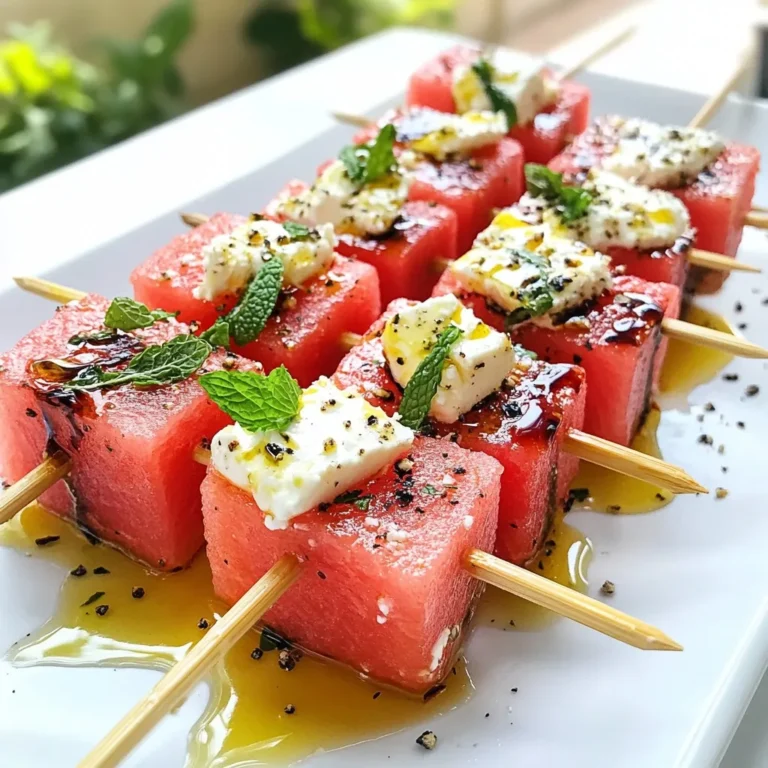
Watermelon Feta Mint Skewers Refreshing Summer Snack

To create delicious espresso chocolate chunk cookies, you'll need the following ingredients: - 1 cup unsalted butter, softened - 1 cup brown sugar, packed - 1/2 cup granulated sugar - 2 large eggs - 2 teaspoons vanilla extract - 2 cups all-purpose flour - 1 teaspoon baking soda - 1/2 teaspoon salt - 2 tablespoons instant espresso powder - 1 cup dark chocolate chunks - 1/2 cup chopped walnuts (optional) These ingredients work together to create rich flavor and soft texture. The butter adds creaminess, while the sugars contribute sweetness and structure. Eggs help bind everything together. The vanilla extract enhances the cookie’s taste. For the dry mix, all-purpose flour provides the base. Baking soda makes the cookies rise, and salt balances the sweetness. Instant espresso powder gives a strong coffee flavor that pairs perfectly with chocolate. Dark chocolate chunks add a melty richness, while walnuts offer a nice crunch. Feel free to skip the walnuts if you prefer a nut-free cookie. Each ingredient plays a role in making these cookies a treat you won't forget! {{ingredient_image_1}} 1. Preheat the oven and prepare baking sheets Start by setting your oven to 350°F (175°C). This hot oven makes for crispy edges. Line two baking sheets with parchment paper. This helps the cookies not stick. 2. Cream together butter and sugars In a large mixing bowl, put 1 cup of softened butter. Add 1 cup of packed brown sugar and 1/2 cup of granulated sugar. Mix them well until the mixture is light and fluffy. This step is key for a soft cookie. 3. Add eggs and vanilla extract Beat in 2 large eggs, one at a time. This helps to incorporate air. Next, add 2 teaspoons of vanilla extract for flavor. Mix until smooth. 1. Whisk together dry ingredients In another bowl, combine 2 cups of all-purpose flour, 1 teaspoon of baking soda, 1/2 teaspoon of salt, and 2 tablespoons of instant espresso powder. Whisk these together to blend well. This mix adds flavor and lift. 2. Combine wet and dry mixtures Gradually add the dry mix to the wet ingredients. Stir gently until just combined. Be careful! Overmixing makes tough cookies. 1. Final dough prep and spacing Fold in 1 cup of dark chocolate chunks and 1/2 cup of chopped walnuts if you like. Use a cookie scoop or tablespoon to drop dough onto the prepared sheets. Space them about 2 inches apart. 2. Baking time and techniques Bake the cookies in the oven for 10 to 12 minutes. Watch for lightly golden edges. The centers may look soft; they will firm up after cooling. 3. Cooling instructions Take the cookies out and let them cool on the baking sheets for about 5 minutes. Then transfer them to a wire rack to cool completely. Enjoy the warm, rich smell as they cool! - Creaming butter and sugars: Start by softening your butter. Mix it with brown and granulated sugar until the mix is light and fluffy. This step adds air, making your cookies soft and chewy. - Avoiding overmixing: When you add the dry mix to the wet mix, stir gently. Overmixing can make your cookies tough. Aim for just combined, with some flour still showing. - Monitoring baking time: Watch your cookies closely as they bake. They need about 10-12 minutes. The edges should be golden, while the centers look soft. They will firm up as they cool. - Presentation tips for serving: Serve these cookies warm on a rustic wooden platter. A sprinkle of sea salt on top adds flavor and looks nice. - Pairing with beverages: These cookies shine with a small cup of espresso. The coffee enhances the chocolate and espresso flavors, making each bite even better. Pro Tips Use Fresh Espresso Powder: For the best flavor, make sure your instant espresso powder is fresh. Old powder can lose its potency and affect the overall taste of the cookies. Chill the Dough: If you have time, chill the cookie dough for at least 30 minutes before baking. This helps the cookies maintain their shape and results in a chewier texture. Experiment with Chocolate: While dark chocolate chunks are delicious, feel free to mix in white chocolate or milk chocolate for a different flavor profile. The combination can add a delightful sweetness! Storage Tips: Store the cookies in an airtight container at room temperature to keep them fresh. For longer storage, consider freezing them, and simply thaw before serving. {{image_2}} You can change up the taste of your cookies in fun ways. Here are some ideas: - Chocolate Options: Try using milk chocolate or white chocolate chunks. Each type brings its own sweet twist. Milk chocolate adds creaminess, while white chocolate gives a rich, buttery flavor. - Nuts and Fruits: Instead of walnuts, you can use pecans or almonds. Chopped dried fruits like cranberries or cherries can add a nice chewiness. They also bring a fruity touch to balance the coffee flavor. You can make these cookies fit different diets. Here’s how: - Gluten-Free Versions: To make gluten-free cookies, swap all-purpose flour for a gluten-free flour blend. Look for blends that work for baking. This change keeps your cookies soft and chewy. - Vegan Substitutes: For a vegan option, replace butter with coconut oil or vegan butter. Use flax eggs instead of regular eggs. Mix 1 tablespoon of ground flaxseed with 2.5 tablespoons of water. Let it sit for a few minutes until it thickens. This keeps the cookies moist and delicious. These variations keep your espresso chocolate chunk cookies exciting and suitable for everyone! To keep your Espresso Chocolate Chunk Cookies fresh, place them in an airtight container. This helps the cookies stay soft and chewy. You can use a cookie jar or a plastic container. Keep them at room temperature away from heat and moisture. For best taste, eat the cookies within a week. If you want to keep them longer, think about freezing. This way, you can enjoy them later without losing flavor. You can freeze the cookie dough for later use. To do this, scoop the dough into balls and place them on a baking sheet. Freeze them for about an hour until firm. Once they are solid, transfer them to a freezer bag. Label the bag with the date and type of cookie. When you want to bake them, take out how many you need. Let them thaw in the fridge overnight or on the counter for a few hours. You can bake them straight from the freezer too; just add a minute or two to the baking time. For baked cookies, let them cool completely before freezing. Place them in an airtight container or freezer bag. They can stay fresh for up to three months. When you are ready to eat, thaw at room temperature. Enjoy that fresh-baked taste again! You can use instant coffee instead of espresso powder. It has a similar taste, but the flavor may be slightly milder. If you want a stronger taste, try using a bit more coffee. You can also brew a strong cup of coffee and use that, but adjust the other liquids in your recipe. These cookies stay fresh for about a week when stored in an airtight container. They will keep their soft and chewy texture. If you want to enjoy them longer, you can freeze them. Just make sure to wrap them well to avoid freezer burn. Yes, you can try different types of flour. Whole wheat flour adds a nutty flavor, while almond flour makes them gluten-free. If you use almond flour, you may need to adjust the liquid in your recipe. Just remember, each flour type changes the taste and texture a bit. This blog post covered how to make delicious cookies. We discussed key ingredients, and step-by-step instructions, and shared tips for perfect results. You learned about variations to try and how to store cookies for freshness. Always remember, baking is a fun way to explore flavors and create treats. Use these guides to make your baking experience enjoyable and rewarding. Happy baking!

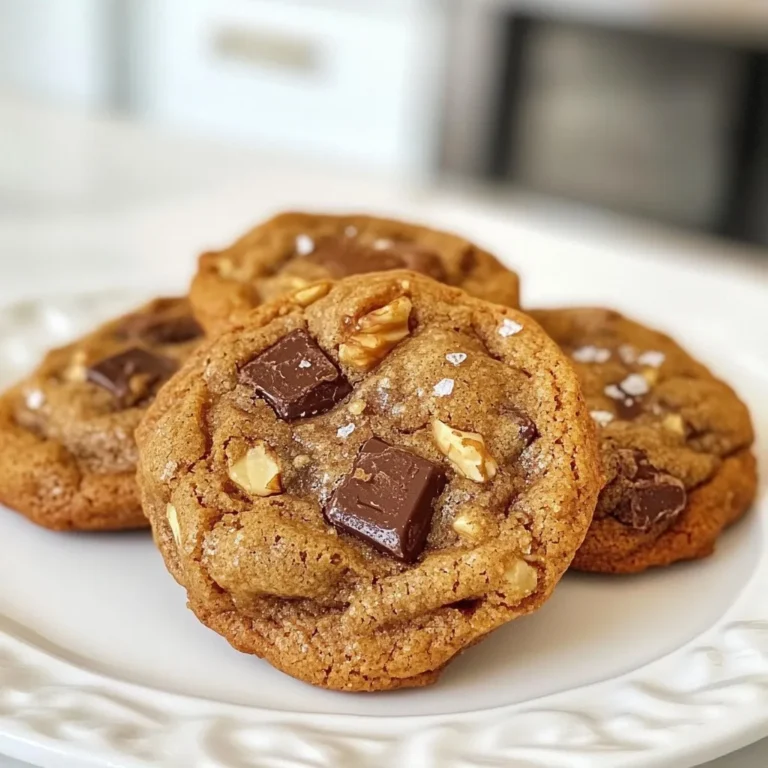
Espresso Chocolate Chunk Cookies Irresistibly Delightful

- 2 pounds baby potatoes, halved - 3 tablespoons olive oil - 4 cloves garlic, minced - 1 teaspoon Italian seasoning - ½ cup grated Parmesan cheese - Salt and pepper to taste - Fresh parsley, chopped for garnish For my Garlic Parmesan Air Fryer Potatoes, I start with fresh baby potatoes. These little gems are perfect because they cook quickly and have a great texture. I cut them in half to help them crisp up nicely. Next, I grab some olive oil. It adds flavor and helps the spices stick. I use three tablespoons, just enough to coat the potatoes well. Garlic is a must. I use four cloves, minced finely to release all that savory goodness. The aroma fills the kitchen as I mix it in. Italian seasoning adds a classic touch. One teaspoon gives just the right balance of herbs. Parmesan cheese is where the magic happens. I use a generous half cup of grated cheese. It gives the potatoes a rich, cheesy flavor and a lovely crunch when they cook. Don’t forget salt and pepper! They enhance all the other flavors. I season to taste, making sure everything is balanced. Finally, I chop fresh parsley for garnish. It adds a pop of color and freshness when serving. With these ingredients, you can create crispy, flavorful potatoes that everyone will love. {{ingredient_image_1}} Preheat your air fryer to 400°F (200°C) for five minutes. Preheating is key. It helps the potatoes cook evenly and get that crispy texture we all love. Without preheating, they may turn out soft or unevenly cooked. In a large bowl, mix halved baby potatoes with three tablespoons of olive oil, four minced garlic cloves, one teaspoon of Italian seasoning, and salt and pepper. Toss the potatoes well. Make sure each piece is coated with oil and seasonings. This ensures every bite is packed with flavor. Then, sprinkle half a cup of grated Parmesan cheese over the potatoes. Toss again to mix everything evenly. This step adds that rich, cheesy goodness we crave. Carefully arrange the seasoned potatoes in the air fryer basket. Place them in a single layer. Avoid overcrowding. This allows hot air to circulate freely, giving you crispy potatoes. Cook them for 15 to 20 minutes. Halfway through, shake the basket to move the potatoes around. This helps them cook evenly and get golden brown on all sides. When done, the potatoes should be crispy on the outside and tender on the inside. Enjoy your delicious creation! To get the best texture, follow these tips. Cook the potatoes at 400°F for 15-20 minutes. This heat makes them crispy outside and soft inside. Cut the baby potatoes in halves for uniform cooking. Even sizes help them cook at the same rate. Garlic adds a great taste. You can use raw garlic for a sharp flavor. If you want a milder taste, try roasted garlic. Roasted garlic is sweet and smooth. You can also add other herbs or spices. Consider thyme or rosemary for extra depth. Parmesan cheese is classic, but feel free to experiment. Try cheddar for a different taste. If you prefer dairy-free, use vegan cheese. Many options melt well and taste great. Just make sure to adjust the amount based on the cheese type you choose. Pro Tips Choose the Right Potatoes: For the best texture and flavor, use small or medium-sized baby potatoes. They cook evenly and become perfectly crispy in the air fryer. Don’t Skip the Preheat: Preheating your air fryer is crucial for achieving that desired crispy texture. It ensures the potatoes start cooking immediately at the right temperature. Shake It Up: Remember to shake the basket halfway through cooking. This helps the potatoes cook evenly and promotes that golden, crispy exterior. Experiment with Seasonings: Feel free to customize the seasoning to your liking! Try adding paprika, cayenne pepper, or even herbs like rosemary for an extra flavor boost. {{image_2}} To make these potatoes spicy, add red pepper flakes. Start with a teaspoon and adjust to your taste. You can also try other spice blends like Cajun or taco seasoning. These spices will give the dish a nice kick while still keeping the garlic and Parmesan flavors intact. Fresh herbs can add a lovely touch to your potatoes. Try adding rosemary, thyme, or basil. Chop them finely and mix them with the potatoes before air frying. This will enhance the flavors and give your dish a fresh twist. Make sure to balance the herbs with the garlic, so they complement rather than overpower. You can add more veggies to the mix. Bell peppers, zucchini, or carrots work well. Just chop them to a similar size as the potatoes. This ensures even cooking. If you add more vegetables, check on them a few minutes early. They often cook faster than potatoes in the air fryer. Store your leftover garlic Parmesan potatoes in an airtight container. Glass or plastic containers with tight lids work best. Keep them in the fridge for up to three days. This keeps the potatoes fresh and tasty. You can reheat the potatoes in the air fryer or microwave. If using the air fryer, set it to 350°F (175°C) for about 5-7 minutes. This keeps them crispy. In the microwave, heat them for 1-2 minutes. This method is quicker but may make them less crispy. To keep the flavor strong, add a sprinkle of Parmesan on top before reheating. You can freeze these potatoes, but they may lose some texture. For best results, freeze them in a single layer on a baking sheet before storing in a freezer bag. This prevents clumping. They can stay in the freezer for up to a month. To thaw, move them to the fridge overnight. Reheat in the air fryer or oven until heated through. Yes, you can use other potatoes. Yukon Gold and red potatoes work well. These potatoes have a smooth texture and cook evenly. If you choose larger potatoes, cut them into smaller pieces. This helps them cook faster and get crispy. Look for a golden brown color. The potatoes should feel crisp on the outside. Use a fork to check if they are tender inside. If the fork goes in easily, they are ready to eat. Yes, you can use an oven instead. To bake, set your oven to 425°F (220°C). Spread the potatoes on a baking sheet in a single layer. Bake for about 25-30 minutes. Make sure to flip them halfway to get them crispy on all sides. You can make delicious Garlic Parmesan Air Fryer Potatoes easily at home. Start with baby potatoes, season them well, and use your air fryer for that crispy texture. Remember to preheat your air fryer for even cooking. Explore variations with spices or herbs to add more flavor. Don't forget to store your leftovers correctly, so they taste great later. Enjoy experimenting in the kitchen with these simple tips and tasty ideas!

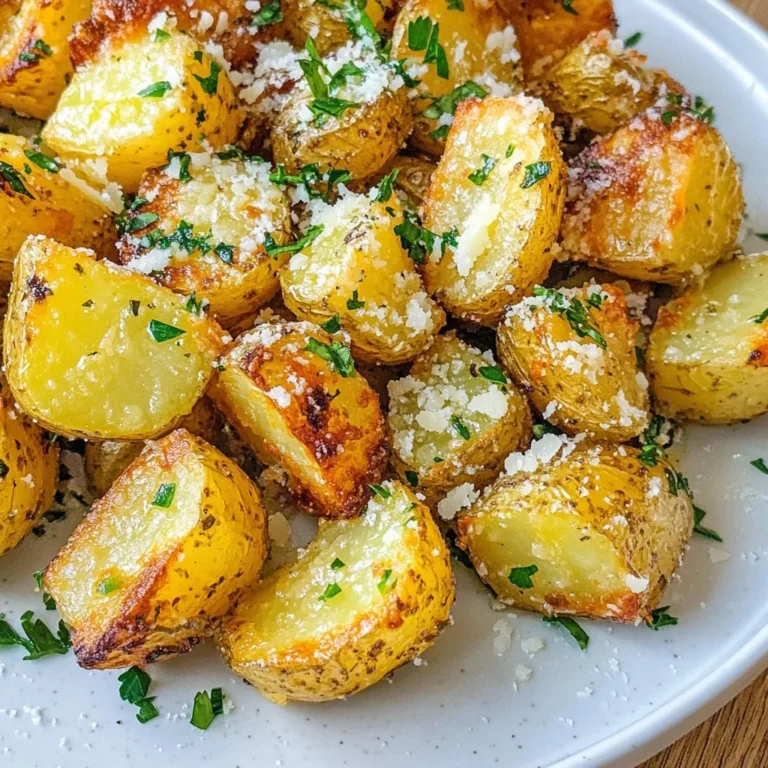
Garlic Parmesan Air Fryer Potatoes Savory and Crispy

To make delicious Peanut Butter Blossom Cookies, gather these simple ingredients: - 1 cup creamy peanut butter - 1 cup granulated sugar - 1 large egg - 1 teaspoon vanilla extract - 1 cup all-purpose flour - 1 teaspoon baking soda - ¼ teaspoon salt - 24 milk chocolate kisses, unwrapped - Extra granulated sugar for rolling Each ingredient plays an important role in making these cookies perfect. The creamy peanut butter gives the cookies their nutty flavor and rich texture. Granulated sugar adds sweetness and helps the cookies spread during baking. The egg acts as a binder, holding everything together. Vanilla extract brings warmth and depth to the flavor. The all-purpose flour gives structure to the cookies, while baking soda helps them rise. A pinch of salt enhances the sweetness and balances the flavors. Finally, the milk chocolate kisses add a sweet touch right in the center. The extra sugar for rolling gives the cookies a lovely, sparkly finish. With these ingredients, you can create a batch of cookies that are both sweet and simple to make. {{ingredient_image_1}} Start by preheating your oven to 350°F (175°C). This step warms the oven for even baking. Next, line a baking sheet with parchment paper. This helps the cookies not to stick. In a large mixing bowl, add 1 cup of creamy peanut butter and 1 cup of granulated sugar. Use a spatula or spoon to mix them well. Make sure the sugar blends in with the peanut butter. This makes the base sweet and nutty. Then, crack in 1 large egg and pour in 1 teaspoon of vanilla extract. Stir until the mixture is smooth and creamy. In another bowl, whisk together 1 cup of all-purpose flour, 1 teaspoon of baking soda, and ¼ teaspoon of salt. Mixing these dry ingredients well is key. Slowly add this mixture to the peanut butter base. Stir gently until everything is just combined. Don’t overmix; lumps are okay. Take about 1 tablespoon of dough and roll it into a ball using your hands. Roll each ball in extra granulated sugar until fully coated. This gives the cookies a nice sweet crunch. Place the balls on the lined baking sheet, leaving about 2 inches between them. Bake the cookies in the preheated oven for 10-12 minutes. Look for lightly golden edges. As soon as they come out, press a milk chocolate kiss into the center of each cookie. Let them cool on the baking sheet for 5 minutes. Then, transfer the cookies to a wire rack to cool completely. Enjoy the sweet smell while they cool! To get the best texture for your peanut butter blossom cookies, follow these tips: - Use creamy peanut butter. It blends well and keeps the cookies soft. - Measure your flour accurately. Too much flour can make cookies dry. - Do not overmix the dough. Stir just until the dry and wet ingredients are combined. Here are some common mistakes that can affect your cookies: - Skipping the sugar coating. It adds sweetness and crunch to the outside. - Pressing the chocolate kiss too hard. A gentle press is best to keep it from sinking. - Not spacing the cookies. Give them room to spread while baking. To keep your cookies fresh, follow these steps: - Store cookies in an airtight container. This keeps them soft and chewy. - Add a slice of bread inside the container. It helps maintain moisture. - For longer storage, freeze them. Place cookies in a freezer bag and seal tightly. These tips will help you make and enjoy your peanut butter blossom cookies even more! Pro Tips Chill the Dough: Refrigerating the cookie dough for about 30 minutes before baking helps to prevent spreading and results in thicker cookies. Use Room Temperature Ingredients: Ensure your egg and peanut butter are at room temperature for better mixing and a smoother texture. Experiment with Nut Butters: Try using almond or cashew butter for a different flavor profile that pairs well with chocolate. Store Properly: Keep your cookies in an airtight container at room temperature for up to a week to maintain freshness. {{image_2}} You can easily change Peanut Butter Blossom Cookies. Try adding nuts or chocolate for fun. Chopped walnuts or pecans mix well with the dough. They add crunch and flavor. For chocolate lovers, use dark chocolate kisses instead of milk chocolate. This swap makes the cookies richer. You can make these cookies vegan and gluten-free. Replace the egg with 1 tablespoon of ground flaxseed mixed with 2.5 tablespoons of water. This mix binds the dough well. Use almond flour or a gluten-free blend instead of all-purpose flour. Make sure to check labels for gluten-free options. Want to add a twist? Try spices or extracts. A pinch of cinnamon gives warmth, while a dash of nutmeg adds a cozy feel. You can also use almond or hazelnut extract for a unique taste. These small changes can take your cookies from good to great! To keep your Peanut Butter Blossom Cookies fresh, store them in an airtight container. This will help them stay soft and tasty. Place a piece of bread inside the container. The bread adds moisture and keeps cookies from drying out. You can store them at room temperature for up to one week. If you want them to last longer, consider freezing. Freezing cookies is easy and a great way to save them. Start by placing the cooled cookies in a single layer on a baking sheet. Freeze them for about an hour. This helps them keep their shape. Once frozen, move the cookies to a freezer bag or container. Make sure to squeeze out the air to prevent freezer burn. They will stay good for up to three months. Just remember to label your bags with the date. To enjoy your cookies warm, you can reheat them easily. Preheat your oven to 350°F (175°C). Place the cookies on a baking sheet. Heat them for about 5-7 minutes. This will make them soft and gooey again. You can also use a microwave. Heat each cookie for about 10-15 seconds. Be careful not to overheat, as this can make them hard. Enjoy your cookies fresh and warm! If you need a peanut butter swap, try almond butter or sunbutter. Both give a nice taste. You can also use soy nut butter for a nut-free option. Each will change the flavor a bit, but they work well. These cookies stay fresh for about one week at room temperature. Store them in an airtight container. If you want them to last longer, keep them in the fridge for up to two weeks. Yes, you can use crunchy peanut butter! This will add a nice texture to your cookies. Just remember that the cookies may be a bit less smooth. Peanut Butter Blossom Cookies date back to the 1950s in the United States. They gained fame for their unique look and taste. The chocolate kiss on top makes them stand out. Many home bakers love making these cookies for holidays and special events. To cut down on sugar, you can reduce the granulated sugar by half. You can also use a sugar substitute like stevia or erythritol. This will help keep the cookies sweet but lower in calories. This blog post covered how to make delicious Peanut Butter Blossom Cookies. You learned the key ingredients, step-by-step instructions, and helpful tips for perfect cookies. I shared variations to fit different diets and preferences, plus storage tips to keep your cookies fresh. With this knowledge, you can bake with confidence. Enjoy making these treats and sharing them with friends and family. Happy baking!

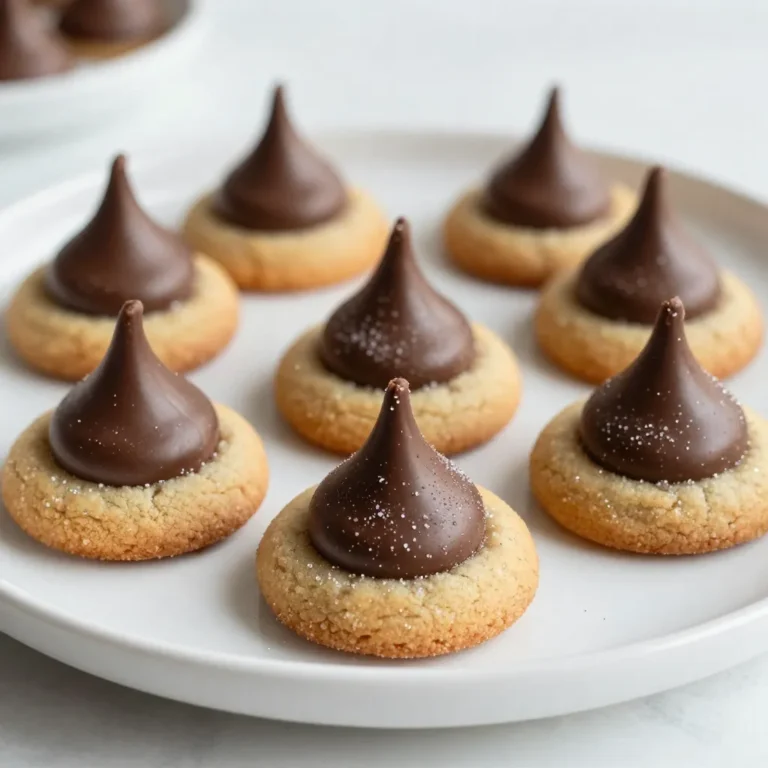
Peanut Butter Blossom Cookies Sweet and Simple Delight

- 1 cup all-purpose flour - 2 tablespoons sugar - 1 teaspoon baking powder - 1/2 teaspoon baking soda - 1/4 teaspoon salt - 1 ripe banana, mashed - 1 cup buttermilk (or substitute with milk + 1 tablespoon vinegar) - 1 large egg - 1 teaspoon vanilla extract - 2 tablespoons melted butter or coconut oil - 1/2 cup chocolate chips - Extra butter or coconut oil for greasing When making Chocolate Chip Banana Pancake Bites, using the right ingredients is key. Let’s break down what you need. For the dry mix, you will start with all-purpose flour. This gives the bites structure. Add sugar for sweetness. Baking powder and baking soda help them rise. A pinch of salt brings out the flavors. Now for the wet mix, grab a ripe banana. It should be mashed well. This adds moisture and natural sweetness. Use buttermilk for a rich taste. If you don’t have it, mix milk with vinegar as a substitute. Add a large egg for binding. A splash of vanilla extract gives a lovely aroma. Finally, include melted butter or coconut oil for richness. For the fun part, chocolate chips are essential. They melt to create pockets of chocolate joy. You’ll also want extra butter or oil to grease your cooking surface. This keeps the bites from sticking. With these ingredients, you can make a delicious treat that’s fun to share or enjoy alone! {{ingredient_image_1}} 1. Whisking dry ingredients: Start with a big bowl. Add 1 cup of all-purpose flour, 2 tablespoons of sugar, 1 teaspoon of baking powder, 1/2 teaspoon of baking soda, and 1/4 teaspoon of salt. Whisk these well until you see no lumps. This step helps the pancake bites rise nicely. 2. Mixing wet ingredients: In another bowl, mash 1 ripe banana until smooth. Add 1 cup of buttermilk, 1 large egg, 1 teaspoon of vanilla extract, and 2 tablespoons of melted butter. Stir this mix until everything is just combined. Don't worry if there are a few small banana bits. 3. Folding the batter: Now, pour the wet mix into the dry ingredients. Gently fold them together with a spatula. Stop when you see a few lumps. Overmixing can make your pancake bites tough. Then, carefully fold in 1/2 cup of chocolate chips. 1. Preheating the skillet: Heat a non-stick skillet over medium heat. Lightly grease it with butter or coconut oil. This helps keep the bites from sticking and allows them to cook evenly. 2. Portioning and cooking pancake bites: Use a tablespoon to drop small portions of batter onto the skillet. Make them about 1-2 inches in size. Cook for 2-3 minutes. You will know they are ready when bubbles start to form on top. 3. Flipping and finishing: Carefully flip each pancake bite. Cook for another 2-3 minutes until they turn golden brown. Repeat this until all the batter is cooked. Your kitchen will smell amazing! - Ideas for toppings: Serve these tasty bites warm. Add maple syrup, fresh banana slices, or a dollop of whipped cream on top. You can also sprinkle some extra chocolate chips if you like. - Optional side dishes: Pair them with fresh fruit or yogurt for a balanced meal. These pancake bites make a great breakfast or snack any time of the day! To get fluffy pancake bites, avoid overmixing your batter. When you stir, do it gently. It's okay to have some lumps. This keeps the texture light. Also, finding the right cooking temperature is key. If your skillet is too hot, the outside cooks too fast, leaving the inside raw. A medium heat works best for even cooking. You can add a pinch of cinnamon or nutmeg for extra warmth. These spices boost flavor without overpowering the banana. If you want to try something different, swap the chocolate chips for peanut butter chips or chopped nuts. These choices add a nice twist to your pancake bites. For thicker bites, use less buttermilk. For thinner bites, add a bit more. Pay attention to size, too. Smaller bites cook faster and are great for kids. When cooking, time is important. Each side should cook for about 2-3 minutes. Look for bubbles before flipping. This shows they are ready to turn. Pro Tips Use Ripe Bananas: The riper the banana, the sweeter and more flavorful your pancake bites will be. Look for bananas with brown spots for the best results. Don’t Overmix: When combining wet and dry ingredients, mix just until combined. Overmixing can lead to tough pancakes. Control the Heat: Make sure to preheat your skillet properly but avoid cooking on too high heat, as this can burn the outside while leaving the inside undercooked. Add Extra Flavor: Enhance your pancake bites by adding a pinch of cinnamon or nutmeg to the dry ingredients for a warm, spiced flavor. {{image_2}} You can make your pancake bites even better by adding nuts or seeds. Chopped walnuts or almonds add a nice crunch. You can try sunflower seeds for a fun twist. Using flavored chocolate chips is another great option. Try dark chocolate or mint chocolate chips for a special touch. If you need gluten-free options, use gluten-free flour instead of all-purpose flour. Many brands work well in this recipe. For dairy-free substitutions, use almond milk or oat milk. These work great in place of buttermilk. Incorporating seasonal fruits can add freshness to your bites. In summer, try adding diced strawberries or blueberries. During the fall, chopped apples and a pinch of cinnamon can make them festive. You can also top them with whipped cream or a drizzle of maple syrup for holidays. These toppings can bring joy to any meal. To store leftover pancake bites, let them cool first. Place them in an airtight container. Keep the container in the refrigerator. They stay fresh for about three days. Reheat them in a toaster or microwave when ready to eat. This method helps keep them soft and tasty. For long-term storage, you can freeze pancake bites. Place cooled bites on a baking sheet in a single layer. Freeze them for about two hours. Once firm, transfer them to a freezer bag. Remove as much air as possible. You can reheat them straight from the freezer. Just pop them in a toaster oven or microwave. To prevent sogginess, avoid stacking warm pancake bites. Let them cool completely before storing. Use a container that allows some air to flow. A glass or plastic container with a loose lid works well. This way, the moisture won’t build up. Keeping the bites from touching helps them stay fresh longer. To prevent sticking, use a non-stick skillet. Lightly grease it with butter or coconut oil. Make sure the pan is hot before adding the batter. This helps create a nice crust that won't stick. Yes, you can make the batter ahead of time. Store it in the fridge for up to 24 hours. Just give it a gentle stir before cooking. This keeps your pancake bites fresh and tasty. If you don't have buttermilk, use regular milk with vinegar. Mix 1 cup of milk with 1 tablespoon of vinegar. Let it sit for a few minutes. This creates a similar tangy flavor to buttermilk. Yes, these pancake bites freeze well. Let them cool completely, then place them in a zip-top bag. You can freeze them for up to a month. Reheat them in a toaster or microwave when you're ready to eat. To make these pancake bites sugar-free, skip the sugar in the batter. You can use ripe bananas for natural sweetness. Consider adding a sugar substitute if you want extra sweetness without sugar. This blog post covered how to make delicious pancake bites. We explored the right dry and wet ingredients. I shared simple steps for cooking and fun serving ideas. You learned tips for perfect texture and flavor, plus some tasty variations. Finally, we discussed storage to keep your pancake bites fresh. Now you have all the tools to create a fun breakfast treat. Enjoy your cooking adventure!

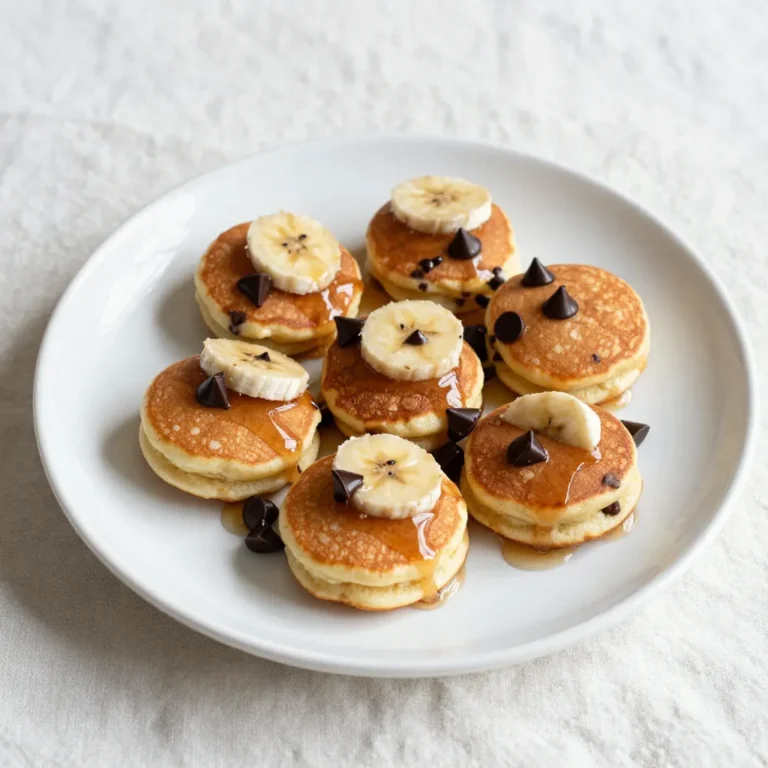
Chocolate Chip Banana Pancake Bites Easy Delight

- 1 lb large shrimp, peeled and deveined - 3 tablespoons honey - 4 cloves garlic, minced - 2 tablespoons soy sauce (or tamari for gluten-free) - 1 tablespoon olive oil - 1 teaspoon fresh ginger, grated - 1 tablespoon lemon juice - 1/4 teaspoon red pepper flakes (optional) - Salt and pepper to taste - 2 green onions, sliced (for garnish) - Cooked rice or quinoa, for serving The key to a great honey garlic shrimp skillet is fresh and simple ingredients. Start with large shrimp. These shrimp give a nice, meaty bite. Next, honey adds a sweet touch. It balances the salty soy sauce. Garlic brings a strong, rich flavor. You can use tamari if you're gluten-free. Olive oil helps cook the shrimp evenly. Fresh ginger adds warmth and zest. Lemon juice brightens the dish. Red pepper flakes give heat, but they are optional. Adjust this to your taste. Don’t forget salt and pepper to enhance all the flavors. Lastly, green onions add a fresh crunch when you serve. This dish pairs well with rice or quinoa. Both add a nice base for the shrimp. You can easily find these ingredients at your local store. They are common and affordable. Enjoy cooking this delicious meal! {{ingredient_image_1}} To start, gather your ingredients. In a medium bowl, combine: - 3 tablespoons honey - 4 cloves garlic, minced - 2 tablespoons soy sauce - 1 teaspoon fresh ginger, grated - 1 tablespoon lemon juice - 1/4 teaspoon red pepper flakes (optional) Mix these well. You want all the flavors to blend together nicely. This marinade will add a sweet and savory taste to your shrimp. Next, take 1 pound of peeled and deveined shrimp. Add the shrimp to the marinade. Make sure each shrimp gets coated well. This step is crucial for flavor. Let it marinate for 15 to 20 minutes. This allows the shrimp to soak up all the goodness from the marinade. Now it’s time to cook. Heat 1 tablespoon of olive oil in a large skillet over medium heat. Once the oil is hot, add the marinated shrimp along with the marinade. Cook the shrimp for 4 to 6 minutes. You'll know they’re done when they turn pink and opaque. Be careful not to overcook the shrimp. This can make them rubbery. After cooking, season with salt and pepper to taste. Cook for another minute to thicken the sauce slightly. This will give you a rich, glossy finish. Enjoy the delightful aroma as you prepare to serve! To get the best shrimp, avoid overcooking. Overcooked shrimp become rubbery and tough. Cook the shrimp for 2-3 minutes on one side. Once pink, flip them and cook another 2-3 minutes. This timing helps keep the shrimp tender. You can add more spices for extra flavor. Try adding a pinch of black pepper or a dash of sesame oil. Fresh herbs like cilantro or basil also brighten the dish. For sides, serve your shrimp over rice or quinoa. Steamed veggies or a crisp salad make great pairings. They balance the rich sauce and add color to your plate. Pro Tips Use Fresh Shrimp: For the best flavor and texture, always opt for fresh shrimp over frozen. If using frozen, be sure to thaw them properly before cooking. Don't Overcook: Shrimp cook quickly; overcooking can make them tough. Keep an eye on them and remove from heat as soon as they turn pink. Adjust Sweetness: Feel free to adjust the amount of honey to suit your taste preference. You can also substitute with maple syrup for a different flavor profile. Add Vegetables: For a more balanced meal, consider adding vegetables like bell peppers or snap peas to the skillet during the last few minutes of cooking. {{image_2}} You can easily make this dish gluten-free. Simply swap soy sauce for tamari. Tamari has a similar taste but contains no gluten. This small change keeps the flavor while making it safe for those with gluten sensitivities. Enjoy the same sweet and savory taste without worry. Want some heat? Adjust the amount of red pepper flakes. If you like things spicy, add more flakes. If you prefer a mild flavor, use less. This lets you customize the dish to your taste. You can make it as spicy as you like! You can mix in extra veggies or proteins to this dish. Consider adding bell peppers, snap peas, or broccoli for color and crunch. If you want more protein, try mixing in chicken or tofu. These options can make the meal heartier and more balanced. Experiment with what you have on hand for a fun twist! To keep your honey garlic shrimp fresh, store it in an airtight container. Make sure the shrimp cools before sealing. Place the container in the fridge to keep it safe. You can store shrimp for up to three days in the fridge. After that, the shrimp may lose taste and texture. Always check for any odd smell or color before eating. To reheat your shrimp, use a pan on low heat. Add a splash of water or broth to keep it moist. Heat it until warm, about 3-5 minutes. Avoid using a microwave, as it may make the shrimp rubbery. Make sure it warms evenly for the best flavor and texture. To know shrimp is cooked, look for its color. When shrimp turns pink, it is ready. The flesh also becomes opaque. You can also check the shape. Cooked shrimp curls into a loose "C." If it forms a tight "O," it may be overcooked. Always aim for that perfect pink hue. Yes, you can use frozen shrimp! Just make sure to thaw them first. Place the shrimp in cold water for about 15-20 minutes. Pat them dry before marinating. Frozen shrimp can save time and still taste great. Fresh shrimp is nice, but frozen works well in a pinch. Honey garlic shrimp pairs well with many sides. Here are some tasty ideas: - Cooked rice - Quinoa - Steamed broccoli - Stir-fried vegetables - A fresh salad These sides will balance the sweet and savory flavors of the shrimp. They make the meal more filling and fun! You can make honey garlic shrimp using simple steps. We reviewed the ingredients, cooking methods, and tips for perfecting your dish. Remember, marinate your shrimp for great flavor. Avoid overcooking to keep them tender. Try adding your favorite veggies or spices for a twist. Whether you serve it with rice or quinoa, this dish is sure to please. Store leftovers in the fridge and reheat gently to enjoy later. Dive into this tasty meal and savor each bite!

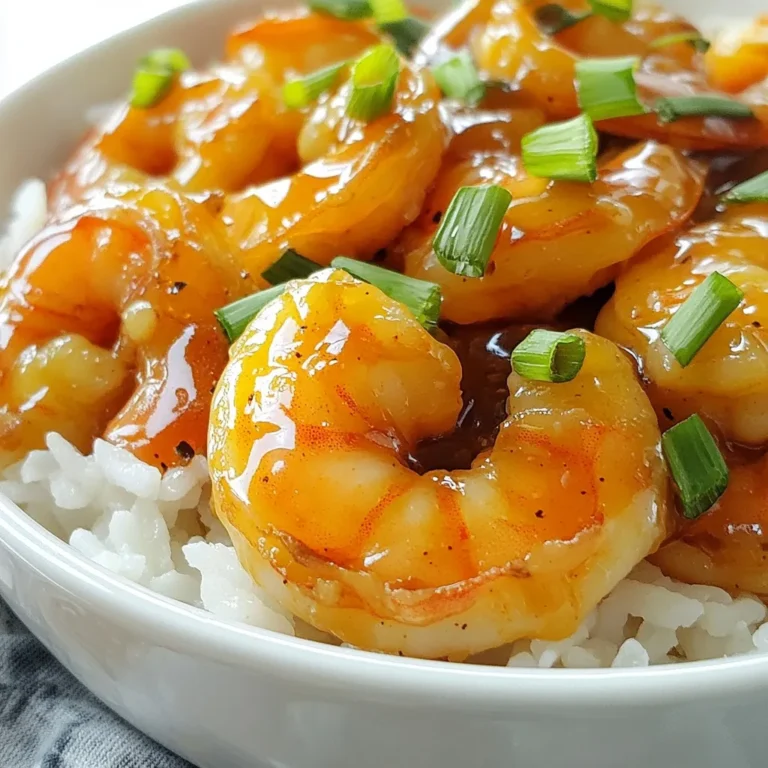
Honey Garlic Shrimp Skillet Easy and Flavorful Meal

Here’s what you need to make Loaded Guacamole Deviled Eggs: - 6 large eggs - 1 ripe avocado - 1 small tomato, diced - ¼ cup red onion, finely chopped - 1 small jalapeño, deseeded and minced - 2 tablespoons lime juice - ¼ cup fresh cilantro, chopped - Salt and pepper to taste - Optional toppings: crumbled feta cheese, sliced olives, or additional cilantro These ingredients bring a burst of flavor. The ripe avocado makes the filling smooth. You can adjust the spice by adding more jalapeño if you like it hot. Fresh cilantro adds a bright taste. Choose your favorite toppings to make these eggs your own. Crumbled feta gives a salty kick, while olives add a savory touch. Use these ingredients to create a dish that impresses your guests. {{ingredient_image_1}} First, you need to cover the eggs with water in a pot. Place the pot on the stove and bring the water to a boil. Once it boils, cover the pot and remove it from heat. Let the eggs sit in the hot water for 12 minutes. This method ensures your eggs are perfectly hard-boiled. After 12 minutes, it’s time to cool the eggs. Carefully transfer them to a bowl filled with ice water. Let them sit in the ice water for 5 minutes. This helps to stop the cooking and makes peeling easier. Once cooled, gently peel the shells off. Slice each egg in half lengthwise, and set the whites aside for later. Now, let’s get to the fun part! In a mixing bowl, scoop out the yellow yolks from the egg halves. Use a fork to mash the yolks until they are smooth. Next, add the ripe avocado to the mashed yolks. Mash them together until creamy. Then, mix in the lime juice, chopped cilantro, minced jalapeño, finely chopped red onion, and diced tomato. Don’t forget to season with salt and pepper to taste! Time to fill those egg white halves! You can either spoon the guacamole mixture into the egg whites or use a piping bag for a neat look. If you want a decorative finish, choose a piping bag with a star tip. This will make your Loaded Guacamole Deviled Eggs look even more appealing. To make your eggs pop, consider adding optional toppings. You might use crumbled feta cheese, sliced olives, or a sprinkle of extra cilantro. These toppings add flavor and enhance the presentation. Feel free to get creative with your garnishes! Lastly, refrigerate your Loaded Guacamole Deviled Eggs for at least 30 minutes before serving. This chilling time allows the flavors to meld together beautifully. When you serve them, your guests will enjoy a tasty treat that’s perfect for any party! To make sure your yolks are well-cooked, I suggest you follow these steps: - Use fresh eggs. They peel easier. - Place eggs in cold water. Bring the water to a boil. - Once boiling, cover the pot and turn off the heat. Let them sit for 12 minutes. To avoid the green rings around the yolks, cool the eggs quickly. After the 12 minutes, place them in ice water for five minutes. This stops the cooking process. For the best guacamole, you need to mash the avocado well. Here’s how: - Use a fork to mash the avocado. Aim for a creamy texture with some small chunks. - Add lime juice right away. It helps prevent browning and adds a fresh taste. Balance the flavors by adding salt and pepper. You can also mix in diced tomatoes and finely chopped onion for a tasty twist. Pair these deviled eggs with fun drinks. They go well with: - Sparkling water with lime - Light beers or margaritas For side dishes, try serving them with tortilla chips or a fresh salad. When it comes to plating, use a nice platter. Arrange the eggs in a circle. Top each egg with your choice of toppings to make them pop! Pro Tips Use Fresh Ingredients: Always opt for fresh avocados and vegetables to ensure the best flavor and texture in your deviled eggs. Adjust Spice Level: If you prefer a milder flavor, reduce the amount of jalapeño or remove the seeds completely before mincing. Chill for Flavor: Allow the filled eggs to chill in the refrigerator for at least 30 minutes before serving to let the flavors meld together. Presentation Matters: Use a piping bag fitted with a star tip for a beautiful and professional-looking presentation of the guacamole filling. {{image_2}} You can add more jalapeño or hot sauce for heat. If you love spice, add extra minced jalapeño. You can also mix in a few dashes of your favorite hot sauce. This twist makes the eggs bold and zesty. The creaminess of the avocado balances the spice. Try it at your next party for a fun kick! If you want a vegetarian option, substitute avocado with Greek yogurt. This swap still gives you a creamy texture. Greek yogurt adds a tangy flavor. You can also use silken tofu for a dairy-free choice. Both options make the deviled eggs lighter yet still delicious. Explore different toppings to create unique flavors. You can use crumbled feta cheese for a salty bite. Sliced olives add a briny note that meshes well with the guacamole. Fresh herbs like basil or dill can brighten up the taste. For seasonal flair, try adding roasted red peppers or even diced mango for sweetness. Get creative, and let your taste buds guide you! To store leftover deviled eggs, place them in an airtight container. Cover the eggs well to keep them fresh. They can stay in the fridge for up to three days. After that, the taste and texture may change. If you want to keep them longer, consider other methods. You can freeze these deviled eggs, but it is best to freeze only the filling. Egg whites don't freeze well and can become rubbery. To freeze the filling, scoop it into a safe freezer bag. Remove air and seal it tightly. You can store it for up to three months. When you're ready to use it, thaw it in the fridge overnight. If you prefer your deviled eggs warm, heat them gently. Place them on a microwave-safe plate. Cover them with a damp paper towel and warm them in short bursts. Start with 15 seconds, then check. Repeat until they reach your desired warmth. This method keeps them moist and prevents drying out. Enjoy your tasty treat! To make hard-boiled eggs easier to peel, use older eggs. Fresh eggs tend to stick to the shell. Start by covering the eggs with water and bringing it to a boil. Once boiling, cover the pot and remove it from the heat. Let the eggs sit for 12 minutes. After that, place them in ice water for 5 minutes. The shock helps separate the egg from the shell, making it easier to peel. Yes, you can make these Loaded Guacamole Deviled Eggs in advance. Prepare the eggs and filling separately. Store the egg whites in one container and the guacamole filling in another. This keeps the eggs fresh and the filling from browning. You can fill the eggs just before serving. This way, they stay creamy and tasty. The best avocado for guacamole is the Hass avocado. It has a dark, bumpy skin and is creamy and rich. Its flavor is smooth, making it perfect for dips. If you want a milder taste, you can try the Fuerte avocado. It has a green, smooth skin and is less creamy. Both are good, but Hass is my favorite. You can use store-bought guacamole for convenience. It saves time and effort. However, store-bought options may lack freshness. They can also have added preservatives or flavors. If you want the best taste, I recommend making your own. Fresh ingredients give a better flavor and texture. Deviled eggs can sit out for about two hours at room temperature. After that time, bacteria can grow, making them unsafe to eat. If it’s hot, keep them out for only one hour. To keep them fresh longer, place them on ice. This helps maintain a safe temperature. Yes, Loaded Guacamole Deviled Eggs are gluten-free. All the ingredients, like eggs and avocado, contain no gluten. They are safe for anyone with gluten sensitivities. Always check the labels if you use any pre-made ingredients. These Loaded Guacamole Deviled Eggs are easy to make and fun to serve. We covered ingredients, step-by-step instructions, and tips for the perfect dish. You can customize them with flavors and toppings to suit any gathering. Remember, practice helps improve your technique. Store leftovers properly to enjoy them later. Have fun experimenting and sharing this delicious recipe with friends and family!

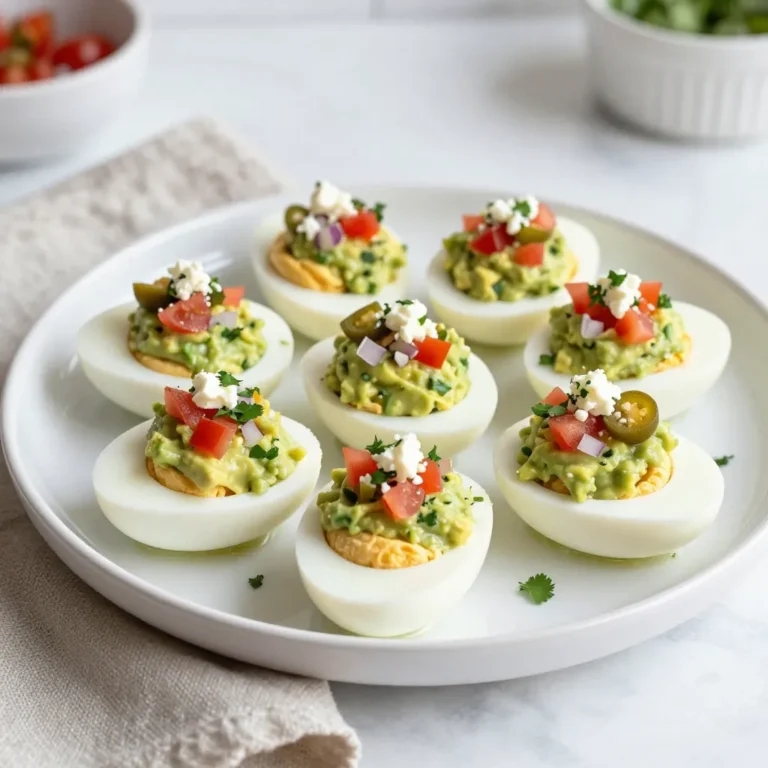
Loaded Guacamole Deviled Eggs Perfect for Parties

PREV 1 2 3 4 … 86 NEXT
tasty trail blazer

explore

DessertsDinnerAppetizersDrinks

Our Policies

  • Cookie Policy
  • Copyright Policy
  • Disclaimer
  • GDPR Policy
  • Terms Of Use
Back to Top
  • About
  • Contact Us
  • Privacy Policy
© 2026 tasty trail blazer