FREE DINNER EBOOK! Get your copy!
  • Cookie Policy
  • GDPR Policy
  • Disclaimer
  • Terms Of Use
  • Visit my other site: Fun Cookie Recipes
tasty trail blazer
  • Home
  • Dinner
  • Desserts
  • Drinks
  • Appetizers
  • Contact
  • About
  • Privacy Policy
  • Home
  • Dinner
  • Desserts
  • Drinks
  • Appetizers
  • Contact
  • About
  • Privacy Policy
  • Cookie Policy
  • GDPR Policy
  • Disclaimer
  • Terms Of Use
Visit my other site: Fun Cookie Recipes

HOME / CATEGORIES /

Latest

- 1 cup rolled oats - 1 cup almond milk (or any milk of choice) - 1 tablespoon chia seeds - 1 tablespoon maple syrup (or honey) - 1 teaspoon ground cinnamon - 1/2 teaspoon ground ginger - 1/4 teaspoon ground cardamom - 1/4 teaspoon ground cloves - Pinch of black pepper - 1/2 teaspoon vanilla extract - Fresh fruit toppings (like sliced bananas or berries) - Optional: nuts or seeds for crunch These ingredients create a warm and cozy breakfast. Rolled oats are the base. They soak up the milk overnight. Almond milk adds a nutty flavor, but you can use any milk you like. Chia seeds help thicken the oats and add healthy fiber. Chai spices bring the magic! Each spice adds its own unique taste. Cinnamon gives warmth. Ginger adds a little kick. Cardamom and cloves provide depth. Black pepper gives it a surprising twist. Maple syrup or honey sweetens the oats. You can adjust the sweetness to your taste. Vanilla extract rounds out the flavors nicely. For toppings, fresh fruits like berries or bananas add color and nutrition. Nuts or seeds add a satisfying crunch. Feel free to mix and match these toppings based on your mood or what you have available. Get your ingredients ready, and you’ll be set for a tasty breakfast! {{ingredient_image_1}} First, grab a mixing bowl. Add 1 cup of rolled oats, 1 cup of almond milk, and 1 tablespoon of chia seeds. Stir well. Make sure the oats and chia seeds mix evenly. Next, add 1 tablespoon of maple syrup, 1 teaspoon of ground cinnamon, 1/2 teaspoon of ground ginger, 1/4 teaspoon of ground cardamom, and 1/4 teaspoon of ground cloves. Don’t forget a pinch of black pepper and 1/2 teaspoon of vanilla extract. Mix until all the spices blend in. Now it’s time to cover the bowl. You can also use individual mason jars for easy storage. Seal them tightly to keep the oats fresh. Place the bowl or jars in the fridge. Let them chill overnight or for at least 6 hours. This helps the oats soak up the milk and flavors. When you wake up, it’s time to enjoy your oats! Open the jar or bowl and give the mixture a good stir. If you want a creamier texture, add a splash of almond milk. Now, it’s time for toppings! Add fresh fruit like sliced bananas or berries. You can also sprinkle some nuts or seeds on top for a nice crunch. Enjoy your tasty chai spice overnight oats! To get creamy oats, soak them for at least 6 hours. This time lets the oats absorb the milk and chia seeds. If you want a softer mix, add a splash more milk before serving. This helps reach your perfect creaminess. You can switch up sweeteners if you like. Try honey or agave syrup instead of maple syrup. Each will give a nice twist to your oats. Also, use different types of milk. Coconut milk adds a tropical taste, while oat milk offers a creamy texture. For a fun look, layer your toppings. Start with oats, then add fruit, and finish with nuts or seeds. Use jars for a cute serving option. They make breakfast easy to grab and go. Bowls work too if you prefer. Enjoy making your oats look as good as they taste! Pro Tips Soak Longer: For an even creamier texture, soak the oats for longer than 6 hours—overnight is ideal! Spice It Up: Feel free to adjust the spice levels to your taste. Add more ginger or cinnamon for a stronger flavor. Mix and Match: Experiment with different milk alternatives, like coconut or oat milk, for unique flavors. Top It Right: Use seasonal fruits for toppings to enhance flavor and nutrition—berries and bananas are great choices! {{image_2}} You can change up your chai spice overnight oats with fun flavors. Try chocolate chai overnight oats for a sweet twist. Just mix in some cocoa powder. The rich taste pairs well with the chai spices. You will love this blend of warmth and sweetness. Next, think about pumpkin spice overnight oats. It’s simple! Add pumpkin puree and a bit of nutmeg. This flavor feels like fall in a bowl. You can feel cozy and satisfied with every bite. If you need gluten-free options, use gluten-free oats. They work just like rolled oats. You will still get that creamy texture. For non-dairy alternatives, swap almond milk for coconut milk or oat milk. Each milk adds a unique taste. Choose what you like best! Holiday-inspired flavors can take your oats to the next level. Try adding eggnog or a dash of nutmeg for a festive touch. It brings the spirit of the season to your breakfast. In summer, pair your oats with fresh fruit. Chopped peaches or berries give a bright taste. The sweet fruit makes each bite refreshing and light. You can enjoy the changing seasons with these simple swaps! To keep your chai spice overnight oats fresh, choose glass mason jars or airtight containers. These options seal well and help maintain flavor. Store your oats in the refrigerator for up to five days. This way, you can enjoy a tasty breakfast throughout the week. If you have leftover oats, freezing is a great option. Pour the oats into freezer-safe containers or bags. Make sure to leave some space for expansion as they freeze. To thaw, simply move your oats to the fridge overnight. When ready to eat, reheat in the microwave or on the stove until warm. Always check for signs of spoilage. Look for changes in texture or smell. If the oats smell sour or have a strange look, it’s best to throw them away. Proper sealing is key to keeping your overnight oats safe. Always make sure containers are tightly closed to avoid air exposure and bacteria growth. You can use quick oats, but the texture will change. Quick oats cook faster and become mushy. Rolled oats stay chewy and hold their shape better. If you choose quick oats, let them soak less time. You can keep overnight oats in the fridge for up to five days. To keep them fresh, store them in airtight containers. If you see any signs of spoilage, like a sour smell or mold, discard them. Yes, you can easily make these oats vegan. Just use almond milk or any plant-based milk. Instead of honey, use maple syrup or agave nectar for sweetness. Both options taste great! Absolutely! You can make a big batch for the week. Just layer the oats in jars. Seal them tightly and store them in the fridge. This way, you have breakfast ready to go every morning! You can now make delicious chai spice overnight oats with ease. We explored the key ingredients, step-by-step instructions, and creative variations. You learned how to store your oats safely and keep them fresh. Remember to adjust flavors and textures to your liking. These oats are perfect for breakfast or a quick snack. Enjoy the endless options and get creative! Your taste buds will thank you.

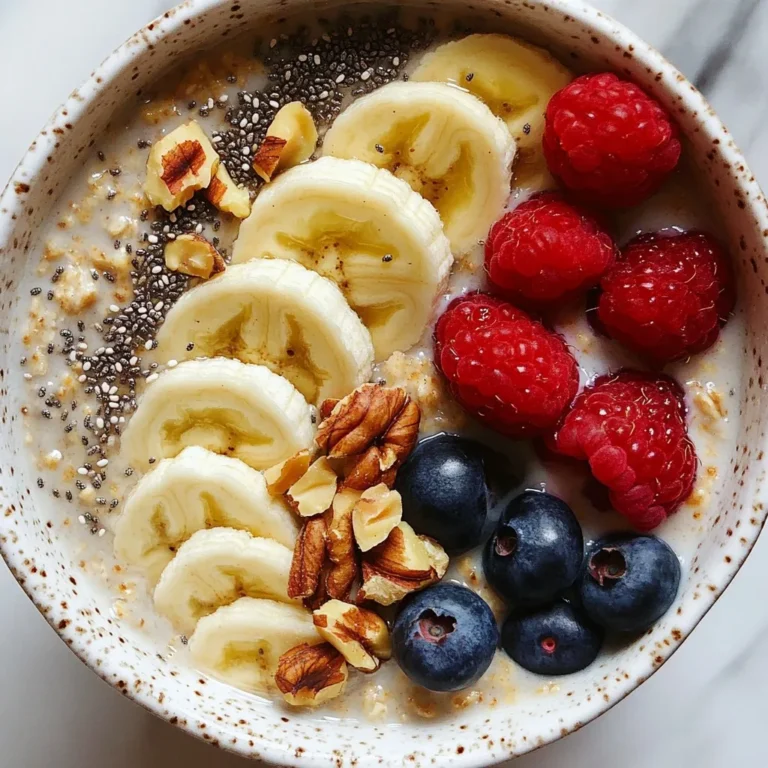
Chai Spice Overnight Oats Simple and Tasty Recipe

When making Raspberry White Chocolate Scones, you need fresh, simple ingredients. Each one plays a key role in creating that perfect scone. Here’s what you will need: - 2 cups all-purpose flour - 1/2 cup granulated sugar - 1 tablespoon baking powder - 1/2 teaspoon salt - 1/4 cup unsalted butter, cold and cubed - 1/2 cup heavy cream - 1 large egg - 1 teaspoon vanilla extract - 1 cup fresh raspberries (or frozen) - 1/2 cup white chocolate chips - 1 egg wash (1 egg beaten with a splash of water) Each ingredient has a purpose. The flour gives structure, while the sugar adds sweetness. Baking powder helps the scones rise, and salt enhances flavors. Cold butter creates a crumbly texture, and heavy cream adds richness. The egg serves as a binder, while vanilla brings warmth. Fresh raspberries and white chocolate bring a delightful twist. Using frozen raspberries works too, just keep them slightly frozen before mixing. This helps them hold their shape. Each bite of these scones is a burst of flavor, balancing sweet chocolate with tart berries. {{ingredient_image_1}} - Preheat your oven to 400°F (200°C). - Line a baking sheet with parchment paper. This keeps the scones from sticking. - In a large bowl, whisk together the flour, sugar, baking powder, and salt. - Make sure these dry ingredients mix well. This helps the scones rise nicely. - Add the cold, cubed butter to your flour mix. - Use a pastry cutter or your fingers to blend the butter until it looks crumbly. This step is key for a flaky texture. - In a separate bowl, whisk together the heavy cream, egg, and vanilla extract. - Make sure this mixture is smooth before adding it to the dry mix. - Pour the cream mixture into the flour mixture. Stir gently until just combined. - Fold in the fresh raspberries and white chocolate chips. Be careful not to crush the berries. - Turn the dough onto a floured surface and gently knead it. - Shape the dough into a disc about 1-inch thick. Cut it into 8 wedges like a pizza. - Place the wedges on the prepared baking sheet. Brush the tops with the egg wash for a nice finish. - Bake for 15-18 minutes. Look for a light golden color on top. A toothpick should come out clean when inserted. - Let the scones cool on the baking sheet for about 5 minutes. Then, transfer them to a wire rack. To get the best scone texture, avoid overmixing the dough. When you mix too much, the scones can turn tough. Mix just until the ingredients come together. This keeps them light and flaky. Using cold butter is also key. Cold butter creates small pockets of air. These air pockets give your scones a nice rise and soft texture. So, always cube your butter and keep it cold until you're ready to use it. An egg wash gives your scones a beautiful golden finish. It adds shine and color to the tops. To make your egg wash, beat one egg with a splash of water. Brush this mixture over the scones before baking. This small step ensures they bake up nice and shiny. It makes them look more appealing and helps with the overall texture too. Serve your Raspberry White Chocolate Scones warm for the best flavor. You can dust them with powdered sugar for some extra sweetness. Pair them with clotted cream or your favorite jam. Fresh raspberries on the side add a nice touch. Enjoy them with a cup of tea or coffee for a lovely treat. These simple additions elevate your scone experience. Pro Tips Use Cold Ingredients: Make sure your butter and cream are cold to achieve a flaky texture in your scones. Don’t Overmix: Mix the dough just until combined to keep the scones tender and light. Fresh vs. Frozen Raspberries: If using frozen raspberries, do not thaw them before mixing to prevent the dough from becoming soggy. Egg Wash for Shine: Brushing the tops with egg wash before baking gives your scones a beautiful golden color. {{image_2}} You can play with flavors in these scones. Here are some fun ideas: - Nuts: Add chopped walnuts or pecans for crunch. - Citrus Zest: A bit of lemon or orange zest adds brightness. - Spices: A dash of cinnamon or nutmeg can warm up the flavor. - Dried Fruits: Consider adding dried cranberries or cherries for extra sweetness. These add-ins can change the taste and make your scones unique. Feel free to mix and match! You can change the sweetness to fit your taste. If you like it less sweet, cut the sugar to 1/3 cup. For sweeter scones, add an extra tablespoon of sugar. Remember, the white chocolate also adds sweetness. Taste the dough before baking for the best result. This way, you control how sweet your scones are. If you need a gluten-free version, you can still enjoy these scones. Use gluten-free all-purpose flour instead of regular flour. Make sure it has xanthan gum or add 1/2 teaspoon for better texture. You might need to adjust the liquid slightly. Start with the same amount of cream and add more if the dough feels dry. This way, you can savor these treats without gluten! To keep your scones fresh, wrap them in plastic wrap. Place them in an airtight container. This helps lock in moisture and flavor. Store them at room temperature for up to two days. For longer storage, consider the freezer. You can freeze both baked scones and unbaked dough. For baked scones, let them cool completely first. Then, wrap each scone in plastic wrap and place them in a freezer bag. They can last for about three months in the freezer. If you want to freeze the dough, shape it into wedges before wrapping. You can bake them straight from the freezer; just add a few extra minutes to the baking time. To reheat scones, preheat your oven to 350°F (175°C). Place the scones on a baking sheet. Heat for about 10 minutes, or until warm. This method keeps them soft and flaky. Avoid using a microwave, as it can make them tough. Enjoy your scones warm for the best taste! Yes, you can use frozen raspberries! They work great in scones. Just remember to adjust the recipe slightly. First, do not thaw them before use. Adding them straight from the freezer prevents them from becoming mushy. You might want to reduce mixing time to avoid overworking the dough. This keeps your scones light and fluffy. Look for a few signs to check if your scones are done. They should be lightly golden on top. Insert a toothpick into a scone; it should come out clean. If you see wet batter, they need more time. Lastly, give them a gentle tap. If they sound hollow, they’re ready to come out of the oven! Absolutely! You can swap white chocolate for dark or milk chocolate. Dark chocolate will add a richer flavor. Milk chocolate will make it sweeter and creamier. Each type brings a unique taste to your scones, so feel free to experiment! You learned how to make delicious Raspberry White Chocolate Scones. We covered key ingredients like flour, butter, and fresh raspberries. You now know the crucial steps, from mixing to baking, to get perfect scones. Plus, I shared tips for texture and serving to elevate your treat. Don't forget variations and storage tips for longer enjoyment. Now, it’s time to bake and impress your friends and family with these tasty scones!

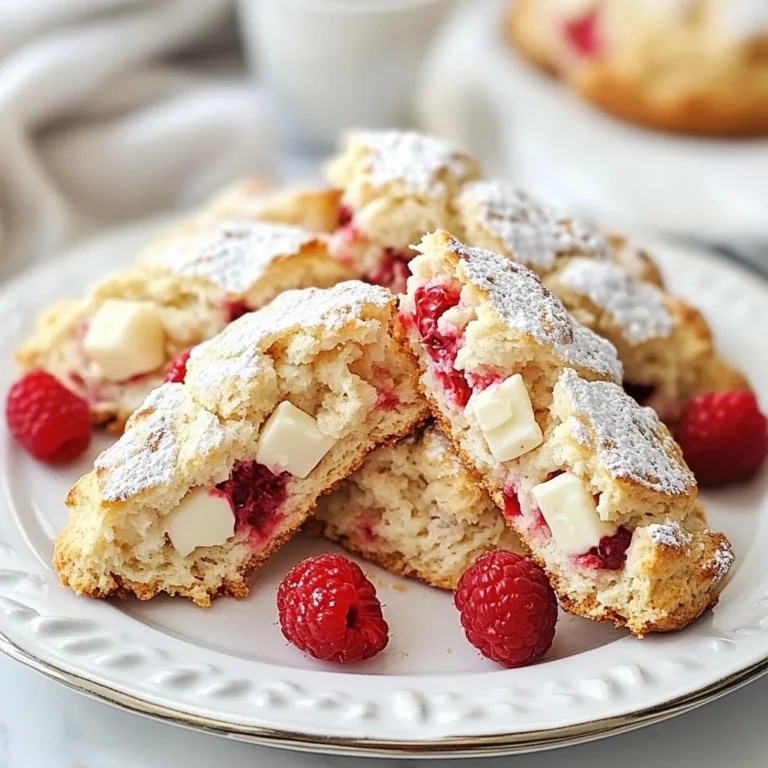
Raspberry White Chocolate Scones Freshly Baked Delight

To make this dish, you need a few main items. Here’s what you will need: - 4 salmon fillets (about 6 ounces each) - 3 tablespoons olive oil - 3 cloves garlic, minced - Juice and zest of 2 lemons - 1 teaspoon dried oregano - 1 teaspoon smoked paprika - Salt and pepper to taste These ingredients provide a great blend of flavors. The salmon is the star, while garlic and lemon enhance its taste. The marinade is key to the dish. It adds depth and flavor. Here’s what goes into the marinade: - Olive oil - Minced garlic - Lemon juice - Lemon zest - Dried oregano - Smoked paprika - Salt and pepper Mix these together to create a tasty sauce. It keeps the salmon moist and flavorful while baking. The right veggies make this dish colorful and healthy. Here’s what I recommend: - 1 cup cherry tomatoes, halved - 1 bell pepper (red or yellow), sliced - 1 zucchini, sliced These veggies cook well and add a nice crunch. They soak up the marinade, adding extra flavor to the meal. You can also choose other vegetables if you like! {{ingredient_image_1}} First, gather all your ingredients. You need four salmon fillets, olive oil, garlic, lemons, and spices. The veggies include cherry tomatoes, a bell pepper, and a zucchini. Next, preheat your oven to 400°F (200°C). Line a large sheet pan with parchment paper. This helps with easy cleanup later. In a small bowl, whisk together three tablespoons of olive oil, minced garlic, juice and zest of two lemons, oregano, smoked paprika, salt, and pepper. You now have a zesty marinade. Place the salmon fillets in the center of the sheet pan. Pour half of the marinade over the salmon. Make sure it coats the fillets well. In a large bowl, toss the halved cherry tomatoes, sliced bell pepper, and zucchini with the remaining marinade. Mix until all the veggies get coated. Arrange your veggies around the salmon on the sheet pan. Make sure they are spread out. This helps them cook evenly. Bake in the preheated oven for about 15-20 minutes. The salmon should be cooked through and flake easily with a fork. The veggies need to be tender and colorful. Once they are done, carefully remove the sheet pan from the oven. Let it sit for a couple of minutes to cool down. Garnish the salmon and veggies with chopped fresh parsley. This adds a pop of color and taste. Serve the dish right from the sheet pan for a casual feel. You can pair this meal with rice or a green salad for a complete dinner. Enjoy the fresh flavors and the ease of clean-up! To get tender salmon, choose fresh fillets. Look for bright color and firm texture. Before you cook, let the salmon sit at room temperature for about 15 minutes. This helps it cook evenly. When baking, don’t overcook it. Salmon is perfect when it flakes easily with a fork. Aim for an internal temperature of 145°F (63°C). To boost flavor, try adding fresh herbs like dill or thyme. A splash of white wine in the marinade adds depth, too. If you like heat, add red pepper flakes. They give a nice kick. For a zesty twist, use lime juice instead of lemon. You can also experiment with different spices, like cumin or coriander. For an eye-catching dish, arrange the salmon and veggies on a large platter. Sprinkle fresh parsley on top for color. Serve with lemon wedges for a fresh touch. Pair it with a simple green salad or some crusty bread. This meal looks great and tastes even better! Pro Tips Fresh Ingredients: Always use fresh, high-quality salmon and vegetables for the best flavor and texture. Marinate Time: For even more flavor, let the salmon marinate in the refrigerator for 30 minutes before cooking. Even Cooking: Ensure the vegetables are cut to similar sizes to promote even cooking and uniform tenderness. Garnish for Flavor: Don't skip the fresh parsley garnish; it adds a burst of freshness and color to the dish. {{image_2}} You can change up the veggies in this dish. Try using asparagus, broccoli, or carrots. These options bring new flavors and textures. They also cook well with the salmon. Always cut veggies to a similar size for even cooking. Roasting them adds a nice crunch. Mixing up the marinade can add fun twists. Try adding honey for sweetness or Dijon mustard for a tangy kick. You can also swap lemon juice for lime juice. For an Asian touch, use soy sauce and ginger. Each choice gives the dish a new vibe. If you want to mix cooking methods, try grilling the salmon. Just marinate it as usual, then place it on the grill. This gives a smoky flavor that’s hard to beat. You can also use an air fryer for a crispy finish. Just adjust the time to about 10-15 minutes. This keeps the salmon moist while cooking quickly. After enjoying your meal, let the salmon cool. Place leftovers in an airtight container. Store the container in the fridge. Your lemon garlic salmon will stay fresh for up to three days. Keep the veggies with the salmon for best taste. To reheat your salmon, preheat the oven to 350°F (175°C). Place the salmon and veggies on a baking sheet. Cover them with foil to keep moisture in. Heat for about 10-15 minutes until warm. You can also use the microwave. If using the microwave, heat in short bursts for about 1-2 minutes. Check to make sure it's warm all the way through. If you want to freeze the salmon, wrap each fillet tightly in plastic wrap. Place the wrapped fillets in a freezer bag. This way, they won’t get freezer burn. You can freeze the salmon for up to three months. When ready to eat, thaw it overnight in the fridge before reheating. Yes, you can use frozen salmon. Just thaw it first in the fridge. This helps the salmon cook evenly. If you're in a hurry, you can thaw it in cold water for about 30 minutes. Once thawed, you can follow the recipe as usual. Keep in mind that cooking time may vary slightly. Always check for doneness. You have many tasty options to serve with lemon garlic salmon. Here are a few ideas: - Rice or quinoa for a filling side. - A fresh green salad to add crunch. - Roasted potatoes for a hearty touch. - Steamed broccoli for a healthy option. - Crusty bread to soak up the sauce. These sides balance the flavors and make your meal complete. You can tell when salmon is done by its color and texture. Perfectly cooked salmon is light pink and flakes easily with a fork. Use a fork to gently press down on the thickest part. If it flakes apart, it’s done. The internal temperature should reach 145°F (63°C) for safe eating. If you have a meat thermometer, this is the best way to check. Enjoy your perfectly cooked salmon! This blog post covered how to cook salmon with various ingredients and methods. We discussed main ingredients, marinades, and veggie options. I provided step-by-step instructions for prep, cooking, and serving. You learned tips to enhance texture and flavor and explored fun variations. Finally, we talked about how to store leftovers and answered common questions. Take these ideas to delight your taste buds and impress your guests!

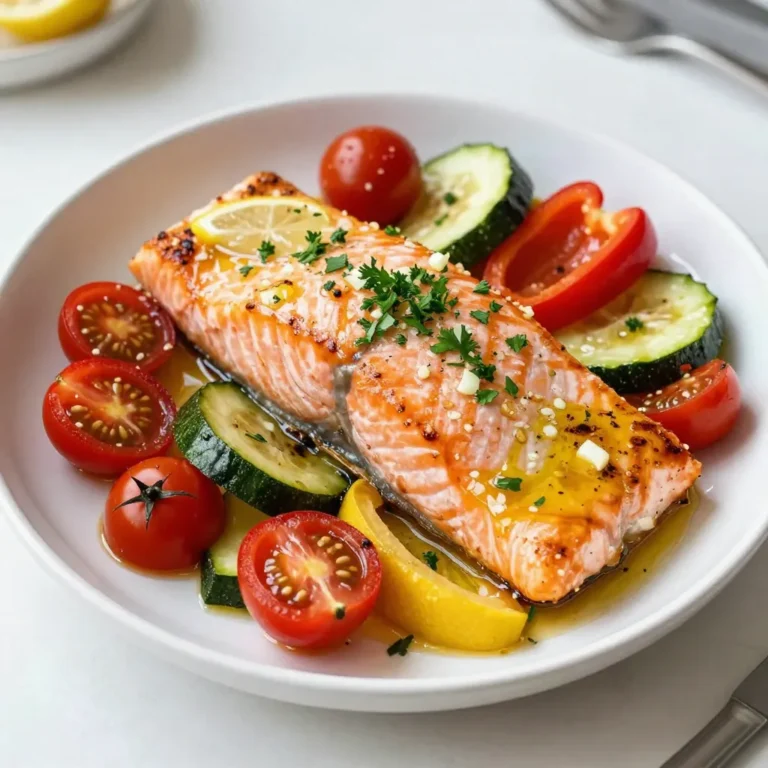
Sheet Pan Lemon Garlic Salmon Flavorful and Easy Meal

To make chocolate-covered pretzel rods, you will need a few simple items. Each ingredient adds flavor and fun to this treat. - 12 pretzel rods - 1 cup dark chocolate chips - 1 tablespoon coconut oil - 1/2 cup colorful sprinkles - 1/4 cup crushed nuts (such as peanuts or almonds) - Sea salt for sprinkling (optional) The pretzel rods provide a crunchy base. Dark chocolate chips bring rich sweetness. Coconut oil helps the chocolate melt smoothly. Colorful sprinkles and crushed nuts add a fun touch. A sprinkle of sea salt can enhance the flavor balance. Gather these ingredients before you start. It makes the process easy and fun! {{ingredient_image_1}} First, grab a baking sheet. Line it with parchment paper or a silicone mat. This makes it easy to lift the pretzel rods later. It also keeps them from sticking. Make sure you have enough space for all the rods. Next, get a microwave-safe bowl. Add 1 cup of dark chocolate chips and 1 tablespoon of coconut oil. The coconut oil helps the chocolate melt smoothly. Microwave the bowl in 30-second bursts. Stir after each burst until the chocolate is fully melted and shiny. Now, it’s time to coat the pretzel rods. Dip each pretzel rod into the melted chocolate. Make sure to cover it well. Let the extra chocolate drip off. This step is key for a nice coating. While the chocolate is still wet, it’s time to decorate. You can roll the rods in colorful sprinkles or crushed nuts. This makes them look fun and tasty. Make sure to coat them evenly for the best look. Once you finish coating all the pretzel rods, place them on the lined baking sheet. If you like, sprinkle a tiny bit of sea salt on top for a sweet and salty taste. Put the baking sheet in the fridge for about 30 minutes. This helps the chocolate set hard. When done, you can take them out and enjoy! To get a smooth chocolate coating, use coconut oil. Mix it with your chocolate chips. This helps the chocolate melt evenly. Heat your mixture in short bursts. Stir often to keep it silky. If the chocolate gets too thick, add a little more coconut oil. I love using dark chocolate chips for this recipe. They provide a rich taste. You can also use milk or white chocolate if you prefer. Just make sure it's good quality. Quality chocolate melts better and tastes great. Get creative with your toppings! Use colorful sprinkles for a fun look. Crushed nuts add a nice crunch. You can mix and match toppings for variety. Try adding a drizzle of melted chocolate on top too. It makes them look fancy. Serve these pretzel rods on a nice platter. They make great snacks for parties. You can also wrap them in clear bags for gifts. They are fun for kids’ parties or movie nights. Enjoy them fresh or store them for later! Pro Tips Use Quality Chocolate: Choose high-quality dark chocolate chips for a richer flavor and smoother melting. Experiment with Toppings: Try different toppings such as crushed cookies or coconut flakes for unique flavor combinations. Keep Chocolate Warm: If the chocolate starts to harden, microwave it for a few seconds to re-melt for easy dipping. Storage Tips: Store the pretzel rods in a cool, dry place to keep the chocolate from melting. {{image_2}} You can change up the flavor of your chocolate-covered pretzel rods. Here are some fun ideas: - White Chocolate Covered: Use white chocolate chips instead of dark chocolate. This gives a sweet, creamy taste. You can also add fun toppings like crushed candies or nuts. The color looks great too! - Milk Chocolate with Sea Salt: Melt milk chocolate chips for a classic treat. When you coat the pretzel rods, sprinkle a bit of sea salt on top. This adds a nice salty crunch that balances the sweetness. - Peanut Butter Drizzle: After coating your pretzel rods in chocolate, melt some peanut butter. Drizzle it over the chocolate for a rich, nutty taste. It adds flavor and looks amazing! You can also make these pretzel rods fit different diets. Here are some options: - Gluten-Free Options: Use gluten-free pretzel rods. Many brands offer tasty choices that keep the crunch. Just check the label to make sure. - Vegan Alternatives: For a vegan treat, use dairy-free chocolate chips. You can find these at most stores. Pair them with vegan toppings like nuts or seeds for a delicious snack. These variations let you enjoy chocolate-covered pretzel rods in many ways! Store your chocolate-covered pretzel rods in an airtight container. This keeps them fresh. Place parchment paper between layers if you stack them. This prevents sticking and keeps them pretty. Chocolate-covered pretzel rods last about two weeks at room temperature. Keep them away from heat or direct sunlight. If you want them to last longer, refrigerate them. They can stay fresh for about three weeks in the fridge. You can freeze these delicious treats for up to three months. Wrap each pretzel rod in plastic wrap. Then, place them in a freezer-safe bag. When you want to enjoy them, let them thaw at room temperature. This keeps them tasty without losing their crunch. Chocolate-covered pretzel rods last about one week when stored properly. Keep them in an airtight container. Store them in a cool, dry place. If you keep them in the fridge, they may last a bit longer. However, the pretzels might get a little soft. Yes, you can use different types of chocolate! Milk chocolate, white chocolate, or even flavored chocolate work well. Each type gives a unique taste. Try mixing chocolates for fun flavors. Just make sure to melt them the same way. Many toppings can make your pretzel rods special. Here are some great options: - Colorful sprinkles - Crushed nuts (like peanuts or almonds) - Mini chocolate chips - Crushed cookies - Coconut flakes These toppings add texture and flavor. Get creative and mix and match! Making gluten-free pretzel rods is simple. Just find gluten-free pretzel rods at your store. For vegan options, use dairy-free chocolate. Many brands offer good dark chocolate or vegan chocolate chips. Always check the labels to ensure they fit your diet. You learned how to make delicious chocolate-covered pretzel rods in this post. I shared the key ingredients, step-by-step instructions, and helpful tips. You can even explore fun variations and storage options. Now you can enjoy these tasty treats anytime. Experiment with flavors and toppings to make them your own. Get creative and share them with friends and family. Making these treats is simple and fun! Enjoy your sweet creation!

Chocolate Covered Pretzel Rods Simple and Fun Treat

To make a tasty Sesame Ginger Noodle Salad, gather these fresh ingredients: - 8 oz soba noodles - 1 cup shredded carrots - 1 cucumber, julienned - 1 bell pepper (red or yellow), thinly sliced - 1 cup edamame (cooked and shelled) - 2 green onions, thinly sliced - 1/4 cup sesame seeds (toasted) - 1/4 cup fresh cilantro, chopped These ingredients bring color and crunch to the dish. The soba noodles are the base, while the veggies add nutrition. Edamame gives protein, and sesame seeds add a nutty flavor. The dressing ties this salad together. You will need: - 1/4 cup sesame oil - 2 tablespoons soy sauce (or tamari for gluten-free) - 1 tablespoon grated fresh ginger - 1 tablespoon rice vinegar - 1 tablespoon honey or maple syrup - 1 teaspoon garlic, minced - Salt and pepper to taste This dressing is simple yet full of flavor. The sesame oil and soy sauce bring depth, while ginger adds a zing. Honey or maple syrup balances the saltiness. Feel free to customize your salad with these extras: - Chopped bell peppers or other colorful veggies - Sliced radishes for extra crunch - Fresh herbs like mint or basil - Protein options like grilled chicken or tofu These optional ingredients let you tailor the salad to your taste. You can add more veggies or proteins to make it a full meal. {{ingredient_image_1}} Start by boiling water in a pot. Once it boils, add 8 ounces of soba noodles. Cook them according to the package directions, usually about 6-8 minutes. When they finish cooking, drain the noodles in a colander. Rinse them under cold water to stop the cooking. This helps them stay firm. Place the noodles in a large mixing bowl and set them aside. Now, let’s add some color and crunch. Take 1 cup of shredded carrots and add them to the bowl. Next, slice 1 cucumber into thin strips, known as julienne. Add this to the bowl as well. Then, take 1 bell pepper, either red or yellow, and slice it thinly. Toss this in, too. For protein, add 1 cup of cooked and shelled edamame. Finally, chop 2 green onions and mix everything gently. In a small bowl, we will make the dressing. Start with 1/4 cup of sesame oil. Add 2 tablespoons of soy sauce or tamari if you need it gluten-free. Then, add 1 tablespoon of grated fresh ginger. This gives a nice kick. Next, pour in 1 tablespoon of rice vinegar and 1 tablespoon of honey or maple syrup for sweetness. Add 1 teaspoon of minced garlic and a pinch of salt and pepper. Whisk it all together until smooth. Now, it’s time to bring it all together. Drizzle the dressing over the noodle and vegetable mix. Toss everything together gently until all the noodles and veggies are well-coated. Just before serving, sprinkle 1/4 cup of toasted sesame seeds and 1/4 cup of chopped cilantro on top. Let the salad sit for about 10-15 minutes. This helps the flavors blend well. Enjoy your fresh and easy Sesame Ginger Noodle Salad! To cook soba noodles, follow the package directions carefully. Use plenty of water to let them move freely. Once they soften, drain them right away. Rinse under cold water to stop cooking. This keeps them from getting sticky. Always taste them to ensure they are just right. Perfectly cooked noodles are key to a great salad. To boost flavor, use fresh ingredients. Fresh ginger adds a bright kick. A good quality sesame oil makes a big difference too. Don’t forget to taste your dressing as you mix. Adjust salt and pepper to your liking. You can also add a splash of lime juice for extra zing. This small change can elevate your salad to a new level. For a stunning display, serve your salad in a large bowl or plate it individually. Sprinkle extra sesame seeds on top for a nice crunch. Fresh cilantro adds a pop of color. A lime wedge on the side brings a fresh touch. This simple act of garnishing makes your dish more appealing and fun to eat. Pro Tips Use Cold Water for Noodles: Rinsing the soba noodles under cold water not only stops the cooking process but also helps to keep them from becoming sticky. Fresh Ingredients Matter: Opt for fresh vegetables and herbs to enhance the flavor and nutritional value of your salad. Customize Your Veggies: Feel free to add or substitute other veggies like bell peppers, radishes, or snap peas based on your preference or what you have on hand. Let It Rest: Allowing the salad to sit for 10-15 minutes before serving helps the flavors to meld beautifully. {{image_2}} If you want a gluten-free dish, swap the soba noodles for rice noodles. Rice noodles taste great and stay light. For the dressing, use tamari instead of soy sauce. This change keeps the flavor rich without gluten. Always check labels to ensure your ingredients are gluten-free. Adding protein makes this salad more filling. You can use grilled chicken for a tasty option. Cook the chicken, slice it, and mix it in. Tofu is another great choice. Use firm tofu, pan-fry it, and add it to the salad. Both options work well with the sesame ginger flavors. For a vegan dish, replace honey with maple syrup. This keeps the sweetness without using animal products. You can also add chickpeas for extra protein. They add texture and a nutty flavor. These changes keep your salad vegan and delicious! After you enjoy your Sesame Ginger Noodle Salad, store any leftovers in an airtight container. This keeps the salad fresh for up to three days. You want to ensure the dressing is well mixed with the noodles and veggies before sealing it. If you separate the dressing, it helps keep the noodles from getting soggy. This salad tastes best cold. If you prefer to reheat it, do so gently. Use a microwave on low power for about 30 seconds. Stir the salad and check the warmth. Be careful not to overheat, as the flavors can change. You can also serve it at room temperature if you like. For meal prep, you can prepare the noodles and veggies ahead of time. Store them in separate containers. This way, you can mix them with the dressing when you are ready to eat. The salad stays crisp, and the flavors stay fresh. You can make the dressing up to a week ahead. Just store it in the fridge in a sealed jar. You can store Sesame Ginger Noodle Salad in the fridge for up to three days. Keep it in an airtight container. The flavors will stay fresh and tasty. However, the vegetables may lose some crunch over time. To keep them crisp, add the dressing just before serving. Yes, you can make the dressing ahead of time. In fact, I often do this for convenience. Store it in the fridge for up to one week. The flavors blend well when it sits. Just give it a quick stir before using it on your salad. Sesame Ginger Noodle Salad pairs well with many dishes. You can serve it with grilled chicken or shrimp for extra protein. It also goes great with spring rolls or dumplings. If you want a lighter meal, enjoy it on its own. The salad is filling and satisfying. Absolutely! While soba noodles are my favorite, you can use other types. Try rice noodles for a gluten-free option. You can also use whole wheat spaghetti or even zucchini noodles for a low-carb choice. Just remember to adjust cooking times as needed. This blog post covers all you need for a tasty Sesame Ginger Noodle Salad. We explored the main ingredients, dressing, and options for customization. I provided step-by-step instructions to help you prepare and combine everything. We also shared tips to enhance flavor and suggestions for a nice presentation. You can even find variations for gluten-free, protein-rich, or vegan meals. Storage and reheating tips ensure your salad stays fresh. Enjoy making this dish your own and savor the flavors!

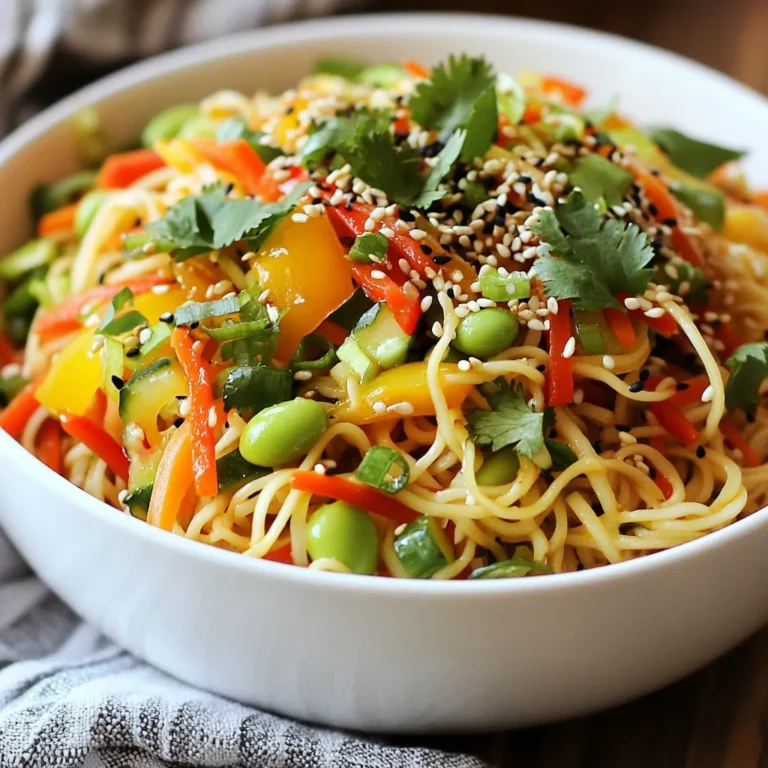
Savory Sesame Ginger Noodle Salad Fresh and Easy Dish

To make this dish, you need some key ingredients. Here’s what you need: - 2 boneless, skinless chicken breasts - 2 tablespoons Cajun seasoning - 1 tablespoon olive oil - 8 oz fettuccine pasta - 1 cup heavy cream - 1 cup chicken broth - 1 cup bell peppers (red, yellow, and green), sliced - 1 small onion, diced - 3 cloves garlic, minced - ½ cup grated Parmesan cheese - Salt and pepper to taste - Chopped parsley for garnish These ingredients come together to create a dish full of flavor and creaminess. While the essential ingredients are great, you can add more for extra flavor. Consider these options: - Fresh herbs like thyme or basil - A squeeze of lemon for brightness - Red pepper flakes for added heat - Spinach or mushrooms for more veggies Adding these can make your pasta even more delicious. You don’t always have to stick to the list. Here are some substitutions: - Chicken can be swapped for shrimp or sausage. - Fettuccine can change to penne or any pasta you like. - Use low-fat milk instead of heavy cream for a lighter sauce. - Vegetable broth works if you need a meat-free option. These swaps keep the dish versatile and fun to make. {{ingredient_image_1}} Start by rubbing Cajun seasoning on the chicken breasts. Make sure each piece is well coated. Let the chicken sit for about 10-15 minutes. This step allows the spices to soak in and boosts the flavor. Next, boil a large pot of salted water. Once it's rolling, add the fettuccine pasta. Cook it according to the package instructions until it is al dente. Reserve ½ cup of the pasta water before draining the rest. Set the pasta aside for later. In a large skillet, heat olive oil over medium-high heat. Add the seasoned chicken breasts and cook them for about 6-7 minutes on each side. You want them fully cooked, reaching an internal temperature of 165°F (75°C). Once done, take the chicken out and let it rest. Slice it into strips after it cools. In the same skillet, add diced onion and sliced bell peppers. Sauté them for about 4-5 minutes until soft. Then, add minced garlic and sauté for another minute. This creates a tasty base for your sauce. Pour chicken broth into the skillet and let it simmer gently. Lower the heat and stir in heavy cream. Let it thicken for about 2-3 minutes. Add grated Parmesan cheese and stir until it melts into the sauce. This will give your dish a rich and creamy texture. Now, add the cooked fettuccine to the skillet with the sauce. Toss everything together until the pasta is well coated. If the sauce seems too thick, add a bit of the reserved pasta water to reach your desired consistency. Don't forget to season with salt and pepper to taste. Plate the creamy Cajun chicken pasta and top it with the sliced chicken. For a fresh touch, garnish with chopped parsley. This dish not only looks great but also tastes amazing! Enjoy every creamy, spicy bite. To make the sauce just right, keep these tips in mind: - Use heavy cream as it gives a rich texture. - Start with chicken broth to add depth. - Let the sauce simmer gently to thicken. - If it’s too thick, add the reserved pasta water little by little. - Stir well after each addition to check the texture. This will help you get a creamy and smooth sauce that clings to the pasta. Perfect chicken is vital for this dish. Here’s how I do it: - Use boneless, skinless chicken breasts for quick cooking. - Coat the chicken with Cajun seasoning evenly. - Let it rest after seasoning for better flavor. - Cook over medium-high heat, about 6-7 minutes per side. - Use a meat thermometer to check for 165°F (75°C) inside. These steps ensure juicy and flavorful chicken every time. Boosting flavor is easy with a few extras: - Add more Cajun seasoning for heat and zest. - Try fresh herbs like thyme or basil for freshness. - A squeeze of lemon juice brightens the dish. - Consider adding a dash of smoked paprika for depth. These tips help you create a dish that surprises your taste buds. Pro Tips Rest the Chicken: Allowing the seasoned chicken to rest for 10-15 minutes before cooking helps the flavors penetrate deeper and results in a juicier texture. Adjust the Creaminess: If you prefer a lighter sauce, you can substitute half of the heavy cream with Greek yogurt or sour cream for a tangy twist. Customizable Veggies: Feel free to add or substitute your favorite vegetables like zucchini or mushrooms to enhance the dish's flavor and nutrition. Leftover Storage: Store any leftovers in an airtight container in the fridge for up to 3 days. Reheat gently on the stove, adding a splash of chicken broth to revive the sauce. {{image_2}} You can make this dish vegetarian by swapping chicken for veggies. Use mushrooms, zucchini, and spinach for a tasty mix. Just sauté the veggies until they are soft. Then follow the same sauce steps. This option keeps the creamy goodness while being meat-free. Fettuccine is classic, but many noodles work well. You can try penne, bowtie, or even whole wheat. Each type changes the vibe a bit. For a gluten-free option, look for rice or chickpea pasta. Each noodle adds its own charm to the dish. Cajun seasoning packs a punch, but you can adjust the heat. If you love spice, add more seasoning. If you prefer mild flavors, use less. You can also add a pinch of cayenne pepper for a kick. For a touch of sweetness, mix in some bell peppers. Adjust until it feels just right for you! To keep your creamy Cajun chicken pasta fresh, let it cool first. Place it in an airtight container. Store it in the fridge for up to three days. Make sure to label the container with the date. This way, you know when to eat it. When ready to eat, reheat the pasta gently. Use a skillet over low heat. Add a splash of chicken broth or cream to keep it creamy. Stir often until it's warm. Avoid the microwave, as it can dry out the dish. You can freeze this dish for later. Put the cooled pasta in a freezer-safe container. It can last up to three months in the freezer. When you're ready to eat, thaw it overnight in the fridge. Reheat as mentioned above for the best taste. You can use half-and-half, milk, or coconut cream instead of heavy cream. Each will change the taste slightly, but they work well. If you want a thicker sauce, add a bit of flour or cornstarch. This will help create that creamy texture we all love. To make this dish gluten-free, swap the fettuccine for gluten-free pasta. Look for brands made from rice or quinoa. Be sure to check the Cajun seasoning too. Some blends may contain gluten. Always read the labels to be sure. Yes, you can use shrimp, sausage, or even tofu. Shrimp cooks fast and adds a nice flavor. Sausage brings a spicy kick, while tofu makes it vegetarian. Adjust the cooking time based on what you choose. This way, you can enjoy different flavors each time. When reheating creamy pasta, use low heat on the stove. Add a splash of chicken broth or water to keep it moist. Stir often to prevent sticking. You can also use the microwave, but do it in short bursts. This way, you won't lose that creamy goodness. In this article, you learned about making creamy Cajun chicken pasta. We covered key ingredients, seasoning, and cooking steps. I shared tips for perfect texture and flavor. You can create variations, like a vegetarian option, to suit your taste. Remember, leftovers can be stored and reheated well with a few simple tricks. Enjoy crafting this dish your way, and share it with others. Cooking is fun, so get creative and make it yours!

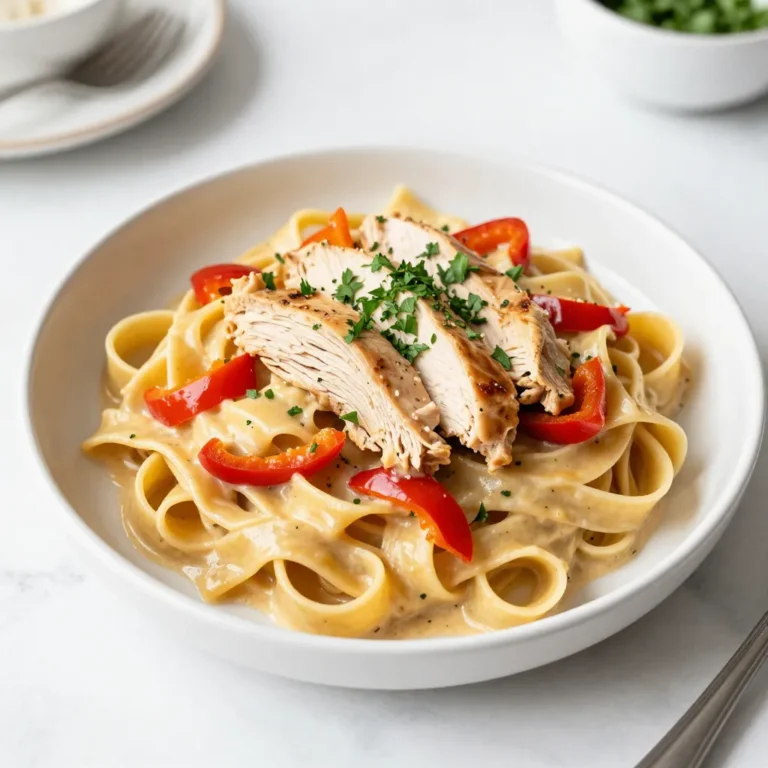
Creamy Cajun Chicken Pasta Flavorful and Easy Dish

To make Coconut Mango Chia Pudding, you need a few simple ingredients. Each one adds flavor and texture to the dish. Here’s what you will need: - 1 cup coconut milk - 1/2 cup almond milk - 1/4 cup chia seeds - 2 tablespoons honey or maple syrup (adjust to taste) - 1 ripe mango, diced - 1 teaspoon vanilla extract - A pinch of salt - Optional toppings: shredded coconut, sliced almonds, or mint leaves Coconut milk gives a rich, creamy base. Almond milk adds a nice nutty taste. Chia seeds are key for thickening the pudding. You can sweeten it with honey or maple syrup, based on your taste. The mango brings a fresh, fruity touch. Vanilla extract adds warmth and depth. A little salt enhances all the flavors. For toppings, think about shredded coconut or sliced almonds for crunch. Mint leaves add a bright finish. With these ingredients, you create a delightful and refreshing treat. {{ingredient_image_1}} Making Coconut Mango Chia Pudding is easy and quick. Gather all your ingredients first. This way, you stay organized and enjoy the process. The total time needed is just about 2 hours. Most of this time is for refrigeration. 1. Start by mixing the coconut milk, almond milk, and vanilla extract in a bowl. 2. Next, add the chia seeds, honey, and salt. Whisk well to avoid clumps. 3. Cover the bowl and let it sit for 10 minutes. This helps the chia seeds start absorbing liquid. 4. After 10 minutes, stir the mixture again. This prevents the seeds from sticking together. 5. Cover the bowl once more and place it in the fridge. Let it chill for at least 2 hours, or overnight for best texture. 6. When you are ready to serve, remove the pudding from the fridge. Stir it well to mix everything. 7. Layer the pudding in serving glasses, adding diced mango in between layers. Aim for 2-3 layers for a nice look. 8. Finally, top with shredded coconut, sliced almonds, or mint leaves if you like. The chia seeds need time to soak up the liquid. This is key to getting the right pudding texture. A minimum of 2 hours in the fridge will do. For the best results, let it sit overnight. This way, you enjoy a creamy and thick pudding. To get that creamy pudding texture, use the right chia seeds. I recommend using whole chia seeds. When you mix them with the liquid, they absorb it and swell. Stir the mixture after 10 minutes to keep the seeds from clumping. Refrigerate for at least two hours. This helps the seeds absorb more liquid. The longer you let it sit, the thicker it gets. For a smoother texture, blend the mixture before chilling. Adding sweetness is all about your taste. Start with two tablespoons of honey or maple syrup. Taste the mix, and add more if needed. Remember, the mango adds natural sweetness too! If you want it less sweet, use less syrup. You can also try using agave for a lighter touch. The right ratio is key for perfect pudding. Use 1/4 cup of chia seeds to 1 1/2 cups of liquid. This gives you the right thickness. Too many seeds will make it too thick, while too few will keep it runny. Adjust this ratio based on how thick or thin you like your pudding! Pro Tips Use Fresh Mango: For the best flavor, choose a ripe mango that gives slightly when pressed. It should be sweet and fragrant. Chill Overnight: For a thicker and creamier texture, refrigerate the chia pudding overnight instead of just 2 hours. Experiment with Sweeteners: You can substitute honey or maple syrup with agave syrup or stevia for a different sweetness profile. Layering Technique: When layering, use clear glasses to showcase the beautiful colors and textures of the pudding and mango. {{image_2}} You can easily make this pudding dairy-free. Use only coconut milk for a rich taste. Almond milk adds creaminess too. You can also try oat milk or cashew milk. Each will give a unique twist to the taste. Want to spice it up? Add a pinch of cinnamon or nutmeg for warmth. You can also try cardamom for a fragrant touch. Vanilla extract is a must, but a few drops of almond extract can boost flavor. Experiment and find what you love! Toppings make this pudding fun and tasty. Shredded coconut adds a nice crunch. Sliced almonds give a nutty flavor. Fresh mint leaves add a burst of color and freshness. You can also try fresh berries for a tart contrast. Mix and match to create your perfect treat! Store any leftover coconut mango chia pudding in a sealed container. This keeps it fresh. Place it in the fridge for quick access. Enjoy it within three days for the best taste. You can freeze chia pudding if you want to save it for later. Pour it into airtight containers. Leave some space at the top for expansion. This helps prevent freezer burn. When ready to eat, thaw it in the fridge overnight. Each ingredient has a different shelf life: - Coconut milk: Use within a week after opening. - Almond milk: Lasts about 7-10 days after opening. - Chia seeds: Store in a cool, dry place. They can last for 2-3 years. - Honey or maple syrup: These sweeteners last indefinitely. - Fresh mango: Use within a few days when ripe. Unripe mangoes can last longer. - Vanilla extract: Keeps for years if stored properly. - Salt: No expiration, but keep it dry. Knowing how to store leftovers and ingredients helps you enjoy this tasty treat longer! Yes, you can use many fruits. Berries like strawberries and blueberries work great. You can also try bananas or kiwi for a fun twist. The key is to pick ripe fruits for the best flavor. Just dice them up and layer them in your pudding. This pudding lasts about 4 to 5 days in the fridge. Make sure to store it in a sealed container. If you notice any separation, just stir it up before serving. It’s easy to grab for a quick snack or breakfast! Yes, chia pudding is very healthy. Chia seeds are full of fiber, protein, and omega-3s. They help keep you full and support digestion. Coconut milk and almond milk add healthy fats and vitamins. Overall, this pudding is a tasty way to eat better. This blog shared great tips for making a tasty chia pudding. We covered key ingredients like coconut milk and mango. I walked you through the simple steps to prepare it and how to achieve the best texture. Remember, you can customize flavors and toppings to suit your taste. Store your pudding well to keep it fresh. Now, you have everything you need to enjoy chia pudding at home. Dive in and have fun experimenting with flavors!

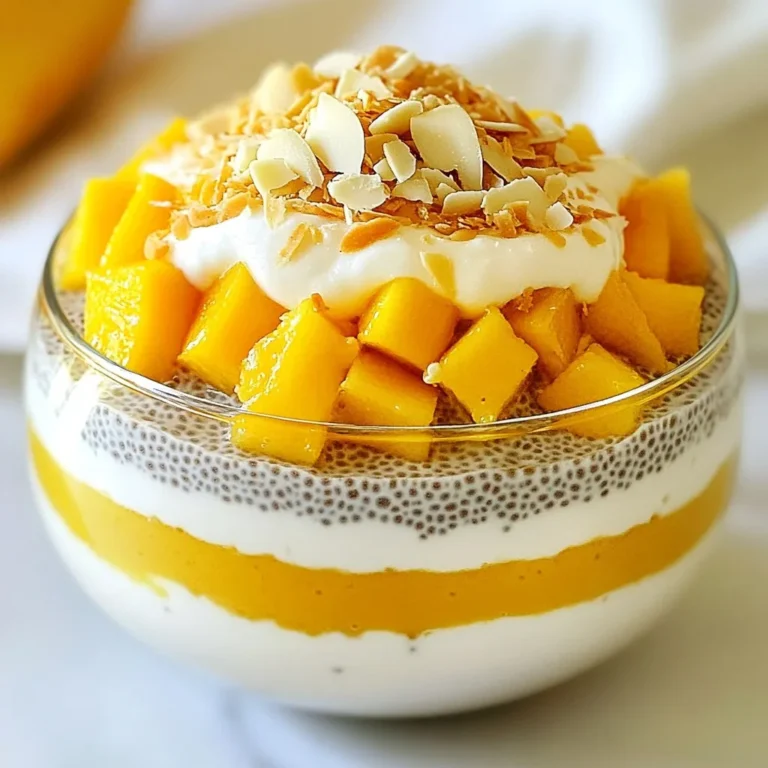
Coconut Mango Chia Pudding Refreshing and Easy Recipe

- 1 cup cream cheese, softened - 1/2 cup plain Greek yogurt - 1/4 cup powdered sugar - 1 teaspoon vanilla extract These main ingredients create a base that is rich and creamy. The cream cheese gives a thick texture. Greek yogurt adds tanginess and helps balance the sweetness. Powdered sugar sweetens the dip without being grainy, while vanilla extract adds warmth and flavor. - 1 cup fresh strawberries, hulled and diced (plus extra for garnish) - Fresh mint leaves for garnish Fresh strawberries bring color and a burst of flavor. They make the dip taste like a real dessert. The mint leaves not only look pretty but also add a fresh taste that lifts the whole dish. - 1/4 cup graham cracker crumbs - Assorted dippers (graham crackers, pretzels, apple slices, vanilla wafers) Graham cracker crumbs give a bit of crunch on top. They mimic the crust of a cheesecake. You can choose dippers based on your taste. Graham crackers are classic, but pretzels add a salty bite. Apple slices bring a crisp freshness, and vanilla wafers add sweetness. {{ingredient_image_1}} Start by beating the cream cheese until smooth. Use a hand mixer or whisk. This step is key for a creamy dip. Once smooth, mix in the Greek yogurt, powdered sugar, and vanilla extract. Blend until everything is well combined. This will create a rich and tasty base for your dip. Next, gently fold in the diced fresh strawberries. This adds sweetness and color to your dip. Be careful not to mash the strawberries too much. You want some pieces to stay intact. This keeps the dip interesting and gives it great texture. Now, transfer your dip to a serving bowl. Smooth the top with a spatula for a nice finish. Sprinkle the graham cracker crumbs evenly on top. This adds a crunchy layer that pairs well with the creamy dip. Finally, garnish with extra diced strawberries and fresh mint leaves. This makes your dip look beautiful. Serve it right away with assorted dippers, like graham crackers or apple slices. Enjoy this easy and fun treat! You can make this dip ahead of time. Just mix it up and chill it for a bit. This helps the flavors blend well. Store it in an airtight container in the fridge. It stays fresh for about three days. If you want it to last longer, avoid adding strawberries until serving. Softened cream cheese is key for this dip. It makes mixing easy and gives a smooth texture. If your cream cheese is cold, it will be hard to mix. Let it sit out for about 30 minutes before mixing. When you add the strawberries, fold them in gently. This keeps some chunks intact for a nice texture. You can adjust the sweetness to fit your taste. Start with the 1/4 cup of powdered sugar. Then, taste and add more if you like it sweeter. If you want a healthier option, try honey or maple syrup instead of powdered sugar. Just remember, these will change the flavor a bit. Pro Tips Use Room Temperature Cream Cheese: For a smoother and creamier dip, ensure your cream cheese is at room temperature before mixing. Customize Your Dippers: Experiment with different dippers like chocolate-covered pretzels or fruit skewers for added variety and fun. Make It Ahead: Prepare the dip a few hours in advance and store it in the refrigerator to let the flavors meld together. Fresh Strawberries Are Key: Use ripe, in-season strawberries for the best flavor and sweetness in your dip. {{image_2}} You can add a splash of lemon or lime juice for a zesty twist. This brightens the dip and enhances the strawberry flavor. If you want more fruity fun, try adding blueberries or raspberries. Both fruits mix well with the strawberries and add extra color. For dippers, think about seasonal fruits like sliced peaches or cherries in summer. These fresh fruits bring a sweet touch to each bite. If you need gluten-free options, try rice cakes, or veggie sticks. They provide a nice crunch and pair well with the creamy dip. You can lighten up the dip by using low-fat cream cheese or Greek yogurt. These swaps keep it creamy while cutting calories. If you want less sugar, try sugar substitutes like stevia or erythritol. They blend well and help keep the sweetness. You can keep your strawberry cheesecake dip in the fridge for about 3 to 5 days. Make sure you store it in an airtight container. This helps keep the dip fresh and tasty. If you use a bowl, cover it tightly with plastic wrap or a lid. This way, you prevent air from making it dry or spoil. Yes, you can freeze this dip! To freeze, place it in a freezer-safe container. Leave some space at the top for expansion. When you're ready to enjoy it, take the dip out and let it thaw in the fridge overnight. This keeps the texture smooth. Stir it gently before serving to mix it well again. To tell if the dip has gone bad, look for changes in color or smell. If the dip looks or smells off, it's best to toss it. You should also check for any mold on the surface. If you see any, do not eat it. Freshness is key for this creamy treat! Yes, you can use low-fat cream cheese and yogurt. However, it may change the taste and texture. Low-fat options might not be as creamy. They can be a bit tangy, which may affect the overall flavor. If you want a rich taste, stick with full-fat products. The dip lasts about three days in the fridge. Be sure to keep it in an airtight container. After three days, the dip may lose its texture and taste. If you see any signs of spoilage, like a sour smell, it’s best to throw it away. You can use crushed cookies, like vanilla wafers or digestive biscuits. Crushed pretzels also add a nice salty crunch. Oats or almond flour can work too for a gluten-free option. Just choose what you like best for your topping! This blog post shared a simple, tasty strawberry cheesecake dip recipe. We looked at the main ingredients and steps to make it. I also shared tips for prepping ahead and customizing the dip. You can even try healthier options or alternative dippers. In the end, enjoy making this dip for your next get-together or snack. It's easy and fun, and you'll impress your friends! Dive into the mix of flavors, and bring joy to every bite.

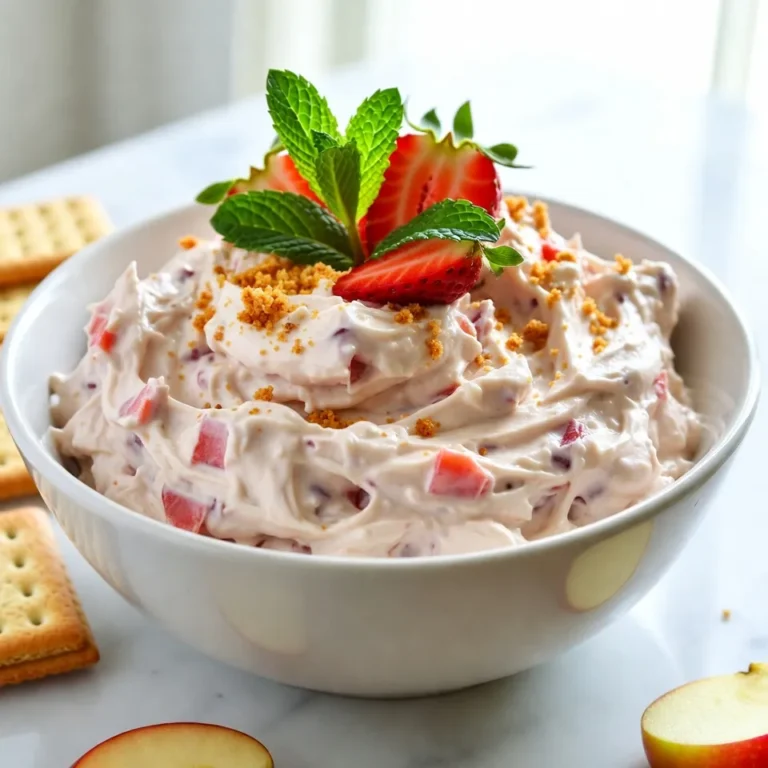
Strawberry Cheesecake Dip Creamy and Easy Treat

To make Chicken Parmesan Stuffed Shells, gather these main ingredients: - 20 jumbo pasta shells - 2 cups cooked chicken, shredded - 1 cup ricotta cheese - 1 cup mozzarella cheese, grated - 1/2 cup Parmesan cheese, grated - 1 cup marinara sauce (plus extra for topping) These ingredients bring together a blend of flavors and textures. The jumbo pasta shells hold the filling perfectly. The cooked chicken adds a hearty touch. Creamy ricotta, melty mozzarella, and sharp Parmesan create a cheesy delight. Next, you need some seasoning to boost the flavor: - 1 teaspoon garlic powder - 1 teaspoon dried Italian herbs (oregano, basil, thyme) - Salt and pepper to taste The garlic powder adds warmth. Dried Italian herbs bring a fresh, aromatic taste. Salt and pepper enhance all the flavors. This mix makes every bite tasty. For a finishing touch, consider these garnishes: - Fresh basil leaves - Extra marinara sauce for topping Fresh basil adds a pop of color and freshness. A drizzle of marinara sauce on top gives a nice contrast. These extras make your dish look great and taste even better. {{ingredient_image_1}} - Preheat your oven to 375°F (190°C). - Cook the jumbo pasta shells until they are al dente. Follow the package instructions. Drain them and set aside. - In a large mixing bowl, combine the shredded chicken, ricotta cheese, half of the mozzarella, and half of the Parmesan. - Sprinkle in the garlic powder, dried Italian herbs, salt, and pepper. Mix it all well until smooth and creamy. - Spread about 1/2 cup of marinara sauce on the bottom of a 9x13 inch baking dish. - Take each cooked pasta shell and stuff it with about 2-3 tablespoons of the chicken mixture. Place them in the baking dish, opening side up. - Pour the remaining marinara sauce over the stuffed shells. Make sure they are well coated. - Top it all off with the rest of the mozzarella and Parmesan cheese. - Cover the baking dish with aluminum foil. This helps the shells cook evenly. Bake for 20 minutes. - After 20 minutes, remove the foil. Bake for another 10-15 minutes. The cheese should be bubbly and golden brown. To make your Chicken Parmesan Stuffed Shells great, cook the shells until they are al dente. This means they should be firm but not hard. If they are too soft, they can break when you stuff them. Aim for about 9 minutes of boiling time. The right cheese ratios are key too. Use equal parts mozzarella and Parmesan in the filling for a rich taste. The mozzarella melts well, while Parmesan gives a nice flavor. Mix them well to ensure every bite is cheesy and tasty. Add spices or herbs to the filling for more flavor. I like using garlic powder and dried Italian herbs like oregano, basil, or thyme. These spices make the chicken taste fresh and lively. You can also mix in some chopped spinach for added nutrients and color. Using a homemade marinara sauce can elevate your dish. Store-bought sauce is fine, but making your own adds a personal touch. Simmering tomatoes, garlic, and herbs creates a deep flavor that complements the stuffed shells perfectly. Cover the baking dish with foil while baking. This step traps steam and helps the shells heat evenly. After 20 minutes, remove the foil to let the cheese get golden and bubbly. Baking times are crucial for a perfect meal. Bake covered for 20 minutes, then uncovered for 10-15 more. Check that the cheese is fully melted and slightly browned. This gives you that cheesy, gooey texture everyone loves. Pro Tips Choose the Right Pasta: Opt for high-quality jumbo shells to ensure they hold the filling well and provide a satisfying bite. Make Ahead: Prepare the stuffed shells in advance and refrigerate them before baking. This allows the flavors to meld together beautifully. Extra Cheese: For an extra cheesy experience, mix in additional cheeses like provolone or gouda into the filling or sprinkle on top. Garnish for Freshness: Always finish with fresh basil or parsley to enhance presentation and add a burst of freshness to the dish. {{image_2}} You can change up the protein in this dish. Ground turkey or beef works well. For a vegetarian option, try using cooked mushrooms or lentils. These swaps keep the dish hearty and delicious. Different cheese combinations can also add flavor. If you don't have ricotta, cottage cheese is a great substitute. You can mix in some feta for a tangy twist. Feel free to experiment with different blends of cheese. This recipe shines with marinara sauce, but you can get creative. Pesto adds a fresh, herbal flavor that pairs nicely with chicken. Alfredo sauce gives a creamy texture that many love. You can also try different marinara sauces. Look for spicy varieties for a kick or sweet ones for a milder taste. Each sauce can change the whole dish's vibe, so explore what works for you. These stuffed shells are great as a main dish. Pair them with a fresh side salad for a balanced meal. A nice Caesar or garden salad can add crunch and color to your plate. Garlic bread is another fantastic option. The crispy, buttery bread complements the cheesy shells perfectly. You can serve these shells as an appetizer too, cutting them into smaller portions for sharing. Enjoy them any way you like! After a delicious meal, store any leftovers in airtight containers. This keeps them fresh and prevents odors. You can eat them within three to four days. When reheating, use the oven for best results. Heat them at 350°F (175°C) until warm throughout. You can also use the microwave, but it may not keep them crispy. To freeze your stuffed shells, let them cool completely. Then, place them in freezer-safe containers. You can also wrap them well in plastic wrap and foil. They can last up to three months in the freezer. When you're ready to eat, thaw them in the fridge overnight. Bake them at 375°F (190°C) until heated through, about 25-30 minutes. In the fridge, Chicken Parmesan Stuffed Shells last about three to four days. Watch for signs of spoilage like a sour smell or mold. If they smell off or look strange, it's best to throw them away. Keeping track of these signs helps you enjoy your meal safely. If you don’t have ricotta cheese, you can use cottage cheese. Blend it for a smooth texture. Cream cheese is another option. Mix it with a bit of milk to soften it. You can also try some mashed tofu for a dairy-free choice. You can use regular pasta shells, but it will change the dish. Stuffing smaller shells is more challenging. You may need to adjust the baking time. Keep an eye on them to make sure they cook through. To prepare in advance, assemble the dish but don’t bake it. Cover it tightly with foil and store it in the fridge. You can also freeze it for later. Just add extra baking time if it’s frozen. These stuffed shells pair well with a fresh salad. Garlic bread is also a great choice. A side of steamed veggies can add color and nutrients. You can even serve it with a nice glass of red wine. Check for bubbling cheese on top. The cheese should be golden brown. You can also use a fork to see if the filling is hot inside. Let them cool for a few minutes before serving. This helps the flavors settle. This blog post outlined a tasty recipe for Chicken Parmesan Stuffed Shells. We covered key ingredients, like jumbo shells, chicken, and cheeses. I shared step-by-step instructions for preparing, mixing, and baking. You learned helpful tips for texture and flavor, as well as fun ingredient swaps. In summary, this dish offers versatility, making it perfect for many occasions. Try it out and enjoy every cheesy bite!

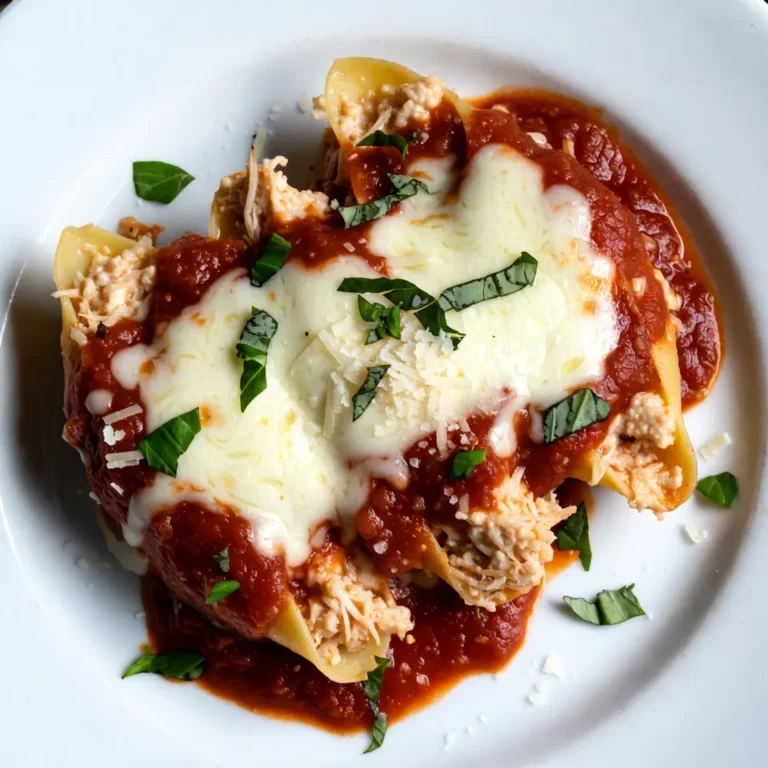
Chicken Parmesan Stuffed Shells Flavorful Dinner Delight

- Pasta type: You can use rotini or fusilli pasta. Both shapes hold the dressing well. Rotini has a spiral shape, while fusilli has a corkscrew look. Choose one based on your texture preference. - Fresh mozzarella selection: I like using bocconcini, which are small, soft mozzarella balls. Halve them for easy eating. They add a creamy taste that contrasts nicely with other ingredients. - Alternative ingredients for customization: Don't hesitate to mix things up! You can add cucumbers for crunch or bell peppers for sweetness. If you want protein, try adding grilled chicken or shrimp. - Balsamic glaze vs. homemade balsamic dressing: You can use balsamic glaze for a rich, sweet flavor. If you prefer, make a simple balsamic dressing with balsamic vinegar, olive oil, and a bit of honey. Both options taste great! - Importance of extra virgin olive oil: Always choose extra virgin olive oil for your dressing. It has a rich taste and healthy fats that enhance the salad's flavor. - Potential spice additions: To kick up the heat, add red pepper flakes. They bring warmth without overwhelming the dish. You can adjust the amount based on your taste. {{ingredient_image_1}} To start, bring a large pot of water to a boil. Salt this water well. Salting the water helps the pasta absorb flavor. Add about 8 oz of rotini or fusilli pasta to the pot. Check the package for cooking time, usually around 8-10 minutes. You want the pasta al dente, which means it should be firm but not hard when bitten. After cooking, drain the pasta in a colander and let it cool. You can rinse it under cold water to stop the cooking process quickly. While the pasta cools, it's time to prep the fresh ingredients. First, take your cup of cherry tomatoes. To halve them, use a sharp knife and cut through the middle. This method keeps the juice inside, adding flavor. Next, take your mozzarella balls. Slice them in half the same way. This gives the salad a nice creamy texture. Finally, grab an avocado. Cut it in half, remove the pit, and dice it into small pieces. This adds a rich, buttery flavor to the dish. Now, it’s time to mix everything. In a large bowl, combine the cooled pasta, halved cherry tomatoes, mozzarella, and diced avocado. Add in the torn basil leaves too. This mix creates a colorful and fresh salad. To toss the salad, gently stir using a large spoon. Be careful not to mash the ingredients. You can serve it right away or chill it for about 30 minutes. Chilling helps the flavors blend together more. If you enjoy immediate freshness, serve it right away! - Using fresh herbs vs. dried: Fresh basil brings a bright taste. Dried basil lacks that fresh punch. I suggest using fresh basil for the best flavor in your Caprese pasta salad. - Adjusting dressing quantities for taste: Start with the suggested amounts of balsamic glaze and olive oil. You can add more if you like a stronger flavor. Taste as you go! - The role of garlic powder in the recipe: Garlic powder adds depth without being too strong. It blends well with the other flavors. If you love garlic, feel free to add a bit more! - How to make the salad ahead of time: You can prep this salad a few hours before serving. Just keep the dressing separate until you are ready to eat. This keeps the pasta and veggies fresh. - Freezing notes for ingredients: I don’t recommend freezing the whole salad. The pasta and veggies can become mushy. You can freeze any extra dressing for later use. - Best storage containers to use: Use an airtight container for the salad. Glass containers work best as they do not hold odors. Keep it in the fridge for up to three days. Pro Tips Use Fresh Ingredients: Always opt for the freshest tomatoes, mozzarella, and basil to enhance the flavor of your salad. Customize Your Pasta: Feel free to substitute the rotini or fusilli with your favorite pasta shape for a unique twist. Add Protein: To make this salad more filling, consider adding grilled chicken, shrimp, or chickpeas. Perfect Storage: Keep the salad covered in the fridge for up to 2 days for optimal freshness, but add avocado just before serving to prevent browning. {{image_2}} You can change up your Caprese pasta salad by using seasonal veggies. In summer, try adding fresh corn or zucchini. In fall, roasted butternut squash brings a sweet touch. You can also add proteins like chicken or shrimp. Grilled chicken adds heartiness, while shrimp gives a nice, light flavor. Both options make the salad more filling. Making the pasta salad gluten-free is easy. Just use gluten-free pasta instead of regular pasta. For vegan options, swap the mozzarella for dairy-free cheese. You can also use a vegan dressing instead of the balsamic glaze. This way, you keep the flavor while sticking to your diet. To change up the taste, try using different vinegars or dressings. Red wine vinegar gives a nice tang. You can also add nuts or seeds for crunch. Pine nuts or sunflower seeds work well. They add texture and a nutty flavor, making your salad even more exciting. Caprese pasta salad shines at many gatherings. It is perfect for picnics and potlucks. You can serve it cold, which makes it easy to transport. This salad also works well as a side dish for barbecues. The bright flavors complement grilled meats perfectly. Guests will love its fresh taste and colorful look. To make your dish stand out, focus on plating. Use a large bowl to show off the vibrant colors. Drizzle extra balsamic glaze on top for a glossy finish. You can also add whole basil leaves for a fresh touch. Arrange the salad neatly for an inviting look. Remember, we eat with our eyes first! Beverages can enhance your meal. A crisp white wine pairs well with the salad. If you prefer non-alcoholic drinks, try sparkling water with lemon. It adds a refreshing twist. For other dishes, consider serving grilled chicken or shrimp. These proteins will round out your meal and keep everyone satisfied. You can store Caprese Pasta Salad in the fridge for up to three days. Keep it in an airtight container. This helps keep it fresh. Signs of spoilage include: - Unpleasant odor - Off-color changes - Slimy texture on ingredients If you see any of these signs, it is best to toss the salad. Yes, you can use other cheeses in your salad. Here are some great options: - Feta: This cheese adds a salty flavor. It crumbles easily but can be creamier than mozzarella. - Goat cheese: This cheese is tangy and creamy. It works well, but some may find it too strong. - Parmesan: This cheese adds a nutty taste. It can be grated or shaved but lacks the creaminess of mozzarella. Each cheese brings a unique taste to your dish, so feel free to mix and match! You can add many herbs to enhance flavor. Here are some good choices: - Oregano: This herb adds a warm, earthy taste. - Thyme: This herb has a subtle lemon flavor. It pairs well with tomatoes and basil. - Chives: This herb adds a mild onion flavor. It's fresh and bright. Adding herbs can change the flavor profile. Experiment to find your favorite combination! Caprese pasta salad combines fresh ingredients for a bright, flavorful dish. We discussed main ingredients like pasta type, mozzarella, and dressings. Then, I detailed cooking, prepping, and mixing steps. I shared tips for flavor enhancement and meal prep. You learned how to adjust the recipe for dietary needs and seasonal ingredients. Experimenting with different herbs and flavors can make this dish your own. Remember, this salad is great for sharing or enjoying solo. Enjoy every bite of your creation!

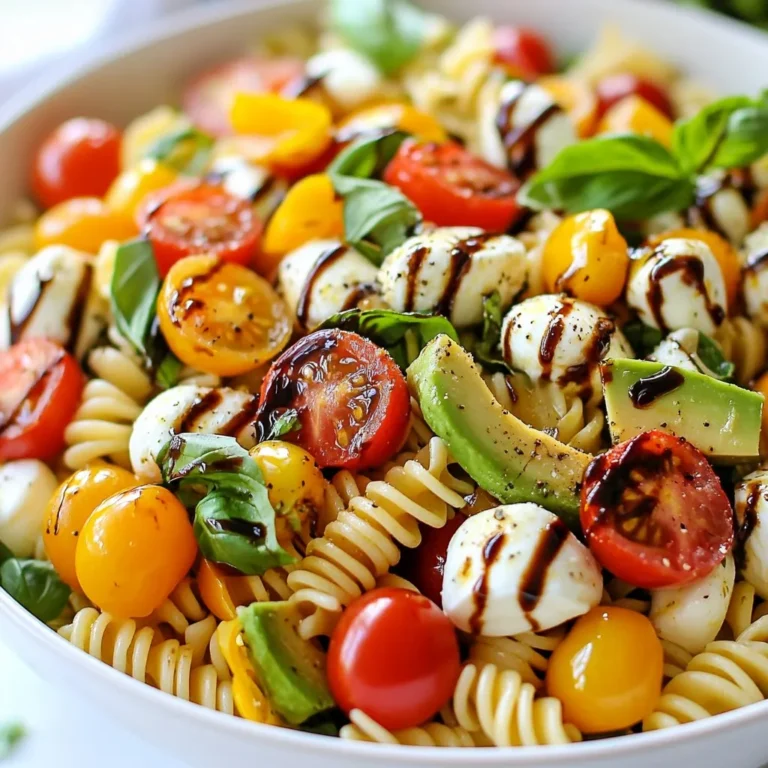
Caprese Pasta Salad Fresh and Flavorful Delight

PREV 1 … 3 4 5 … 86 NEXT
tasty trail blazer

explore

DessertsDinnerAppetizersDrinks

Our Policies

  • Cookie Policy
  • Copyright Policy
  • Disclaimer
  • GDPR Policy
  • Terms Of Use
Back to Top
  • About
  • Contact Us
  • Privacy Policy
© 2026 tasty trail blazer