FREE DINNER EBOOK! Get your copy!
  • Cookie Policy
  • GDPR Policy
  • Disclaimer
  • Terms Of Use
  • Visit my other site: Fun Cookie Recipes
tasty trail blazer
  • Home
  • Dinner
  • Desserts
  • Drinks
  • Appetizers
  • Contact
  • About
  • Privacy Policy
  • Home
  • Dinner
  • Desserts
  • Drinks
  • Appetizers
  • Contact
  • About
  • Privacy Policy
  • Cookie Policy
  • GDPR Policy
  • Disclaimer
  • Terms Of Use
Visit my other site: Fun Cookie Recipes

HOME / CATEGORIES /

Latest

To make the best Jalapeño Lime Grilled Chicken, gather these items: - 4 boneless, skinless chicken breasts - 2 fresh jalapeños, seeded and finely chopped - 3 tablespoons lime juice (freshly squeezed) - 2 tablespoons olive oil - 3 cloves garlic, minced - 1 teaspoon ground cumin - 1 teaspoon smoked paprika - Salt and pepper to taste - Fresh cilantro, chopped (for garnish) These ingredients come together to create a bright and zesty flavor. Fresh jalapeños add a nice kick. Lime juice gives it a refreshing taste. When you shop, look for the freshest chicken. The color should be pink, not gray. Check for any bad smells, too. For jalapeños, pick ones that feel firm. They should have smooth skin and a bright green color. The fresher they are, the better your dish will taste. When buying limes, look for ones that feel heavy for their size. They should be bright green and free from blemishes. Fresh garlic should be dry, firm, and free from sprouts. While the main ingredients shine, you can always mix in extra flavors. Try adding a pinch of cayenne if you like heat. A dash of honey can balance the spice with sweetness. For an herby twist, add some chopped fresh oregano or thyme. These subtle changes can make your dish unique. Experiment and find what you love! {{ingredient_image_1}} Start by gathering your ingredients. You will need lime juice, olive oil, minced garlic, chopped jalapeños, ground cumin, smoked paprika, salt, and pepper. In a medium bowl, whisk together the lime juice and olive oil. Add the minced garlic and chopped jalapeños for that spicy kick. Next, mix in the ground cumin and smoked paprika. Finally, add salt and pepper to taste. This marinade brings a burst of flavor to the chicken. Now, take the chicken breasts and place them in a large resealable bag. You can also use a shallow dish if you prefer. Pour the marinade over the chicken, making sure each piece is well coated. Seal the bag or cover the dish tightly. Let it sit in the fridge for at least 30 minutes. For extra flavor, you can marinate it for up to 2 hours. This step is crucial as it allows the chicken to absorb all those tasty flavors. When you are ready to grill, preheat your grill to medium-high heat. Take the chicken out of the marinade, letting any extra drip off. Discard the leftover marinade to keep things safe. Place the chicken on the grill and cook for about 6-7 minutes on each side. You want the internal temperature to reach 165°F (75°C). Look for nice grill marks too! Once cooked, remove the chicken from the grill and let it rest for 5 minutes. This helps the juices stay inside. Slice the chicken, garnish with fresh cilantro, and serve right away. Enjoy your tasty Jalapeño Lime Grilled Chicken! The best temperature for grilling chicken is medium-high, around 375°F to 450°F. This heat cooks the chicken well without burning it. If it's too hot, the outside cooks fast, but the inside stays raw. Use a meat thermometer to check for doneness. Aim for 165°F in the thickest part of the chicken. To get those great grill marks, start with a clean grill. Preheat your grill for about 10 minutes before cooking. Place the marinated chicken on the grill at a 45-degree angle. After about 3-4 minutes, rotate the chicken 90 degrees to create those lovely diamond marks. Flip the chicken and repeat on the other side. Resting the chicken is key for juicy meat. After grilling, let the chicken sit for 5 minutes. This allows the juices to redistribute. If you cut it right away, all the juice runs out. A simple step makes a big difference in taste and texture. Enjoy the tender, flavorful results! Pro Tips Marinate for Maximum Flavor: Allowing the chicken to marinate for at least 2 hours will enhance the flavor and tenderness, making each bite more delicious. Grill Temperature Matters: Make sure your grill is preheated to medium-high heat for optimal searing, which locks in juices and gives your chicken those beautiful grill marks. Resting is Key: Letting the chicken rest for 5 minutes after grilling helps retain its juices, resulting in a moist and flavorful dish. Customize Your Heat Level: Adjust the number of jalapeños or leave the seeds in for extra heat, or use a milder pepper for a more subtle spice. {{image_2}} If you love heat, this version packs a punch! Use more jalapeños. You can also add a pinch of cayenne pepper. This extra spice will wake up your taste buds. Be careful; adjust based on your heat tolerance. Add fresh herbs for a new flavor. Try cilantro or parsley. Just chop the herbs and mix them into the marinade. This twist brightens up the dish. It also adds freshness that pairs well with the lime. Fruits can make your chicken sweet and savory. Try adding diced mango or pineapple to the marinade. These fruits caramelize on the grill, creating a tasty glaze. This addition makes the dish fun and unique. Plus, it adds a pop of color to your plate! After enjoying your Jalapeño Lime Grilled Chicken, store leftovers safely. Place the chicken in an airtight container. You can keep it in the fridge for up to four days. Make sure it cools down before sealing it. This helps prevent moisture buildup and keeps your chicken fresh. When you’re ready to eat your leftovers, reheating is key. Use a microwave or an oven. If you use a microwave, cover the chicken with a damp paper towel. This helps keep it moist. Heat it for about one to two minutes. If using an oven, preheat it to 350°F (175°C). Bake the chicken for about 10-15 minutes. Both methods help maintain flavor and texture. Freezing is a great option for longer storage. Wrap each chicken breast in plastic wrap. Then place them in a freezer bag. Be sure to remove as much air as possible. This keeps the chicken fresh for up to three months. When you want to eat it, thaw the chicken in the fridge overnight. This method keeps it safe and tasty. You should marinate the chicken for at least 30 minutes. This time allows the flavors to soak in. If you have more time, let it marinate for up to 2 hours. This longer time gives more depth to the flavor. Always refrigerate the chicken while it marinates. Yes, you can use other cuts of chicken. Thighs or drumsticks work well. They have more fat and stay juicy. Just adjust your cooking time. Ensure the internal temperature reaches 165°F (75°C) for safety. You can serve this chicken with many sides. Here are some great ideas: - Grilled corn on the cob - Fresh guacamole and tortilla chips - A crisp garden salad - Cilantro lime rice - Black beans or refried beans These sides will enhance the meal and add freshness. Enjoy mixing and matching! Jalapeño lime grilled chicken is a tasty dish made with fresh ingredients. Selecting quality items enhances flavor in your meal. Marinated chicken, grilled at the right temperature, brings out the best taste. Remember to rest it for juicy bites. You can switch it up with spices, herbs, or fruits. Store leftovers properly and reheat for a great meal later. Enjoy making this dish and experiment with variations for fun dining. Make food that excites your taste buds!

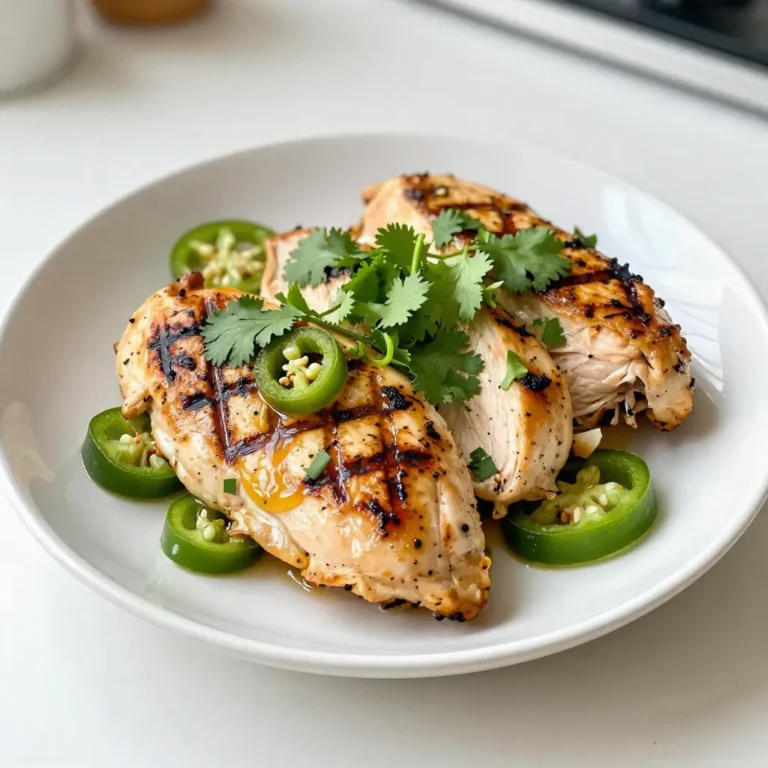
Jalapeño Lime Grilled Chicken Flavorful Summer Dish

To make this tasty chocolate chip pumpkin bread, gather these ingredients: - 1 cup pumpkin puree - 1/2 cup granulated sugar - 1/2 cup brown sugar, packed - 1/2 cup vegetable oil - 2 large eggs - 1 teaspoon vanilla extract - 1 1/2 cups all-purpose flour - 1 teaspoon baking soda - 1/2 teaspoon baking powder - 1/2 teaspoon salt - 1 teaspoon ground cinnamon - 1/2 teaspoon ground nutmeg - 1/4 teaspoon ground ginger - 1 cup chocolate chips (semi-sweet or dark) - Optional: 1/2 cup chopped walnuts or pecans You can swap some ingredients if needed: - Use applesauce instead of oil for lower fat. - Coconut sugar can replace brown sugar for a different taste. - If you have no eggs, use 1/4 cup of unsweetened applesauce per egg. - Whole wheat flour can replace all-purpose flour for a healthier loaf. Add a twist to your bread with these options: - Mix in 1/2 cup of chopped walnuts or pecans for crunch. - Try adding raisins or dried cranberries for a fruity touch. - For a spice kick, consider adding a pinch of cayenne pepper. These ingredients and swaps make it simple to create your own version of chocolate chip pumpkin bread! {{ingredient_image_1}} Start by preheating your oven to 350°F (175°C). This will help the bread bake evenly. Next, prepare your 9x5-inch loaf pan. You can grease it with cooking spray or line it with parchment paper. This makes it easier to remove the bread later. In a large mixing bowl, add the pumpkin puree, granulated sugar, brown sugar, vegetable oil, eggs, and vanilla extract. Use a whisk to mix everything until it is smooth and well combined. This step is key since it blends the flavors together nicely. Take another bowl and sift together the flour, baking soda, baking powder, salt, cinnamon, nutmeg, and ginger. Sifting helps to mix the dry ingredients well. It also breaks up any lumps and ensures even flavor in your bread. Now, gently add the dry mix to the wet mix. Use a spatula or wooden spoon to stir. Mix until just combined. Be careful not to overmix, as this can make the bread tough. It’s okay if there are a few lumps left. Fold in the chocolate chips and any nuts if you choose to use them. Pour the batter into your prepared loaf pan. Smooth the top with a spatula. Bake for 55-65 minutes. Check if it’s done by inserting a toothpick in the center. If it comes out clean or with a few moist crumbs, it’s ready! Once baked, take it out of the oven. Let it cool in the pan for about 10 minutes. Then, transfer the bread to a wire rack to cool completely. This helps keep the bread from getting soggy. Baking can be tricky. Here are some common mistakes to watch for: - Overmixing: Mixing too much makes the bread tough. Mix until just combined. - Wrong Oven Temp: Make sure your oven is at 350°F. An incorrect temp affects the bake. - Skipping Parchment: Using parchment paper helps with easy removal. Don’t skip this step. To check if your bread is done, use a toothpick. Insert it into the center. If it comes out clean or with a few crumbs, the bread is ready. If it’s wet, bake a bit longer. Always trust the toothpick method for best results. Quality matters in baking. Here are my tips: - Pumpkin Puree: Use real pumpkin puree for great flavor. Canned works, but fresh is best. - Sugars: Use both granulated and brown sugar. This combo gives the bread sweetness and moisture. - Chocolate Chips: Choose semi-sweet or dark chocolate chips. They add richness and depth. These tips will help you bake a delicious Chocolate Chip Pumpkin Bread every time! Pro Tips Fresh Pumpkin Puree: For the best flavor, consider using homemade pumpkin puree. Simply roast a sugar pumpkin, scoop out the flesh, and blend until smooth. Don’t Overmix: When combining the wet and dry ingredients, mix just until everything is incorporated. Overmixing can lead to a dense bread. Storage Tips: To keep the bread moist, wrap it tightly in plastic wrap or aluminum foil and store it at room temperature for up to 3 days or in the refrigerator for up to a week. Customize Your Add-ins: Feel free to experiment with different mix-ins like dried cranberries, raisins, or even a swirl of cream cheese for added flavor and texture. {{image_2}} You can mix up the flavor of your chocolate chip pumpkin bread. Try adding spices like cardamom or allspice for a warm kick. You can also swap some chocolate chips for butterscotch or white chocolate chips. Each choice gives a new taste and twist. If you love nuts, add almonds or hazelnuts instead of walnuts. You can make this recipe a bit healthier with simple swaps. Use whole wheat flour instead of all-purpose flour for more fiber. Replace half the oil with unsweetened applesauce. This keeps the bread moist and cuts down on fat. For sweetness, try using honey or maple syrup instead of sugar. These options give great flavor without the refined sugar. Pumpkin bread is great any time of the year, but you can add seasonal flair. In the fall, add chopped apples or cranberries for a fruity twist. In winter, try adding orange zest for a bright flavor. For summer, fresh blueberries are a fun addition. These changes keep the recipe fresh and exciting, no matter the season! To keep your chocolate chip pumpkin bread fresh, store it at room temperature. Wrap it tightly in plastic wrap or foil. This keeps moisture in and helps prevent it from drying out. If you want to store it for longer, use an airtight container. Make sure it cools completely before wrapping. This helps avoid soggy bread. You can freeze chocolate chip pumpkin bread for up to three months. First, let the bread cool completely. Then, wrap it tightly in plastic wrap, followed by aluminum foil. This double wrapping helps protect it from freezer burn. When you want to enjoy it, let it thaw in the fridge overnight. You can also slice it before freezing for easy serving. Chocolate chip pumpkin bread lasts about 3-5 days at room temperature. If stored in the fridge, it can last up to a week. Freezing extends its life to about three months. Always check for any signs of spoilage before eating. If it smells off or shows mold, it’s best to toss it. Yes, you can use fresh pumpkin. First, you need to cook it. Cut the pumpkin, remove the seeds, and roast it until soft. Then, scoop out the flesh and mash it. This gives you a nice, fresh taste. Make sure to measure the same amount as the puree. You can use several options to replace eggs. Here are some ideas: - 1/4 cup unsweetened applesauce per egg. - 1/4 cup plain yogurt per egg. - 1 tablespoon ground flaxseed mixed with 2.5 tablespoons water (let it sit for 5 min). These work well to bind the ingredients together. To check if your bread is undercooked, use a toothpick. Insert it into the center of the bread. If it comes out clean or with a few moist crumbs, it is ready. If it has wet batter on it, bake for a few more minutes. Yes, you can make mini loaves! This recipe fits well in mini loaf pans. Just adjust your baking time. Check after 25-30 minutes. The toothpick test still applies. Enjoy your mini treats! In this post, we explored every key step in your baking journey. We covered essential ingredients and their substitutes. You learned how to prepare, mix, and bake your batter. We shared tips to avoid common mistakes and ways to check if your bread is done. Finally, we discussed storage and ways to vary your recipe. Always remember that baking is about creativity and fun. Enjoy the process, try new flavors, and make this recipe your own!

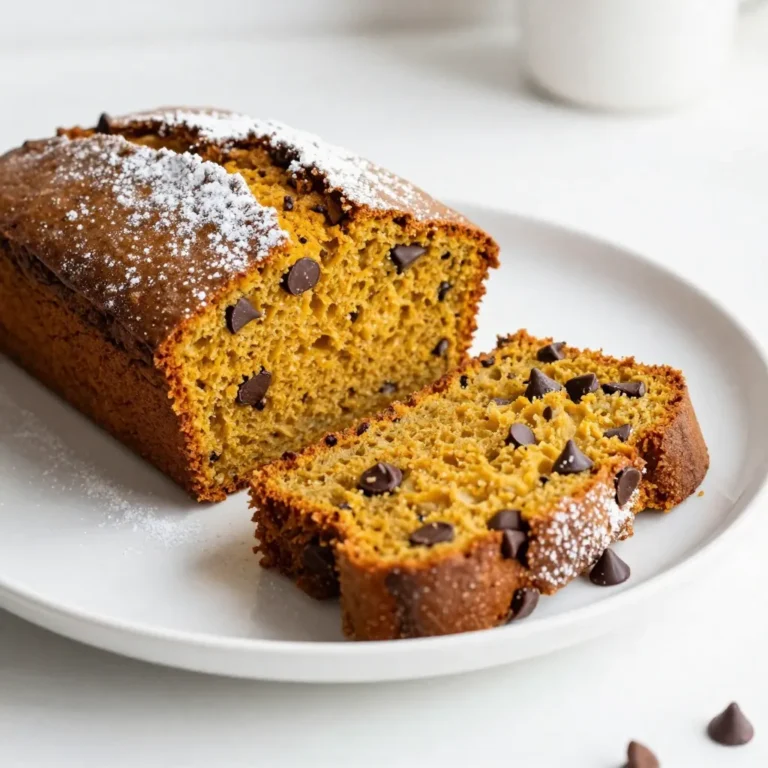
Chocolate Chip Pumpkin Bread Simple and Tasty Recipe

- 1 cup quinoa, rinsed - 2 cups vegetable broth or water - 1 red bell pepper, chopped - 1 zucchini, diced - 1 yellow squash, diced - 1 red onion, cut into wedges - 2 cups cherry tomatoes, halved - 1/4 cup fresh parsley, chopped - 1/4 cup feta cheese (optional) - Juice of 1 lemon Quinoa is the star of this salad. It cooks up light and fluffy. I always rinse it to remove any bitter taste. The vegetable broth adds a nice depth of flavor. Use fresh veggies for the best taste. I love the bright colors of bell pepper, zucchini, and squash. They not only look good but also taste great. Cherry tomatoes add sweetness and juicy bites. If you want a creamy touch, add feta cheese. It gives the salad a nice tang. Fresh parsley brings brightness and a pop of color. - 3 tablespoons olive oil - 1 teaspoon garlic powder - 1 teaspoon smoked paprika - Salt and pepper to taste Olive oil helps the veggies roast well. It enhances the flavors and adds richness. Garlic powder gives a warm, savory taste. Smoked paprika adds a hint of smokiness. Season with salt and pepper. This basic seasoning makes every bite tasty. You can adjust it based on your taste. Roasted Veggie Quinoa Salad is healthy and satisfying. It is full of fiber and protein, which helps keep you full. Each serving has about 300 calories, depending on added ingredients. Quinoa is a complete protein. It provides all nine essential amino acids. The veggies add vitamins and minerals. This salad is a great option for a nutritious lunch or dinner. It is simple to make and packed with flavor. Enjoy the health benefits while savoring every bite! {{ingredient_image_1}} To cook quinoa perfectly, start by rinsing it well. This step removes any bitter taste. Next, in a medium pot, bring 2 cups of vegetable broth or water to a boil. Once boiling, add 1 cup of quinoa. Lower the heat to a simmer and cover the pot. Cook for about 15 minutes or until all the liquid is absorbed. After cooking, fluff the quinoa with a fork. This helps separate the grains and gives it a light texture. For fluffiness, avoid stirring the quinoa while it cooks. Let it sit covered for 5 minutes after cooking. This resting time helps the grains expand and become fluffy. Preparing the veggies is easy. Start by chopping the red bell pepper, zucchini, yellow squash, and red onion. Halve the cherry tomatoes. Place all these veggies on a large baking sheet. Drizzle 3 tablespoons of olive oil over the vegetables. Then sprinkle with 1 teaspoon of garlic powder, 1 teaspoon of smoked paprika, salt, and pepper. Toss the veggies well to coat them evenly. For optimal roasting, preheat your oven to 400°F (200°C). Roast the veggies for 20-25 minutes. Stir them halfway through to ensure even cooking. They should turn tender and caramelized. In a large bowl, combine the cooked quinoa with the roasted vegetables. Mix gently to keep the quinoa fluffy. Now, add a squeeze of fresh lemon juice over the mixture. This adds brightness and flavor. Toss in 1/4 cup of chopped parsley for freshness. If you like, sprinkle 1/4 cup of feta cheese on top for a creamy touch. Taste the salad and adjust seasoning. Add more salt, pepper, or lemon juice if needed. Your Roasted Veggie Quinoa Salad is now ready to enjoy! To ensure even roasting, cut your veggies into similar sizes. This helps them cook at the same rate. I suggest stirring them halfway through roasting. This way, they brown nicely on all sides. If you notice some veggies are cooking faster, remove them early. For example, cherry tomatoes roast quickly. Adjust cooking times based on your oven and the size of your cuts. You can customize flavor profiles easily. Try adding herbs like thyme or rosemary for a fresh taste. For a spicy kick, mix in some red pepper flakes. Balancing acidity with lemon juice is key. It brightens the dish and enhances all flavors. If you want more zing, add extra lemon juice to taste. When serving, use a large salad bowl to show off the colors. This makes the dish more inviting. For garnishing, sprinkle extra parsley on top for a fresh look. You can also add lemon wedges on the side. They give a nice touch and let guests add more juice if they like. Pro Tips Use Fresh Ingredients: Whenever possible, opt for fresh, seasonal vegetables to enhance the flavor and nutritional value of your salad. Customize Your Veggies: Feel free to mix and match vegetables based on your preferences or what you have on hand. Root vegetables, like carrots or sweet potatoes, can add a different texture and taste. Perfectly Cooked Quinoa: Rinsing quinoa before cooking removes its natural coating, called saponin, which can give it a bitter taste. Make sure to fluff it with a fork after cooking for the best texture. Add Some Crunch: Consider adding nuts or seeds, such as almonds or sunflower seeds, for an extra crunch and a boost of healthy fats. {{image_2}} You can change up the veggies in this salad. Try adding broccoli, carrots, or cauliflower. These add great color and taste. If you don’t have quinoa, use farro or rice instead. For dressing, swap olive oil with avocado oil for a different flavor. This salad is easy to make vegan. Just leave out the feta cheese. For vegetarians, the cheese adds creaminess. If you're gluten-free, quinoa is already a safe choice. Just avoid any grains that contain gluten. Want some crunch? Add nuts like almonds or walnuts. Seeds like pumpkin or sunflower seeds work too. For extra flavor, try fresh herbs like basil or cilantro. They can brighten up the dish and add freshness. To keep your roasted veggie quinoa salad fresh, store it in the fridge. Place leftovers in an airtight container. This helps prevent the salad from drying out. You want the flavors to stay bright and tasty. Use a glass container for best results. It allows you to see what's inside and avoids staining. If you have more salad than you can eat, freezing is an option. Scoop servings into freezer-safe bags. Remove as much air as possible before sealing. This helps keep the salad fresh for longer. When you're ready to eat, thaw it in the fridge overnight. Reheat gently in the microwave or a pan. The quinoa may lose some texture but will still taste great. The shelf life of the salad varies. In the fridge, it stays good for about 3 to 5 days. If frozen, it can last for up to 3 months. Leftovers can be fun! You can mix the salad with eggs for a tasty breakfast. Add it to a wrap with some protein for lunch. It also pairs well with grilled chicken or fish for dinner. Toss in some fresh greens for a crunchy side. These ideas make your meals exciting and reduce waste. Enjoy your flavorful creations! To make quinoa fluffy, rinse it well before cooking. This step removes the saponins, which can taste bitter. Use a pot with a tight lid. Once the quinoa cooks, let it sit covered for 5 minutes. Then, fluff it with a fork. Avoid stirring too much while it cooks, as that can make it gummy. Common mistakes to avoid: - Not rinsing the quinoa. - Using too much water. - Not letting it rest after cooking. Yes, you can use other grains in this salad. Good options include farro, barley, or brown rice. Each grain brings its own texture and flavor. Try using bulgur for a quick-cooking alternative. Exploring alternatives for texture: - Quinoa: light and fluffy. - Farro: chewy and nutty. - Brown rice: hearty and filling. Absolutely! This salad is great for meal prep. You can cook quinoa and roast veggies ahead of time. Store them separately in the fridge. When ready to eat, mix them together. Tips for preparing in advance and storing: - Keep the dressing separate until serving. - Use airtight containers for storage. - It will last about 3 to 4 days in the fridge. This blog post explores how to make a delicious quinoa salad. We covered the main ingredients, oils, and spices that enhance flavor. You learned essential steps for cooking quinoa and roasting vegetables. I shared tips for perfect seasoning and presentation. We also discussed different variations and storage info for leftovers. Overall, quinoa salad is a healthy and flexible dish. It’s easy to prepare, nutritious, and great for meal prep. Enjoy creating your own version!

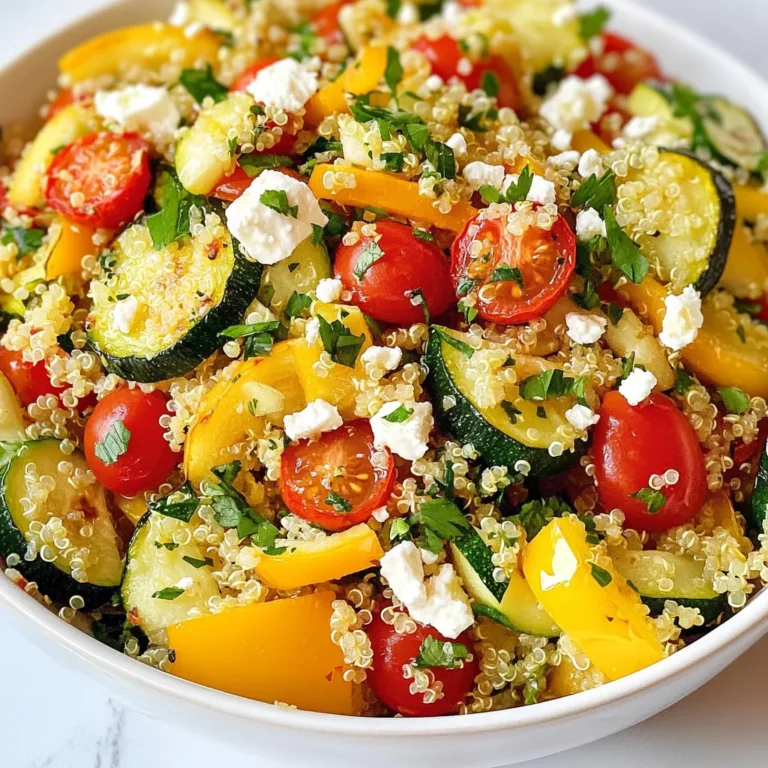
Roasted Veggie Quinoa Salad Nutritious and Simple Meal

To make cranberry pistachio biscotti, gather these ingredients: - 2 cups all-purpose flour - 1 cup granulated sugar - 1/2 teaspoon baking powder - 1/4 teaspoon baking soda - 1/4 teaspoon salt - 3 large eggs - 1 teaspoon vanilla extract - 1/2 teaspoon almond extract - 1 cup dried cranberries - 3/4 cup pistachios, shelled and coarsely chopped You can adjust some ingredients if needed: - For a gluten-free version, use gluten-free flour mix instead of all-purpose flour. - Replace granulated sugar with coconut sugar for a lower glycemic option. - Use lemon zest instead of almond extract for a bright, citrus flavor. - Substitute walnuts or almonds for pistachios to change the nut flavor. - Dried cherries or raisins can work instead of dried cranberries. You'll need a few essential tools to make this biscotti: - Large mixing bowl for combining ingredients - Whisk for mixing the dry ingredients - Separate bowl for blending wet ingredients - Baking sheet lined with parchment paper - Serrated knife for slicing the biscotti - Cooling rack for letting the biscotti cool completely These tools will help you create a delightful and crunchy treat! {{ingredient_image_1}} First, you need to preheat your oven to 350°F (175°C). This step is very important. A hot oven helps the biscotti bake evenly. Next, line your baking sheet with parchment paper. This prevents sticking and makes cleanup easy. In a large mixing bowl, whisk together the dry ingredients. Combine 2 cups of all-purpose flour, 1 cup of granulated sugar, 1/2 teaspoon of baking powder, 1/4 teaspoon of baking soda, and 1/4 teaspoon of salt. Make sure everything is mixed well. This helps the flavors blend together perfectly. In another bowl, beat 3 large eggs. Add 1 teaspoon of vanilla extract and 1/2 teaspoon of almond extract. Mix until you get a smooth texture. This combination adds a lovely flavor to your biscotti. Gradually pour the wet mix into the dry ingredients. Stir until just combined. Then, fold in 1 cup of dried cranberries and 3/4 cup of chopped pistachios. On a floured surface, divide the dough in half. Shape each half into a log about 12 inches long and 2 inches wide. Carefully place the logs on the prepared baking sheet. Leave at least 3 inches between them. Bake in the preheated oven for 25-30 minutes. The logs should look golden and feel slightly firm in the center. Remove the baking sheet from the oven and let the logs cool for 10-15 minutes. Once cooled, use a serrated knife to slice them diagonally into 1/2-inch thick pieces. Arrange the slices cut-side down on the baking sheet. Return them to the oven for another 10-15 minutes. Flip them halfway through for even crispness. Let the biscotti cool completely on a wire rack before serving. To make your biscotti crisp, bake them twice. The first bake firms them up. After slicing, the second bake gives that perfect crunch. Keep an eye on them. Overbaking can lead to hard biscotti. Aim for a golden color, and remember, they will crisp more as they cool. Use parchment paper to line your baking sheet. This prevents sticking and makes cleanup easy. Preheat your oven well. A hot oven helps create a nice rise. Space your logs apart to allow room for expansion. Flipping the biscotti during the second bake ensures even crispiness. Don’t skip the cooling time after the first bake. This step helps with slicing. If the dough is too sticky while shaping, use a little flour on your hands. Avoid overmixing the dough. Overmixing can lead to tough biscotti. Lastly, make sure to measure your ingredients correctly. Too much flour can change the texture. Pro Tips Chill the Dough: If the dough is too sticky to handle, refrigerate it for about 30 minutes. This makes shaping the logs easier. Use Fresh Ingredients: For the best flavor, make sure your baking powder and baking soda are fresh. Check the expiration dates before use. Slice with Care: Use a serrated knife for slicing the biscotti after the first bake. This helps achieve cleaner cuts and prevents crumbling. Store Properly: Keep the cooled biscotti in an airtight container at room temperature to maintain their crispness for up to two weeks. {{image_2}} You can change the taste of your cranberry pistachio biscotti easily. Try using different nuts like almonds or walnuts. They add new flavors and textures. For a twist, swap dried cranberries with raisins or cherries. You can even use chocolate chips for a sweeter treat. Each swap gives a new delight in every bite. If you need gluten-free options, you can still enjoy this treat. Use a good gluten-free flour blend instead of all-purpose flour. Make sure it has xanthan gum for better texture. The taste still shines with cranberries and pistachios. You won’t miss the gluten at all! Feel free to mix in other nuts or dried fruits. Pecans or hazelnuts can add a rich flavor. Dried apricots or figs bring a fruity sweetness. The goal is to have fun with the recipe. Each variation can create a unique biscotti experience. Enjoy experimenting and find your favorite blend! To keep your cranberry pistachio biscotti fresh, store them in an airtight container. This helps prevent moisture from making them soggy. I like to use glass jars or plastic containers with tight lids. Place parchment paper between layers to avoid sticking. Keep the biscotti at room temperature, away from sunlight. This way, they stay crispy and delicious. You can freeze your biscotti for longer storage. First, let them cool completely. Then, wrap each piece in plastic wrap. Place the wrapped biscotti in a freezer bag. They can stay frozen for up to three months. When you’re ready to enjoy, remove them from the freezer. Let them thaw at room temperature for about two hours. For extra crispiness, reheat them in the oven at 350°F for 5-10 minutes. Cranberry pistachio biscotti can last for about two weeks at room temperature. After that, they may lose their crunch and flavor. Check for signs of freshness. If the biscotti feel soft or have a stale smell, it’s time to toss them. Fresh biscotti should be firm to the touch and have a sweet nutty aroma. Enjoy them while they are at their best! To make biscotti softer, reduce the baking time. Bake for just 20 minutes instead of 25-30 minutes. Let them cool before slicing. You can also add a bit more moisture. Try adding a tablespoon of milk or an extra egg. This adds softness without losing the biscotti's shape. You can use fresh cranberries, but they change the texture. Fresh cranberries are juicy and tart. This can make the biscotti wet and harder to shape. If you want to use them, I suggest chopping them and reducing other wet ingredients. This keeps the dough firm. Cranberry pistachio biscotti pairs well with many drinks. Serve it with coffee or tea for a classic touch. You can also try it with hot chocolate for a sweet treat. Another option is to serve with melted chocolate. A small dish of chocolate for dipping makes it special. Baking biscotti takes about 35-45 minutes total. The first bake is for 25-30 minutes. After slicing, the second bake is for 10-15 minutes. Keep an eye on them as they bake. You want them golden and crisp, not burnt. This article covered all you need to make delicious biscotti. We explored ingredients, tools, and step-by-step baking instructions. We also discussed tips for crispiness and common mistakes to avoid. Variations showed how to switch up flavors and accommodate dietary needs. Lastly, we reviewed storage methods to keep your biscotti fresh. Now, you can enjoy baking and try new flavors with confidence. Happy baking!

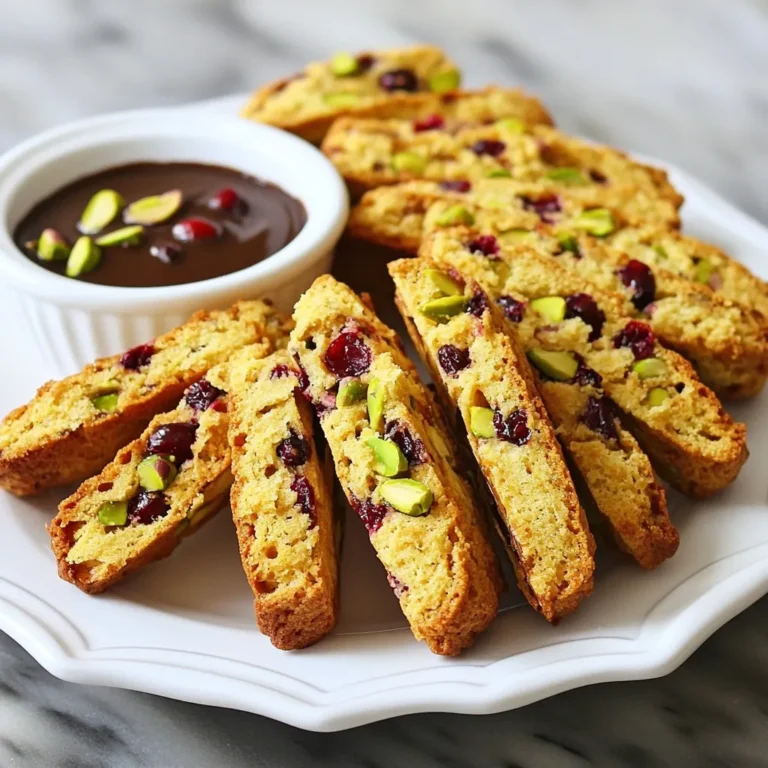
Cranberry Pistachio Biscotti Delightful and Crunchy Treat

To make chai spice overnight oats, gather these key ingredients: - 1 cup rolled oats - 1 cup almond milk (or your preferred milk) - 1 tablespoon chia seeds - 1 tablespoon maple syrup (or honey) - 1 teaspoon vanilla extract - 1 teaspoon ground cinnamon - 1/2 teaspoon ground ginger - 1/4 teaspoon ground cardamom - 1/4 teaspoon ground nutmeg - Pinch of black pepper - 1/2 cup plain Greek yogurt (optional for creaminess) - Fresh fruit for topping (like sliced bananas, apples, or berries) - Chopped nuts or seeds for crunch You can use different types of milk in this recipe. Almond milk is a great choice. If you prefer dairy, try whole milk or skim milk. Oat milk or soy milk also works well for a creamy texture. Simply swap in what you like best! Want to spice things up? Add a pinch of cloves for warmth. You can also mix in some cocoa powder for a chocolate twist. If you like a sweeter taste, try adding more maple syrup or honey. Fresh herbs like mint can add a refreshing kick. Feel free to get creative! {{ingredient_image_1}} Start by taking a mixing bowl. Add 1 cup of rolled oats into the bowl. Pour in 1 cup of almond milk. If you like, you can use any milk you prefer. Next, add 1 tablespoon of chia seeds. This gives your oats a nice texture. Then, drizzle in 1 tablespoon of maple syrup or honey for sweetness. Finally, add 1 teaspoon of vanilla extract to enhance the flavor. Stir all these ingredients well. Make sure everything is mixed evenly. Now it’s time to add the spices. Sprinkle in 1 teaspoon of ground cinnamon. Then, add 1/2 teaspoon of ground ginger and 1/4 teaspoon of ground cardamom. Don’t forget to add 1/4 teaspoon of ground nutmeg. A pinch of black pepper adds an extra kick. Mix it all together until the spices blend into the oat mixture. This step makes your oats truly chai-flavored and aromatic. Once your oat mixture is ready, transfer it into a mason jar or any airtight container. Seal it with a lid to keep the flavors fresh. Place the jar in the refrigerator. Let it chill overnight, or at least for 4 hours. This allows the oats to soak up the milk and spices. In the morning, give the oats a good stir. If they seem thick, add a splash of almond milk. Top with fresh fruit and your choice of nuts for crunch. Enjoy your delicious chai spice overnight oats! To get the best texture for your chai spice overnight oats, use rolled oats. They soak up liquid well and stay chewy. Chia seeds add a nice thickness. They also give a slight crunch, making each bite fun. If the oats feel too thick in the morning, stir in a little more almond milk. This will make them creamy and smooth. You can adjust the sweetness to your taste. Start with one tablespoon of maple syrup or honey. If you like it sweeter, add more after mixing. Remember, fresh fruit on top also brings natural sweetness. So, taste your oats before serving to find the right balance. Serving your oats can be a fun part! Use clear jars or bowls to show off the layers. Add a sprinkle of cinnamon on top for a nice touch. Fresh fruit, like sliced bananas or berries, can make your dish pop with color. Chopped nuts or seeds also add crunch. These little details make your oats look great and taste even better! Pro Tips Use Steel-Cut Oats for Texture: If you prefer a heartier texture, consider using steel-cut oats instead of rolled oats. Just be sure to adjust the soaking time as they require longer to soften. Experiment with Milks: While almond milk is delicious, try using coconut milk or oat milk for a different flavor profile. Each type of milk can drastically change the taste of your overnight oats. Add Protein: For an extra protein boost, include a scoop of your favorite protein powder when mixing the ingredients or increase the amount of Greek yogurt. Customize Your Toppings: Get creative with your toppings! Adding a drizzle of nut butter, a sprinkle of granola, or even a dollop of yogurt can enhance both the flavor and texture of your oats. {{image_2}} You can easily make this recipe vegan. Swap the Greek yogurt for a plant-based yogurt. You can also use maple syrup instead of honey. Choose almond milk or any plant milk you like. This way, you keep the tasty flavor while making it dairy-free. Feel free to get creative with flavors. You can add cocoa powder to make chocolate chai oats. For a fruity twist, mix in mashed bananas or pureed pumpkin. You can also try adding a splash of almond extract for a nutty taste. Each new flavor brings a fun surprise! Toppings can change how your oats taste and look. Fresh fruits like berries, bananas, or apples add sweetness and color. Chopped nuts or seeds give a nice crunch. You can also sprinkle extra cinnamon or a drizzle of maple syrup for a sweet touch. Get creative with your toppings for a unique bite every time! After making your chai spice overnight oats, store them in a mason jar or airtight container. This keeps them fresh and tasty. Always refrigerate the oats right away. They will last well in the fridge for up to five days. If you make a big batch, it’s best to keep individual servings in separate jars. This way, you grab one easily for breakfast. You can freeze these oats if you want to save them for later. First, pour the oats into freezer-safe containers. Leave some space at the top since they expand when frozen. Seal the containers tightly. They can stay in the freezer for up to three months. When you want to eat them, let them thaw in the fridge overnight. Then, stir in a splash of milk or yogurt for creaminess. Chai spice overnight oats are great for meal prep. They taste best when eaten within five days, but they can last longer if stored well. If you notice any changes in smell or texture, it’s best to toss them out. You can also add fresh toppings right before eating. This keeps them crunchy and fresh. Enjoy them cold or warm; both ways are delicious! Yes, you can use quick oats. However, they will make your oats softer. Rolled oats give a better texture and chew. If you want a heartier bite, stick with rolled oats. Quick oats are fine if you prefer a smoother mix. Overnight oats can last for up to five days in the fridge. Make sure to store them in an airtight container. If you add fresh fruit, eat quickly to avoid spoilage. If you keep toppings separate, they stay fresh longer. You can top your oats with many tasty options. Fresh fruit like bananas, apples, or berries works well. Nuts or seeds add crunch. For extra sweetness, drizzle some honey or maple syrup on top. Yes, warming up chai spice overnight oats is easy. Just transfer them to a microwave-safe bowl. Heat for about 30 seconds, stir, and check the temperature. If needed, heat for a few more seconds. Enjoy them warm for a cozy breakfast! In this blog post, we explored how to make delicious overnight oats. We covered core ingredients, milk substitutions, and extra flavor options. You learned step-by-step instructions for prepping the oat mixture and adding spices. We also shared tips for texture, sweetness, and presentation. Variations for vegan options and ways to customize toppings were included. Lastly, we discussed the best storage practices and answered common questions. Now, you can enjoy overnight oats your way, tailored to your taste and needs.

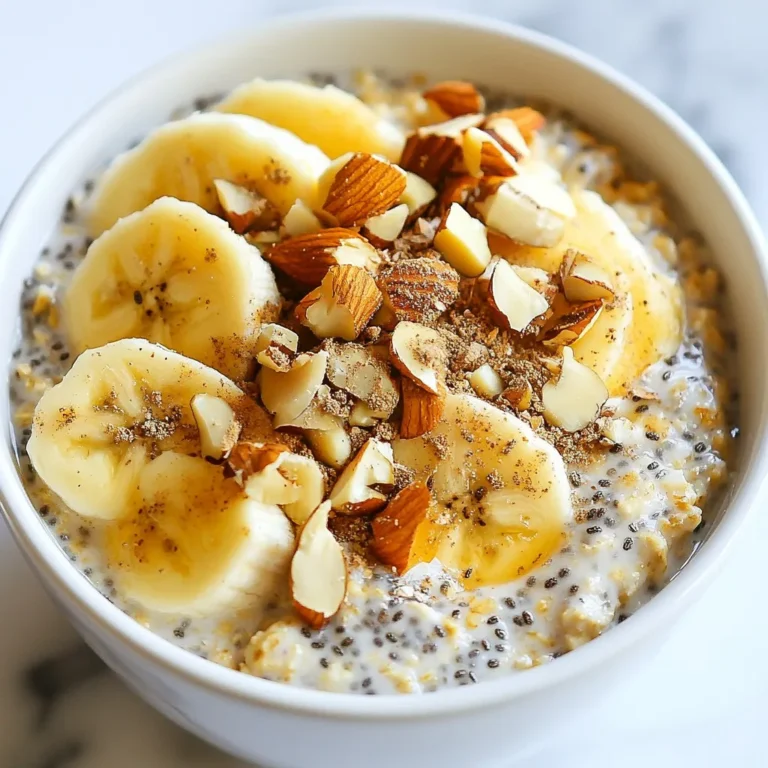
Chai Spice Overnight Oats Delicious and Easy Recipe

To make Chocolate Peanut Butter Energy Balls, gather these simple ingredients: - 1 cup rolled oats - 1/2 cup natural peanut butter - 1/4 cup honey or maple syrup - 1/3 cup dark chocolate chips - 1/4 cup ground flaxseed - 1/2 teaspoon vanilla extract - Pinch of sea salt You can easily swap items in this recipe. If you have allergies, try these: - Use almond butter or sunflower seed butter instead of peanut butter. - For a vegan option, replace honey with maple syrup. - If you don’t have dark chocolate chips, use milk chocolate or white chocolate instead. - Ground chia seeds work well if you lack flaxseed. Each energy ball has a nice balance of nutrients. Here’s a quick look: - Calories: About 100 per ball - Protein: 3 grams - Carbohydrates: 12 grams - Fat: 5 grams - Fiber: 2 grams - Sugar: 3 grams These energy balls give you a great source of energy. They are perfect for a snack or a post-workout boost. {{ingredient_image_1}} To make Chocolate Peanut Butter Energy Balls, start by gathering your ingredients. You'll need rolled oats, peanut butter, honey, dark chocolate chips, ground flaxseed, vanilla extract, and sea salt. In a large mixing bowl, combine the rolled oats, ground flaxseed, and a pinch of sea salt. Mix these dry ingredients well. Next, in a separate bowl, mix the peanut butter, honey, and vanilla until smooth. Pour this wet mixture into the dry bowl and stir until everything is combined. Gently fold in the dark chocolate chips to make sure they spread evenly in the mix. When mixing, use a spatula or your hands to get a good blend. If the mix feels too dry, add a little more honey or peanut butter. If it feels too wet, add a few more oats or flaxseed. Make sure to mix until no dry spots remain. This step is key for the balls to hold together later. Be careful not to over-mix, as that can make the energy balls tough. Once mixed, scoop out small portions of the dough. Roll each portion into a ball about one inch wide. Place the balls on a baking sheet lined with parchment paper. After rolling them all, put the tray in the fridge for at least 30 minutes. This chilling time helps them set. After chilling, store the energy balls in an airtight container in the fridge. They will stay fresh for up to a week. Enjoy them as a quick snack or a tasty treat! To make great energy balls, you need to measure your ingredients right. Here are some tips: - Use a dry measuring cup for oats and flaxseed. - Pack the peanut butter into the cup for an accurate measure. - If using syrup, pour it in a liquid measuring cup. - Level off each measurement with a straight edge for accuracy. Measuring properly helps your energy balls hold together. It also keeps the taste just right. Want more flavor? Here are some ideas: - Add a dash of cinnamon or cocoa powder for warmth. - Swap half the peanut butter for almond or cashew butter. - Mix in chopped nuts or seeds for added crunch. - Use different chocolate types like milk or white chocolate chips. Experimenting with flavors keeps things exciting. You can find your perfect mix! Avoid these common mistakes for the best energy balls: - Don't skip the chilling step. This helps them set properly. - Use fresh ingredients, especially oats and nut butter. - Don’t make the balls too big. Aim for about 1 inch. - Forgetting to mix everything well can lead to uneven flavor. By avoiding these errors, you'll create energy balls that everyone loves. Enjoy the process and have fun! Pro Tips Use Sticky Peanut Butter: Opt for a natural peanut butter that is creamy and slightly sticky to ensure the energy balls hold together well. Chill for Better Texture: Chilling the energy balls in the refrigerator not only helps them to set but also enhances their flavor. Customize Add-Ins: Feel free to add other ingredients like chopped nuts, seeds, or dried fruits for added texture and nutrition. Watch Portion Size: Be mindful of the size of each ball; keeping them around 1 inch ensures they are the perfect bite-sized snack. {{image_2}} You can change the taste of your energy balls easily. Try adding spices like cinnamon or nutmeg for warmth. If you prefer a different nut butter, almond or cashew butter work well too. Each nut butter adds its unique flavor. You can even mix in cocoa powder for a richer chocolate taste. These energy balls can fit many diets. To make them gluten-free, ensure the oats are certified gluten-free. For a vegan option, swap honey for maple syrup. Vegan protein powder can also boost the protein content if you like. These simple swaps keep the taste great while meeting your needs. Get creative with add-ins. You can toss in chopped nuts or sunflower seeds. They add crunch and extra nutrients. Dried fruits like raisins or cranberries bring a sweet touch. You can also try coconut flakes for a tropical twist. Mix and match to find your favorite combination! To keep your energy balls fresh, store them in an airtight container. I always use a glass jar or a plastic container with a tight lid. This keeps moisture out and helps maintain their taste and texture. Place the container in the fridge. They stay good for up to one week. If you want them to last longer, you can freeze them. Freezing your energy balls is simple and effective. First, place the rolled balls on a baking sheet. Make sure they aren’t touching. Freeze them for about two hours. This helps them hold their shape. Once frozen, transfer the balls to a freezer-safe bag. Squeeze out the air before sealing. They can stay in the freezer for up to three months. Just thaw them in the fridge before you eat. When stored properly, your energy balls can last a week in the fridge. If you freeze them, they can last three months. Always check for signs of spoilage, like an off smell or strange texture. Keep them in a cool, dark place if you leave them out. But I recommend storing them in the fridge or freezer for the best freshness. Yes, you can use different sweeteners in these energy balls. Honey and maple syrup work well. You may also try agave nectar or date syrup. Each sweetener adds a unique flavor. Just keep the same amount to ensure the right texture. You can store these energy balls in the fridge for up to one week. Keep them in an airtight container to keep them fresh. If you want them to last longer, consider freezing them. These energy balls make a great snack any time. Enjoy them after workouts or as a quick breakfast. They also fit well in lunchboxes for kids or adults. You can even serve them at parties as a healthy treat. Yes, you can make nut-free energy balls. Substitute peanut butter with sun butter or soy nut butter. These alternatives give a similar taste and texture. Always check for allergies before serving to others. In this blog post, we covered how to make delicious chocolate peanut butter energy balls. We explored ingredients, substitutions, and key nutritional info. I shared step-by-step instructions for preparation and tips to ensure success. We discussed variations, storage tips, and even addressed common questions. These energy balls are a tasty and healthy snack. With easy swaps and fun flavors, anyone can make them. Enjoy your journey in creating these bites of goodness!

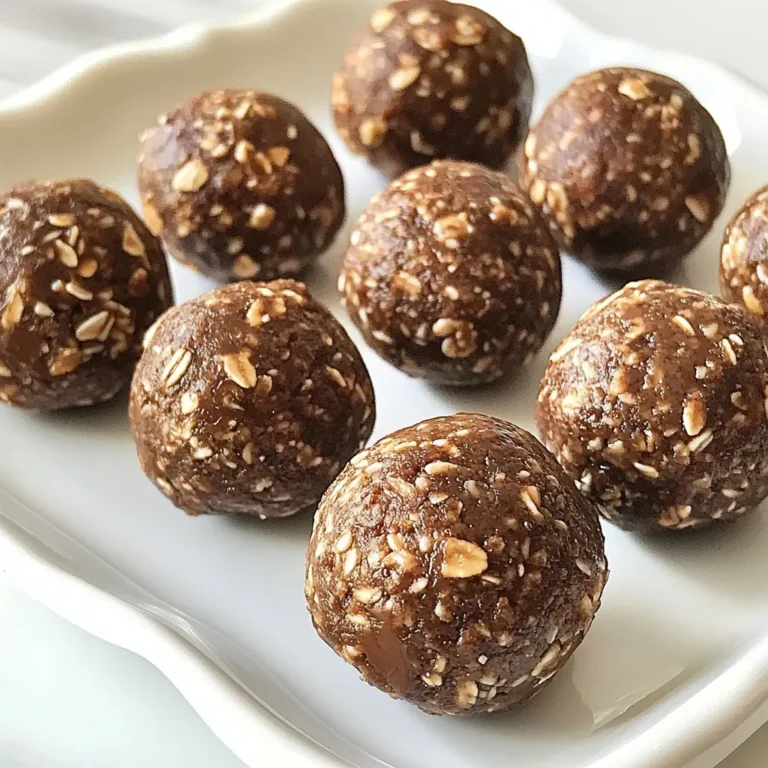
Chocolate Peanut Butter Energy Balls for Energy Boost

- Cauliflower florets - Batter ingredients: flour, garlic powder, onion powder, smoked paprika, salt, water - Buffalo sauce and butter For these Buffalo Cauliflower Bites, you need fresh cauliflower florets. They give the best taste and texture. Next, you will use a mix of flour, garlic powder, onion powder, smoked paprika, and salt to create a batter. This mix adds flavor and helps the cauliflower get crispy. You’ll also need water to make the batter smooth. To finish, you will need buffalo sauce and melted butter. This combination gives the bites that spicy kick we love. You can use store-bought buffalo sauce for convenience or make your own if you prefer. - Fresh celery sticks - Dipping dressings: blue cheese or ranch dressing When serving, I recommend fresh celery sticks. They add a nice crunch and balance the heat. Pair your bites with either blue cheese or ranch dressing for dipping. Both dressings complement the spicy flavor well. Enjoy these bites hot for the best experience! {{ingredient_image_1}} 1. Preheat your oven to 450°F (232°C). This heat makes the bites crispy. 2. Line a baking sheet with parchment paper. This helps with easy cleanup. 3. In a large bowl, whisk together these ingredients: - 1 cup all-purpose flour - 1 teaspoon garlic powder - 1 teaspoon onion powder - 1 teaspoon smoked paprika - 1 teaspoon salt - 1 cup water Mix until smooth. This batter will coat the cauliflower. 1. Dip each cauliflower floret into the batter. Make sure each piece is well-coated. 2. Place the coated florets on the baking sheet. Keep space between them for even cooking. 3. Bake these for 20 minutes. They should turn golden and slightly crispy. 4. While baking, mix 1 cup buffalo sauce with 2 tablespoons melted butter. Stir until combined. 5. After 20 minutes, remove the cauliflower from the oven. Drizzle the buffalo sauce on top. 6. Toss gently to coat the florets evenly with the sauce. 7. Return the cauliflower to the oven. Bake for another 10 minutes. This helps the sauce stick and caramelize. 8. Once done, take them out and allow them to cool slightly before serving. To get those crispy cauliflower bites, focus on the batter. A thick batter coats the florets well. If it's too thin, your bites will turn out soggy. You want a nice, smooth mix. Use equal parts flour and water for the best results. Next, baking technique matters. Preheat your oven to a high temperature, around 450°F (232°C). This helps to crisp the coating quickly. Spread the florets out on the baking sheet. Give them space to breathe. If they touch, they will steam instead of crisp. Bake for 20 minutes first. This initial bake creates a strong base. After that, add the buffalo sauce and bake again. This second bake allows the sauce to caramelize and adds extra crunch. To kick up the flavor, think about spices. You can add cayenne pepper for heat or smoked paprika for depth. A bit of cumin can also add a nice earthy note. Feel free to play around with your favorite spices for a personal touch. When it comes to buffalo sauce, choose wisely. A good sauce should have a balance of heat and flavor. Store-bought options work great, but homemade can shine. Consider mixing your buffalo sauce with melted butter. This adds richness and helps the sauce stick. Experiment with different brands or styles to find your favorite. Pro Tips Adjust the Spice Level: If you prefer a milder flavor, use a less spicy buffalo sauce or mix it with some ranch dressing before applying. Keep It Crisp: For extra crispiness, consider air-frying the cauliflower bites after baking. This will give them an even crunchier texture. Experiment with Seasonings: Feel free to customize the batter by adding different spices like cumin or cayenne pepper for a unique twist. Perfect Dipping Sauce: Try mixing blue cheese with a bit of sour cream for a creamy dip that complements the heat of the buffalo sauce. {{image_2}} You can switch up the sauce on your Buffalo cauliflower bites. BBQ sauce offers a sweet twist. Honey mustard adds a tangy kick. If you want a vegan option, look for plant-based buffalo sauces. Many brands make them now, and they taste great! If you need gluten-free options, try almond or coconut flour. Both work well and add unique flavor. You can also add cheese for extra richness. Try sprinkling shredded cheese on top before baking. For a fun twist, use different coatings. Panko breadcrumbs create a crunchy texture. To keep your Buffalo Cauliflower Bites fresh, store them properly. First, let them cool completely. Then, place the bites in an airtight container. Make sure to separate layers with parchment paper to avoid sticking. Store the container in the fridge. They last about 3 to 4 days this way. If you want to keep them longer, consider freezing them. Place the bites on a baking sheet in a single layer. Freeze until solid, then transfer to a freezer-safe bag. They can stay frozen for up to 3 months. Reheating is key to keeping that crunch. For best results, use your oven. Preheat it to 375°F (190°C). Place the cauliflower bites on a baking sheet lined with parchment. Bake for about 10 to 15 minutes. This will help restore their crispiness. You can also use an air fryer. Set it to 350°F (175°C) and cook for about 5 to 7 minutes. Both methods keep the bites tasty and crispy, just like when they were fresh. To make Buffalo Cauliflower Bites gluten-free, swap the all-purpose flour for a gluten-free flour blend. Many brands offer mixes that work well in recipes. You can also use almond flour or chickpea flour. These alternatives keep the bites crispy and tasty. Just follow the same steps in the recipe using your chosen flour. Yes, you can use frozen cauliflower! Just thaw it and pat it dry before using. Remove excess moisture to ensure crispiness. Frozen cauliflower may take a bit longer to bake, so keep an eye on it. Aim for a golden color to know when it’s ready. Buffalo Cauliflower Bites pair well with fresh celery sticks. The crunch of celery balances the spicy flavor. You can also serve them with blue cheese or ranch dressing for dipping. Feel free to add other veggies or chips for more variety. You now have a clear guide to making delicious Buffalo Cauliflower Bites. From preparing the ingredients to achieving the perfect batter, every step matters. Remember to experiment with spices and sauces to enhance flavor. Keep leftovers sealed tightly for freshness and reheat them to maintain crispiness. With these tips, you can enjoy this tasty treat any time. Step into the kitchen and start creating your own mouthwatering bites!

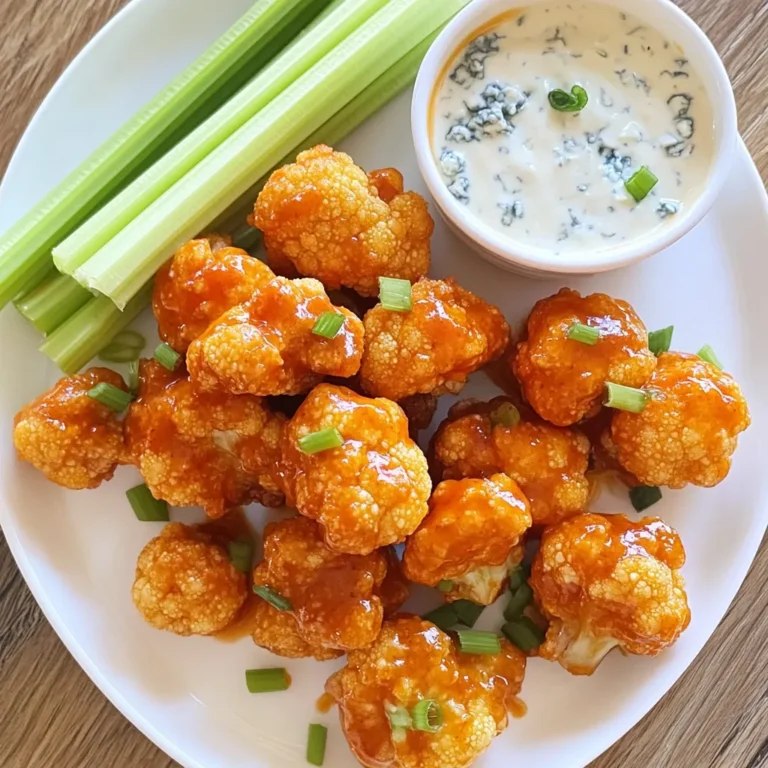
Buffalo Cauliflower Bites Crispy and Flavorful Snack

For Mediterranean stuffed sweet potatoes, you need fresh and wholesome ingredients. Here’s the list: - 2 large sweet potatoes - 1 cup cooked quinoa - 1 cup canned chickpeas, rinsed and drained - 1 cup cherry tomatoes, halved - 1/2 cup feta cheese, crumbled - 1/4 cup kalamata olives, sliced - 1/4 cup red onion, finely chopped - 2 tablespoons olive oil - 1 tablespoon lemon juice - 1 teaspoon garlic powder - Salt and pepper to taste - Fresh parsley for garnish Each ingredient plays a key role in creating the flavors of this dish. Sweet potatoes provide a soft, sweet base. Quinoa adds protein and a nice texture. Chickpeas give heartiness, while cherry tomatoes and red onion add freshness. Feta cheese and olives bring salty, tangy notes. Olive oil and lemon juice brighten the flavors. Garlic powder, salt, and pepper enhance everything. Fresh parsley makes it look beautiful and adds an herbaceous touch. Gather all these ingredients to make your cooking experience smooth and fun! {{ingredient_image_1}} Start by preheating your oven to 400°F (200°C). This heat helps cook the sweet potatoes evenly. Next, wash the sweet potatoes well under cold water. Use a fork to poke several holes in each potato. This step lets steam escape while baking. Now, place the sweet potatoes on a baking sheet. Bake them for 45 to 60 minutes. They are ready when a fork easily pierces them. While the sweet potatoes bake, it's time to make the filling. In a large bowl, combine 1 cup of cooked quinoa and 1 cup of rinsed chickpeas. Add in 1 cup of halved cherry tomatoes, ½ cup of crumbled feta cheese, ¼ cup of sliced kalamata olives, and ¼ cup of finely chopped red onion. Drizzle the mix with 2 tablespoons of olive oil and 1 tablespoon of lemon juice. Sprinkle in 1 teaspoon of garlic powder along with salt and pepper to taste. Stir everything together until well mixed. Once the sweet potatoes are done, take them out of the oven. Let them cool for a few minutes. Then, cut each sweet potato in half lengthwise. Use a fork to fluff the sweet potato flesh gently. Be careful not to break the skin. Now, spoon the Mediterranean filling generously into each half. Place the stuffed sweet potatoes back in the oven for 10 more minutes. This step warms up the filling. Finally, remove them from the oven. Sprinkle fresh parsley on top before serving them warm. Enjoy your tasty dish! To start, pick large sweet potatoes. They cook better and hold more filling. Wash them well and poke holes with a fork. This helps steam escape. Preheat your oven to 400°F (200°C). Bake the sweet potatoes for 45-60 minutes. They should feel soft when you pierce them with a fork. Let them cool slightly before cutting. This ensures the filling stays inside. To make the filling extra tasty, use fresh ingredients. Combine cooked quinoa, chickpeas, and halved cherry tomatoes in a bowl. Add crumbled feta cheese and sliced kalamata olives for a salty kick. Finely chopped red onion adds crunch and zest. Drizzle olive oil and lemon juice over the mix. Sprinkle in garlic powder, salt, and pepper. This blend gives a rich, Mediterranean flavor. Garnishing makes your dish look beautiful. After baking, sprinkle fresh parsley on top. It adds a pop of color and freshness. You can also add extra feta for a creamy touch. Serve the stuffed sweet potatoes warm. This makes them even more inviting. A well-garnished dish impresses everyone at the table. Pro Tips Choose the Right Sweet Potatoes: Look for sweet potatoes with smooth skin and no blemishes for the best flavor and texture. Customize Your Filling: Feel free to add other ingredients like spinach, artichokes, or nuts for added flavor and texture. Serve with a Sauce: Drizzle some tahini or yogurt sauce on top for an extra layer of creaminess and flavor. Perfectly Cooked Sweet Potatoes: To check if sweet potatoes are done, insert a fork; it should slide in easily without resistance. {{image_2}} You can change the stuffing to suit your taste. Try using brown rice or farro instead of quinoa. Both add a nice texture. You can also mix in roasted bell peppers or spinach for extra color and flavor. If you love spices, add some cumin or smoked paprika to the filling. These spices give your dish a warm, rich taste. For a vegan version, simply skip the feta cheese. You can replace it with mashed avocado or a nut-based cheese. Some brands make great vegan feta that has a similar flavor. Also, make sure to use a vegan-friendly quinoa. This keeps your meal plant-based and delicious. You can switch up the cheese to find your favorite flavor. Goat cheese adds a tangy kick. Mozzarella melts beautifully and gives a creamy texture. If you want something sharp, try using aged cheddar. Each cheese brings a new taste experience to your sweet potatoes. Feel free to experiment! Store leftover Mediterranean stuffed sweet potatoes in an airtight container. They last for up to four days in the fridge. Make sure to cool them before sealing. This helps keep moisture at bay and prevents sogginess. You can freeze these stuffed sweet potatoes for longer storage. Wrap each one tightly in plastic wrap and then place them in a freezer bag. They can last up to three months in the freezer. Thaw in the fridge before reheating for the best texture. To reheat, you can use the oven or microwave. For the oven, set it to 350°F (175°C). Place the stuffed sweet potatoes on a baking sheet and heat for about 15-20 minutes. If using a microwave, cover them with a damp paper towel and heat in 1-minute intervals until warm. Enjoy your tasty dish! To make Mediterranean stuffed sweet potatoes, first bake the sweet potatoes. Preheat your oven to 400°F (200°C). Wash the sweet potatoes and poke holes in them. Bake for about 45-60 minutes until tender. While they bake, mix your filling. In a bowl, combine cooked quinoa, chickpeas, cherry tomatoes, feta cheese, olives, and red onion. Add olive oil, lemon juice, garlic powder, salt, and pepper. Stir well. After baking, cut the sweet potatoes in half. Fluff the insides and fill them with the mixture. Bake again for 10 minutes. Garnish with parsley before serving. Mediterranean stuffed sweet potatoes are packed with nutrients. Sweet potatoes are high in fiber and vitamins A and C. Quinoa adds protein and essential amino acids. Chickpeas provide protein and iron. Feta cheese offers calcium but watch for salt content. Tomatoes add antioxidants. This dish is balanced and filling. Yes, you can use other vegetables in the stuffing. Zucchini, bell peppers, or spinach are great choices. Just chop them finely. You can roast or sauté them first for extra flavor. Feel free to mix and match based on what you like. Stuffed sweet potatoes last about 3 to 5 days in the fridge. Store them in an airtight container to keep them fresh. Reheat in the oven or microwave before eating. Just ensure they're heated through. Mediterranean stuffed sweet potatoes combine great flavors and nutrients. We explored the key ingredients, step-by-step prep, and cooking tips. It’s a fun and simple dish to make, with room for your personal touch. Try different fillings or toppings to make it your own. Remember, you can store them in the fridge or freezer for later meals. Enjoy this healthy dish that tastes amazing and fills you up.

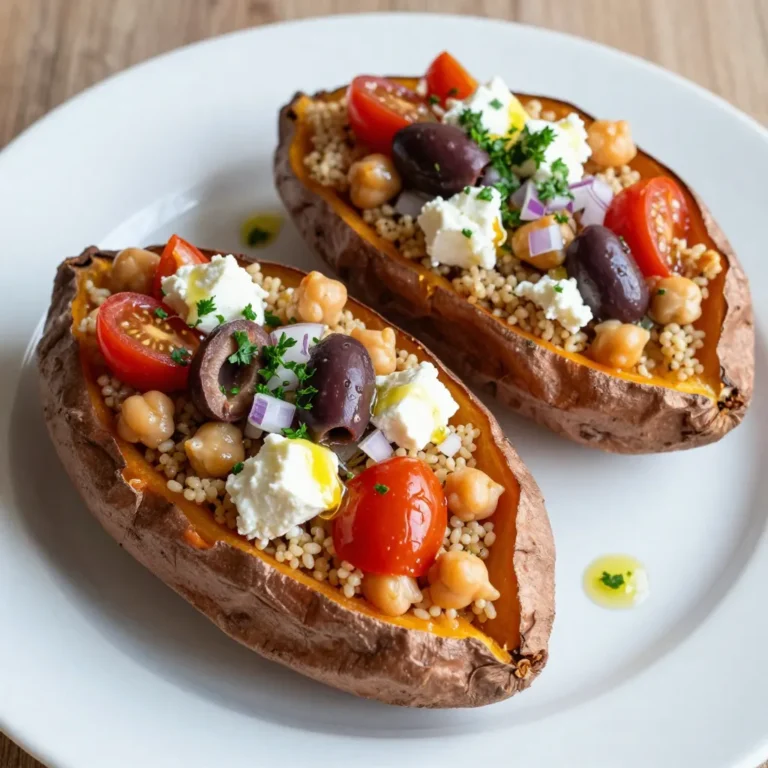
Mediterranean Stuffed Sweet Potatoes Flavorful Dish

Here is what you need to make chocolate covered banana pops: - 4 ripe bananas - 1 cup semi-sweet chocolate chips - 2 tablespoons coconut oil - 1/2 cup crushed nuts (e.g., almonds, walnuts, or peanuts) - 1/2 cup shredded coconut (optional) - 4 popsicle sticks or wooden skewers - Sea salt for sprinkling (optional) These ingredients are simple and easy to find. Ripe bananas give the best flavor and sweetness. Semi-sweet chocolate chips melt nicely, creating a smooth coating. Coconut oil helps the chocolate stay shiny and smooth. You can choose your favorite nuts or skip them if you prefer. Shredded coconut adds a fun texture, but it’s not a must. Don’t forget the popsicle sticks! They make it easy to hold and eat the pops. A sprinkle of sea salt elevates the flavor, making it sweet and salty. It is fun to mix and match toppings. Use your favorites to create a unique treat! This list keeps it easy and fun. Gather these ingredients, and you are ready to create a delicious snack! {{ingredient_image_1}} First, take your ripe bananas. Peel them carefully. Next, cut each banana in half across the middle. You should have four pieces. Now, grab your popsicle sticks. Insert one stick into the cut end of each banana half. This step will make them easy to hold later. Next, line a baking sheet with parchment paper. This will stop the banana pops from sticking. Place your banana pops on the lined sheet. Make sure they are spaced apart. Now, put the baking sheet in the freezer. Let the pops freeze for about one hour. They should feel firm to the touch. While the bananas freeze, you can melt the chocolate. In a microwave-safe bowl, add the chocolate chips and coconut oil. Heat this mixture in the microwave. Do it in 30-second intervals. Stir in between each interval until it is smooth. Once the bananas are frozen, take them out of the freezer. Dip each banana pop into the melted chocolate. Make sure to coat them well. Let any extra chocolate drip off. Before the chocolate hardens, sprinkle crushed nuts or shredded coconut on top. If you like, add a pinch of sea salt for a tasty twist. Place the decorated pops back on the baking sheet. Return them to the freezer for about 30 more minutes. Once the chocolate is set, your banana pops are ready to enjoy! To get a smooth dip, melt your chocolate chips with coconut oil. Use a microwave-safe bowl. Heat in 30-second bursts, stirring each time. This method helps the chocolate stay smooth. To prevent chocolate from hardening too quickly, work fast. Dip each banana pop while the chocolate is warm. You can also keep the melted chocolate over low heat. This keeps it runny. For presentation, arrange the pops neatly on a platter. Drizzle leftover melted chocolate over the top. This adds a touch of elegance. You can also sprinkle more crushed nuts or colorful sprinkles for fun. Try different flavor combinations. Use crushed nuts, shredded coconut, or a sprinkle of sea salt. Each adds a unique taste. You can also dip them in white or dark chocolate for variety. Bananas are a great snack. They are high in potassium and vitamins. These nutrients help with muscle function and energy. For healthier chocolate options, choose dark chocolate. It has less sugar and more antioxidants. You can also look for dairy-free or organic chocolate. These options can make your treat even better! Pro Tips Perfectly Ripe Bananas: Choose bananas that are just ripe with a few brown spots for optimal sweetness and flavor. Chocolate Melting Technique: Use a double boiler or microwave in short bursts to prevent burning the chocolate while melting. Customization Options: Feel free to experiment with different toppings like mini chocolate chips, dried fruits, or sprinkles for added fun! Storage Tips: Store leftover pops in an airtight container in the freezer for up to a week for a quick and satisfying snack. {{image_2}} You can make chocolate covered banana pops even more fun with new flavors. Try adding different toppings like: - Sprinkles - Crushed cookies - Mini marshmallows - Drizzles of caramel or peanut butter You can also switch up the chocolate. Use white or dark chocolate for a unique taste. Each type gives a new twist to your banana pops. Bananas are great, but many other fruits work well too. Try using: - Strawberries - Apples - Pineapple chunks These fruits are delicious when dipped in chocolate. If you need a change due to allergies, choose fruits that work for you. Make your banana pops festive for holidays or parties. Add seasonal toppings like: - Red and green sprinkles for Christmas - Heart-shaped sprinkles for Valentine’s Day - Pumpkin spice for fall treats You can also use themed decorations. Use fun colors and shapes to match your event. This makes your treats stand out and adds joy to any gathering. To keep your banana pops fresh, store them in an airtight container. Place parchment paper between each pop to avoid sticking. This helps keep them nice and neat. They freeze well, so don’t worry if you have extras. Just pop them back in the freezer. For reheating, I suggest letting them sit out for a few minutes. This way, they soften up a bit. Then, enjoy them as is. There’s no need to reheat chocolate-covered banana pops. Banana pops stay good in the freezer for about two months. After that, they may lose taste or texture. Check for signs of spoilage. If the chocolate looks dull or the bananas turn brown, it’s time to toss them. Freshness matters for flavor and enjoyment. Have extra chocolate or toppings? Use that chocolate for drizzling on other snacks! You can coat pretzels or fruit slices. For toppings, sprinkle crushed nuts on yogurt or oatmeal. If you want other dessert ideas, try making chocolate-covered strawberries or apples. They are fun and easy! You can use the same steps for coating. Enjoy getting creative with your leftovers! For melting, I recommend using semi-sweet chocolate chips. They melt well and have a nice taste. You can also use dark chocolate for a richer flavor. If you prefer a sweeter option, choose milk chocolate. Just make sure the chocolate is made for melting. Avoid chocolate bars with extra ingredients, as they may not melt smoothly. Yes, you can make these banana pops ahead of time. After coating them in chocolate, freeze them for up to two weeks. Just wrap each pop in plastic wrap to prevent freezer burn. You can also prepare the bananas and freeze them in advance. This way, you can dip them in chocolate whenever you want a treat. To make this recipe vegan, swap out the semi-sweet chocolate chips for dairy-free chocolate chips. Use coconut oil as the fat, which is already vegan. For the toppings, ensure that the nuts and coconut are free from animal products. This way, you can enjoy a tasty treat without any animal-based ingredients. You learned how to make tasty banana pops. We covered the easy steps, ingredients, and fun variations. Plus, we shared tips on storage and health benefits. Feel free to get creative with flavors and toppings. These pops can fit any party or snack time. Enjoy making them with friends and family. These treats are not just yummy; they're fun to make! Happy snacking!

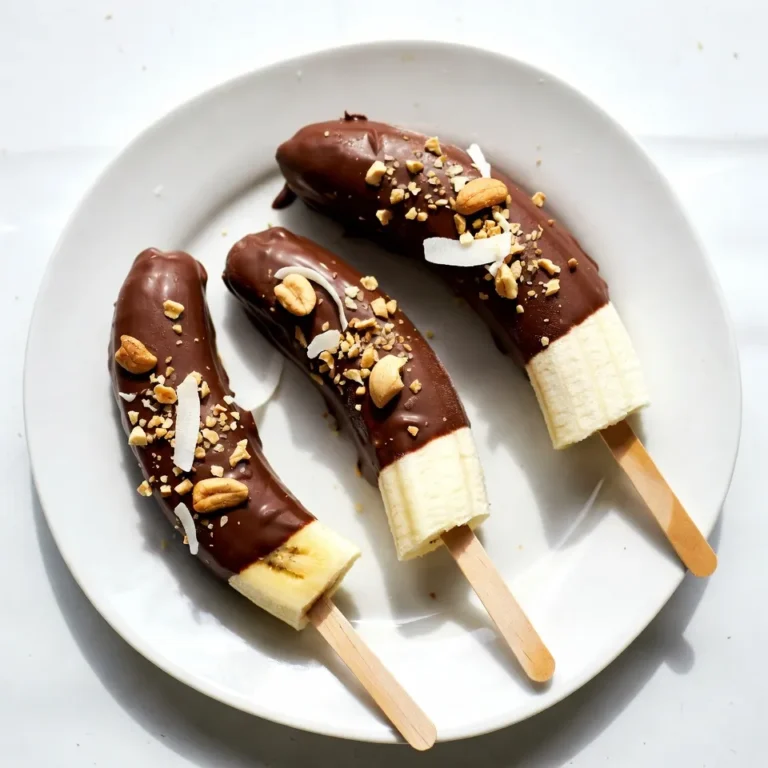
Chocolate Covered Banana Pops Easy and Fun Treat

- 2 cups all-purpose flour - 1/2 cup granulated sugar - 1 tablespoon baking powder - 1/2 teaspoon salt - 1/4 cup cold unsalted butter, cubed - 1/2 cup heavy cream - 1 large egg - 1 teaspoon vanilla extract - 1/2 cup dried cranberries - 1 tablespoon orange zest - 1 cup powdered sugar - 2 tablespoons freshly squeezed orange juice Gathering the right ingredients is key. Start with the dry mix. You need flour, sugar, baking powder, and salt. These form the base of your scone. Each plays a role. Flour gives structure, while sugar adds sweetness. Baking powder helps the scones rise, and salt balances the flavors. Next, grab the wet ingredients. Cold unsalted butter is essential. It keeps the scones light. You'll also need heavy cream, a large egg, and vanilla extract. These add moisture and flavor. The cream helps create a tender crumb. Now, for the add-ins and glaze. Dried cranberries bring a tart punch. Orange zest adds brightness. For the glaze, mix powdered sugar with fresh orange juice and more zest. This will give your scones a sweet, tangy finish that glistens. By choosing fresh and high-quality ingredients, you’ll elevate your scones. Each bite will burst with flavor, making them a delightful breakfast treat. {{ingredient_image_1}} 1. Preheat the oven and prepare the baking sheet. Set your oven to 400°F (200°C). While it heats, line a baking sheet with parchment paper. This helps the scones bake evenly and not stick. 2. Mixing the dry ingredients and incorporating butter. In a big bowl, whisk together 2 cups of all-purpose flour, 1/2 cup of granulated sugar, 1 tablespoon of baking powder, and 1/2 teaspoon of salt. Next, add 1/4 cup of cold, cubed unsalted butter. Use your fingers or a pastry cutter to mix until it looks like coarse crumbs. 3. Adding cranberries and orange zest. Toss in 1/2 cup of dried cranberries and 1 tablespoon of orange zest. Stir gently so they mix well with the flour mixture. 1. Whisking together wet ingredients. In another bowl, whisk 1/2 cup of heavy cream, 1 large egg, and 1 teaspoon of vanilla extract. This adds moisture and flavor to your dough. 2. Folding wet and dry ingredients together. Pour the wet mixture into the dry ingredients. Gently fold them together until just combined. The dough should feel a bit sticky but not wet. Do not overmix, as this can make your scones tough. 1. Shaping the dough and cutting scones. Turn the dough out onto a lightly floured surface. Shape it into a disc about 1-inch thick. Cut this disc into 8 wedges. Place them on the prepared baking sheet, spaced apart. 2. Baking time and visual cues for doneness. Bake the scones for about 15 to 18 minutes. They should be lightly golden on the top when done. Keep an eye on them toward the end to avoid burning. To make the best scones, cold butter is key. When butter is cold, it creates flaky layers. I cut the butter into small cubes and chill it before mixing. This helps the scones rise and stay light. Avoiding overmixing is also important. When you combine the wet and dry ingredients, mix just until they come together. If you mix too much, the scones become tough. A sticky dough is perfect for good scones. Choosing high-quality ingredients will boost your scone's taste. I always use fresh orange zest and dried cranberries. They bring a bright flavor that complements each other. You can also experiment with additional spices. Try adding a pinch of cinnamon or nutmeg for warmth. Each spice brings a new twist to the classic recipe. To make your scones look great, try garnishing them. Add extra orange slices or a few cranberries on the plate. This adds a pop of color and makes the dish more inviting. Serving temperature matters, too. I love serving these scones warm from the oven. This way, the glaze melts into the scones, making each bite even more delicious. Pro Tips Use Cold Butter: Make sure your butter is very cold when mixing it into the flour. This helps create flaky layers in your scones. Don't Overmix: When combining wet and dry ingredients, mix just until combined. Overmixing can lead to tough scones. Check for Doneness: Scones should be lightly golden on top. If you're unsure, insert a toothpick; it should come out clean. Glaze While Warm: Drizzle the glaze over the scones while they are still warm for better absorption and a shinier finish. {{image_2}} You can swap out cranberries for other fruits. Try blueberries or chopped apples for a new twist. Dried cherries also make a great choice. You can even mix different fruits for a fun blend. Adding nuts or chocolate can enhance the flavor too. Walnuts or pecans add crunch, while chocolate chips bring sweetness. Using different citrus zests adds depth to your scones. Lemon zest brightens the flavor, while lime gives a fresh twist. You might also consider adding spices. A pinch of cinnamon or nutmeg can warm the taste. These small changes can make your scones feel unique and special. For gluten-free options, use gluten-free flour blends. They work well and keep the texture light. You can also make vegan scones. Use coconut oil instead of butter and almond milk for cream. These simple swaps let everyone enjoy your scones, no matter their diet. To keep your scones fresh, store them in an airtight container. This helps keep moisture in and prevents the scones from drying out. You can also wrap them in plastic wrap before placing them in the container for extra protection. The best storage duration is about 2 to 3 days at room temperature. If you want to keep them longer, freezing is a great option. If you want to save scones for later, freezing is easy. First, let the scones cool completely after baking. Then, place them on a baking sheet in a single layer. Freeze for about an hour until firm. Once frozen, transfer the scones to a freezer bag. Be sure to remove as much air as possible. You can freeze them for up to 3 months. To enjoy, simply thaw them in the fridge overnight. Reheat in the oven at 350°F (175°C) for about 10 minutes for that fresh-baked taste. Understanding how long your scones last is key. Freshly baked cranberry orange glazed scones are best within 1 to 2 days for optimal flavor and texture. After that, they may lose some quality. If stored properly, frozen scones can maintain their quality for 3 months. Always check for any signs of freezer burn or off smells before eating. Enjoy your delightful breakfast treat while it's still fresh! To get scones to rise, you need baking powder. This key ingredient creates bubbles in the dough that make it puff up. Cold butter is also important. It helps create steam as it melts during baking, adding to the rise. Make sure to mix the butter into the flour until it looks like crumbs. This helps keep the scones light and airy. Yes, you can make scone dough ahead of time. Prepare the dough, then wrap it tightly in plastic wrap. You can store it in the fridge for up to 24 hours. If you want to keep it longer, freeze the dough. Just remember to thaw it in the fridge before baking. This saves time and lets you enjoy fresh scones when you want. Serve cranberry orange glazed scones warm for the best taste. They pair well with butter or clotted cream. For drinks, try them with tea or coffee. A light fruit tea goes nicely too. You can also add fresh orange slices or cranberries as a garnish for a pretty touch. This makes for a delightful breakfast or snack! You now have a complete guide to making delicious cranberry orange scones. We covered the key ingredients, step-by-step instructions, and helpful tips. Remember to keep your butter cold and don’t overmix to get the best texture. Feel free to experiment with different fruits and flavors to suit your taste. With proper storage, your scones can stay fresh and tasty. Enjoy baking and sharing these treats with loved ones!

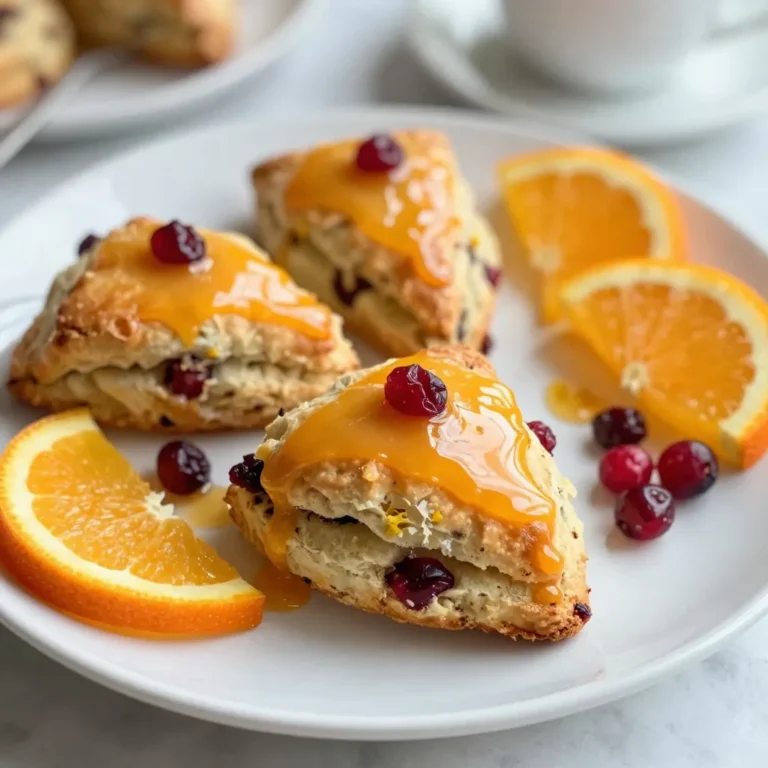
Cranberry Orange Glazed Scones Delightful Breakfast Treat

PREV 1 … 4 5 6 … 86 NEXT
tasty trail blazer

explore

DessertsDinnerAppetizersDrinks

Our Policies

  • Cookie Policy
  • Copyright Policy
  • Disclaimer
  • GDPR Policy
  • Terms Of Use
Back to Top
  • About
  • Contact Us
  • Privacy Policy
© 2026 tasty trail blazer