FREE DINNER EBOOK! Get your copy!
  • Cookie Policy
  • GDPR Policy
  • Disclaimer
  • Terms Of Use
  • Visit my other site: Fun Cookie Recipes
tasty trail blazer
  • Home
  • Dinner
  • Desserts
  • Drinks
  • Appetizers
  • Contact
  • About
  • Privacy Policy
  • Home
  • Dinner
  • Desserts
  • Drinks
  • Appetizers
  • Contact
  • About
  • Privacy Policy
  • Cookie Policy
  • GDPR Policy
  • Disclaimer
  • Terms Of Use
Visit my other site: Fun Cookie Recipes

HOME / CATEGORIES /

Latest

To make Cajun Chicken Tortellini, gather these ingredients: - 2 cups cheese tortellini - 1 pound chicken breast, diced - 1 tablespoon Cajun seasoning - 1 tablespoon olive oil - 1 bell pepper (red or green), sliced - 1 medium onion, sliced - 3 cloves garlic, minced - 1 cup heavy cream - 1 cup diced tomatoes (canned or fresh) - 1/2 cup grated Parmesan cheese - Salt and pepper to taste - Fresh parsley, chopped (for garnish) Each ingredient plays a key role in making this dish tasty. The cheese tortellini brings a delightful texture. The chicken adds protein and heartiness. Cajun seasoning provides the signature kick. Olive oil is perfect for cooking and flavor. Bell pepper and onion create a sweet base. Garlic adds depth and aroma. Heavy cream makes the sauce rich and creamy. Diced tomatoes bring freshness and acidity. Parmesan cheese gives a savory touch. Salt and pepper enhance all the flavors. Lastly, fresh parsley brightens the dish and adds color. Having everything ready makes cooking easy. Trust me, you’ll love how these ingredients come together! {{ingredient_image_1}} To cook the tortellini, start by bringing a large pot of salted water to a full boil. This adds flavor to the pasta. Once boiling, carefully add 2 cups of cheese tortellini. Cook it according to the package instructions, usually about 2 to 4 minutes, until it is al dente. Al dente means it is firm but not hard. After cooking, drain the tortellini and set it aside. This will help keep it from getting mushy later. Next, let’s sauté the chicken. In a large skillet, heat 1 tablespoon of olive oil over medium heat. Season 1 pound of diced chicken breast with 1 tablespoon of Cajun seasoning, salt, and pepper. The seasoning adds a nice kick to the chicken. Add the chicken to the hot skillet. Cook it for about 6 to 7 minutes until it turns golden brown and is fully cooked. Make sure to stir it often for even cooking. Once done, remove the chicken from the skillet and set it aside. In the same skillet, add your sliced bell pepper and onion. Sauté them for about 4 to 5 minutes until they soften. This adds color and flavor to your dish. Then, add 3 minced garlic cloves. Cook for an additional 1 to 2 minutes. Garlic brings a wonderful aroma and taste to the mix. Now it’s time to make the sauce. Pour in 1 cup of heavy cream and 1 cup of diced tomatoes. Stir well to combine all the ingredients. Bring the mixture to a simmer. Let it cook for about 5 minutes. This allows the sauce to thicken slightly. If you want a thicker sauce, let it simmer a bit longer. Return the cooked chicken to the skillet. Gently fold in the drained tortellini. This helps to mix all the flavors together. Sprinkle in 1/2 cup of grated Parmesan cheese. Stir until everything is coated in the sauce. If the sauce seems too thick, add a splash of water or chicken broth until it reaches your desired consistency. Finally, taste the dish and adjust the seasoning with salt, pepper, or more Cajun seasoning as needed. - Avoiding overcooking: Cook tortellini for just a few minutes. Follow the package guide. Al dente means firm, not mushy. Overcooked tortellini loses its shape. - Choosing the right type of tortellini: I love using cheese tortellini. It adds a rich flavor. You can try spinach or meat tortellini too. Each type brings its own taste to the dish. - Experimenting with different Cajun seasonings: Cajun seasoning is key. You can try different brands. Some may be hotter or milder. Adjust to your taste. Don't be afraid to mix spices for a unique kick. - Tips for adding extra flavor: Fresh herbs are great. Add thyme or oregano for depth. A squeeze of lemon juice brightens the dish. You can also toss in some hot sauce for extra heat. - Suggestions for garnishing: Fresh parsley adds a pop of color. Sprinkle it on top before serving. For a touch of elegance, add extra Parmesan. A drizzle of olive oil can also enhance the look. - Serving ideas for guests: Serve in a large bowl for a family-style meal. Provide bowls and utensils for guests to help themselves. Pair with a simple salad or crusty bread for a complete feast. Pro Tips Perfectly Cook Tortellini: Always cook the tortellini in salted water and follow the package instructions closely for the best texture. Season Chicken Generously: Don't be shy with the Cajun seasoning; it enhances the flavor significantly. Adjust to your spice preference. Thicken Your Sauce: If you want a creamier sauce, let it simmer a bit longer. Adding a splash of chicken broth can also help if it becomes too thick. Garnish for Presentation: A sprinkle of fresh parsley and extra Parmesan cheese not only adds color but also elevates the dish's flavors. {{image_2}} To make this dish meat-free, swap the chicken for plant-based protein. Options like tofu or tempeh work great. You can also use canned chickpeas for added protein. For extra nutrition, add colorful vegetables. Bell peppers, spinach, and zucchini bring flavor and vitamins. Toss in some cherry tomatoes for a sweet burst. If you love heat, spice it up! Add cayenne pepper or crushed red pepper flakes. This gives your meal a nice kick. You can also use spicy sausage instead of chicken. And don't forget to sprinkle in more Cajun seasoning for that bold taste. You can choose between a creamy or tomato-based sauce. If you want a lighter version, use tomato sauce instead of heavy cream. For a creamy feel without heavy cream, use coconut milk or cashew cream. These options keep your dish rich and tasty. Feel free to try different flavors and make this dish your own! To store your Cajun Chicken Tortellini in the fridge, let it cool first. Place it in an airtight container. This keeps the dish fresh and safe. I recommend using glass or plastic containers with tight lids. These containers help prevent spills and keep the flavor intact. Your meal will last for about three to four days in the fridge. To freeze Cajun Chicken Tortellini, wait until it cools. Use freezer-safe bags or containers. Remove as much air as possible before sealing. This helps avoid freezer burn. When you're ready to enjoy it again, thaw the dish overnight in the fridge. To reheat, warm it in a skillet over low heat. Add a splash of water or broth if needed. This keeps the dish creamy and delicious. Cajun Chicken Tortellini stays fresh for a short time. In the fridge, it lasts three to four days. In the freezer, it can last up to three months. Look for signs of spoilage, like an off smell or discoloration. If it looks or smells strange, it's best to toss it. Keeping an eye on freshness ensures your meal tastes great every time you enjoy it. Cajun Chicken Tortellini is a tasty one-pan meal. It combines tender chicken, cheese tortellini, and Cajun spices. The dish has a creamy sauce made with heavy cream and tomatoes. You can enjoy it in about 30 minutes. Yes, you can use frozen tortellini. Just cook them according to the package. Frozen tortellini usually takes a bit longer than fresh. Add them to boiling water and cook until they float. This should take about 5-7 minutes. If you want a lighter option, you can use half-and-half. You could also use milk with a bit of flour. This will help thicken the sauce. For a vegan choice, try coconut milk or almond milk. To make this dish dairy-free, skip the heavy cream and cheese. Use coconut milk or a dairy-free cream. You can also use nutritional yeast for a cheesy flavor. It adds a nice taste without dairy. Cajun Chicken Tortellini has a mild to medium spice level. The heat comes from Cajun seasoning. If you prefer less spice, use less seasoning. You can always taste and adjust as you cook. Definitely! You can add veggies like spinach, zucchini, or mushrooms. These will add flavor and nutrition. Just sauté them with the bell pepper and onion for the best taste. Cajun Chicken Tortellini combines bold flavors and simple steps for a fantastic meal. You can cook cheese tortellini and sauté chicken, peppers, and onions with ease. Then, mix everything in a creamy sauce for a delicious dish. Remember, you can adjust spices and add veggies to match your taste. This dish is easy to store and reheats well. Try different variations to keep it exciting. Enjoy cooking and savoring this tasty meal!

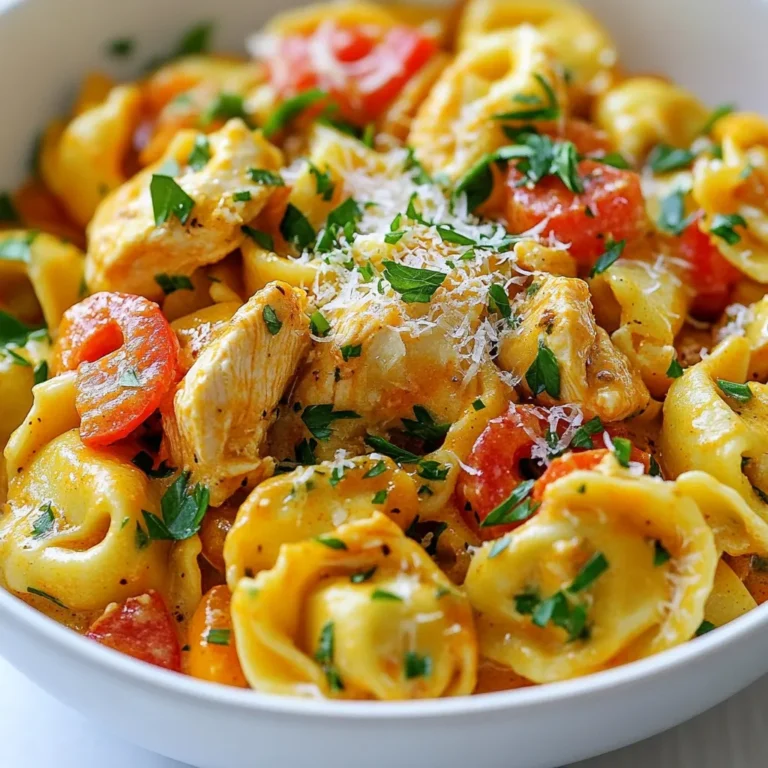
Cajun Chicken Tortellini Flavorful One-Pan Meal

- orzo pasta - cherry tomatoes - fresh mozzarella balls - fresh basil leaves - olive oil - balsamic glaze - garlic powder - salt and pepper - optional: pine nuts To make a great Caprese Orzo Salad, you need a few key ingredients. First, orzo pasta is a small, rice-shaped pasta. It cooks quickly and adds a nice texture. Next, cherry tomatoes bring sweetness and color. Fresh mozzarella balls add creaminess, making every bite delicious. Fresh basil leaves give the salad its classic Caprese feel. Olive oil is vital for dressing, while balsamic glaze adds a sweet tang. Garlic powder boosts flavor, and salt and pepper help balance everything. If you want a crunch, add toasted pine nuts. Gather these ingredients, and you’ll create a fresh salad that is full of flavor. You can find most of these items at your local grocery store. Each bite will remind you of sunny Italian days! {{ingredient_image_1}} To start, bring a large pot of salted water to a boil. Add 1 cup of orzo pasta. Cook it according to the package instructions. This usually takes about 8 to 10 minutes. You want the orzo to be al dente, which means it should be firm but not hard. To check, taste a piece a minute or two before the time is up. Once done, drain the orzo in a colander and rinse it under cold water to stop the cooking process. This also helps cool it down. In a large mixing bowl, combine the cooled orzo, 1 cup of halved cherry tomatoes, and 1 cup of halved mozzarella balls. Stir gently to mix the ingredients without breaking the mozzarella. This step creates a colorful base for your salad. It’s simple but essential for a fresh flavor. Now, we’ll add some flavor! Drizzle 3 tablespoons of olive oil and 2 tablespoons of balsamic glaze over the orzo mixture. Then, sprinkle in 1 teaspoon of garlic powder, along with salt and pepper to taste. Mix everything well. Next, gently fold in 1 cup of torn basil leaves. This adds a fresh taste that is key to a Caprese salad. If you want some crunch, toast ¼ cup of pine nuts in a dry skillet over medium heat for 2-3 minutes until golden. Add these to the salad for extra texture. Let the salad chill in the refrigerator for at least 30 minutes. This resting time helps the flavors blend together beautifully. To avoid mushy pasta, cook the orzo just until al dente. This means it should feel firm but not hard. After draining, rinse it under cold water. This stops the cooking process and keeps the pasta from getting soft. For the freshest taste, always use ripe cherry tomatoes and high-quality mozzarella. Fresh basil leaves should be bright green and fragrant. These ingredients make all the difference in flavor and texture. Serve the salad chilled or at room temperature. It looks great in a large bowl or on a platter. You can add grilled chicken or shrimp for extra protein. This salad pairs well with crusty bread or a light soup. These options make for a complete meal that everyone will love. You can make this salad ahead of time. Just skip adding basil until you are ready to serve. This keeps the leaves fresh and vibrant. You can also customize the flavors by adding ingredients like olives or bell peppers. If you want a kick, try adding a dash of crushed red pepper flakes. These little tweaks can turn a simple salad into a new favorite. Pro Tips Perfectly Cooked Orzo: Make sure to cook the orzo pasta until al dente for the best texture in your salad. Overcooked pasta can become mushy. Fresh Ingredients Matter: Use the freshest cherry tomatoes and basil you can find to enhance the flavor of your salad. Fresh ingredients make a significant difference. Customize Your Salad: Feel free to add other ingredients like diced cucumbers or bell peppers for extra crunch and flavor. This salad is versatile! Make Ahead: This salad can be made a few hours in advance. Just keep it refrigerated and give it a good stir before serving to redistribe the dressing. {{image_2}} If you want to mix things up, try using different cheeses. Feta or goat cheese can add a nice twist. They bring a tangy flavor that pairs well with the other ingredients. If you prefer herbs, swap basil for parsley or cilantro. Each herb gives the salad a unique taste and freshness. Instead of balsamic glaze, explore different vinaigrettes. A simple olive oil and vinegar mix can work wonders too. For a zesty flavor, add lemon or lime juice. This brightens the dish and enhances the flavors. A citrus twist can make your salad feel light and refreshing. Adjust your salad based on the season. In summer, add some fresh cucumbers or bell peppers for crunch. In fall, think about roasted squash or brussels sprouts for warmth. Seasonal vegetables not only taste great but also keep your salad vibrant and exciting. Enjoy the best of each season in your Caprese Orzo Salad! Store your Caprese Orzo Salad in an airtight container. Glass or plastic containers work well. This keeps the salad fresh and prevents odors from mixing. The salad lasts about 3 to 5 days in the fridge. However, it tastes best within the first couple of days. Can you freeze Caprese Orzo Salad? I don’t recommend it. The fresh ingredients, like tomatoes and basil, do not freeze well. If you want to save it, consider freezing the orzo separately. To do this, cook and cool the orzo, then place it in a freezer-safe bag. Press out all the air before sealing. When ready to use, thaw it in the fridge overnight. Reheating Caprese Orzo Salad is not needed. Instead, you can refresh it. Add a splash of olive oil or balsamic glaze. Toss in some fresh basil or a few cherry tomatoes. This brings back the salad’s bright flavors. It makes the dish feel new again! Yes, you can make Caprese Orzo Salad ahead of time. This salad is great for meal prep. To do this, follow these tips: - Cook the orzo and let it cool completely. - Mix in all the other ingredients, but hold off on the basil until just before serving. - Store it in an airtight container in the fridge. It lasts for up to three days. - When ready to eat, add the torn basil leaves. This keeps them fresh and vibrant. Regular orzo pasta is not gluten-free. However, there are gluten-free pasta options available. Here are some alternatives: - Brown rice orzo offers a similar texture. - Quinoa pasta is another healthy choice. - Chickpea pasta adds a nice flavor and protein boost. These options allow everyone to enjoy this tasty salad without worry. You can serve Caprese Orzo Salad warm, but it's best chilled. Serving it warm changes the texture and flavor. If you prefer it warm, follow these steps: - Cook the orzo and mix with the other ingredients while still warm. - Serve it right away for a comforting dish. - Keep in mind, the flavors blend better when chilled. Enjoy experimenting with the temperature to find your favorite way to serve it! This blog covers the steps to make a great Caprese Orzo Salad. We discussed key ingredients, cooking tips, and ways to adjust flavors. You learned how to store leftovers and how to make this dish your own. Final thoughts: This salad is easy and fun. It's perfect for any meal. Try different herbs and toppings to keep it fresh. Enjoy your delicious creation!

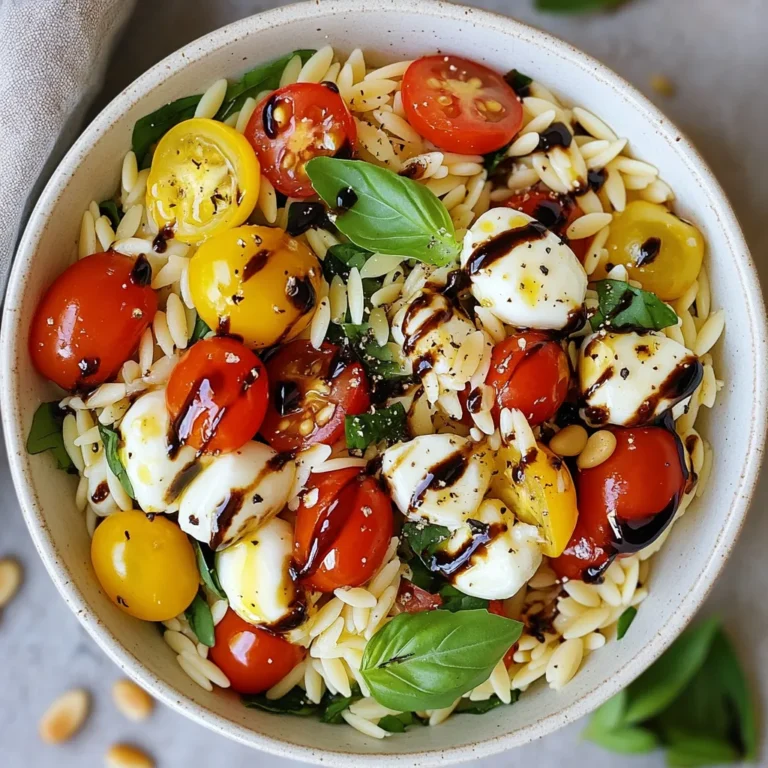
Caprese Orzo Salad Simple and Fresh Flavor Boost

- 1 lb white fish fillets (tilapia or cod) - 1 teaspoon cumin - 1 teaspoon paprika - Salt and pepper to taste - 1 tablespoon olive oil - 8 small corn tortillas - 1 cup diced ripe mango - 1/2 red onion, finely chopped - 1 jalapeño, minced (seeds removed) - 1/4 cup fresh cilantro, chopped - Juice of 2 limes - 1/2 avocado, sliced - Optional: 1 cup shredded cabbage for topping The main ingredients focus on fresh fish, spices, and juicy mango. I love using tilapia or cod for this dish. They cook well and have a mild flavor. The spices add warmth and depth. Cumin and paprika blend perfectly, enhancing the fish's taste. Next, the other ingredients bring a burst of color and flavor. The diced mango is sweet and bright. It pairs well with the spicy jalapeño and crunchy red onion. Fresh cilantro adds a hint of earthiness. The lime juice brings all the flavors together with a zesty kick. Lastly, don't forget the tortillas! Corn tortillas are my favorite. They are soft and add a nice texture. They hold the fish and salsa well. For a crunch, add some shredded cabbage on top. It adds a great layer of flavor and texture. This mix of ingredients makes the tacos fresh and flavorful. You’ll want to take a bite right away! {{ingredient_image_1}} - Rinse the fish fillets under cold water and pat them dry. - In a bowl, mix cumin, paprika, salt, and pepper. - Rub this spice mix evenly over the fish fillets. - Heat olive oil in a skillet over medium heat. - Add the fish fillets and cook for 3-4 minutes on each side. - The fish is done when it flakes easily with a fork. - In a bowl, combine diced mango, chopped onion, minced jalapeño, cilantro, and lime juice. - Stir gently to mix and season with salt to your taste. - Warm corn tortillas in a dry skillet for about 30 seconds on each side. - This makes them soft and easy to fold. - Flake the cooked fish into large pieces. - Distribute the fish among the warm tortillas. - Top each taco with mango salsa and avocado slices. - Serve the tacos warm with lime wedges on the side. - Squeeze lime juice over the tacos for a fresh burst of flavor. To know when your fish is done, look for a few signs. The fish should turn opaque and flake easily with a fork. If it feels firm and breaks apart, it is ready. For alternatives, you can use shrimp or even chicken if you prefer. Just make sure they are cooked through. For a twist on your mango salsa, consider adding fruits like pineapple or peach. These fruits bring a sweet flavor that pairs well with the fish. You can also try different herbs like mint or basil for a fresh taste. Adding a pinch of chili powder can give your salsa an extra kick too. Choosing the right tortilla is key. Corn tortillas work best for their flavor and texture. You can also use flour tortillas if you like them better. To warm your tortillas, heat a dry skillet over medium heat. Warm each tortilla for about 30 seconds on both sides. This makes them soft and easy to fold. Pro Tips Choose Fresh Fish: Always select the freshest fish available for the best flavor and texture in your tacos. Customize the Heat: Adjust the amount of jalapeño in the salsa to suit your heat preference, or replace it with a milder pepper if desired. Make it Ahead: Prepare the mango salsa a few hours in advance to allow the flavors to meld together for an even more delicious taste. Warm Tortillas Properly: Warming the tortillas in a dry skillet enhances their flavor and makes them more pliable for filling. {{image_2}} You can switch up the protein in these tacos easily. Instead of fish, try grilled shrimp. Shrimp cooks fast and adds a sweet touch. You might also enjoy grilled chicken. It offers a heartier bite and pairs well with mango salsa. For a vegetarian option, use grilled vegetables like zucchini and bell peppers. They add great flavor and color. Salsa doesn’t have to be just mango. You can try black bean corn salsa for a hearty twist. It adds fiber and protein. Avocado salsa is another great choice. Its creaminess balances the spice of the fish well. If you like heat, make a spicy mango salsa. Just add more jalapeño or a dash of hot sauce. Toppings can elevate your tacos. Consider adding shredded cheese for extra creaminess. Sour cream gives a cool contrast to the spicy fish. You can also use fresh lime juice to brighten the flavor. For side dishes, consider serving chips and guacamole. A simple salad pairs nicely too, adding freshness to your meal. To keep your leftover fish and salsa fresh, follow these steps: - Wrap the cooked fish in plastic wrap or place it in an airtight container. - Store the mango salsa in a separate container. - Refrigerate both for up to three days. For tortillas, stack them in a plastic bag. Seal the bag well to keep them soft. When reheating cooked fish, here’s what you should do: - Use a skillet over low heat. - Heat for about 2-3 minutes on each side. This helps keep the fish moist. To keep tortillas fresh, wrap them in a damp paper towel. Microwave for about 20 seconds. This method keeps them warm and soft. Yes, you can freeze fish tacos! Here’s how: - Wrap the fish tightly in plastic wrap, then place it in a freezer bag. - Store mango salsa in a freezer-safe container. For best results, freeze each component separately. This way, you can thaw only what you need later. To add heat, use more jalapeño. You can keep the seeds for extra kick. Try adding a pinch of cayenne pepper to the spice mix. Hot sauce can also enhance the flavor. For a smoky taste, use chipotle powder instead of paprika. Adjust the spice to match your taste. Remember to balance heat with sweetness from the mango salsa. Yes, frozen fish fillets work well. Thaw them in the fridge overnight for best results. If in a rush, place them in cold water for about 30 minutes. Cook them straight from frozen, but increase cooking time by a few minutes. Make sure the fish reaches 145°F internally. This ensures it is safe to eat and still tasty. Pair your tacos with a fresh side salad. A simple green salad with lime vinaigrette works great. Corn on the cob adds a sweet crunch. Black beans are a hearty choice too. For a light touch, serve with tortilla chips and guacamole. These sides will enhance the taco experience. Yes, these tacos are a healthy option. Fish is a great source of lean protein. Mango adds vitamins A and C, which are beneficial. The lime juice has antioxidants that support health. Using corn tortillas gives you fiber without added fat. Overall, these tacos are a balanced meal choice. In this post, I covered how to make delicious fish tacos with mango salsa. We discussed the main ingredients like white fish, spices, and fresh mango. I shared step-by-step instructions, tips for perfecting your dish, and variations to try. Remember, you can substitute proteins or add extra toppings to make these tacos your own. Storing leftovers properly keeps them fresh for later. Enjoy making these tasty tacos, and don’t hesitate to personalize them to your taste!

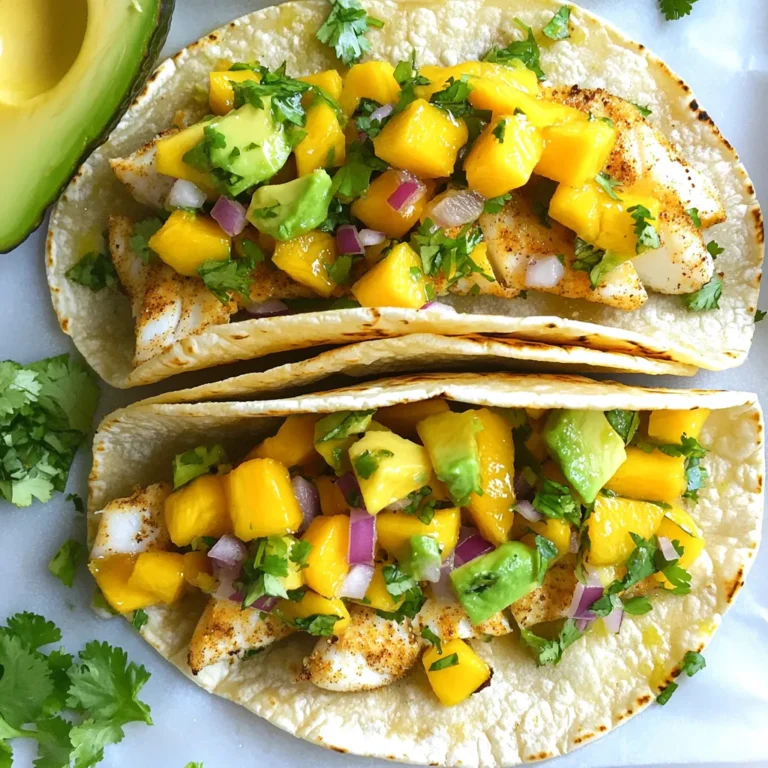
Mango Salsa Fish Tacos Fresh and Flavorful Delight

To make crispy air fryer mozzarella sticks, gather these simple ingredients: - 12 sticks of part-skim mozzarella cheese - 1 cup all-purpose flour - 2 large eggs - 1 cup Italian seasoned breadcrumbs - 1 teaspoon garlic powder - 1 teaspoon dried oregano - 1 teaspoon paprika - Salt and pepper to taste - 1 tablespoon olive oil (optional) - Marinara sauce for dipping Each ingredient plays a key role. The part-skim mozzarella gives that classic stretchy cheese bite. Flour helps the coating stick. Eggs bind everything together. The seasoned breadcrumbs add flavor and crunch. Garlic powder, oregano, and paprika give a nice kick. Salt and pepper enhance all the tastes. Olive oil can boost crispiness, but it’s optional. Finally, marinara sauce is a must for dipping! With these ingredients, you are on your way to a delicious snack. Enjoy the process and let your creativity shine! {{ingredient_image_1}} Start by cutting the mozzarella cheese into 3-4 inch long sticks. This size is perfect for dipping. After cutting, place the sticks in the freezer for about 30 minutes. Freezing helps the cheese firm up, making it easier to coat later. Now, set up your breading stations. Use three separate bowls: - In the first bowl, mix 1 cup of all-purpose flour with salt and pepper. - In the second bowl, beat 2 large eggs. - In the third bowl, combine 1 cup of Italian seasoned breadcrumbs with 1 teaspoon of garlic powder, 1 teaspoon of dried oregano, and 1 teaspoon of paprika. To coat the cheese sticks, take one frozen stick and dip it in the flour first. Shake off any extra flour. Next, dip it in the beaten eggs. Let the excess egg drip off before moving to the breadcrumb bowl. Press gently into the breadcrumbs to ensure they stick well. Repeat this for all the sticks. If you want them extra crispy, spray or drizzle a little olive oil on top. Preheat the air fryer to 390°F (200°C) for about 5 minutes. Once hot, arrange the mozzarella sticks in a single layer in the basket. Leave space between them for air to flow. Depending on your air fryer, you may need to do this in batches. Air fry the mozzarella sticks for 6-8 minutes. Watch them closely to avoid over-melting. They should turn golden brown and crispy. After cooking, take them out and let them cool for a minute. Serve with warm marinara sauce for dipping. Enjoy your tasty snack! To get crispy mozzarella sticks, freezing them is key. Freeze the cheese sticks for about 30 minutes. This step helps keep the cheese from melting too fast. It also helps the coating stick better. A light spray of olive oil adds even more crispiness. Just a little goes a long way. It helps the breadcrumbs turn golden brown and crunchy. If your mozzarella sticks fall apart, don’t worry. Make sure you coat them well in each step. Press the breadcrumbs firmly onto the sticks. If they still break, try freezing them longer next time. Each air fryer is different. You might need to adjust the cooking time. If they are not crispy enough, add a minute or two. If they cook too fast, reduce the time slightly. Serve mozzarella sticks with marinara sauce for dipping. It is a classic pairing that many enjoy. You can also try ranch or spicy dipping sauces for a twist. For a nice presentation, place them on a wooden board. Add fresh parsley or basil around them. This makes the dish look appealing and inviting. Pro Tips Chill the Cheese: Freezing the mozzarella sticks for 30 minutes makes them firmer and easier to coat, ensuring they hold their shape during cooking. Seasoning Matters: Feel free to customize the breadcrumb mixture with your favorite herbs and spices for added flavor. Experiment with different seasonings like Italian seasoning or crushed red pepper flakes. Don’t Overcrowd: Make sure to arrange the mozzarella sticks in a single layer in the air fryer basket for even cooking. Overcrowding can lead to uneven crispiness. Watch the Time: Keep an eye on the mozzarella sticks as they cook, as air fryers can vary in temperature. Remove them as soon as they are golden brown to prevent melting too much. {{image_2}} You can change the taste of your mozzarella sticks by adding different seasonings. Try using herbs like basil or thyme to bring a fresh touch. You can also spice things up with red pepper flakes or cayenne pepper for some heat. Mixing in a bit of onion powder can add a savory kick. These simple tweaks can create a unique twist on this classic snack. If you want to try different cheeses, you have great options. Cheddar cheese gives a sharp taste, while pepper jack adds a spicy flavor. For a fun twist, use string cheese for a kid-friendly version. If you follow a vegan diet, look for plant-based mozzarella. Many brands now make vegan cheese that melts well, so you can enjoy this treat without dairy. To make gluten-free mozzarella sticks, swap regular breadcrumbs for gluten-free ones. You can find many brands in stores or make your own from gluten-free bread. For the flour, use almond flour or coconut flour for a tasty alternative. These swaps will still give you that crispy texture without the gluten. After enjoying your cheesy treats, store leftover mozzarella sticks in the fridge. Place them in an airtight container. This keeps them fresh for up to three days. You can also wrap them in plastic wrap for extra protection. If you want to save them for later, freezing is a great option. First, let the mozzarella sticks cool completely. Then, arrange them on a baking sheet in a single layer. Freeze them for about an hour. Once frozen, transfer the sticks to a freezer bag. This way, they can last for up to three months. When it's time to enjoy your leftover mozzarella sticks, reheating is key. The best method for crispiness is the air fryer. Preheat it to 350°F (175°C). Place the sticks in the basket in a single layer. Heat them for about 4-5 minutes. This restores their crunchy texture. You can also use a microwave, but it may make them soggy. If you choose this method, heat them for 30 seconds at a time. Check often to avoid overcooking. For the best results, the air fryer is always the way to go. To prevent cheese ooze, start by freezing the mozzarella sticks for 30 minutes. Make sure they are well coated in flour, eggs, and breadcrumbs. Press the breadcrumbs firmly onto the cheese. This helps to seal in the cheese during cooking. Cook at the right temperature, 390°F, for 6-8 minutes. Keep an eye on them as they cook. Yes, you can use frozen mozzarella sticks. Just adjust the cooking time. For frozen sticks, add 2-3 minutes to the cooking time. Check them at 8 minutes; they should be golden. This slight change helps them cook evenly and get crispy. Homemade mozzarella sticks last about 3-4 days in the fridge. Make sure to store them in an airtight container. This keeps them fresh and safe to eat. If you want them to last longer, consider freezing them. You learned how to make tasty mozzarella sticks from start to finish. We covered the ingredients, step-by-step instructions, and essential tips for a perfect cook. I hope you feel ready to try this at home. Whether it’s for a snack or a party, these sticks will be a hit. Enjoy your cooking and the yummy results!

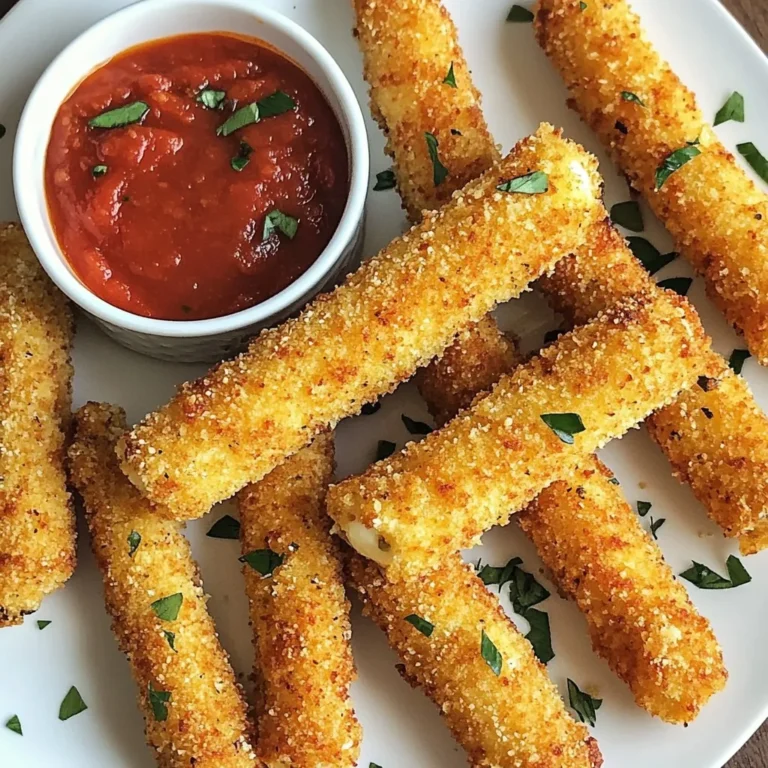
Air Fryer Mozzarella Sticks Crispy and Simple Snack

To make Cajun Shrimp & Sausage Foil Packets, you will need fresh and tasty ingredients. Here’s what to gather: - 1 lb large shrimp, peeled and deveined - 1 lb smoked sausage, sliced - 1 red bell pepper, diced - 1 green bell pepper, diced - 1 small red onion, chopped - 3 cloves garlic, minced For seasoning and oil, you will need: - 2 tablespoons Cajun seasoning - 2 tablespoons olive oil - Salt and pepper to taste For garnishes and serving, consider: - Fresh parsley, chopped for garnish - Lemon wedges for serving These ingredients combine to create a bold and flavorful dish. The shrimp and sausage bring a hearty base, while the bell peppers and onion add sweetness and crunch. The garlic and Cajun seasoning give it that signature kick. Don't forget the lemon! It brightens the flavors and adds a zesty finish. Enjoy crafting this meal; it's sure to impress your friends and family! {{ingredient_image_1}} Start by gathering all your ingredients. You will need 1 pound of large shrimp and 1 pound of smoked sausage. Peel and devein the shrimp if needed. Slice the sausage into rounds. Next, chop 1 red bell pepper, 1 green bell pepper, and 1 small red onion. Mince 3 cloves of garlic for that extra flavor. In a large bowl, mix the shrimp, sausage, diced peppers, chopped onion, and minced garlic. Drizzle 2 tablespoons of olive oil over this mixture. Then, add 2 tablespoons of Cajun seasoning, along with salt and pepper to taste. Toss everything together until all the ingredients are well coated. This step ensures that every bite is full of flavor. Now that your mixture is ready, it’s time to prepare the foil packets. Cut four large pieces of aluminum foil, each about 12x18 inches. Grab a piece of foil and place an equal amount of the shrimp and sausage mixture in the center. Fold the sides of the foil over the mixture. Then, roll the ends tightly to seal the packets. Make sure there are no gaps. This prevents any juices from leaking out while cooking. Proper sealing is key to keep all those delicious flavors inside. You can cook these foil packets in two ways: grilling or baking. Preheat your grill or oven to 400°F (200°C). For grilling, place the sealed packets directly on the grill. Cook them for about 15-20 minutes. If you choose to bake, place the packets on a baking sheet in the oven. The cooking time remains the same. After cooking, carefully open the packets. Watch out for steam! Finally, garnish with fresh parsley and serve with lemon wedges. The lemon adds a nice zest that brightens the dish. Enjoy your tasty Cajun shrimp and sausage foil packets! To boost the flavor of your Cajun shrimp and sausage foil packets, use fresh spices. Fresh herbs like thyme and oregano add depth. You can mix in some paprika for a smoky touch. If you crave more heat, add cayenne pepper. Taste as you go to find the right balance. Cooking time can change based on shrimp size and sausage type. For large shrimp, 15-20 minutes works well. If you use smaller shrimp, check for doneness at 12 minutes. If your sausage is raw, add a few extra minutes. Always ensure shrimp are pink and opaque. Serving is half the fun! Place the foil packets on a plate. Let your guests open them at the table. This adds a surprise element and fills the air with aroma. Garnish with fresh parsley for a pop of color. Add lemon wedges for a zesty touch. Pro Tips Use Fresh Ingredients: Fresh shrimp and vibrant vegetables will enhance the flavor and texture of your dish. Avoid frozen shrimp if possible for the best results. Customize the Spice Level: If you prefer a milder dish, reduce the amount of Cajun seasoning or use a mild version. You can also add more to spice it up! Seal the Packets Tightly: Ensure that the foil packets are sealed well to keep the moisture in. This will result in succulent shrimp and juicy sausage. Experiment with Vegetables: Feel free to add other vegetables like zucchini, corn, or asparagus for added flavor and nutrition. Just ensure they cook in the same time frame as the shrimp. {{image_2}} You can swap shrimp for other seafood. Try scallops or crab for a twist. They bring a sweet taste. You can also use fish like salmon or tilapia. Just cut them into bite-sized pieces. Cooking times may change slightly, so check them closely. The goal is to have everything cook evenly. Want more veggies in your packets? Add zucchini or corn for extra texture. Broccoli or asparagus work well too. You can even toss in some baby potatoes. Just cut them small so they cook fast. Mix and match to your taste. The more colors, the more fun! To make this dish gluten-free, check the sausage label. Some brands add gluten. For a low-carb meal, skip the sausage or use turkey sausage. You can also use cauliflower instead of potatoes. This keeps the dish light but still tasty. Always read labels to ensure all ingredients fit your diet. To keep your Cajun shrimp and sausage foil packets fresh, store them in an airtight container. Let the packets cool completely before sealing. Place them in the fridge for up to three days. This helps lock in flavors and keeps the shrimp tender. When you're ready to enjoy the leftovers, reheat them properly. Use the oven or a skillet for best results. Preheat your oven to 350°F (175°C). Place the foil packet on a baking sheet and heat for about 10-15 minutes. If using a skillet, add a splash of water and cover to steam. This keeps the shrimp juicy. Yes, you can freeze Cajun shrimp and sausage foil packets! Wrap each packet tightly in plastic wrap, then place them in a freezer bag. They last for up to three months. When ready to cook, thaw in the fridge overnight and follow the reheating tips above. This way, you have a quick meal ready to go! Yes, you can use frozen shrimp. Just make sure to thaw them first. Place the shrimp in the fridge overnight or run them under cold water. This helps them cook evenly. If you add frozen shrimp directly, they may not cook well. Cajun seasoning is a blend of spices. Common ingredients include paprika, cayenne pepper, garlic powder, and onion powder. Some mixes add herbs like oregano or thyme. You can buy it pre-made or mix your own. This blend adds bold flavors to your dish. You can adjust the spice level to suit your taste. If you like it hot, add more cayenne pepper. For milder heat, use less Cajun seasoning. You can also add ingredients like diced jalapeños for extra kick. Taste as you go to find your perfect flavor! Cajun Shrimp & Sausage Foil Packets are tasty and easy. We covered fresh ingredients, seasoning, and assembly. I shared cooking methods and important tips for flavor. You can even try variations with seafood or veggies. Proper storage helps keep leftovers fresh, and reheating is simple. By following these steps, you can enjoy a fun meal for any occasion. Now, it's your turn to create and enjoy this dish your way!

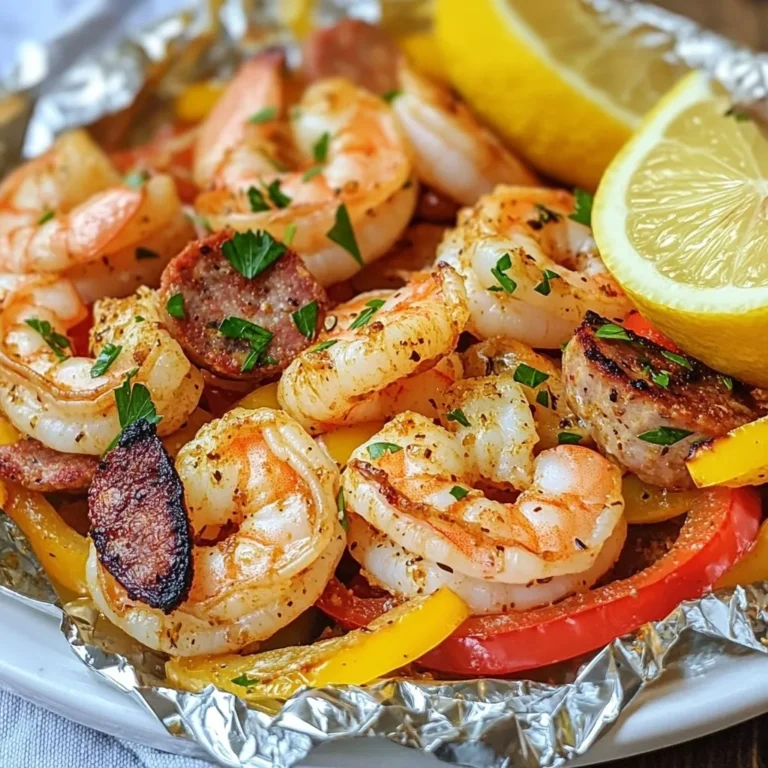
Cajun Shrimp & Sausage Foil Packets Easy Meal Idea

- 1 lb boneless, skinless chicken breasts - 1 cup breadcrumbs (panko for extra crunch) - 1/2 cup grated Parmesan cheese - 1 tsp garlic powder - 1 tsp onion powder - 1 tsp smoked paprika - 1/2 tsp salt - 1/4 tsp black pepper - 2 large eggs - 1 tbsp Dijon mustard - 1 tbsp olive oil Gathering the right ingredients is key to making crispy baked chicken tenders. Start with one pound of boneless, skinless chicken breasts. Cut them into strips for easy cooking and eating. Next, I use one cup of breadcrumbs. Panko works best because it adds extra crunch. For a cheesy flavor, we need half a cup of grated Parmesan cheese. This will make the coating rich and tasty. Now, let’s spice things up. I add one teaspoon each of garlic powder, onion powder, and smoked paprika. These spices give the chicken a great flavor. Don’t forget half a teaspoon of salt and a quarter teaspoon of black pepper to enhance the taste. For binding, we need two large eggs. They help the breadcrumbs stick to the chicken. One tablespoon of Dijon mustard adds a nice kick, and one tablespoon of olive oil keeps the chicken tender and juicy. With these ingredients, you are all set to create a delicious dish that’s easy to make and full of flavor. {{ingredient_image_1}} - Preheat your oven to 425°F (220°C). This helps the chicken cook evenly. - Line a baking sheet with parchment paper. This makes for easy cleanup. - In a shallow dish, combine the breadcrumbs, Parmesan, garlic powder, onion powder, smoked paprika, salt, and black pepper. Mix well to spread the spices evenly. - In another shallow dish, whisk together the eggs, Dijon mustard, and olive oil until smooth. - Take each chicken strip and dip it in the egg mixture. Let the extra egg drip off. - Next, transfer the chicken to the breadcrumb mixture. Press gently so the coating sticks. Place the chicken tenders on the lined baking sheet. - Once all the chicken strips are coated, spray them lightly with cooking spray. This helps them crisp up nicely. - Bake in the preheated oven for 15-20 minutes. Flip the tenders halfway through for even cooking. - When they turn golden brown, remove them from the oven. Let the tenders rest for a few minutes before enjoying. To make your chicken tenders super crispy, use panko breadcrumbs. These breadcrumbs add a great crunch that regular ones can't match. Just sprinkle them on the chicken for even coverage. Before baking, spray the tenders lightly with cooking spray. This little step helps them crisp up nicely in the oven. When it comes to serving, pair your tenders with honey mustard or ranch dressing. These sauces add a tasty dip that kids and adults love. For a pretty touch, garnish your dish with fresh herbs. Parsley or basil works great and adds a pop of color. Bake your chicken tenders at 425°F for 15-20 minutes. This high heat cooks the chicken quickly while keeping it juicy. Remember to flip the tenders halfway through. This ensures they cook evenly on both sides. Let the chicken rest for a few minutes before serving. This helps keep the juices inside, making each bite tender and moist. Pro Tips Choose the Right Breadcrumbs: Using panko breadcrumbs will give your chicken tenders an extra crunch compared to regular breadcrumbs. Don’t Skip the Resting: Allowing the tenders to rest for a few minutes after baking helps retain their juices, making them more tender and flavorful. Experiment with Seasonings: Feel free to add your favorite herbs or spices to the breadcrumb mixture to customize the flavor profile to your liking. Perfect Pairings: Serve these chicken tenders with a variety of dipping sauces like honey mustard, ranch, or barbecue for a flavorful experience. {{image_2}} You can easily change the taste of your chicken tenders. Try adding different spices to the breadcrumb mix. Italian seasoning adds a nice herbal note. You can also use flavored breadcrumbs. These come in many varieties. Spicy or garlic-flavored options can give your tenders a fun twist. For a healthier twist, use alternative binders. Yogurt or milk works great instead of eggs. They help the breadcrumbs stick while adding moisture. If you want a gluten-free option, almond flour is a fantastic choice. It gives a nice texture and keeps the tenders light. Dipping sauces can elevate your chicken tenders. Homemade ranch is a classic choice and pairs well with crispy bites. Honey mustard offers a sweet and tangy flavor that kids love. For those who like heat, spicy sriracha mayo adds a kick. Mix mayo with sriracha to your taste. Each sauce brings a unique flavor to your meal. To keep your chicken tenders fresh, place them in an airtight container. This helps keep moisture in, preventing them from drying out. Store your chicken tenders in the fridge right after they cool down. They stay good for about 3 to 4 days. When it’s time to enjoy leftovers, use the oven to reheat. Set the temperature to 375°F (190°C). Place the chicken tenders on a baking sheet. Heat for about 10 to 15 minutes. This method helps keep them crispy. Avoid using the microwave. It can make your tenders soggy. If you want to save some for later, freezing is a great option. First, let the chicken tenders cool completely. Place them in a single layer on a baking sheet. Freeze them for about 1 to 2 hours. Once frozen, transfer them to a freezer bag. They can stay good for up to 3 months. When you’re ready to eat, thaw the chicken tenders overnight in the fridge. Reheat them in the oven as mentioned before for best results. Enjoy your crispy baked chicken tenders anytime! Bake chicken tenders for 15 to 20 minutes at 425°F (220°C). Make sure they are golden brown and cooked through. Flip them halfway for even crispiness. This step helps to get that nice crunch on both sides. You can use frozen chicken tenders, but they may not get as crispy. If you choose frozen, bake them longer. Follow the package instructions for best results. Fresh chicken tends to have a better texture and flavor. Serve baked chicken tenders with honey mustard or ranch dressing for dipping. They pair well with: - French fries - Sweet potato fries - Fresh salad - Steamed veggies These sides add color and texture to your meal. Enjoy experimenting with different options! You've learned how to make tasty baked chicken tenders with simple steps. We covered main ingredients, seasoning, and binding elements. I shared tips for crispiness and healthy variations. Storing and reheating tips help keep leftovers fresh. These tenders can impress any guest or family member. Enjoy your cooking adventure, and don't be afraid to try new flavors. You'll create a dish everyone will love.

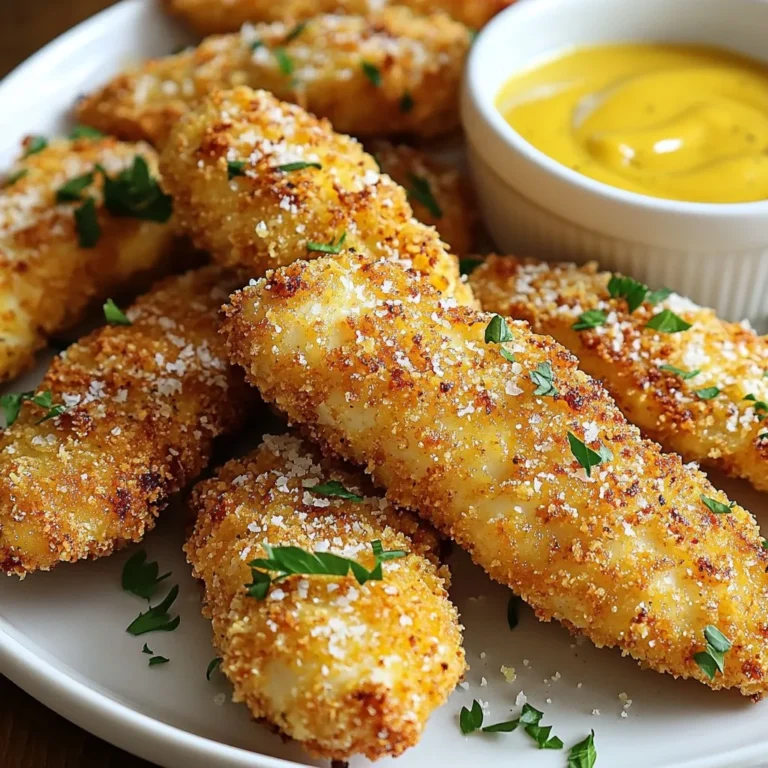
Crispy Baked Chicken Tenders Easy and Flavorful Recipe

- 1 cup green or brown lentils, rinsed - 1 medium onion, diced - 2 carrots, diced - 2 celery stalks, diced - 3 garlic cloves, minced - 1 can (14 oz) diced tomatoes - 6 cups vegetable broth - 1 teaspoon ground cumin - 1 teaspoon dried thyme - 1 bay leaf - 2 tablespoons olive oil - Salt and pepper to taste - Fresh parsley, chopped (for garnish) Lentils are the star of this soup. They add protein and fiber. I love using green or brown lentils because they hold their shape well. Diced tomatoes bring bright flavor and color. The broth is important for depth. If you don't have lentils, try split peas or chickpeas. You can swap vegetable broth with chicken broth for extra flavor. Don't have fresh parsley? Use dried herbs or omit it. For a twist, add kale or spinach for greens. You can use any onion type, but yellow or white work best. Cumin adds warmth, but feel free to try coriander instead. This soup is low in calories with high protein. Each serving has about 200 calories. It packs about 12 grams of protein and 8 grams of fiber. It is also rich in vitamins A and C from the veggies. This makes lentil soup a heart-healthy choice. Enjoy this classic dish with confidence, knowing it’s both nutritious and delicious! {{ingredient_image_1}} - Rinse 1 cup of lentils in a strainer. - Dice 1 medium onion, 2 carrots, and 2 celery stalks. - Mince 3 garlic cloves. - Open a 14 oz can of diced tomatoes. - Measure out 6 cups of vegetable broth. 1. In a large pot, heat 2 tablespoons of olive oil over medium heat. 2. Add the diced onion, carrots, and celery. Sauté for 5 to 7 minutes. 3. Add the minced garlic and cook for 1 more minute until it smells good. 4. Stir in the rinsed lentils, diced tomatoes, vegetable broth, and spices. - Use 1 teaspoon of ground cumin. - Use 1 teaspoon of dried thyme. - Add 1 bay leaf. 5. Bring the soup to a boil. Then, reduce the heat to low and cover the pot. 6. Let it simmer for 30 to 35 minutes. Check the lentils; they should be soft. 7. Remove the bay leaf. For a creamier soup, blend some of it with an immersion blender. 8. Add salt and pepper to taste. 9. Serve hot with fresh chopped parsley on top. - Cut all vegetables into the same size for even cooking. - Stir the veggies often to avoid burning. - Cook until the onion is clear and the carrots are soft. - Adding a pinch of salt helps draw out moisture and flavor. - Use a wide pot to give veggies space to cook well. To make your lentil soup even tastier, try these tips: - Add herbs early: Add thyme and bay leaf at the start. This helps the flavors blend well. - Use fresh garlic: Fresh garlic gives a bold taste. Mince it right before cooking. - Finish with acid: A squeeze of lemon juice at the end brightens the soup. It makes all the flavors pop! - Garnish wisely: Fresh parsley not only looks great but adds a fresh flavor. Avoid these common mistakes when making lentil soup: - Skipping the sauté: Always sauté the onion, carrots, and celery first. This step builds flavor. - Not rinsing lentils: Rinse lentils before using. This removes dirt and debris. - Cooking too long: Don’t overcook the lentils. They should be soft but not mushy. - Ignoring seasoning: Taste your soup before serving. Adjust salt and pepper for the best flavor. Here’s what I find essential for making lentil soup: - Large pot: A sturdy pot helps cook the soup evenly. - Wooden spoon: Great for stirring and scraping the pot. - Immersion blender: This tool can purée part of the soup for a creamier texture. - Measuring cups and spoons: Accurate measurements ensure the right balance of flavors. With these tips and tricks, your classic lentil soup will be both simple and hearty! Enjoy the process and the delicious results! Pro Tips Store Lentils Properly: Keep lentils in a cool, dry place in an airtight container to maintain their freshness and prevent spoilage. Customize Your Vegetables: Feel free to add other vegetables such as bell peppers or spinach for added nutrition and flavor. Enhance Flavor with Herbs: Fresh herbs like rosemary or cilantro can add a unique twist to the soup's flavor profile when added just before serving. Batch Cooking: This soup freezes well, so consider making a double batch and freezing half for a quick meal later. {{image_2}} Classic lentil soup is already vegetarian. To make it vegan, just skip any animal products. Use vegetable broth instead of chicken broth. This keeps the flavor rich and tasty. You can add more veggies like bell peppers and zucchini. They add texture and nutrients. You can boost the flavor by adding a few simple ingredients. Consider these options: - Spinach or kale: Add them near the end of cooking. They wilt quickly and add color. - Potatoes: Diced potatoes make the soup heartier. Add them with the lentils so they cook well. - Lemon juice: A splash of lemon brightens the soup. Add it just before serving for freshness. Spices can change the whole taste of your soup. Here are some to try: - Smoked paprika: This adds a nice smoky flavor. Use about a teaspoon for a warm touch. - Curry powder: Add this for a unique twist. Start with half a teaspoon and adjust to taste. - Bay leaves: You can add more bay leaves for depth. Just remember to remove them before serving. These variations keep the soup interesting. Each change can create a new experience. Let the soup cool to room temperature. Use airtight containers to store it. This keeps the soup fresh and tasty. You can keep it in the fridge for about 3 to 5 days. If you plan to eat it later, freezing is a great option. To freeze your soup, pour it into freezer-safe bags or containers. Leave some space at the top, as it will expand. Label each container with the date. You can freeze it for up to 3 months. This way, you always have a warm meal ready. When you want to eat the soup, take it out of the fridge or freezer. If frozen, let it thaw in the fridge overnight. You can reheat it on the stove over medium heat. Stir often until it's hot. If it's too thick, add a little water or broth to loosen it. Enjoy your hearty meal! Yes, you can! To make lentil soup in a slow cooker, start by sautéing the onion, carrots, and celery in olive oil. This step adds flavor. After that, add all the other ingredients to the slow cooker. Cook on low for 6 to 8 hours or on high for 3 to 4 hours. This method lets the flavors blend well while you go about your day. Lentil soup can last about 4 to 5 days in the fridge. Store it in an airtight container. Just make sure to let it cool down first. If you want to enjoy it later, freeze it. It will keep well in the freezer for up to 3 months. Just thaw it before reheating. Classic lentil soup pairs well with many sides. Here are some ideas: - Fresh crusty bread - A simple green salad - Grilled cheese sandwiches - Crackers or breadsticks These sides complement the soup's hearty flavors. This article covered key ingredients for lentil soup and their substitutes. You learned step-by-step instructions for preparation and cooking. I shared tips for sautéing and enhancing flavors. We explored variations for different diets and spices. Lastly, we discussed storage options and answers to common questions. Lentil soup is simple and flexible. You can easily adapt it to your taste. Enjoy cooking and sharing this hearty dish!

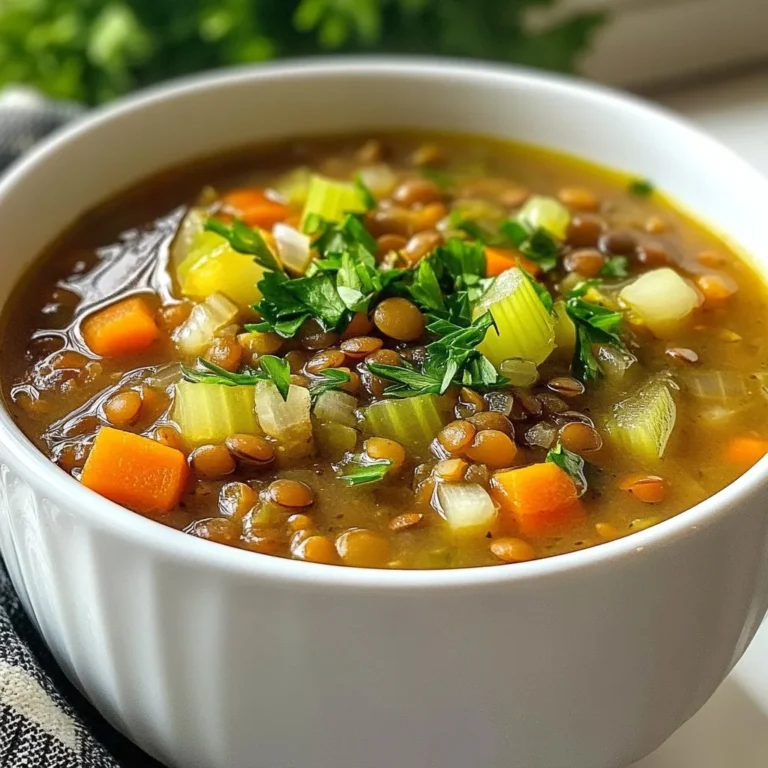
Classic Lentil Soup Simple and Hearty Dish

To make fluffy cottage pancakes, you need these key ingredients: - 1 cup cottage cheese - 3 large eggs - 1 cup all-purpose flour - 1 tablespoon baking powder - 2 tablespoons sugar - 1 teaspoon vanilla extract - 1/4 teaspoon salt - 1/2 cup milk (or more for desired batter consistency) - Butter or oil for cooking Cottage cheese adds a unique texture. It helps make the pancakes fluffy and moist. Eggs bind everything together, while flour gives structure. Baking powder makes the pancakes rise, creating a light feel. Sugar adds sweetness, and vanilla gives a lovely flavor. Salt balances the sweetness and enhances taste. You can customize your pancakes with these optional ingredients: - Fresh fruits (like blueberries or bananas) - Chocolate chips - Nuts (like walnuts or pecans) - Cinnamon for extra flavor Adding fruits or nuts can give your pancakes a delicious twist. Chocolate chips can turn breakfast into a treat. Feel free to mix and match for fun flavors. When buying ingredients, focus on quality: - Choose fresh cottage cheese. Look for a creamy texture and no lumps. - Use large eggs for the best results. Fresh eggs yield better flavor. - Select all-purpose flour that is unbleached for a natural taste. - Opt for pure vanilla extract instead of imitation for richer flavor. Quality ingredients make a big difference in taste and texture. Fresh eggs and cottage cheese enhance the flavor of your pancakes. Always check expiration dates to ensure freshness. {{ingredient_image_1}} To make the batter, start by mixing cottage cheese and eggs. Use a large bowl and whisk them together until smooth. Next, add milk and vanilla extract. Mix well to combine these ingredients. In another bowl, mix flour, baking powder, sugar, and salt. Slowly add this dry mix to the wet mix. Stir gently until just combined. It’s okay if the batter is a little lumpy. This will help keep your pancakes fluffy. Heat a non-stick skillet over medium heat. Add a small amount of butter or oil to the skillet. Pour 1/4 cup of batter for each pancake. Cook them for 2 to 3 minutes. You will see bubbles form on the surface. Then, flip the pancakes and cook for another 1 to 2 minutes until they are golden brown. Repeat this process with the remaining batter. Add more butter or oil as needed to prevent sticking. Serve your fluffy cottage pancakes warm. You can top them with fresh fruit, maple syrup, or a dollop of yogurt. Each topping adds a special touch. Feel free to mix and match to find your favorite combinations. Enjoy your delightful morning treat! To make your pancakes fluffy, use fresh cottage cheese. This adds moisture and lifts. Blend the cottage cheese and eggs well. Mixing them well creates a smooth batter. When adding dry ingredients, stir gently. Over-mixing leads to tough pancakes. Aim for a lumpy batter; lumps are okay. Let the batter rest for a few minutes. This helps the baking powder work its magic. One big mistake is using old baking powder. Always check the date on the package. If it’s past the date, it won't rise well. Another mistake is cooking on too high heat. Medium heat is best for even cooking. If the heat is too high, the outside cooks too fast. Lastly, don’t skip the butter or oil in the pan. This keeps the pancakes from sticking. A non-stick skillet or griddle works best. Make sure it’s preheated before pouring the batter. Use a 1/4 cup measure for even pancake sizes. This helps them cook evenly. A spatula with a thin edge helps flip the pancakes easily. If you have a large batch, consider using a warming tray. This keeps your pancakes warm while you finish cooking. Pro Tips Fresh Ingredients: Use fresh cottage cheese and eggs for the best texture and flavor in your pancakes. Don’t Overmix: Gently stir the batter to keep it fluffy. A few lumps are okay; overmixing can lead to dense pancakes. Adjust Consistency: If your batter is too thick, add a little more milk until you reach your desired consistency for pouring. Heat Control: Make sure your skillet is at the right temperature; too hot and they'll burn, too cool and they'll be soggy. {{image_2}} You can swap some ingredients for healthier options. Use whole wheat flour instead of all-purpose flour. This change adds fiber and nutrients. You can also use low-fat cottage cheese. This keeps the pancakes light while reducing fat. If you want less sugar, try using mashed bananas. They add sweetness and moisture without added sugar. Want to jazz up your pancakes? Add fruits like blueberries or strawberries to the batter. They bring color and natural sweetness. You can also mix in nuts for crunch. A splash of almond or coconut extract adds a lovely twist. Try cinnamon for a warm flavor. Just a pinch can make a big difference. Feeling adventurous? Make savory pancakes by adding cheese and herbs. Grated cheddar or feta works great. Chopped fresh herbs like chives or parsley add flavor. You can even mix in cooked bacon bits. Serve them with a dollop of sour cream or yogurt for a tasty twist. These savory pancakes can be a fun brunch option. To keep your leftover pancakes fresh, stack them with parchment paper in between each one. Place the stack in a sealed container. This way, they won't stick together. Store them in the fridge for up to three days. If you want to keep them longer, freezing is a great option. When reheating, a skillet works best. Heat it on low, and add a little butter. Place the pancake on the skillet for about one minute on each side. This warms it through and keeps it soft. You can also use the microwave. Just place the pancake on a microwave-safe plate and heat for 20-30 seconds. To freeze pancakes, let them cool completely. Then, stack them with parchment paper in between. Place the stack in a freezer bag or container. They can stay frozen for up to three months. When you're ready to eat, take them out and let them thaw in the fridge overnight. You can also reheat them straight from the freezer. Just add a minute or two to your cooking time. Enjoy your fluffy cottage pancakes any time! Cottage cheese pancakes have a unique texture. The cottage cheese adds moisture and fluffiness. Traditional pancakes are usually made with just flour and milk. This means they can be denser. Cottage cheese pancakes are lighter and more filling. They offer more protein, making them a great breakfast choice. Yes, you can make these pancakes ahead of time. Simply cook them as usual and let them cool. Once cool, stack them on a plate. Cover them with plastic wrap or foil. Store them in the fridge for a few days. You can also freeze them for longer storage. Just place parchment paper between pancakes before freezing. Toppings can make or break your pancake experience. Here are some tasty ideas: - Fresh berries like strawberries or blueberries - Sliced bananas for a sweet twist - A drizzle of maple syrup for classic flavor - A dollop of yogurt for creaminess - Chopped nuts for crunch Feel free to mix and match these toppings for a fun breakfast! Fluffy cottage pancakes are easy to make and even easier to enjoy. You learned how to choose the best ingredients and customize your pancakes to fit your taste. I shared tips for making them fluffy and avoiding common mistakes. You can also explore healthy swaps and flavor options. Lastly, I covered how to store leftovers. Now, you can enjoy these pancakes anytime. Try new flavors, share with friends, and have fun in the kitchen!

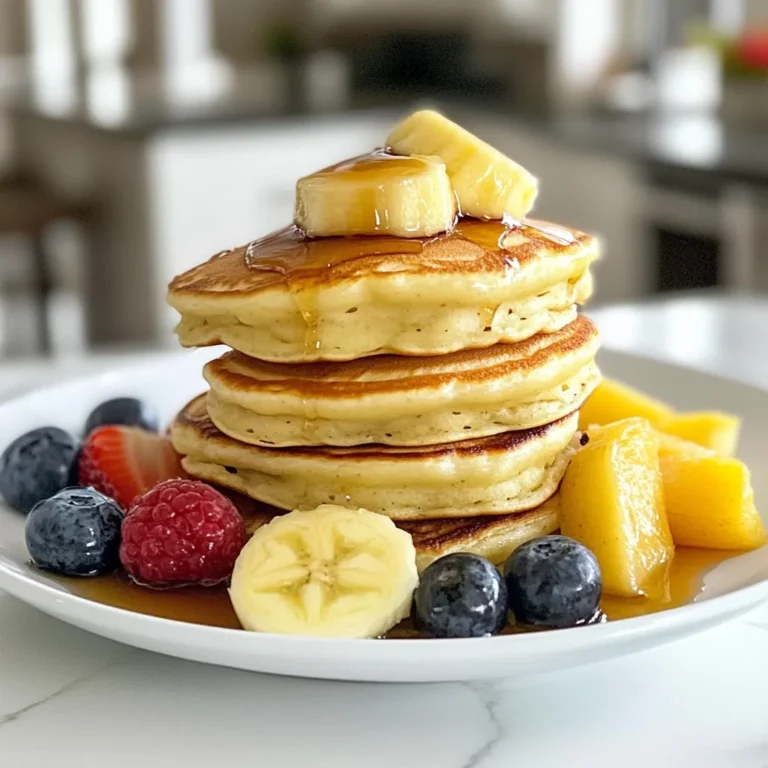
Fluffy Cottage Pancakes Simple Morning Delight

- 2 medium-sized apples (such as Honeycrisp or Fuji), peeled, cored, and diced - 1 cup all-purpose flour - 1/2 cup granulated sugar - 1 teaspoon baking powder - 1/2 teaspoon cinnamon - 1/4 teaspoon nutmeg - 1/4 teaspoon salt - 1/2 cup milk - 1 large egg - 1 teaspoon vanilla extract - Oil for frying - Powdered sugar for dusting You can swap the apples for pears or peaches. If you want a gluten-free option, use almond flour or a gluten-free blend. Instead of milk, try almond or soy milk for a dairy-free version. If you don’t have eggs, use a flax egg (1 tablespoon flaxseed meal + 2.5 tablespoons water, mixed and set for 5 minutes). - Choose firm apples like Honeycrisp for the best flavor and texture. - Allow the apples to sit with sugar for 10 minutes; this brings out their natural juices. - Don't overmix the batter; it should be lumpy for fluffy fritters. - Heat the oil to 350°F for crispy bites; too low will make them soggy. - Dust with powdered sugar right after frying for a sweet touch. {{ingredient_image_1}} Start by peeling, coring, and dicing two medium-sized apples. I love using Honeycrisp or Fuji apples for their sweet flavor. Next, place the diced apples in a bowl. Add one tablespoon of granulated sugar to the apples. This helps bring out their natural sweetness. Let the apples sit for about ten minutes. You will see some juices forming at the bottom of the bowl. This process is called maceration and it makes the apples even tastier. In a separate bowl, mix one cup of all-purpose flour, half a cup of granulated sugar, one teaspoon of baking powder, half a teaspoon of cinnamon, a quarter teaspoon of nutmeg, and a quarter teaspoon of salt. Whisk these dry ingredients well. In another bowl, combine half a cup of milk, one large egg, and one teaspoon of vanilla extract. Mix them until smooth. Now, slowly pour the wet mixture into the dry mixture. Stir gently until just combined. Be careful not to overmix. Gently fold in the macerated apples. This helps to spread the apple flavor throughout the batter. Heat about two inches of oil in a deep frying pan or pot over medium heat. Aim for a temperature of 350°F (175°C). You can check this with a thermometer. If you don’t have one, drop a small spoonful of batter in the oil. If it sizzles and rises, it’s ready. Use a tablespoon or small cookie scoop to drop spoonfuls of batter into the hot oil. Fry them in small batches so they don’t overcrowd. Cook for two to three minutes on each side. Look for a golden brown color and a crispy texture. After frying, place the fritters on a plate lined with paper towels to drain excess oil. Enjoy the sweet aroma as they cool. To get crispy fritter bites, start with hot oil. Heat the oil to 350°F (175°C) for the best results. Use a thermometer for accuracy. This temperature helps the batter cook quickly, sealing the outside. Avoid overcrowding the pot; fry in small batches. This keeps the oil hot. After frying, let them drain on paper towels. This step removes excess oil and keeps them crispy. One common mistake is overmixing the batter. Mix just until combined; lumps are okay. Overmixing makes the fritters tough. Another mistake is not letting the apples macerate long enough. This step brings out the sweetness. It also adds moisture to the batter. Lastly, don’t skip the dusting of powdered sugar. It adds sweetness and makes the fritters look great! You can easily change the flavors in your fritter bites. Add chopped nuts for a crunch, like walnuts or pecans. You can also mix in dried fruits, such as raisins or cranberries. For a fun twist, add a splash of caramel sauce on top. If you love spice, try using ginger or cardamom. Each variation brings a unique taste to your fritters! Pro Tips Choose the Right Apples: For the best flavor and texture, opt for apples that are firm and crisp, such as Honeycrisp or Fuji, which hold up well during frying. Don't Overmix the Batter: When combining wet and dry ingredients, mix just until combined to keep the fritters light and fluffy. Maintain Oil Temperature: Keeping the oil at the right temperature (350°F or 175°C) is crucial for achieving crispy fritters. Use a thermometer for accuracy. Serve Immediately: For the best taste and texture, serve the fritter bites warm right after frying. They can lose their crispiness if left to sit too long. {{image_2}} You can easily make gluten-free apple fritter bites. Just swap regular flour for gluten-free flour. Look for a blend that works well in baking. This will keep the bites crispy and tasty. Make sure to check that your baking powder is gluten-free as well. Your fritter bites will still be soft and delicious. To make vegan apple fritter bites, replace the egg with a flaxseed meal. Mix one tablespoon of flaxseed meal with two and a half tablespoons of water. Let it sit for a few minutes to thicken. Use almond milk or any plant-based milk in place of regular milk. These changes keep the fritters light and plant-based. You can get creative with add-ins and toppings for your fritter bites. Try mixing in nuts like walnuts or pecans for a crunch. Dried fruit, like raisins or cranberries, adds a sweet twist. For toppings, drizzle with caramel or chocolate sauce. You can also add a sprinkle of cinnamon sugar on top for extra flavor. To keep your apple fritter bites fresh, place them in an airtight container. Make sure they cool down first. Store them at room temperature for up to two days. If you want to keep them longer, put them in the fridge. They can last for about a week this way. When you're ready to enjoy leftover fritter bites, reheating is simple. Preheat your oven to 350°F (175°C). Place the fritter bites on a baking sheet. Bake for about 5-7 minutes, or until they feel warm and crispy again. Avoid using the microwave, as it can make them soggy. To freeze your fritter bites, let them cool completely first. Arrange them in a single layer on a baking sheet. Freeze them for about an hour. Once frozen, transfer them to a freezer bag or container. They can stay fresh for up to three months. To thaw, just leave them in the fridge overnight before reheating. You can bake apple fritter bites instead of frying. Preheat your oven to 400°F (200°C). Line a baking sheet with parchment paper. Use the same batter recipe. Instead of dropping the batter into hot oil, spoon it onto the prepared sheet. Bake for about 15-20 minutes or until golden brown. This method gives you a lighter, less oily treat. Yes, you can use different apples. Honeycrisp and Fuji are great choices. Other good options include Granny Smith for tartness or Gala for sweetness. Each type of apple adds its unique flavor. Just remember, firmer apples hold up better in the frying or baking process. Serve apple fritter bites warm for the best taste. Place them in a decorative bowl. You can add a light dusting of powdered sugar on top. Garnish with fresh apple slices or a scoop of vanilla ice cream for extra flair. This makes for a delightful snack or dessert that everyone will love! In this post, we explored how to create delicious apple fritter bites. We discussed key ingredients and offered alternatives to fit your needs. I provided step-by-step instructions for making the batter and frying safely. You learned tips for crispy results and common mistakes to avoid. I also shared options for gluten-free and vegan versions. Finally, we covered storage tips for leftovers. These fritters can be a tasty treat for any occasion. Enjoy experimenting and make them your own!

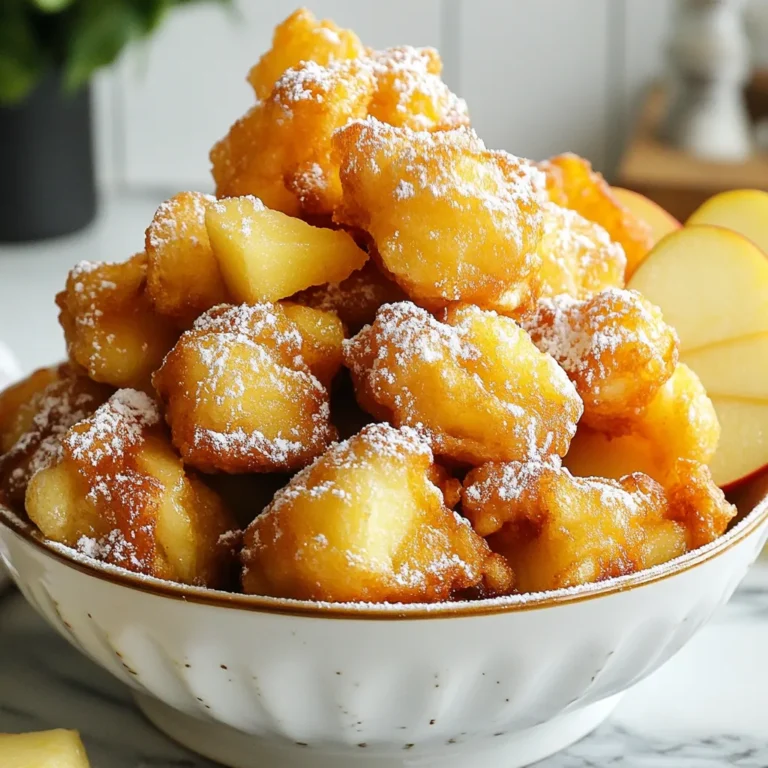
Savory Apple Fritter Bites Easy and Delicious Snack

To make these tasty popsicles, you need a few key ingredients. Here’s what you will need: - 2 ripe mangoes, peeled and diced - 1 can (400ml) coconut milk - 1/4 cup honey or agave syrup - 1 tablespoon lime juice - 1 teaspoon vanilla extract - Pinch of salt These ingredients create a smooth, creamy, and fruity treat. The mangoes give a sweet flavor, while the coconut milk adds creaminess. Lime juice brightens up the taste, and vanilla adds warmth. If you want to switch up the sweetness, you have options. You can use maple syrup or stevia instead of honey or agave syrup. Both options work well and add their own flavors. Always taste your mix to find the right balance of sweetness for you. Garnishes can make your popsicles even more fun! Here are a few ideas: - Toasted coconut flakes: They add a crunchy texture and a nutty taste. - Fresh mint leaves: They offer a bright, fresh flavor. - Fruit slices: Add small pieces of mango or lime on top for a colorful look. These garnishes not only look great but also enhance the popsicle experience. Enjoy crafting your Coconut Mango Popsicles with these simple ingredients and fun extras! {{ingredient_image_1}} First, gather your ingredients. You need two ripe mangoes, coconut milk, honey, lime juice, vanilla extract, and a pinch of salt. Peel and dice the mangoes into small pieces. Place them in a blender. Add the coconut milk, honey, lime juice, vanilla, and salt. Blend until the mixture is smooth. You want a creamy texture, with no chunks left. Taste it and see if you need more sweetness. If so, add more honey or agave syrup and blend again. Once your mixture is ready, it’s time to pour it into molds. Take your popsicle molds and carefully fill them with the mango-coconut blend. Leave a little space at the top. This space allows the mixture to expand when it freezes. After filling the molds, insert popsicle sticks. Make sure they stand straight. This step is key for easy eating later. Place the molds in the freezer. Let them freeze for at least six hours. You want them to be completely solid. After freezing, it's time to enjoy. To remove the popsicles, run warm water over the outside of the molds. This helps loosen them. Gently pull the popsicles out. If you like, roll them in toasted coconut flakes for an extra crunch. Now, they are ready to serve! To make the perfect creamy popsicle, start with ripe mangoes. The sweeter the fruit, the better the flavor. Use full-fat coconut milk. It adds richness and smoothness. Blend the mangoes and coconut milk until there are no chunks left. A powerful blender helps achieve a silky texture. If the mixture seems thick, add a splash of water or more coconut milk. This will make it easier to blend. You can adjust the sweetness to fit your taste. Start with 1/4 cup of honey or agave syrup. After blending, taste the mixture. If you want it sweeter, add more honey or agave syrup. Blend again after adding more sweetener. This method ensures you find the perfect balance. Remember, the sweetness can change once frozen. Serving your popsicles can be fun! Try placing them on a wooden board for a rustic look. You can also use colorful cups for a vibrant touch. For an extra crunch, roll your popsicles in toasted coconut flakes. Add fresh mint leaves on top for a pop of color and freshness. These small touches will impress your guests and make your popsicles look stunning. Pro Tips Choose Ripe Mangoes: Select mangoes that are slightly soft to the touch and have a sweet aroma for the best flavor. Adjust Sweetness: Taste the mixture before freezing and adjust the honey or agave syrup to your preference for optimal sweetness. Use Full-Fat Coconut Milk: For creamier popsicles, opt for full-fat coconut milk rather than light varieties. Experiment with Flavors: Add other fruits like pineapple or berries for a unique twist on these popsicles. {{image_2}} You can make your popsicles even more fun by adding other fruits. Try using berries like strawberries or blueberries. They add a nice color and flavor. You can also mix in some pineapple for a tropical twist. Just chop the fruit and blend it with the mangoes and coconut milk. You can layer the fruit in the molds for a pretty look. Our coconut mango popsicles are already dairy-free thanks to the coconut milk. If you want to try a different base, use almond or oat milk instead. They will still taste great and keep the popsicles creamy. Just follow the same steps and enjoy a new flavor! You can spice things up by adding herbs or spices to your popsicles. Fresh mint or basil gives a refreshing twist. Just add a few leaves to the blender with the mangoes. If you like a bit of heat, try adding a pinch of cayenne pepper. It will add a nice kick to the sweet flavor. Experiment with these ideas to find what you love! To keep your coconut mango popsicles fresh, store them in an airtight container. This helps prevent freezer burn. If you use popsicle molds, make sure they are tightly sealed after you freeze them. Place your popsicles in the back of the freezer. The back is colder than the front. Wrap your molds in plastic wrap for extra protection. This helps them last longer without losing flavor or texture. To enjoy your popsicles, gently run warm water over the mold for a few seconds. This helps loosen them. Avoid using a microwave, as it can make them melt unevenly. If you have time, let them sit at room temperature for a few minutes. This helps maintain their creamy texture. Yes, you can use frozen mangoes. They work well in this recipe. Frozen mangoes save time and are often just as tasty. When using frozen mangoes, let them thaw for a bit. This helps the blender mix them easier. Coconut mango popsicles can last up to two months in the freezer. To keep them fresh, store them in an airtight container. Make sure to wrap them well to avoid freezer burn. This way, you can enjoy your popsicles whenever you want! Coconut milk is creamy and rich in nutrients. It contains healthy fats that can boost your energy. It also has vitamins like C, E, and B. These vitamins help your skin and support your immune system. Plus, coconut milk is dairy-free, making it great for those who are lactose intolerant. In this post, we explored coconut mango popsicles. We covered key ingredients, including alternative sweeteners and garnishes. I shared simple steps for making these treats, from mixing to freezing. You learned tips for the creamiest texture and fun ways to serve them. Plus, we discussed variations like adding fruits or herbs. Lastly, we reviewed storage tips for freshness. These popsicles are tasty and easy. I encourage you to make them and enjoy your creation!

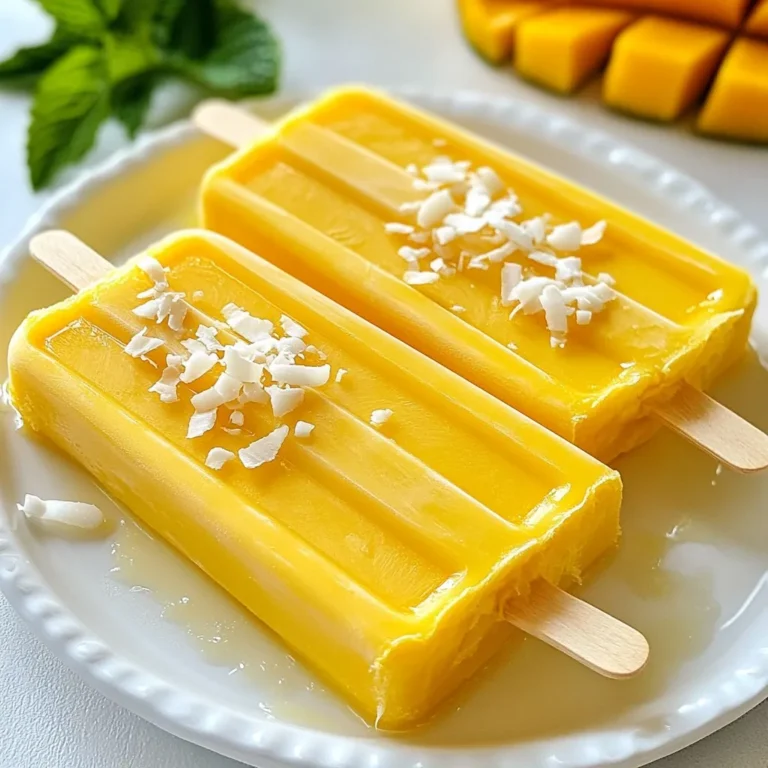
Coconut Mango Popsicles Refreshing Summer Treat

PREV 1 … 50 51 52 … 65 NEXT
tasty trail blazer

explore

DessertsDinnerAppetizersDrinks

Our Policies

  • Cookie Policy
  • Copyright Policy
  • Disclaimer
  • GDPR Policy
  • Terms Of Use
Back to Top
  • About
  • Contact Us
  • Privacy Policy
© 2025 tasty trail blazer