FREE DINNER EBOOK! Get your copy!
  • Cookie Policy
  • GDPR Policy
  • Disclaimer
  • Terms Of Use
  • Visit my other site: Fun Cookie Recipes
tasty trail blazer
  • Home
  • Dinner
  • Desserts
  • Drinks
  • Appetizers
  • Contact
  • About
  • Privacy Policy
  • Home
  • Dinner
  • Desserts
  • Drinks
  • Appetizers
  • Contact
  • About
  • Privacy Policy
  • Cookie Policy
  • GDPR Policy
  • Disclaimer
  • Terms Of Use
Visit my other site: Fun Cookie Recipes

HOME / CATEGORIES /

Latest

To make these easy brownie cookies, you need the following ingredients: - 1 cup all-purpose flour - 1/3 cup unsweetened cocoa powder - 1/2 teaspoon baking powder - 1/4 teaspoon salt - 1/2 cup unsalted butter, melted - 1 cup brown sugar, packed - 1/4 cup granulated sugar - 2 large eggs - 1 teaspoon vanilla extract - 1/2 cup chocolate chips (dark or milk based on preference) - 1/4 cup chopped walnuts or pecans (optional) You can customize your brownie cookies. Here are some ideas: - Use white chocolate chips for a different twist. - Add a pinch of cinnamon for warmth. - Swap walnuts for pecans or skip the nuts completely. - For a gluten-free choice, use almond flour instead of all-purpose flour. Using good-quality ingredients makes a big difference. Fresh cocoa powder adds rich flavor. Real vanilla extract enhances the taste. Use unsalted butter for better control over salt levels. Quality chocolate chips give your cookies a delicious melt. Always choose fresh eggs for the best texture and taste. {{ingredient_image_1}} Start by preheating your oven to 350°F (175°C). This step is key to getting the right texture. Line a baking sheet with parchment paper to prevent sticking. It makes for easy clean-up too. Gather all your ingredients so you have everything in one place. This helps keep the process smooth and fun. In a medium bowl, whisk together the flour, cocoa powder, baking powder, and salt. This mix forms the base of your cookies. In a larger bowl, combine melted butter with brown sugar and granulated sugar. Use a whisk to blend them until smooth. This creates a rich flavor. Now, add the eggs one by one. Mix well after each egg. Then, stir in the vanilla extract. This adds a lovely aroma to your dough. Next, gently fold the dry mixture into the wet ingredients. Do this until just combined. Avoid overmixing to keep your cookies soft and chewy. Finally, fold in the chocolate chips and nuts if you want extra crunch. This adds texture and flavor. Drop tablespoons of dough onto your prepared baking sheet. Space them out to allow for spreading. Bake for 10-12 minutes. You want the edges set and the tops slightly cracked. This means they are perfect. After baking, let them cool on the sheet for about 5 minutes. Then transfer them to a wire rack. This step allows air to circulate around the cookies, keeping them soft. Enjoy your homemade brownie cookies! To get chewy brownie cookies, focus on the ingredients. Use brown sugar for moisture. This sugar adds a nice chewiness. It helps retain moisture better than white sugar. Also, don’t overmix your dough. Overmixing can make cookies tough. Mix until just combined for the best texture. Baking them slightly less also helps. Aim for a soft center when they come out of the oven. One common mistake is baking too long. Keep an eye on the timer. If you bake too much, cookies become dry. Another issue is not measuring ingredients correctly. Use a kitchen scale for best results. Too much flour can lead to hard cookies. Lastly, remember not to skip the cooling time. Letting cookies cool on the wire rack helps them set perfectly. Serve your brownie cookies warm for the best taste. They go great with a scoop of vanilla ice cream. The hot cookie and cold ice cream create a perfect contrast. You can also drizzle them with chocolate sauce or caramel. For drinks, pair them with milk or coffee. This mix enhances the chocolate flavor even more. Pro Tips Chill the Dough: For thicker cookies, chill the dough for at least 30 minutes before baking. This helps prevent spreading and gives a fudgier texture. Use Quality Chocolate: Choose high-quality chocolate chips to enhance the flavor of your brownie cookies. Dark chocolate can add a rich depth to the sweetness. Don’t Overbake: Keep a close eye on the cookies in the last few minutes of baking. They should be soft in the center; they will continue to firm up as they cool. Experiment with Mix-ins: Feel free to get creative! Try adding white chocolate chips, toffee bits, or dried fruit for a unique twist on the classic brownie cookie. {{image_2}} You can switch up the flavor of your brownie cookies easily. Try adding mint extract instead of vanilla. This gives a fresh twist. You could also use espresso powder for a coffee flavor. It boosts the chocolate taste nicely. If you want something fruity, add a few teaspoons of orange zest. This adds a bright note to your treat. If you need gluten-free brownie cookies, swap the all-purpose flour with a gluten-free blend. Look for one that has xanthan gum already mixed in. You can also use almond flour for a nutty flavor. To make them healthier, reduce the sugar. Use half of what the recipe calls for and add mashed bananas for sweetness. You can customize your brownie cookies with various mix-ins. Try adding peanut butter chips or butterscotch chips for extra flavor. Dried fruit, like cranberries or cherries, can add a chewy texture. You can also mix in shredded coconut or even crushed candy bars for a fun twist. The options are endless, so get creative with what you have! To keep your brownie cookies fresh, let them cool completely. After cooling, place them in an airtight container. This helps keep them soft and chewy. You can layer the cookies with parchment paper to avoid sticking. Store the container at room temperature for up to five days. If you want them to last longer, consider freezing them. Freezing is a great way to save your brownie cookies. First, cool them completely as before. Then, wrap each cookie in plastic wrap or foil. Place the wrapped cookies in a freezer bag. Make sure to remove as much air as possible. They can be frozen for up to three months. When you want one, just take it out and let it thaw at room temperature. If you want your brownie cookies warm, reheating is easy. Preheat your oven to 350°F (175°C). Place the cookies on a baking sheet for about 5 minutes. This warms them and restores the soft texture. You can also microwave them for about 10-15 seconds. Enjoy your brownie cookies just like fresh! You can store brownie cookies in an airtight container. They stay fresh for about five days at room temperature. For longer storage, freeze them. They last up to three months in the freezer. Just make sure to wrap them well. Yes, you can make brownie cookies without eggs. Use a substitute like applesauce or mashed banana. Typically, 1/4 cup of applesauce replaces one egg. This keeps the cookies moist and helps them hold together. If you don’t have chocolate chips, try using chopped chocolate bars. You can also use white chocolate or butterscotch chips. Nuts, dried fruit, or even peanut butter chips work well too. Get creative with your favorites! Check the edges of the cookies; they should be set and not shiny. The tops will look slightly cracked. Stick a toothpick in the middle; it should come out with a few moist crumbs, not wet batter. Absolutely! Doubling the recipe is easy. Just make sure you have a large enough bowl for mixing. Also, keep an eye on baking time. Larger batches may need a few extra minutes in the oven. In this post, we covered how to make tasty brownie cookies. We explored key ingredients and quality, along with step-by-step baking instructions. I shared tips for chewy cookies and how to avoid common mistakes. You learned about fun flavor variations and the best storage methods. To wrap up, remember that the right ingredients and techniques matter. Enjoy baking these treats, and don’t hesitate to get creative with your own twists!

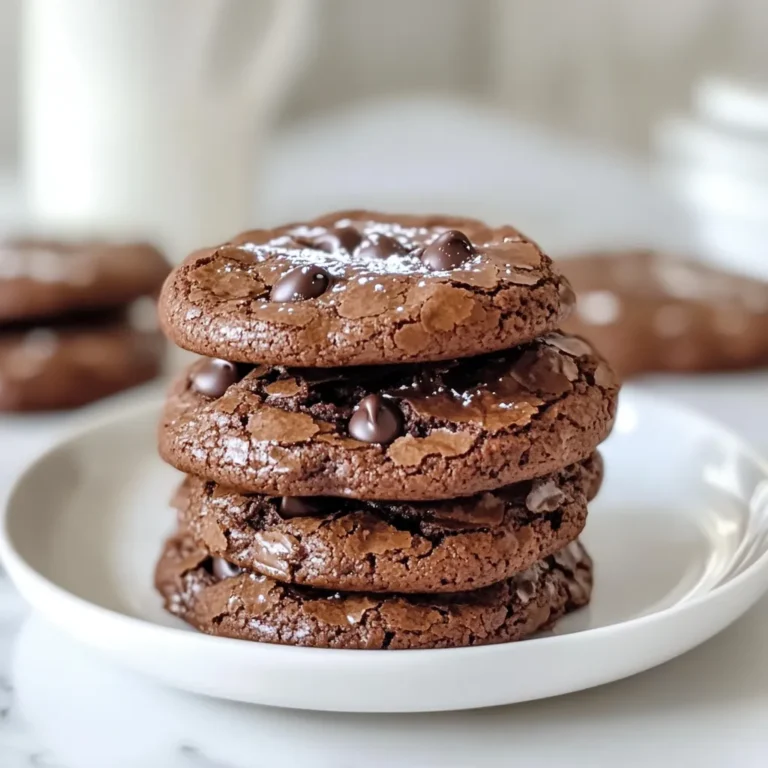
Easy Brownie Cookies Simple Recipe for Delicious Treats

To create Creamy Spinach Artichoke Chicken, gather these fresh ingredients: - 4 boneless, skinless chicken breasts - 1 cup fresh spinach, chopped - 1 cup canned artichoke hearts, drained and roughly chopped - 1 cup cream cheese, softened - 1/2 cup sour cream - 1/2 cup grated Parmesan cheese - 1 teaspoon garlic powder - 1 teaspoon onion powder - 1 teaspoon lemon juice - Salt and pepper to taste - 2 tablespoons olive oil - 1/4 teaspoon red pepper flakes (optional for heat) When choosing your ingredients, I recommend trusted brands for the best taste: - For chicken, use Bell & Evans or Perdue. - Philadelphia is a great choice for cream cheese. - For canned artichokes, look for Del Monte or Roland. - Kraft offers reliable grated Parmesan cheese. - Choose organic spinach for freshness and flavor. If you need to swap out some ingredients, here are a few ideas: - Use Greek yogurt instead of sour cream for a lighter option. - Swap cream cheese with ricotta for a different texture. - Try using fresh artichokes if you prefer a more authentic flavor. - For a dairy-free version, use cashew cream as a substitute. - If you want less spice, leave out the red pepper flakes. These ingredient choices enhance your dish and make it perfect for any occasion. {{ingredient_image_1}} First, gather your ingredients. You will need four chicken breasts, spinach, artichokes, cream cheese, and more. Preheat your oven to 375°F (190°C). This step is key for a perfect bake. Next, season the chicken. Use salt, pepper, garlic powder, and onion powder. Rub the spices all over the chicken. This adds great flavor. Heat two tablespoons of olive oil in a large skillet over medium heat. When the oil is hot, add the chicken. Sear the chicken for about 4 to 5 minutes on each side. Look for a golden brown color. This shows it's cooked well. Remove the chicken from the skillet and set it aside. In the same skillet, lower the heat. Add one cup of chopped spinach and sauté for about two minutes. You want the spinach to wilt but not lose color. In a mixing bowl, combine one cup of softened cream cheese, half a cup of sour cream, and half a cup of grated Parmesan cheese. Add one teaspoon of lemon juice and red pepper flakes if you like heat. Stir well. Finally, mix in the sautéed spinach and chopped artichokes. Ensure everything blends nicely. Now, place the seared chicken breasts in a baking dish. Spread the creamy spinach and artichoke mixture over the chicken. Bake for 20 to 25 minutes. Look for a golden and bubbly top. Let it cool for a few minutes before serving. Enjoy your meal! To cook juicy chicken, start with high heat. Sear the chicken in olive oil for 4–5 minutes per side. This browns the outside and keeps moisture inside. Use a meat thermometer to check. The chicken should reach 165°F (75°C). Let it rest for a few minutes before serving. This helps the juices settle. To boost flavor, use fresh ingredients. Fresh spinach and artichokes add depth. A spoonful of lemon juice brightens the dish. If you like heat, add red pepper flakes. Mix in herbs like thyme or basil for more complexity. Always taste as you go. Adjust salt and pepper for balance. For a stunning plate, serve the chicken in sauce. Spoon the creamy mixture over the chicken. Add a sprinkle of chopped parsley for color. Pair with colorful sides, like roasted vegetables or quinoa. Use a white plate to make the colors pop. A beautiful dish makes every meal special. Pro Tips Choose the Right Chicken: Use fresh, high-quality chicken breasts for the best flavor and texture in your dish. Perfectly Sautéed Spinach: Be careful not to overcook the spinach; sauté just until wilted to preserve its vibrant color and nutrients. Mixing the Creamy Sauce: Make sure your cream cheese is softened to room temperature to ensure a smooth and creamy mixture without lumps. Rest Before Serving: Let the dish cool for a few minutes after baking; this allows the sauce to thicken slightly and makes it easier to serve. {{image_2}} You can make this dish vegetarian by skipping the chicken. Use hearty vegetables like mushrooms or eggplant instead. These veggies soak up the creamy sauce well. You can also add extra spinach and artichokes for more flavor. Serve it over rice or pasta for a filling meal. To make this dish gluten-free, ensure your cream cheese and sour cream are gluten-free. Most brands are safe, but always check the labels. Serve this creamy mixture over gluten-free pasta or quinoa to keep it delicious and safe for gluten-sensitive diners. Feel free to play with flavors in this dish. Add fresh herbs like basil or thyme for a fresh taste. You can also mix in sun-dried tomatoes for a touch of sweetness. For a spicy kick, try adding diced jalapeños or more red pepper flakes. Adjust these flavors to match your taste buds! You can store leftover creamy spinach artichoke chicken in an airtight container. Keep it in the fridge for up to three days. If you want to save it longer, consider freezing it. Make sure the dish is completely cool before putting it away. This step helps avoid extra moisture in the container. To reheat, take the chicken out of the fridge. Place it in a microwave-safe dish. Cover it with a lid or microwave-safe wrap. Heat it on medium power for about two to three minutes. Check that it's warm all the way through. If using the oven, preheat to 350°F (175°C). Bake for about 15-20 minutes until heated. For freezing, use a freezer-safe container. Portion the chicken into individual servings for easy meals. You can also wrap it tightly in plastic wrap, then foil. Label the container with the date. Use the frozen chicken within three months for the best flavor. To thaw, place it in the fridge overnight before reheating. If you find your chicken is overcooked, don't worry. Slice the chicken into strips. This helps the meat feel more tender. You can also add some broth or sauce. This will keep the chicken moist. Yes, you can make Creamy Spinach Artichoke Chicken ahead. Prepare the chicken and sauce, then store them separately. You can bake it later when you're ready to eat. Just warm the chicken first before adding the sauce. This dish goes well with many sides. Here are some ideas: - Quinoa for a healthy grain option - Roasted vegetables for color and flavor - Mashed potatoes for creamy comfort - Garlic bread to soak up the sauce These sides will balance the rich flavors of the chicken. Enjoy mixing and matching! This article covered key ingredients and brands to use for a delicious dish. I shared simple steps for preparing and cooking the chicken to ensure it stays juicy. We discussed helpful tips, neat variations, and how to store leftovers effectively. Cooking can be fun and easy with the right information. Experiment and enjoy every bite you create!

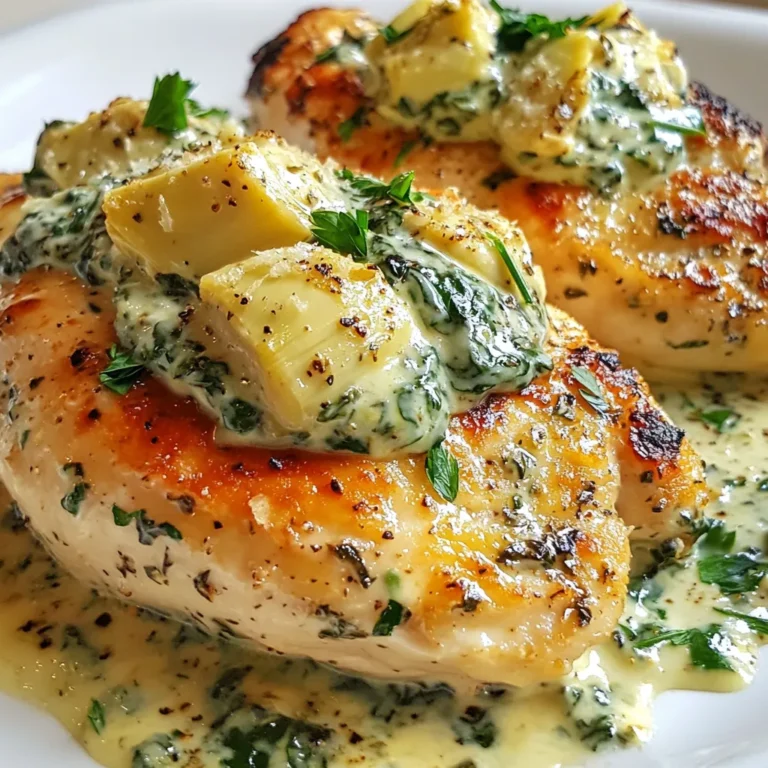
Creamy Spinach Artichoke Chicken Flavorful Delight

- 8 oz (227 g) pasta (penne or fusilli) - 1 lb (450 g) ground beef - 4 cloves garlic, minced - 1 medium onion, finely chopped - 1 red bell pepper, diced - 1 cup cherry tomatoes, halved - 2 cups baby spinach - 1 teaspoon dried oregano - 1 teaspoon smoked paprika - 2 tablespoons olive oil - Salt and pepper to taste - Grated Parmesan cheese for serving - Fresh basil leaves for garnish (optional) When I prepare garlic beef pasta skillet, I gather all my ingredients first. This makes cooking smooth and fun. I love using penne or fusilli pasta because they hold the sauce well. You need one pound of ground beef for a hearty meal. Fresh garlic gives a nice kick, and four cloves work perfectly. Next, I chop one medium onion and dice one red bell pepper. These add great flavor and color. I also use one cup of cherry tomatoes, halved, for sweetness. Two cups of baby spinach add freshness and nutrients. For seasoning, I reach for dried oregano and smoked paprika. These spices enhance the dish's flavor. Olive oil helps cook everything together and adds richness. Don’t forget salt and pepper to taste. Lastly, I love to serve this dish with grated Parmesan cheese and fresh basil for a touch of elegance. Gathering these ingredients makes the cooking process easy and enjoyable. It sets you up for a delicious meal that you and your family will love! {{ingredient_image_1}} To cook pasta for a perfect al dente texture, start by bringing a large pot of salted water to a boil. The salt adds flavor to the pasta. Once boiling, add the pasta. Cook it according to the package instructions, usually around 8 to 10 minutes. Check it a minute or two early to avoid overcooking. When done, drain the pasta but save about a cup of the pasta water. This water is starchy and helps later. For browning ground beef, heat olive oil in a large skillet over medium heat. Add the beef and break it apart with a spatula. Cook it for 5 to 7 minutes until it turns brown. Use lean beef for less fat or fattier beef for more flavor. If you use fatty beef, drain the excess fat from the skillet. This keeps the dish from becoming greasy. Sautéing garlic and onions adds depth to your dish. After browning the beef, add chopped onion, minced garlic, and diced red bell pepper to the skillet. Cook these for 3 to 4 minutes. This softens the veggies and releases their flavors. Be careful not to burn the garlic; it can turn bitter. Stir often to keep it from sticking. To combine tomatoes and spinach with beef, add halved cherry tomatoes, baby spinach, dried oregano, and smoked paprika. Stir everything together in the skillet. Cook for another 3 to 4 minutes until the spinach wilts and tomatoes soften. This step brings color and nutrition to the dish. To mix the pasta and beef mixture effectively, add the cooked pasta to the skillet. Toss everything together gently until well combined. If it seems dry, splash in some of the reserved pasta water. This helps to create a creamy sauce and gives it a nice consistency. Adjust the seasoning with salt and pepper to taste before serving. To make your garlic beef pasta even better, try adding more spices. Red pepper flakes give a nice heat. Fresh herbs like parsley can brighten the dish. You can also use Italian seasoning for a deeper flavor. To enhance your dish, always taste as you go. This way, you can adjust the salt and spices. A splash of lemon juice at the end can add freshness. This dish cooks fast, so multitasking is key. Start boiling the pasta while you brown the beef. This makes the most of your time. Keep your tools close to save steps. Have a clean workspace to avoid chaos. When you chop, do it all at once. Store veggies in bowls to grab when you need them. This helps keep the flow smooth. Garlic beef pasta goes great with a simple salad. A green salad with vinaigrette adds crunch. You can also serve garlic bread on the side for extra flavor. For wine, a light red like Pinot Noir pairs well. It complements the beef without overpowering it. If you prefer white, try a dry Sauvignon Blanc for a crisp taste. Pro Tips Perfect Pasta: Always cook the pasta al dente. It will continue to cook slightly when mixed with the hot beef and vegetable mixture. Garlic Care: Add the minced garlic towards the end of sautéing the vegetables to prevent it from burning and becoming bitter. Flavor Boost: For an extra flavor boost, try adding a splash of balsamic vinegar or a squeeze of lemon juice just before serving. Vegetable Variations: Feel free to add other vegetables like zucchini or mushrooms to enhance the nutritional value and flavor of the dish. {{image_2}} For a gluten-free option, you can use gluten-free pasta. Many brands make great choices that taste just as good. You can find pasta made from rice, corn, or lentils. These alternatives work well in the garlic beef pasta skillet. If you want to switch up the meat, try using ground turkey or plant-based ground beef. Both options add unique flavors. Ground turkey is leaner, while plant-based meat gives a similar taste to beef. To spice things up, add chili flakes or cayenne pepper. This will give your dish a nice kick. You can also use taco seasoning for a fun twist. Mixing in some cumin or coriander can add depth. For extra veggies, think about adding zucchini or mushrooms. These add more texture and nutrition. You can also toss in some frozen peas or carrots. They cook quickly and brighten up the dish. You can turn this dish into a baked option. Just transfer the mixture to a baking dish, top with cheese, and bake until bubbly. This adds a crispy layer that's hard to resist. Another fun idea is to serve it in lettuce wraps. This makes a great low-carb meal. Just spoon the beef and pasta mix into romaine or butter lettuce leaves. It's fresh, fun, and easy to eat! To keep your garlic beef pasta fresh, store it in an airtight container. This helps prevent the pasta from drying out. Make sure to let it cool down first. You can keep it in the fridge for about 3 to 4 days. If you want to enjoy it later, plan to consume it within that time frame. Freezing garlic beef pasta is simple. First, let it cool completely. Then, divide it into servings. Use freezer-safe containers or bags. Make sure to remove as much air as possible to avoid freezer burn. You can freeze it for up to 3 months. When ready to eat, thaw it in the fridge overnight. Reheat it on the stove or in the microwave. Add a splash of water if it seems dry. Enjoy your meal just like fresh! You can prep this meal in advance with some easy steps. First, cook the pasta as directed. Drain it and toss it with a little olive oil to keep it from sticking. Cook the beef, garlic, onion, and bell pepper, then cool them. Store the pasta and the beef mixture in separate containers in your fridge. When you're ready to eat, just heat everything together in a skillet. This method helps keep the flavors fresh. You can also freeze the cooked beef mixture for later use. Yes, you can switch up the meat in this recipe. Ground turkey or chicken works well if you want a lighter option. If you prefer pork, ground pork is also a tasty choice. You can even try using sausage for added flavor. Just make sure to cook it well and drain any extra fat. Each type of meat will bring its unique taste to the dish. If you don’t have fresh basil, don’t worry! You can use dried basil instead. A teaspoon of dried basil can add great flavor. Other herbs like parsley or cilantro can also work. You might even like thyme or oregano for a different taste. Sometimes, a sprinkle of arugula can add a nice peppery kick as a garnish. To make this dish vegetarian, swap out the ground beef for plant-based protein. Options include lentils, chickpeas, or a meat substitute like tempeh or tofu. Make sure to season them well to add flavor. You can keep all the veggies in the recipe, as they add taste and nutrition. This way, you still have a hearty and satisfying meal without meat. In this blog post, I outlined a tasty garlic beef pasta skillet recipe, complete with ingredients, step-by-step instructions, and helpful tips. You learned how to cook the perfect pasta and brown beef. I shared ways to enhance flavor and create variations for different diets. Remember, this dish is easy to customize and store for later. Try it your way and enjoy a delicious meal that fits your taste. Happy cooking!

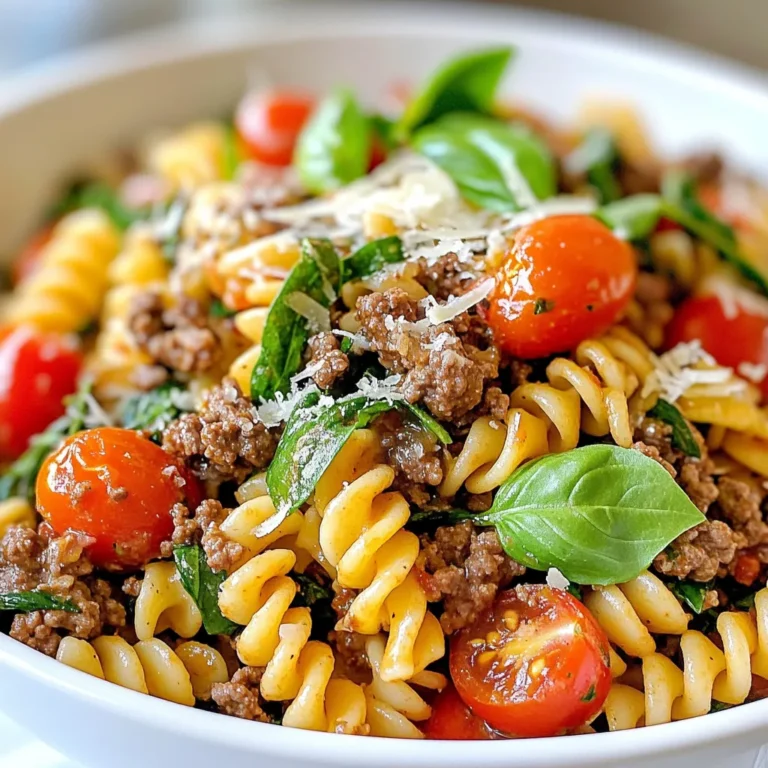
Garlic Beef Pasta Skillet Quick and Tasty Meal

- 2 boneless, skinless chicken breasts - 8 oz penne pasta - 1 cup cherry tomatoes, halved - 1/2 cup fresh basil leaves, chopped - 2 cloves garlic, minced - 1 tablespoon balsamic vinegar - 1 tablespoon olive oil - Salt and pepper to taste - 1/2 cup mozzarella cheese, shredded - 1/4 cup grated Parmesan cheese When I cook, I always choose fresh ingredients. Fresh chicken tastes better and cooks evenly. Look for chicken that is pink and firm. For tomatoes, use bright, ripe cherry tomatoes. They add sweetness and color. Basil should be vibrant green and fragrant. Fresh herbs elevate the dish. For cheese, opt for whole blocks of mozzarella and Parmesan. Grating your own cheese gives the best flavor and texture. Measuring ingredients correctly is key for great results. Use a kitchen scale for the chicken. This ensures even cooking. For the pasta, measuring cups work well. Fill the cup to the top and level it off. For liquids like balsamic vinegar and olive oil, use a liquid measuring cup. Always check your measurements twice. This helps maintain balance in flavors and textures. {{ingredient_image_1}} Start by boiling a large pot of salted water. Add 8 ounces of penne pasta. Cook it according to the package instructions until it is al dente. This usually takes around 10-12 minutes. Once done, drain the pasta and set it aside. This step is key to getting the right texture. While the pasta cooks, grab two boneless, skinless chicken breasts. Season them with salt and pepper. Heat one tablespoon of olive oil in a skillet over medium heat. Add the chicken breasts to the hot skillet. Cook for 6-7 minutes on each side. You want them golden brown and fully cooked. Remove the chicken from the skillet and let it rest for a few minutes. After resting, slice the chicken into bite-sized pieces. This makes it easy to mix into the pasta. In the same skillet, add two cloves of minced garlic. Cook the garlic for one minute until it smells great. Next, add one cup of halved cherry tomatoes and one tablespoon of balsamic vinegar. Stir well and cook for another 3-4 minutes. The tomatoes should soften but still hold their shape. Now, add the cooked penne pasta to the skillet. Mix it with the tomato and garlic mix. Stir in half a cup of chopped fresh basil and the sliced chicken, blending everything nicely. Finally, add half a cup of shredded mozzarella cheese and half of the grated Parmesan cheese. Stir until the cheese melts. This creates a rich, creamy texture. Seasoning makes all the difference in Bruschetta Chicken Pasta. Use salt and pepper to bring out the chicken's flavor. Fresh herbs like basil add a bright taste. You can sprinkle some garlic powder for an extra kick. Balsamic vinegar gives a sweet tang that ties everything together. Taste as you cook, and adjust the seasoning to your liking. Cooking chicken right is key to a tasty dish. Start with boneless, skinless chicken breasts for a quick cook. Heat your skillet before adding the chicken; this helps it brown nicely. Sear the chicken for 6-7 minutes on each side. Check that it’s fully cooked by cutting into it; there should be no pink inside. Let it rest before slicing. This keeps the juices in and makes it tender. Melted cheese adds creaminess to your pasta. To get that perfect melt, add the mozzarella once the heat is off. Stir gently to combine it with the pasta. The residual heat will melt the cheese without making it rubbery. For extra flavor, sprinkle more grated Parmesan on top right before serving. This will give your dish a nice finish. Pro Tips Rest the Chicken: Let the seared chicken sit for a few minutes before slicing. This helps retain its juices, keeping the meat tender and flavorful. Fresh Basil Boost: Add fresh basil at the end of cooking to preserve its vibrant flavor and aroma. This ensures a bright, herbal note in your dish. Custom Cheese Blend: Feel free to mix different cheeses! Try adding feta or goat cheese for a tangy twist that complements the tomatoes beautifully. Perfect Pasta Texture: Cook the penne just until al dente and toss it with the sauce immediately to ensure it absorbs flavors without becoming mushy. {{image_2}} You can swap chicken for other proteins. Try shrimp or turkey for a change. Both cook quickly and add flavor. If you want plant-based options, use chickpeas or tofu. They soak up flavors well and add texture. Adding veggies boosts nutrition and flavor. Try bell peppers, spinach, or zucchini. They cook nicely with the chicken and tomatoes. You can toss in some broccoli for extra crunch. Just remember to chop them small for even cooking. Penne is great, but you can use other pasta too. Fusilli or farfalle work well in this dish. Whole grain pasta adds fiber and a nutty taste. For a gluten-free option, choose rice or lentil pasta. They will still give a nice bite. Store leftover bruschetta chicken pasta in an airtight container. Make sure it cools down first. Place it in the fridge for up to three days. Keep the pasta and chicken together for best results. This keeps the flavors fresh and tasty. To reheat, use a skillet for the best flavor. Add a splash of water or olive oil. This helps to keep the pasta moist. Heat over medium-low heat, stirring gently. You can also use the microwave, but this may dry out the dish. Heat in short bursts and stir often to warm evenly. You can freeze bruschetta chicken pasta for later meals. First, let it cool completely. Then, divide it into portions in airtight containers. It can stay good in the freezer for up to three months. When ready to eat, thaw it in the fridge overnight. Reheat it on the stove for the best taste. Yes, you can use dried herbs. Dried herbs are easy to find and store. They can last a long time in your pantry. Use about one-third of the amount you would use for fresh herbs. So, if the recipe calls for a tablespoon of fresh basil, use only a teaspoon of dried basil. The flavor might not be as bright, but your dish will still taste good. To make Bruschetta Chicken Pasta vegetarian, skip the chicken. You can add protein-rich options like chickpeas or tofu. Both will soak up the flavors well. You can also load up on veggies like bell peppers, spinach, or zucchini. These will add color and taste. Adjust the cooking time to ensure everything is tender and delicious. Bruschetta Chicken Pasta pairs well with several sides. A fresh green salad is a great choice. It adds crunch and balances the meal. Garlic bread or a crusty baguette is also good for dipping. You might enjoy a light dessert, like sorbet, to finish your meal. These options keep your dinner light and enjoyable. This blog post covered the key steps for making Bruschetta Chicken Pasta. We explored every ingredient, focusing on freshness, quality, and accurate measuring. I provided detailed cooking instructions for both pasta and chicken while sharing tips to enhance flavor and cheese melting. We even looked at variations and storage options to increase meal flexibility. In closing, cooking is an art, and each step matters. Follow these tips for great results! Enjoy your delicious creation!

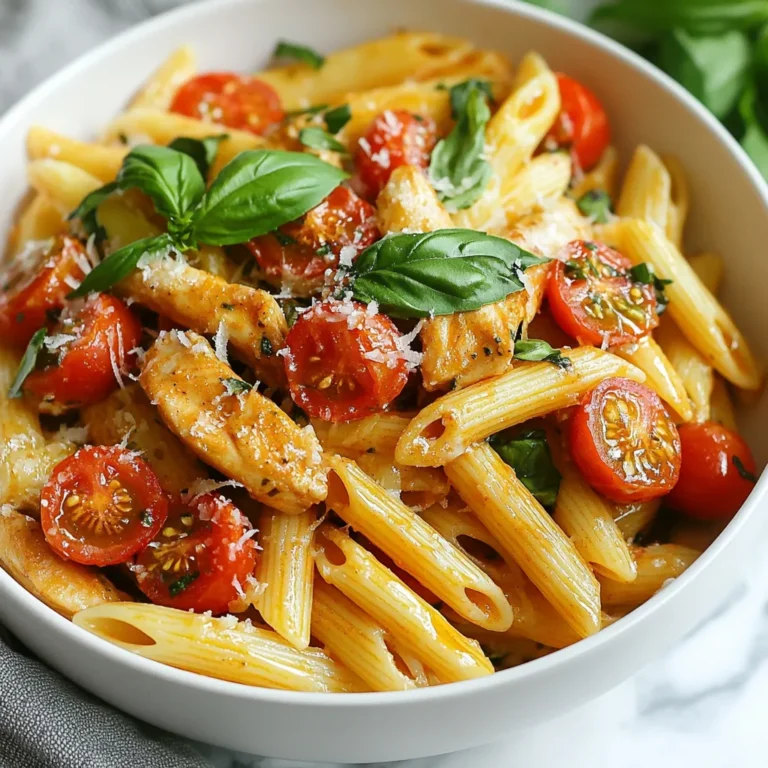
Bruschetta Chicken Pasta Flavorful and Simple Dish

- Chicken and Spice Ingredients - 1.5 lbs boneless, skinless chicken thighs, cut into bite-sized pieces - 1 tablespoon garam masala - 1 tablespoon ground cumin - 1 tablespoon ground coriander - 1 teaspoon turmeric powder - 1 teaspoon cayenne pepper (adjust for spice level) - 1 teaspoon salt - Aromatics - 1 tablespoon vegetable oil - 1 medium onion, finely chopped - 4 garlic cloves, minced - 1-inch piece ginger, grated - Liquid Ingredients - 1 can (14 oz) crushed tomatoes - 1 cup coconut milk - Serving Suggestions - Fresh cilantro, for garnish - Cooked basmati rice or naan, for serving Gathering the right ingredients is key to making delicious Instant Pot Chicken Tikka Masala. You want to start with fresh chicken thighs. They add great flavor and tenderness. Spice is the heart of this dish. Garam masala, cumin, coriander, turmeric, and cayenne pepper create a warm and fragrant profile. Adjust the cayenne if you prefer more or less heat. Aromatics like onion, garlic, and ginger bring depth. Choose a good-quality vegetable oil for sautéing. For the sauce, crushed tomatoes and coconut milk create a rich, creamy base. Garnish with fresh cilantro for a pop of color and flavor. Serve with basmati rice or warm naan to soak up the sauce. Each ingredient plays a role in crafting a dish that is both comforting and bold. {{ingredient_image_1}} Chicken Marination Process Start by mixing the chicken pieces with garam masala, cumin, coriander, turmeric, cayenne pepper, and salt in a bowl. Make sure every piece is coated well. This blend gives the chicken its rich flavor. Importance of Marinating Time Let the chicken marinate for at least 30 minutes. If you can, marinate it overnight in the fridge. This extra time allows the spices to soak in, making the chicken taste even better. Setting Up the Instant Pot Set your Instant Pot to the Sauté function. Add one tablespoon of vegetable oil and let it heat up. This step is key for building flavor. Steps for Sauté Function Once the oil is hot, add the chopped onion. Sauté it for 5 to 7 minutes until it looks translucent. Stir it often to keep it from burning. Next, add minced garlic and grated ginger. Sauté for another minute until you smell their aroma. Cooking Time and Pressure Release Now, add the marinated chicken to the pot. Stir it with the onion mixture and cook for 3 to 4 minutes until the chicken is lightly browned. Pour in the crushed tomatoes and coconut milk. Mix well and make sure the chicken is under the sauce. Close the lid tightly and set the valve to Sealing. Cook on high pressure for 8 minutes. After cooking, carefully turn the valve to Venting for a quick release. When the steam is gone, open the lid. Achieving Desired Consistency Stir the chicken tikka masala well. If you want a thicker sauce, set the Instant Pot back to Sauté for a few minutes. This will help the sauce reduce. Adjusting Seasonings Before serving, taste the dish. If needed, adjust the seasonings. This final touch makes a big difference in flavor. Serve hot with fresh cilantro on top, alongside basmati rice or warm naan. Importance of Fresh Spices Using fresh spices makes a big difference in taste. Ground spices lose flavor over time. Always check dates on your spice jars. If they are old, replace them. Fresh spices give your Chicken Tikka Masala a rich and vibrant taste. Customizing Spice Levels Adjusting spice levels is easy. If you like it mild, use less cayenne pepper. For more heat, add a bit more. Remember, you can always taste and adjust as you cook. This way, you control the heat to fit your taste. Overcooking Chicken Overcooked chicken can turn dry and tough. Follow the cooking time closely. The Instant Pot cooks chicken fast. After eight minutes, check for doneness. It should be tender and juicy. Skipping Marination Marination is key for flavor. Letting the chicken soak in spices adds depth. If you’re short on time, aim for at least 30 minutes. For the best taste, overnight marination is ideal. Don’t skip this step if you want the best results! Pro Tips Marination is Key: Letting the chicken marinate for at least 30 minutes allows the spices to penetrate deeply, enhancing the flavor significantly. Adjust Spice Levels: Feel free to modify the amount of cayenne pepper based on your spice tolerance. You can always start with less and add more later. Thickening the Sauce: If you prefer a thicker sauce, use the Sauté function after cooking to simmer the tikka masala until it reaches your desired consistency. Garnish for Freshness: Don’t skip the fresh cilantro garnish; it adds a burst of freshness that complements the rich, creamy sauce beautifully. {{image_2}} You can easily swap chicken for tofu or paneer. Tofu is a great choice for a vegan dish. Just press the tofu to remove excess moisture. Cut it into cubes and marinate it the same way as chicken. Paneer, a soft cheese, adds a creamy texture. Cut it into cubes, and use it instead of chicken. Both options give a nice twist to the dish. You can change the sauce with different ingredients. If you want a richer taste, try using heavy cream instead of coconut milk. For a lighter option, use Greek yogurt. You can also add vegetables like spinach or bell peppers. Just chop them up and stir them in during the last few minutes of cooking. This adds color and nutrition to your meal. When serving Chicken Tikka Masala, pair it with cooked basmati rice or warm naan. The rice soaks up the sauce well. Naan is perfect for scooping up all that flavor. For garnishing, sprinkle fresh cilantro on top. You can also add a squeeze of lime for a zesty touch. Enjoy your vibrant meal with these simple sides! - Refrigeration Guidelines: After enjoying your Chicken Tikka Masala, let it cool. Place it in an airtight container. It will stay fresh in the fridge for up to four days. Always ensure it's cooled first to avoid condensation inside the container. - Freezing Instructions: For longer storage, freeze your Chicken Tikka Masala. Use a freezer-safe container or bag. It can last for up to three months in the freezer. Make sure to label the container with the date. This helps track how long it’s been stored. - Best Practices for Reheating Chicken Tikka Masala: Reheat your Chicken Tikka Masala slowly. Use a stove or microwave for the best results. If using the stove, heat over medium-low heat. Stir often to prevent sticking. If using a microwave, cover the dish with a lid or microwave-safe wrap. Heat in short bursts, stirring in between. This helps maintain its creamy texture and flavor. Cooking Chicken Tikka Masala in an Instant Pot takes about 30 minutes. This includes 10 minutes for prep and 8 minutes of high pressure cooking. After cooking, you release the steam quickly. The Instant Pot does the hard work for you. Yes, you can make Chicken Tikka Masala without coconut milk. Use heavy cream or yogurt instead. This will change the flavor and texture a bit, but it will still taste great. Adjust the amount to keep the dish creamy. Serve Chicken Tikka Masala with basmati rice or warm naan. Both pair well with the rich sauce. You can also add a side of salad or raita for a refreshing touch. These options balance the flavors nicely. Chicken Tikka Masala can be spicy, depending on the cayenne pepper used. If you want less heat, reduce the cayenne or skip it. For more spice, add extra cayenne or a pinch of chili powder. Adjust to your taste for the perfect meal. In this blog, we explored crafting a tasty Chicken Tikka Masala in an Instant Pot. We covered key ingredients, including chicken, spices, and aromatics. I shared step-by-step instructions for marinating, cooking, and finalizing your dish. Helpful tips can ensure perfect flavor while avoiding common mistakes. You can also switch proteins or sauces to find your favorite variations. Remember, great meals start with the right prep and care. Enjoy your cooking and make it your own!

Instant Pot Chicken Tikka Masala Flavorful and Easy

- 2 boneless, skinless chicken breasts, thinly sliced - 8 oz whole wheat noodles (or any preferred noodles) - 1 cup broccoli florets - 1 red bell pepper, thinly sliced - 1 medium carrot, julienned - 3 green onions, chopped - 1 tablespoon sesame oil - 3 tablespoons soy sauce (low sodium if preferred) - 2 tablespoons teriyaki sauce - 1 tablespoon honey or maple syrup - 1 tablespoon ginger, minced - 2 cloves garlic, minced - Sesame seeds for garnish - Fresh cilantro for garnish (optional) I chose these ingredients for their balance of taste and nutrition. The chicken provides protein and the veggies add color and crunch. Whole wheat noodles offer fiber. You can use sesame seeds or fresh cilantro as garnishes. These add flavor and make the dish look great. Green onions also give a nice pop of color and taste. If you don't have chicken, try shrimp or tofu. For noodles, rice noodles work well too. You can swap broccoli for snap peas or bell peppers for zucchini. Adapt the recipe to what you have on hand! {{ingredient_image_1}} Start by boiling water in a large pot. Once the water boils, add the noodles. Cook them according to the package instructions. Whole wheat noodles take about 8-10 minutes. Stir them often to avoid sticking. When they are done, drain the noodles. Toss them with a little sesame oil to keep them from clumping. Set them aside for later use. Now, grab a large skillet or wok. Heat 1 tablespoon of sesame oil over medium-high heat. Add minced garlic and ginger. Sauté for about 30 seconds until fragrant. Next, add the thinly sliced chicken. Cook it for 5-7 minutes until browned and cooked through. Stir often to ensure even cooking. Once the chicken is cooked, add broccoli florets, red bell pepper, and julienned carrot. Cook for another 3-4 minutes. You want the veggies tender but still crisp. While the chicken cooks, whisk together soy sauce, teriyaki sauce, and honey in a small bowl. Once the chicken and veggies are ready, pour this sauce over them. Mix well to coat everything evenly. Next, add the cooked noodles to the skillet. Toss all the ingredients together until heated through. Remove from heat, and garnish with chopped green onions, sesame seeds, and fresh cilantro if you like. Enjoy your savory Chicken Teriyaki Noodles! To cook chicken well, start with thin slices. Thin slices cook faster and evenly. Use a hot skillet to sear the chicken. This gives a nice brown color. Don't crowd the pan; cook in batches if needed. Season the chicken with a pinch of salt before cooking. This enhances its flavor. Make sure the chicken reaches 165°F to ensure it's safe to eat. For perfect noodles, follow the package instructions closely. Use plenty of water to avoid sticking. Add a little sesame oil after draining. This keeps the noodles separate and adds flavor. Don't overcook the noodles; they should be al dente. This means they should still have a slight bite. If you want a twist, try whole wheat or rice noodles. To boost the flavor, try adding more garlic or ginger. These ingredients give a nice kick. A splash of lime juice can brighten the dish, too. For heat, add red pepper flakes or sriracha. You can also add a splash of rice vinegar for tanginess. Don't forget to garnish with sesame seeds and green onions. They add texture and visual appeal. Pro Tips Marinate the Chicken: For enhanced flavor, marinate the sliced chicken in soy sauce and ginger for at least 30 minutes before cooking. Veggie Variations: Feel free to add other vegetables like snap peas, mushrooms, or bok choy for more variety and nutrition. Adjusting Sweetness: Depending on your preference, you can adjust the sweetness of the sauce by adding more honey or maple syrup. Serving Suggestions: Serve with lime wedges and chili flakes on the side for those who prefer a bit of zest and heat in their dish. {{image_2}} To make Chicken Teriyaki Noodles vegetarian, skip the chicken. You can use tofu instead. Firm tofu works best. Cut it into small cubes. Toss it in the pan until golden brown. For a vegan option, replace honey with maple syrup. This gives a sweet touch without animal products. You can also add edamame for protein. If you need gluten-free noodles, use rice noodles or quinoa noodles. These options cook quickly and taste great. Make sure to choose gluten-free soy sauce. This small swap keeps the dish tasty. Always check labels when buying sauces. Feel free to mix in other veggies. Snap peas add a nice crunch. Mushrooms bring a rich flavor. Zucchini or bell peppers also work well. Slice them thin to cook fast. Add any veggies you love to boost nutrition. This dish is very flexible! To keep your Chicken Teriyaki Noodles fresh, store them in airtight containers. Let the dish cool down first. You can place leftovers in the fridge for up to three days. If you want to keep them for longer, consider freezing. When you're ready to enjoy leftovers, reheat them gently. Use a skillet over medium heat. Add a splash of water or broth to keep them moist. Stir often until everything is heated through. You can also microwave them in a covered bowl. Heat in short bursts, stirring between, until hot. If you want to freeze your Chicken Teriyaki Noodles, they can last for up to three months. Portion them into airtight freezer bags or containers. Make sure to remove as much air as possible. When you're ready to eat, thaw them in the fridge overnight. Reheat as mentioned before for the best taste. Yes, you can use other proteins. Tofu works great for a vegetarian dish. Shrimp or beef are also good choices. Just adjust the cooking time as needed. For shrimp, cook until they turn pink. For beef, thinly slice and cook until browned. Each protein adds its own flavor. Whole wheat noodles are my favorite. They add a nutty flavor and are healthy. You can also use rice noodles, udon, or even ramen. Just pick whichever you like best. Make sure to follow the cooking time on the package for perfect noodles. Add crushed red pepper flakes for heat. Start with a small amount and taste as you go. You can also add sliced jalapeños or a dash of hot sauce. If you like a strong flavor, try using spicy teriyaki sauce. Adjust to your heat preference for a kick! This blog post covered how to make Chicken Teriyaki Noodles. We looked at key ingredients, cooking steps, and helpful tips. Remember to cook your chicken well and choose the right noodles. You can switch up ingredients to suit your taste or diet, like trying a vegan option or adding veggies. Store leftovers properly to keep them fresh. Enjoy creating this delicious dish, and don’t hesitate to improvise!

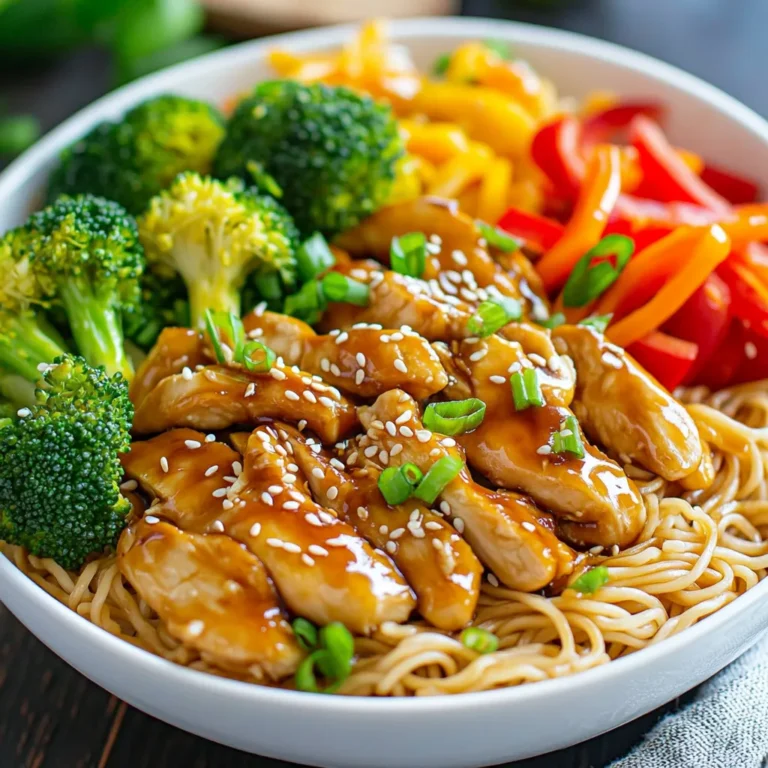
Savory Chicken Teriyaki Noodles Quick and Easy Meal

To make tasty Tacos de Papa, you need these key ingredients: - 4 large russet potatoes, peeled and cubed - 1 tablespoon olive oil - 1 small onion, finely chopped - 2 cloves garlic, minced - 1 teaspoon ground cumin - 1 teaspoon chili powder - Salt and pepper to taste - Corn tortillas - Fresh cilantro, chopped (for garnish) - Salsa (for serving) - Avocado slices (optional, for topping) These ingredients come together to create a warm, hearty filling. The russet potatoes give a nice texture. The spices add depth and flavor. You can customize your Tacos de Papa with optional toppings. Consider adding: - Avocado slices for creaminess - Fresh cilantro for a burst of freshness - Salsa for a spicy kick These toppings elevate your tacos and add more flavor. You can serve them with rice or beans for a complete meal. When choosing potatoes, look for firm ones without spots. They should feel heavy for their size. For onions, select ones that are dry and firm. Fresh garlic should be plump with no soft spots. Using fresh ingredients makes a big difference in taste. Always wash your produce before cooking to ensure cleanliness. {{ingredient_image_1}} To start, place four large russet potatoes in a pot. Peel and cube them first. Cover the potatoes with salted water. Boil this mixture for about 15 to 20 minutes. You want the potatoes to be fork-tender. Once done, drain the water and let the potatoes cool a bit. Next, heat one tablespoon of olive oil in a skillet over medium heat. Add one small onion, finely chopped. Sauté the onion until it turns translucent, which takes a few minutes. Once the onion softens, add two minced garlic cloves. Then, stir in one teaspoon of ground cumin and one teaspoon of chili powder. Cook this for another minute so the spices release their flavors. Now, add the cooked potatoes to the skillet. Use a fork or potato masher to mash them gently. Keep it a bit chunky for texture. Season with salt and pepper to taste. Let the mixture cook for an extra five minutes. This helps the flavors meld together nicely. While your filling cooks, grab some corn tortillas. Warm them in another skillet for about 30 seconds on each side. This makes them pliable and easy to fill. Once warm, spoon the potato filling into each tortilla. For a fresh touch, top each taco with chopped cilantro. If you like, add avocado slices too. Serve your tacos with salsa on the side for extra flavor. Enjoy your delicious Tacos de Papa! To get the best potatoes for your tacos, choose russet potatoes. They are starchy and fluffy. This gives a nice texture in every bite. Peel and cube the potatoes evenly. This helps them cook at the same time. When boiling, add a pinch of salt to the water. It flavors the potatoes as they cook. Boil them until they are fork-tender, about 15 to 20 minutes. Drain them well to avoid watery filling. Spices can make or break your tacos de papa. Use fresh garlic for the best taste. Mince the garlic finely to release its strong flavor. Ground cumin and chili powder add warmth and depth. Adjust the spices based on your taste. If you want more heat, add a pinch of cayenne. Always taste your potato filling before serving. This ensures the flavors are just right. To achieve a crispy texture, fry the filled tortillas lightly. Heat a skillet and add a bit of oil. Once hot, place the filled tacos in the skillet. Cook for 2-3 minutes on each side until golden brown. This step adds a wonderful crunch. You can also bake them in the oven. Brush the tacos with oil and bake at 400°F for 10-15 minutes. Enjoy the extra crunch with your salsa on the side! Pro Tips Use Starchy Potatoes: Russet potatoes are ideal for mashing due to their high starch content, giving your filling a fluffy texture. Customize Spice Levels: Adjust the amount of chili powder and cumin based on your preference for heat and flavor. Preheat Your Tortillas: Warming tortillas before filling helps prevent them from tearing and makes them more pliable. Add a Squeeze of Lime: A splash of fresh lime juice in the potato mixture adds a zesty brightness that enhances the overall flavor. {{image_2}} Tacos de Papa vary by region. In some areas, cooks use different spices. For example, in central Mexico, you might find more chili or herbs mixed in. The south may add cheese for a creamier taste. Each region has its flair, which makes these tacos unique. Exploring these regional flavors brings new excitement to your plate. You can easily customize Tacos de Papa. Try using sweet potatoes for a twist. Instead of olive oil, you might use butter for richer flavor. If you want more heat, add jalapeños or hot sauce to the filling. You can even switch the corn tortillas for flour ones if you prefer. These swaps let you make the recipe your own. Tacos de Papa can be served in fun ways. Try stacking them on a platter with different toppings. You can use salsa, guacamole, or fresh lime juice to add brightness. Serve with a side of black beans or rice for a full meal. Make a taco bar so everyone can build their perfect taco. This makes for a fun and interactive dining experience. Store leftover filling in an airtight container. Let it cool to room temp before sealing. Keep it in the fridge for up to three days. If you want to keep it longer, consider freezing it. To reheat, place the filling in a skillet over medium heat. Stir gently until it warms through, about five to seven minutes. You can also use a microwave. Heat in short bursts, stirring in between. This keeps it moist and tasty. To freeze, assemble the tacos without toppings. Wrap each taco tightly in plastic wrap. Place them in a freezer-safe bag. They last up to three months. When ready to eat, thaw in the fridge overnight and reheat as described above. Enjoy your flavors anytime! I recommend using russet potatoes for Tacos de Papa. They are starchy and fluffy when cooked. This texture makes them easy to mash and perfect for tacos. Other options like Yukon Gold can work, but they are creamier. Russets give you that classic taste and feel that you want in these tacos. Yes, you can make Tacos de Papa ahead of time! Prepare the filling and store it in the fridge. Just keep it in an airtight container. You can warm it up before assembling the tacos. This makes it a great option for meal prep or hosting friends. Just remember to warm your tortillas before serving. Tacos de Papa come from Mexico, where people have enjoyed them for many years. They are a simple yet tasty dish made with potatoes. Many families have their own special recipes. These tacos reflect the love of comfort food in Mexican culture. You will find them in street stalls and homes alike. To find the best Tacos de Papa, check out local Mexican restaurants or food trucks. They often serve authentic recipes. You can also look at online reviews to find popular spots. Don’t forget to ask friends for their favorite places too! Exploring new places can lead to delicious discoveries. When making Tacos de Papa, focus on fresh ingredients and simple steps. You learned how to cook potatoes, prepare filling, and assemble tasty tacos. Our tips helped you perfect the flavor and crunch. Don’t forget the many fun ways to customize your tacos. Store leftovers right to enjoy again. Tacos de Papa are not just a meal; they are a tradition. Try making them today to taste a piece of history. Enjoy your cooking adventure!

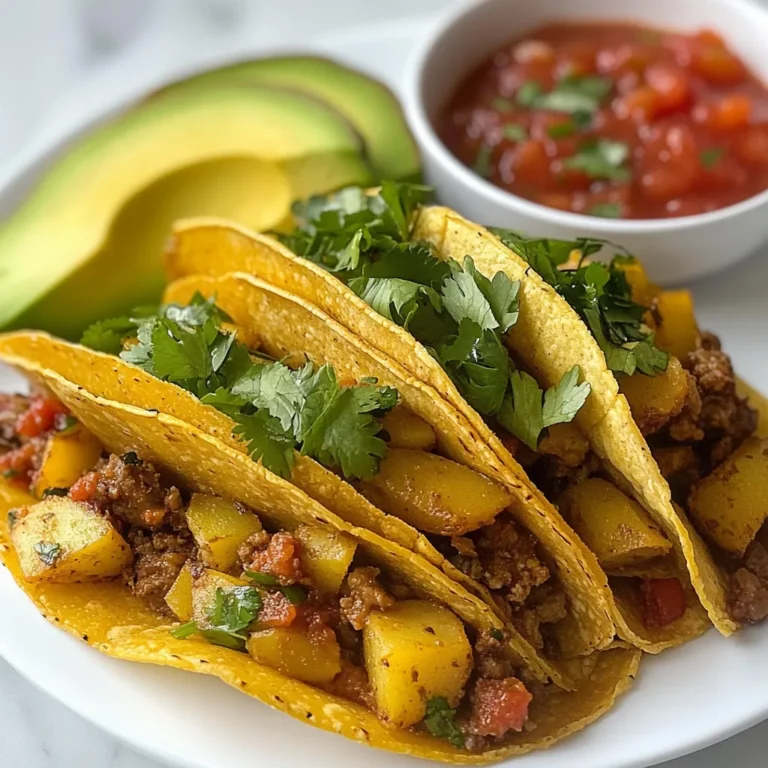
Authentic Tacos de Papa Flavorful and Easy Recipe

- 1 lb ground lamb or beef - 1 cup diced carrots - 1 cup peas (fresh or frozen) - 1 onion, finely chopped - 2 cloves garlic, minced - 1 cup vegetable broth - 1 tablespoon tomato paste - 1 teaspoon Worcestershire sauce - 4 cups mashed potatoes (prepared or homemade) - 2 tablespoons olive oil - Salt and pepper to taste - Fresh thyme leaves for garnish To make a great Shepherd's Pie, you need fresh and good-quality ingredients. I love using ground lamb, but beef works well too. Both meats give rich flavor. Diced carrots add a nice crunch, while peas bring sweetness. Chop the onion finely for even cooking. Garlic adds depth, so don’t skip it. Vegetable broth keeps the filling moist and tasty. Tomato paste and Worcestershire sauce boost the savory notes. For the topping, I recommend homemade mashed potatoes. They create a creamy layer above the filling. Use olive oil to sauté the veggies. Salt and pepper enhance the flavors. Finally, fresh thyme leaves make this dish smell wonderful. Gather these ingredients, and you’ll be ready to create this classic dish. Remember, quality ingredients lead to a better meal! {{ingredient_image_1}} - Preheat the oven to 400°F (200°C). - In a large skillet, heat 2 tablespoons of olive oil over medium heat. - Add 1 finely chopped onion and 2 minced garlic cloves. Sauté until they turn soft and clear, about 3-4 minutes. - Add 1 pound of ground lamb or beef to the skillet. Break it apart as it cooks. - Season with salt and pepper. Cook until the meat is browned, about 5-7 minutes. - Stir in 1 cup of diced carrots, 1 cup of peas, 1 tablespoon of tomato paste, and 1 teaspoon of Worcestershire sauce. - Pour in 1 cup of vegetable broth. Let this simmer for 10 minutes until it thickens. Taste it and adjust the seasoning as needed. - Transfer the meat and vegetable mixture to a baking dish. Spread it evenly across the bottom. - Top with 4 cups of prepared mashed potatoes. Smooth them out with a spoon. - Create peaks with the spoon’s back for a crispy finish. - Bake in the preheated oven for 25-30 minutes, or until the top is golden brown. - Remove from the oven and let it sit for a few minutes. Garnish with fresh thyme leaves before serving. To make the perfect mashed potatoes for Shepherd's Pie, start with starchy potatoes like Russets. Boil them until tender, then drain well. Mash them while they are hot for a smooth texture. Add butter and milk for creaminess. Season with salt and pepper to taste. You can adjust the seasoning in your meat mixture to fit your taste. Start with salt and pepper. Taste the filling before you add the mashed potatoes. If it needs more flavor, add a bit more Worcestershire sauce or a pinch of herbs. Fresh thyme pairs well with the dish. For serving, you can dish out the Shepherd's Pie in a large baking dish for a family-style meal. This is cozy and inviting. If you want individual servings, scoop the pie into ramekins. This adds a nice touch. Garnishing can elevate your Shepherd's Pie. Add a sprig of fresh thyme on top for color. You can also serve it with a simple side salad to brighten the plate. For a restaurant-style look, create peaks on the mashed potatoes before baking. This adds texture and makes it visually appealing. Pro Tips Use Fresh Herbs: Fresh thyme adds a wonderful aroma and flavor that elevates the dish. Consider using rosemary or parsley for a different twist. Perfect Mashed Potatoes: For creamy mashed potatoes, use a combination of butter and cream. Make sure they are well-seasoned for the best flavor contrast with the meat filling. Layering Flavors: Don't rush the browning of the meat and vegetables. A good caramelization adds depth to the flavor profile of your Shepherd's Pie. Make Ahead: This dish can be made ahead of time and stored in the refrigerator. Just reheat in the oven before serving for a quick and satisfying meal. {{image_2}} If you want a twist on classic Shepherd's Pie, try using different meats. Ground turkey or chicken works great as lighter options. For a vegetarian version, use lentils or mushrooms. These give a hearty texture without meat. You can also swap out vegetables. Instead of carrots and peas, try corn, green beans, or even sweet potatoes. Mixing in spinach adds color and nutrients. Don’t forget to adjust your seasoning to match your new ingredients. Adding cheese to the mashed potatoes can make your Shepherd's Pie extra tasty. A sharp cheddar or creamy gouda gives a nice flavor. Mix the cheese into the potatoes before spreading them on top. Incorporating unique spices can add depth to your dish. Try adding smoked paprika for a hint of smokiness or cumin for warmth. Fresh herbs like rosemary or parsley can brighten the flavors. These small changes can turn your Shepherd's Pie into a gourmet delight! After enjoying your Shepherd's Pie, cool it down to room temperature. Use an airtight container to store leftovers. This keeps the pie fresh and tasty for up to three days in the fridge. If you want to reheat it, preheat your oven to 350°F (175°C). Cover the dish with foil to prevent it from drying out. Heat for about 20 minutes or until it is hot all the way through. Yes, you can freeze Shepherd's Pie! It’s a great option for meal prep. First, let it cool completely. Then, wrap it tightly in plastic wrap and foil. This helps prevent freezer burn. You can freeze it for up to three months. To thaw, move the pie to the fridge for about 24 hours before cooking. Once thawed, you can reheat it in the oven. Follow the same steps as before, covering it with foil. This way, it stays moist and delicious! Shepherd's Pie comes from British roots. It began as a way to use leftover meat. Farmers often made it to feed their families. The dish typically uses lamb, while cottage pie uses beef. Both have a crust of mashed potatoes. This dish is a warm, hearty meal that many love. Yes, you can make it ahead. Prepare the meat filling and mashed potatoes separately. Store them in the fridge for one day. Just combine them and bake when ready. You can also freeze it for up to three months. Thaw overnight in the fridge before baking. Look for a golden brown top. The edges should bubble slightly. A good texture means the filling is hot and thick. Insert a knife in the center; it should come out warm. If you see steam, it's ready to serve. Enjoy your delicious Shepherd's Pie! In this article, we explored the classic Shepherd's Pie, from fresh ingredients to cooking tips. You learned how to prepare, bake, and present this dish with flair. Remember to customize it with your favorite meats or veggies. Whether you’re making it ahead of time or storing leftovers, Shepherd's Pie is easy and fun to work with. Cooking can be a joy, so embrace your creativity. Enjoy your delicious meal and share it with friends and family!

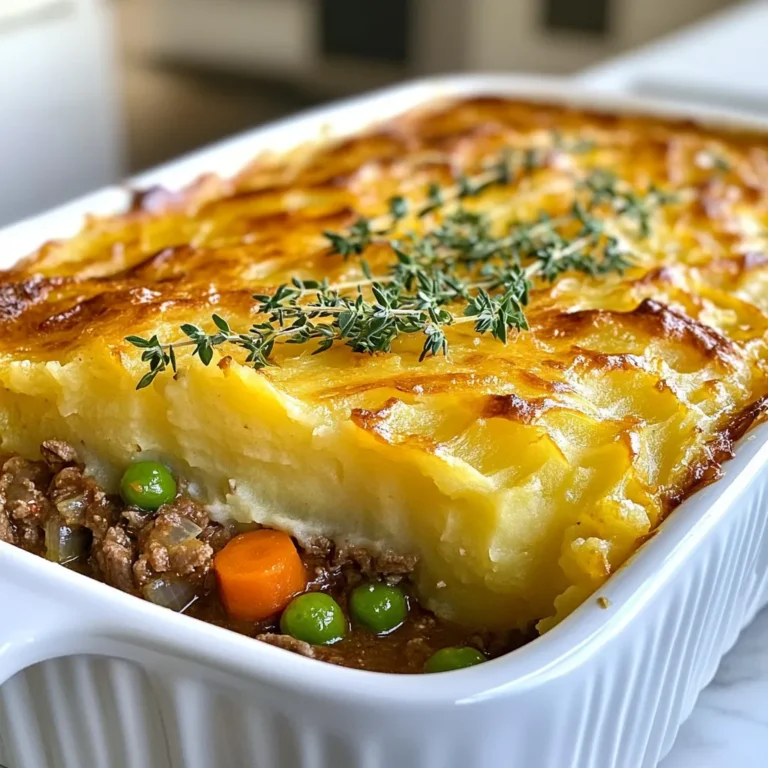
Classic Shepherd’s Pie Simple Comfort Food Delight

To make a delicious sushi bake, gather these key ingredients: - 2 cups sushi rice - 2 1/2 cups water - 1/4 cup rice vinegar - 3 tablespoons sugar - 1 teaspoon salt - 1 pound imitation crab meat, shredded - 1/2 cup cream cheese, softened - 1/4 cup mayonnaise - 1 tablespoon sriracha (adjust for spice level) - 1/4 cup chopped green onions - 1 sheet nori (seaweed), cut into strips - Sesame seeds for garnish - Soy sauce for serving These ingredients create the base of the dish, mixing flavors and textures. The sushi rice provides a soft bed, while the crab mixture adds creaminess and a delightful taste. Feel free to customize your sushi bake with these optional ingredients: - Avocado slices - Cucumber strips - Pickled ginger - Extra spices like garlic powder or wasabi Adding these options can give your dish a unique twist. You can mix and match based on your family's preferences. To make your sushi bake, use these tools: - A medium pot for cooking rice - A mixing bowl for the crab mixture - A greased baking dish (about 9x9 inches) - A spoon or spatula for mixing and spreading Having the right tools makes the process smooth. You’ll enjoy preparing this fun family meal! {{ingredient_image_1}} First, set your oven to 350°F (175°C). This step warms the oven for our sushi bake. A hot oven helps cook the dish evenly and gives it a nice golden top. Rinse 2 cups of sushi rice in cold water. Keep rinsing until the water runs clear. This removes excess starch. Next, put the rinsed rice and 2 1/2 cups of water in a pot. Bring it to a boil, then lower the heat. Cover the pot and let it simmer for 15 minutes. After that, turn off the heat and let it sit for 10 minutes. This resting time helps the rice become fluffy. In a bowl, mix together 1 pound of shredded imitation crab meat, 1/2 cup of softened cream cheese, and 1/4 cup of mayonnaise. Add 1 tablespoon of sriracha for some spice and 1/4 cup of chopped green onions for flavor. Stir until everything is well combined. This crab mixture adds creamy and savory goodness to the bake. Grab a greased baking dish, about 9x9 inches. Spread the seasoned sushi rice evenly on the bottom. Then, layer the crab mixture over the rice. Make sure to spread it out evenly. Place the baking dish in the preheated oven. Bake for 20-25 minutes. The top should turn lightly golden and bubbly when it’s done. Once the sushi bake is out of the oven, garnish it with nori strips and a sprinkle of sesame seeds. Let it cool for a few minutes before slicing into squares. This dish is best served warm. Offer soy sauce on the side for dipping. Enjoy this delightful meal with your family! When making sushi bake, watch out for a few common mistakes. First, do not skip rinsing the sushi rice. Rinsing removes excess starch, which helps the rice stay fluffy. Next, avoid overcooking the rice. If the rice is too soft, it will not hold its shape. Lastly, be careful not to mash the rice while mixing in the vinegar. Gentle folding keeps the grains intact. To get perfect sushi rice, use short-grain rice. This type of rice has the right stickiness. Always measure water and rice carefully. A good rule is to use 1.25 cups of water for every cup of rice. After cooking, let the rice rest. This step helps it steam and become tender. Finally, season the rice while it’s still warm for the best flavor. To boost flavor, try adding more ingredients to your crab mixture. You can mix in avocado or cucumber for a fresh crunch. For more heat, increase the sriracha or add chili flakes. Toasted sesame seeds also add a nice nutty flavor and crunch. Lastly, serve with soy sauce or ponzu sauce for a flavor kick. Pro Tips Perfect Rice Texture: Ensure your sushi rice is rinsed thoroughly to remove excess starch, resulting in a fluffy and non-sticky texture. Adjust Spice Level: Feel free to adjust the amount of sriracha in the crab mixture based on your preferred spice level for a personalized touch. Even Baking: For even baking, spread the crab mixture evenly over the rice and check for doneness to ensure it's heated through and bubbling. Serving Suggestion: Serve your sushi bake with a side of pickled ginger and wasabi for an authentic sushi experience! {{image_2}} You can easily make a vegetarian sushi bake. Start with a base of sushi rice, just like the classic recipe. For the topping, use fresh veggies. Try a mix of bell peppers, carrots, and cucumber. You can add avocado for creaminess. Instead of crab meat, use tofu or tempeh. Marinate them in soy sauce for extra flavor. This option keeps it tasty and healthy! If you like seafood, there are many choices. Instead of imitation crab, you might try shrimp, scallops, or even salmon. Just cook the seafood first, then chop it up. Mix it into the cream cheese and mayo. Each type of seafood brings a new taste. Experiment to find your favorite! You can change the heat level in your sushi bake. Use more sriracha if you like it hot. For a mild option, skip the sriracha and add sesame oil instead. You can also add some garlic powder or ginger for a kick. Don’t forget to taste as you mix! Adjust the flavors until it’s just right for your family. To keep leftover sushi bake fresh, let it cool first. Then, cover it tightly with plastic wrap or aluminum foil. You can also place it in an airtight container. Store it in the fridge for up to three days. This way, it stays tasty and safe to eat. When you're ready to eat, preheat your oven to 350°F (175°C). Place the sushi bake in an oven-safe dish. Cover it with foil to keep it moist. Heat it for about 15-20 minutes. Check that it's hot all the way through before serving. You can also microwave it for quicker reheating, but the oven keeps it crispier. To freeze sushi bake, cool it completely. Cut it into squares for easy portions. Wrap each square in plastic wrap, then place them in a freezer bag. Be sure to label the bag with the date. Sushi bake can stay in the freezer for up to two months. When you're ready to eat, thaw it in the fridge overnight before reheating. You can use real crab meat if you prefer. Shrimp or cooked salmon works too. For a plant-based option, try shredded tofu or a mix of veggies. These will add flavor and texture to your dish. To make sushi bake gluten-free, use gluten-free soy sauce. Ensure all other ingredients are also gluten-free. Check labels on the cream cheese and mayonnaise. You can also use gluten-free rice for the sushi base. Yes, you can use brown rice. However, it won’t be as sticky as sushi rice. You may need to adjust the water amount and cooking time to get the right texture. The sushi bake lasts about three days in the fridge. Be sure to store it in an airtight container. Reheat it in the oven or microwave before serving for the best taste. You now have a clear view of sushi bake. We covered the essential and optional ingredients, tools, and step-by-step instructions to make it. You learned tips for perfecting your dish and variations to suit your taste. We even touched on storage and answered common questions. Keep these insights in mind, and you'll impress your family and friends. Make your sushi bake unique with your favorite flavors. Enjoy your cooking journey, and have fun sharing this tasty dish!

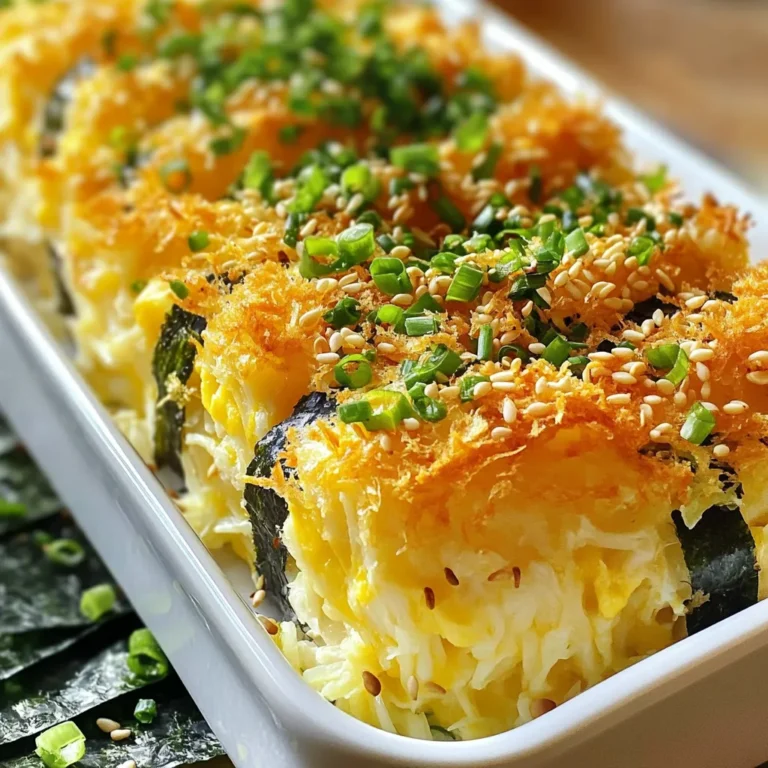
Quick and Easy Sushi Bake Delightful Family Meal

- 1 cup unsalted butter, melted - 1 ¾ cups brown sugar, packed - 2 large eggs - 2 teaspoons vanilla extract - 2 cups all-purpose flour - 1 teaspoon baking powder - ½ teaspoon baking soda - ½ teaspoon salt - 1 tablespoon ground cinnamon - ½ cup granulated sugar (for topping) For perfect blondies, use exact amounts. Measure 1 cup of melted butter. Pack 1 ¾ cups of brown sugar tightly in the cup. Use 2 large eggs for richness. Measure 2 teaspoons of vanilla for flavor. Use 2 cups of all-purpose flour for structure. Add 1 teaspoon of baking powder to help them rise. Use ½ teaspoon of baking soda for extra lift. Measure ½ teaspoon of salt for balance. Add 1 tablespoon of ground cinnamon for that warm spice. Finally, use ½ cup of granulated sugar for the sweet topping. Using high-quality butter makes your blondies rich and flavorful. Opt for fresh, organic eggs to enhance taste. Use pure vanilla extract instead of imitation for better flavor. Choose all-purpose flour that is fresh and finely milled. For the best results, use light brown sugar. It adds moisture and a deep flavor. Fresh ground cinnamon will give a stronger taste than older spices. These choices will make your blondies truly irresistible! {{ingredient_image_1}} Start by preheating your oven to 350°F (175°C). Grease a 9x13-inch baking pan or line it with parchment paper. In a large bowl, mix the melted butter and brown sugar. Use a whisk to combine them until smooth. Next, add the eggs one by one. Mix well after each egg. Then, stir in the vanilla extract. In another bowl, whisk together the flour, baking powder, baking soda, salt, and ground cinnamon. Gradually add this dry mix to the wet ingredients. Stir until just combined; stop mixing as soon as there are no flour streaks. Pour the batter into your prepared pan. Spread it evenly so it bakes well. Now, in a small bowl, combine the granulated sugar and an extra tablespoon of cinnamon. Sprinkle this mixture generously over the batter. Bake in the oven for 20-25 minutes. Check for doneness by inserting a toothpick into the center. If it comes out clean, your blondies are ready! Once baked, let the blondies cool in the pan for at least 10 minutes. This helps them set and makes them easier to slice. After cooling, use a sharp knife to cut them into squares. For serving, you can add a scoop of vanilla ice cream or drizzle some icing on top. Dust with extra cinnamon for a nice touch! To keep your blondies soft, mix the batter gently. When adding dry ingredients, stir until just combined. You want to see some flour bits. This helps the blondies stay chewy and not tough. Ovens can vary. Check your blondies at 20 minutes. If the edges look golden and a toothpick comes out clean, they are done. If not, bake for another 2-5 minutes. Keep a close eye to avoid overbaking. For the best texture, let your blondies cool in the pan for 10 minutes. This helps them set up properly. After cooling, slice them into squares for a soft and chewy treat. A warm blondie with ice cream is hard to resist! Pro Tips Use Room Temperature Eggs: Using eggs that are at room temperature helps them incorporate better into the batter, leading to a lighter texture in your blondies. Don't Overmix: Mix until just combined to avoid tough blondies. Overmixing can develop the gluten in the flour, making them dense. Experiment with Add-ins: Add chocolate chips, nuts, or dried fruit to customize your blondies and add extra flavor and texture. Cool Before Cutting: Let the blondies cool completely in the pan before slicing. This ensures cleaner cuts and prevents them from falling apart. {{image_2}} You can add nuts to your blondies for a crunch. Walnuts or pecans work well. Chop them coarsely and mix them in with the batter. This adds a nice texture and flavor. Nuts give your blondies a warm, nutty taste that pairs well with cinnamon. For a chocolatey twist, add chocolate chips. Use semi-sweet or dark chocolate. Fold in one cup of chips into the batter before pouring it into the pan. Then, sprinkle the cinnamon sugar on top. The blend of sweet chocolate and cinnamon is simply amazing! If you need gluten-free blondies, substitute the all-purpose flour. Use a gluten-free blend instead. Look for blends that include xanthan gum for the best texture. This way, you can enjoy blondies that are safe for gluten-sensitive diets, without losing flavor. Store your cinnamon sugar blondies in an airtight container. This keeps them fresh and moist. Place a piece of parchment paper between layers to stop sticking. Keep them at room temperature for up to three days. If you want them to last longer, consider refrigeration. Blondies can last for a week in the fridge. Just remember, they taste best at room temp. To freeze blondies, first let them cool completely. Cut them into squares for easy serving. Wrap each square in plastic wrap. Then, place them in a freezer-safe bag. They can be stored in the freezer for up to three months. When you want to enjoy them, just take out what you need. Let them thaw in the fridge or on the counter. To reheat your blondies, preheat your oven to 350°F (175°C). Place the blondies on a baking sheet. Cover them with foil to keep them moist. Heat for about 10 minutes. You can also use a microwave for a faster option. Heat them for about 15-20 seconds. Both methods will bring back their soft, chewy goodness. Enjoy them warm with a scoop of ice cream! Yes, you can swap white sugar for brown sugar. However, this change will alter the taste and texture. Brown sugar has more moisture and adds a rich flavor. If you use white sugar, your blondies may be less chewy and have a lighter taste. To mimic brown sugar, add a tablespoon of molasses to your white sugar. To cut blondies well, let them cool for at least 10 minutes. Use a sharp knife for clean edges. For neat cuts, run the knife under hot water and dry it before slicing. This method helps avoid crumbs and keeps the blondies looking nice. You can also line your pan with parchment paper. This makes lifting the blondies out easier. Check if the edges are golden brown. Insert a toothpick into the center. If it comes out clean or with a few moist crumbs, they are done. Keep in mind, blondies continue to cook after you take them out. So, it's better to slightly underbake than to overbake. This way, you get a soft and chewy texture. In this blog post, we explored how to create tasty blondies. We covered the right ingredients, from specific measurements to quality. The step-by-step instructions guide you through making the batter, baking, and cooling. I shared tips to get the best texture and baking time adjustments. You also learned fun variations and how to store your blondies properly. Remember, each step makes a difference for great blondies. Enjoy your baking journey!

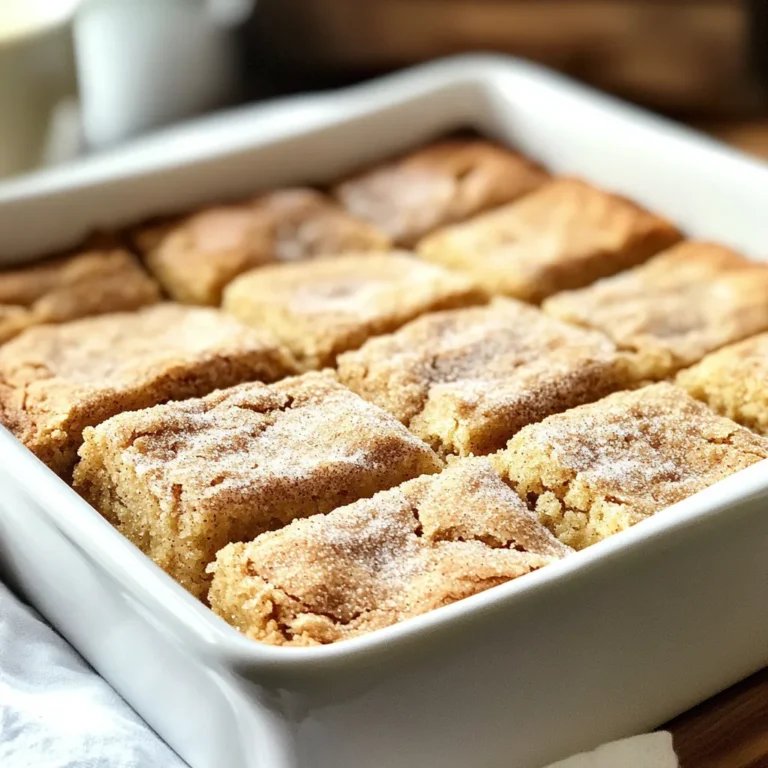
Cinnamon Sugar Blondies Irresistible Sweet Treats

PREV 1 … 51 52 53 … 65 NEXT
tasty trail blazer

explore

DessertsDinnerAppetizersDrinks

Our Policies

  • Cookie Policy
  • Copyright Policy
  • Disclaimer
  • GDPR Policy
  • Terms Of Use
Back to Top
  • About
  • Contact Us
  • Privacy Policy
© 2025 tasty trail blazer