FREE DINNER EBOOK! Get your copy!
  • Cookie Policy
  • GDPR Policy
  • Disclaimer
  • Terms Of Use
  • Visit my other site: Fun Cookie Recipes
tasty trail blazer
  • Home
  • Dinner
  • Desserts
  • Drinks
  • Appetizers
  • Contact
  • About
  • Privacy Policy
  • Home
  • Dinner
  • Desserts
  • Drinks
  • Appetizers
  • Contact
  • About
  • Privacy Policy
  • Cookie Policy
  • GDPR Policy
  • Disclaimer
  • Terms Of Use
Visit my other site: Fun Cookie Recipes

HOME / CATEGORIES /

Latest

- 1 ripe banana - 2 tablespoons natural peanut butter - 1 cup unsweetened almond milk (or milk of choice) - 1 scoop vanilla protein powder - 1 tablespoon honey (or maple syrup for vegan option) - 1 tablespoon chia seeds (optional) - A handful of ice cubes - A pinch of cinnamon (optional) The star of this smoothie is the ripe banana. It adds natural sweetness and creaminess. The peanut butter brings a rich, nutty flavor and healthy fats. Almond milk makes it smooth and light. The vanilla protein powder gives it a protein boost, which helps you stay full longer. Honey or maple syrup adds extra sweetness, while chia seeds can enhance the texture and boost nutrients. - Spinach or kale for greens - Flax seeds for healthy fats - Greek yogurt for creaminess and protein - Cocoa powder for a chocolate twist Adding greens can boost the nutrient value without changing the taste much. Flax seeds add fiber and omega-3s. Greek yogurt thickens the smoothie and packs more protein. If you love chocolate, cocoa powder can give a delightful flavor. - Peanut butter: almond, cashew, or sunflower seed butter - Almond milk: soy, oat, or coconut milk - Honey: agave syrup or stevia for a low-calorie option - Vanilla protein powder: chocolate or plant-based protein powder If you have nut allergies, choose seed butters. For milk, any plant-based option works well. You can swap honey for other sweeteners to fit your diet. Different protein powders can change the flavor, so pick one you enjoy. {{ingredient_image_1}} First, you need to gather all your ingredients. Here’s what you’ll need: - 1 ripe banana - 2 tablespoons natural peanut butter - 1 cup unsweetened almond milk (or milk of choice) - 1 scoop vanilla protein powder - 1 tablespoon honey (or maple syrup for vegan option) - 1 tablespoon chia seeds (optional) - A handful of ice cubes - A pinch of cinnamon (optional) Start with the ripe banana. Peel it and break it into chunks. This makes it easier to blend. Next, measure out the peanut butter. Use natural peanut butter for a healthy choice. Now it’s time to blend! Take your chunks of banana and place them in a blender. Add the peanut butter on top. Pour in the almond milk. This helps to get a smooth blend. Then, add your protein powder. If you want more sweetness, add honey or maple syrup next. Don’t forget the chia seeds if you like them! Finally, toss in a handful of ice cubes and a pinch of cinnamon if you want. Blend everything on high for about 30 to 60 seconds. You want the mix to be smooth and creamy. If it’s not blending well, you can stop and stir it. This helps combine everything better. Taste your smoothie. If it needs more sweetness, add more honey or maple syrup. Blend again if you make changes. To make sure your smoothie is just right, keep a few tips in mind. Use a ripe banana; it adds great flavor and sweetness. Adjust the amount of almond milk to get your desired thickness. If you like a thinner smoothie, add more milk. For a thicker one, reduce the milk. Using ice cubes helps chill the drink and make it frothy. Blend until it’s smooth, but don’t overdo it. You want a creamy texture, not a watery one. Enjoy your delicious peanut butter banana protein smoothie right away for the best taste! To make a smooth peanut butter banana protein smoothie, start with ripe fruit. Ripe bananas blend easier and add more sweetness. Cut the banana into chunks before blending. This helps the blender work better. Add liquid first. Pour the almond milk into the blender before other ingredients. This helps the blades move smoothly. If your blender struggles, stop and stir. This ensures all the ingredients mix well. You can boost the flavor of your smoothie in fun ways. Consider adding a pinch of cinnamon for warmth. This spice pairs well with banana and peanut butter. For more sweetness, add honey or maple syrup. You can adjust the amount based on your taste. If you like crunch, sprinkle chia seeds on top. They add texture and are great for nutrition. Blend in some cocoa powder for a chocolate twist. You can prepare this smoothie in advance. Make a batch and store it in the fridge. Just remember, smoothies are best fresh. If you store it, it may separate. To cut prep time, pre-measure your ingredients. Put them in a bag and freeze. When you're ready, just blend with milk. This makes it easy for a quick snack or breakfast! Pro Tips Use Frozen Bananas: For a creamier texture and colder smoothie, use frozen bananas instead of fresh ones. Protein Powder Variations: Experiment with different flavors of protein powder, such as chocolate or strawberry, to change the flavor profile of your smoothie. Add Greens: For an extra nutrient boost, throw in a handful of spinach or kale; the flavors will blend well and remain subtle. Customize Sweetness: Adjust the sweetness to your liking by varying the amount of honey or maple syrup, or use ripe bananas for natural sweetness. {{image_2}} You can switch up the nut butter to change the taste. Almond butter adds a sweet touch. Cashew butter makes it creamy and rich. Sunflower seed butter is great for nut allergies. Each option gives your smoothie a unique flavor. Want more nutrients? Add a handful of spinach or kale. These greens blend well and add vitamins without changing the taste much. You can also toss in some berries or mango. These fruits add sweetness and nutrition to your drink. If you prefer a vegan smoothie, use almond milk or coconut milk. Replace honey with maple syrup for sweetness. These swaps keep your drink plant-based and delicious. You still get the same creamy texture and flavor you love. If you have leftover smoothie, pour it into a glass or jar. Seal it tightly with a lid. Store it in the fridge. It will stay fresh for about 24 hours. Keep in mind that the smoothie may separate. Just shake or stir before drinking again. You can freeze your smoothie for later use. Pour it into ice cube trays or a freezer-safe container. Leave some space at the top, as it will expand when frozen. To enjoy later, thaw it in the fridge overnight or blend it straight from the freezer for a frosty treat. Use glass jars or BPA-free plastic containers for best results. These types of containers keep your smoothie fresh. Look for ones that seal well to avoid spills. If you want to take your smoothie on the go, choose a travel cup with a lid. This way, you can enjoy your drink anywhere! A Peanut Butter Banana Protein Smoothie has about 400 calories. This can change based on the ingredients you choose. For example, if you use almond milk, it will have fewer calories than regular milk. Yes, you can use any protein powder you like. Whey, soy, or pea protein works well. Just pick a flavor that matches your taste buds. You may want to adjust the sweetness if the protein powder is flavored. This smoothie can work as a meal replacement. It has protein, healthy fats, and carbs. The banana and peanut butter give you energy, while the protein keeps you full. Just add some greens or oats for extra nutrition if you need more. You learned about making a Peanut Butter Banana Protein Smoothie. We covered key ingredients, optional add-ins, and popular substitutes. I gave you step-by-step instructions to prepare and blend the smoothie. We shared tips for the best texture and flavor, and explored fun variations with nut butters and greens. Remember, you can store leftovers easily, freeze portions, and use the right containers. This smoothie fits well for meal prep or as a snack. Enjoy creating your own tasty blends to suit your needs!

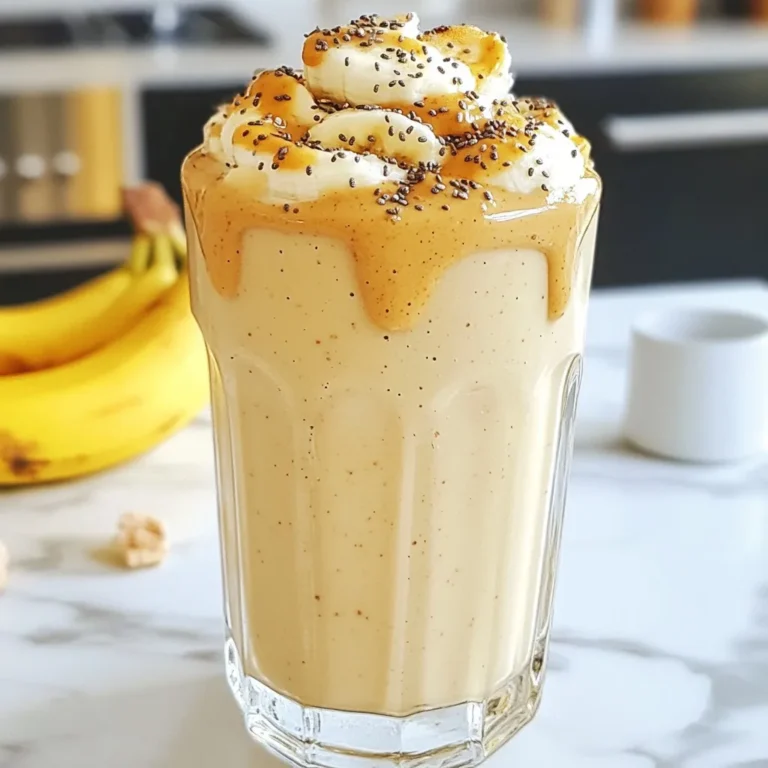
Peanut Butter Banana Protein Smoothie Energizing Snack

- 1 cup all-purpose flour - 2 tablespoons poppy seeds - 2 tablespoons sugar - 1 tablespoon baking powder - 1/2 teaspoon salt - 1 large egg - 1 cup buttermilk (or milk with 1 teaspoon of vinegar) - 3 tablespoons melted butter - Zest of 1 lemon - Juice of 1 lemon - 1/2 teaspoon vanilla extract - Powdered sugar for dusting (optional) - Fresh fruits for serving (optional) To make these pancakes, you will need 1 cup of flour. Use 2 tablespoons of poppy seeds for a nice crunch. You also need 2 tablespoons of sugar to add sweetness. One tablespoon of baking powder helps the pancakes rise. Add 1/2 teaspoon of salt to balance flavors. For the wet mix, use 1 large egg and 1 cup of buttermilk. If you don't have buttermilk, mix 1 cup of milk with 1 teaspoon of vinegar. You will also need 3 tablespoons of melted butter, zest from 1 lemon, and juice from that lemon. Lastly, add 1/2 teaspoon of vanilla extract for extra depth. If you want, dust with powdered sugar and add fresh fruits when serving. You can swap all-purpose flour for whole wheat flour if you prefer. For a dairy-free option, use almond milk or soy milk instead of buttermilk. If you cannot find poppy seeds, chia seeds work well too. You can also skip the sugar if you want a less sweet pancake. Just remember, each change can alter the final taste and texture. Adjust your cooking time if needed. {{ingredient_image_1}} First, gather your dry ingredients. In a large bowl, mix together 1 cup of all-purpose flour, 2 tablespoons of poppy seeds, 2 tablespoons of sugar, 1 tablespoon of baking powder, and 1/2 teaspoon of salt. Use a whisk to combine these well. This mix gives your pancakes texture and flavor. Make sure there are no clumps; each ingredient should blend smoothly. Now, let’s whisk the wet ingredients. Take another bowl and add 1 large egg, 1 cup of buttermilk, 3 tablespoons of melted butter, the zest of 1 lemon, the juice of 1 lemon, and 1/2 teaspoon of vanilla extract. Whisk these together until fully combined. The wet mixture adds moisture and a nice citrus flavor. It helps make the pancakes fluffy and light. Preheat a non-stick skillet or griddle over medium heat. Lightly grease it with cooking spray or a bit of butter. Pour 1/4 cup of batter onto the skillet for each pancake. Cook for about 2-3 minutes. Look for bubbles forming on the surface, and watch the edges start to set. When ready, flip the pancakes and cook for another 2-3 minutes until golden brown. Adjust the heat if they cook too fast. Repeat this process with the remaining batter. Serve your pancakes warm, and feel free to dust them with powdered sugar or top with fresh fruits. Enjoy! To make your pancakes fluffy, use fresh baking powder. This helps the batter rise well. Mix the dry ingredients first, then add wet ones. Fold gently to keep air in the batter. If you overmix, your pancakes may turn out dense. Let the batter rest for a few minutes before cooking. This helps the gluten relax and yields fluffier pancakes. One common mistake is not measuring ingredients accurately. Too much flour can lead to dry pancakes. Also, don’t skip the buttermilk; it adds moisture and tang. Cooking on too high heat can burn the outside while leaving the inside raw. Cook on medium heat and keep an eye on the pancakes. If you see burning, lower the heat immediately. You can boost flavor by adding more lemon zest. A little extra zest gives a bright taste. Consider folding in blueberries or raspberries for a fruity twist. You can also add spices like cinnamon or nutmeg for warmth. If you like a sweeter pancake, mix in a few chocolate chips or chopped nuts. These small changes can make your pancakes even more delightful! Pro Tips Don’t Overmix: Gently fold the batter to keep the pancakes fluffy. A few lumps are perfectly fine! Use Fresh Ingredients: Fresh lemon juice and zest make a significant difference in flavor. Always opt for fresh when possible! Perfect Pancake Size: Use a measuring cup to pour the batter for consistently sized pancakes, ensuring even cooking. Serving Tip: Serve immediately after cooking for the best texture, and keep them warm in a low oven if needed. {{image_2}} You can make these pancakes gluten-free. Just swap the all-purpose flour with a gluten-free flour blend. Look for a blend that includes xanthan gum. This will help keep your pancakes light and fluffy. Mix the gluten-free flour with the other dry ingredients as you would normally. The taste will still be bright and zesty. Want to jazz up your pancakes? Add blueberries or other fruits! Blueberries are a great choice. They burst with juice as the pancakes cook. Just fold in half a cup of fresh or frozen blueberries into your batter. You can also try sliced bananas or chopped strawberries for a fruity twist. These fruits pair well with the lemon flavor. If you love savory flavors, try making a savory version. Add chopped fresh herbs like chives or dill to the batter. You can also mix in crumbled feta cheese. This will give your pancakes a unique taste. Serve them with a dollop of yogurt or a drizzle of honey. This savory option is a fun twist on the classic recipe. After making lemon poppy seed pancakes, let them cool completely. Place them in an airtight container. Store them in the fridge for up to 3 days. This keeps them fresh and ready for your next meal. When you want to eat them, just take them out and enjoy! You can freeze lemon poppy seed pancakes for later. Stack them with a piece of parchment paper between each pancake. This prevents them from sticking together. Wrap the stack in plastic wrap and then place it in a freezer bag. They can stay in the freezer for up to 2 months. This way, you can have a tasty breakfast anytime. To reheat pancakes, you have a few options. The microwave is quick. Place a pancake on a microwave-safe plate and heat it for 20-30 seconds. If you want them crispy, use a skillet. Heat the skillet on medium heat and warm each pancake for about 1 minute on each side. Enjoy them warm with your favorite toppings! To make lemon poppy seed pancakes from scratch, start by mixing dry ingredients. You need flour, poppy seeds, sugar, baking powder, and salt. In another bowl, whisk the egg, buttermilk, melted butter, lemon zest, lemon juice, and vanilla. Combine both mixtures gently. Cook the batter on a hot skillet until golden brown. This method gives you light and fluffy pancakes. Yes, you can use regular milk instead of buttermilk. Just add 1 teaspoon of vinegar to the milk. Let it sit for about five minutes. This creates a similar acidity to buttermilk. The pancakes will still turn out soft and tasty. You can serve lemon poppy seed pancakes with many tasty options. Fresh fruits like berries or sliced bananas add color and flavor. Drizzle maple syrup or honey for sweetness. A dusting of powdered sugar makes them look fancy. You can also add whipped cream for a rich touch. This guide covers all you need for perfect lemon poppy seed pancakes. We explored ingredients, mixing steps, and cooking tips. Fluffy pancakes come from whisking well and avoiding common mistakes. You can try fun variations like gluten-free options or savory twists. For storage, follow the tips to keep pancakes fresh. Enjoy making and sharing these tasty pancakes with family and friends. With a few simple steps, you can turn breakfast into a delightful treat. Happy cooking!

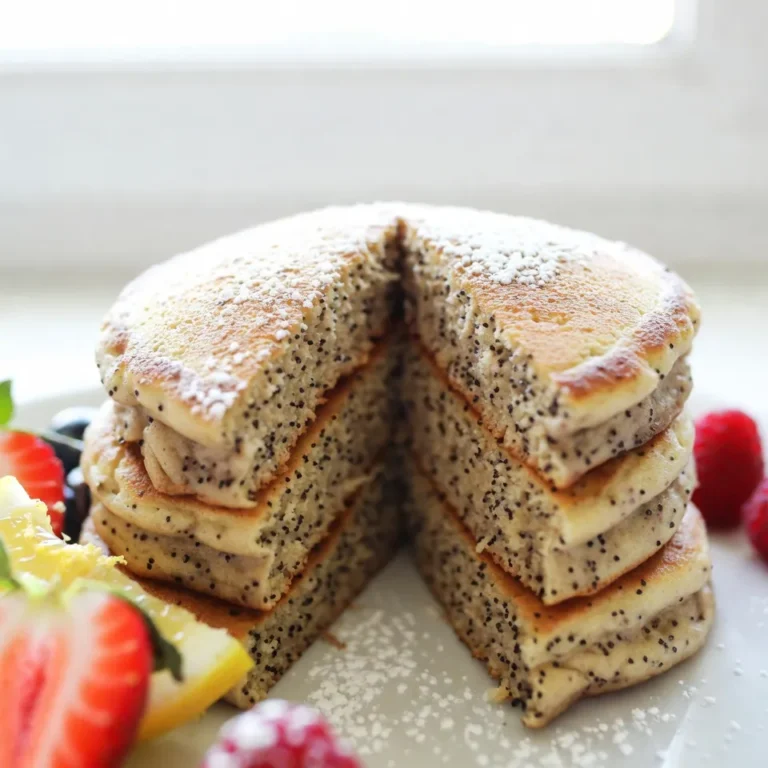
Lemon Poppy Seed Pancakes Fluffy and Flavorful Delight

- 1 large head of cauliflower, cut into florets - 1 tablespoon olive oil - 1 teaspoon smoked paprika - 1 teaspoon garlic powder - Salt and pepper, to taste - 1 cup shredded cheddar cheese (or a cheese blend) - 1/2 cup black beans, rinsed and drained - 1 medium tomato, diced - 1/2 jalapeño, sliced (optional, for heat) - 1/4 cup fresh cilantro, chopped - 1 avocado, diced - Sour cream or Greek yogurt for topping (optional) I love starting with fresh cauliflower florets. They give a nice crunch and hold toppings well. The olive oil adds richness, while smoked paprika and garlic powder bring out great flavors. You can adjust salt and pepper to your taste. Cheese is the star here, so pick a good quality cheddar or a blend that melts nicely. Black beans add protein and fiber, making this snack more filling. Fresh tomato and jalapeño add color and zest. Don't forget the cilantro and avocado for freshness and creaminess! - Additional vegetables - Alternative cheese options You can mix in other veggies like bell peppers or corn for more color. Try using pepper jack cheese if you want some heat. Nutritional yeast is a great vegan cheese alternative, giving a cheesy flavor without dairy. The key is to play with flavors and textures. - Calories per serving: Approximately 250 - Macronutrient breakdown: - Protein: 12g - Carbohydrates: 18g - Fat: 15g These nachos are a tasty snack that won’t weigh you down. You get fiber from the cauliflower and black beans, plus healthy fats from avocado. This balance makes them a smart choice for a snack or light meal. Enjoy them without guilt! {{ingredient_image_1}} To start, preheat your oven to 425°F (220°C). Grab a large mixing bowl. Toss the cauliflower florets with one tablespoon of olive oil. Add one teaspoon of smoked paprika and one teaspoon of garlic powder. Season with salt and pepper to taste. Mix until all the florets are well-coated with oil and spices. Next, spread the cauliflower in a single layer on a baking sheet lined with parchment paper. This helps with easy cleanup. Roast the cauliflower for about 20 to 25 minutes. Look for golden edges and crispy bits. This roasting gives the base a nice texture. Once the cauliflower has roasted, take it out of the oven. Sprinkle one cup of shredded cheddar cheese evenly over the top. You can mix cheeses if you like. Then, add half a cup of rinsed black beans and one medium diced tomato. If you enjoy a kick, add slices of half a jalapeño. Return the baking sheet to the oven for an extra 5 to 7 minutes. Watch closely as the cheese melts and bubbles. This is when it turns into a gooey delight. After baking, let the nachos cool for a minute. This helps to keep the toppings from sliding off. For garnish, sprinkle some chopped fresh cilantro and diced avocado on top. These add great color and freshness. You can serve these warm with sour cream or Greek yogurt on the side. Both make excellent drizzles or dips. Enjoy your tasty and guilt-free snack! To make a creamy cheese sauce, use shredded cheese. Shredded cheese melts better than blocks. Add a splash of milk to enhance creaminess. Stir the cheese constantly over low heat for even melting. If you want a vegan option, choose a plant-based cheese. Nutritional yeast also adds cheesy flavor. To get crispy cauliflower, roast it at a high temperature. Preheat your oven to 425°F (220°C). Spread the florets in a single layer. This helps them roast evenly. Avoid overcrowding the pan. If they touch, they steam and become soggy. You can adjust spice levels based on your taste. Add more garlic powder or smoked paprika for extra flavor. For heat, increase the jalapeño slices. You can also explore different toppings. Try adding olives, corn, or your favorite herbs. Each change makes the nachos unique and tasty! Pro Tips Choose Fresh Cauliflower: Select a cauliflower head that is firm and has tightly packed florets for the best texture and flavor. Customize the Spice Level: Adjust the amount of jalapeño or add other spices like cayenne pepper to suit your heat preference. Experiment with Cheese: Try different cheese blends such as pepper jack or mozzarella for a unique twist on your nachos. Serve Immediately: For the crispiest nachos, serve them right after baking while the cheese is still melty and the cauliflower is warm. {{image_2}} You can easily make this dish vegan. Start by swapping the cheese for plant-based options. Good choices include cashew cheese or vegan cheddar. These options melt well and add rich flavor. For toppings, consider dairy-free sour cream or yogurt. You can also use guacamole or salsa for extra zest. These toppings keep your nachos fresh and tasty. If you want to cut down on carbs, there are great swaps. Instead of black beans, try using diced bell peppers or zucchini. These add color and crunch without the carbs. For toppings, go for sliced olives, chopped green onions, or even cooked bacon. They add flavor while keeping the dish low in carbs. You can make your nachos unique with global toppings. Think of adding kimchi for a Korean twist. This adds a spicy and tangy flavor that surprises your taste buds. You can also try Mediterranean toppings like feta cheese or olives. These add a whole new level of flavor and fun. Get creative and mix your favorite cuisines for a delicious spin! To keep your Cheesy Cauliflower Nachos fresh, store them in an airtight container. This helps prevent moisture from making them soggy. Allow the nachos to cool down before sealing them. I recommend using glass containers or BPA-free plastic ones for safety. When reheating, the oven works best to keep them crispy. Preheat your oven to 350°F (175°C). Spread the nachos on a baking sheet. Heat for about 10 minutes or until they are warm. For a quick fix, use the microwave, but it may not keep the crispiness. To restore some crunch, finish them in a hot skillet for a minute. Yes, you can freeze nachos! To freeze, lay them flat on a baking sheet and freeze until solid. Once frozen, transfer them to a freezer bag. This way, you can enjoy them later. When you are ready to eat, bake them directly from the freezer. Add a few extra minutes to the baking time to ensure they heat through. Cheesy Cauliflower Nachos stay fresh for about three days in the fridge. Store them in an airtight container to keep them tasty. If you notice any moisture, it might make them soggy. I recommend eating them within two days for the best flavor and texture. Yes, you can prepare the cauliflower ahead of time. Cut the cauliflower into florets and toss them with olive oil and spices. Store them in the fridge for up to a day. This saves time when you want to bake your nachos. Just roast them before adding the cheese and toppings. A few great dipping sauces to pair with your nachos include: - Salsa - Guacamole - Sour cream or Greek yogurt - Spicy ranch dressing - A zesty cheese sauce These sauces add extra flavor and make your nachos even more enjoyable! Cheesy cauliflower nachos blend health and taste perfectly. We explored the main ingredients and added flavor options. I provided step-by-step instructions for making a crispy base and a gooey cheese topping. You learned helpful tips to customize recipes and even make vegan or low-carb versions. Consider storing leftovers and reheating them for later enjoyment. These nachos are versatile, tasty, and worthy of your table. Now, it’s time for you to create your own delicious variations!

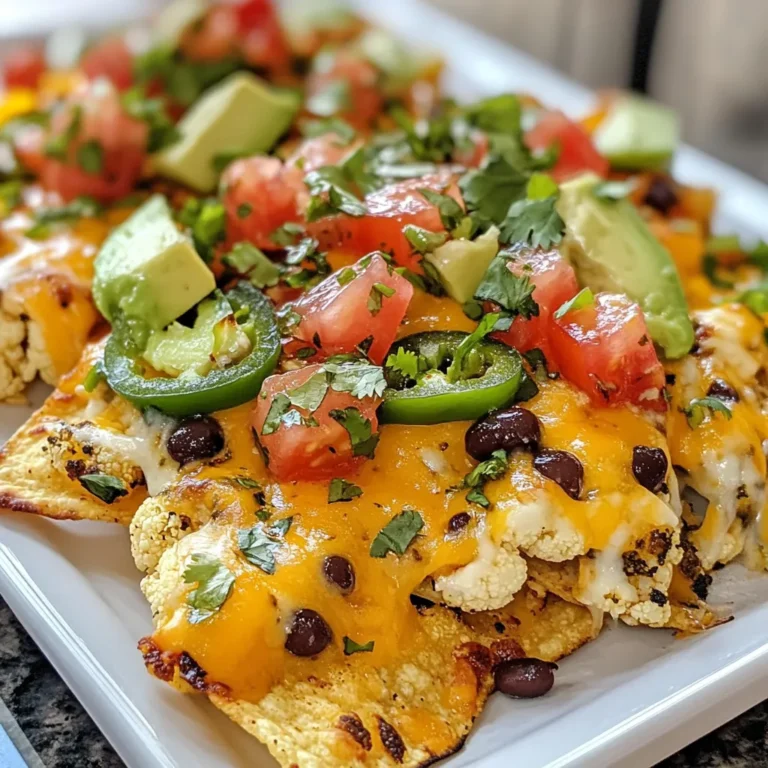
Cheesy Cauliflower Nachos Tasty and Guilt-Free Snack

- Pasta options: You can choose fusilli or rotini. Fusilli has a spiral shape, while rotini is corkscrew-like. Both hold onto the dressing well. I prefer fusilli for its fun shape. - Essential vegetables: - 1 cup cherry tomatoes, halved - 1 cup black beans, rinsed and drained - 1 cup corn kernels (fresh or frozen) - 1 red bell pepper, diced - 1 avocado, diced - ¼ cup red onion, finely chopped - 1 jalapeño, minced (optional for heat) These veggies add color and crunch. They all work together to create a fresh taste. - Key seasonings and dressing components: - ¼ cup lime juice - 3 tablespoons olive oil - 1 teaspoon cumin - 1 teaspoon chili powder - Salt and pepper to taste - Crumbled feta cheese (optional for topping) The lime juice brings brightness. The cumin and chili powder add a warm flavor. Adjust salt and pepper to your liking. If you want creaminess, sprinkle some feta on top. {{ingredient_image_1}} To cook the pasta, start with a large pot of salted boiling water. Add 8 ounces of fusilli or rotini pasta. Cook it until it is al dente, which means it should be firm when you bite. This usually takes about 8 to 10 minutes. Stir the pasta occasionally so it doesn’t stick together. Once the pasta is done, drain it in a colander. Rinse the pasta under cold water. This stops the cooking process and cools it down quickly. It also helps keep the pasta from getting sticky. In a large mixing bowl, combine the cooled pasta with the other salad ingredients. Use 1 cup of halved cherry tomatoes, 1 cup of rinsed black beans, 1 cup of corn kernels, 1 diced red bell pepper, 1 diced avocado, ¼ cup of finely chopped red onion, and the minced jalapeño if you like some heat. To mix, use a large spoon and gently fold the ingredients together. This ensures every bite has a bit of everything. If you want more heat, feel free to add more jalapeño. For the dressing, gather these ingredients: ¼ cup of lime juice, 3 tablespoons of olive oil, 1 teaspoon of cumin, 1 teaspoon of chili powder, and salt and pepper to taste. You will need a small bowl and a whisk. In the bowl, combine the lime juice, olive oil, cumin, chili powder, salt, and pepper. Whisk these together until the dressing is smooth. This step is important because it helps blend the flavors well. Once your dressing is ready, pour it over the pasta salad. Gently toss everything together to coat the ingredients evenly. Then, add ½ cup of chopped cilantro and give it another gentle mix. Taste the salad and adjust the seasoning if needed. Enjoy your vibrant Mexican pasta salad! To make your Mexican pasta salad shine, adjust the lime juice and seasoning to fit your taste. Lime juice adds a bright flavor. Start with a small amount, then taste. You can always add more. Salt and pepper also make a big difference. Fresh ingredients are key. Use ripe tomatoes, crisp bell peppers, and fresh herbs. They bring life to the salad. Fresh corn adds sweetness and crunch. If you have the chance, use fresh corn off the cob. A colorful bowl helps your salad stand out. Serve it in a large bowl to show off the vibrant ingredients. Add garnishes like fresh cilantro and lime wedges. These not only look nice, but they also boost flavor. Place cilantro leaves on top for a pop of green. Lime wedges let guests add more tang if they wish. A sprinkle of crumbled feta cheese can add a creamy touch. These small details make your dish more appealing and fun! Pro Tips Perfect Pasta Texture: Ensure you cook the pasta al dente for the best texture; it will hold up better in the salad and not become mushy. Fresh Ingredients Matter: Use fresh, ripe avocados and tomatoes for the best flavor and texture; they will enhance the overall taste of the salad. Customize Your Heat: Adjust the amount of jalapeño based on your heat preference; you can also substitute with a milder pepper for less spice. Make Ahead for Flavor: Prepare the salad a few hours in advance and let it chill in the fridge; this allows the flavors to meld beautifully. {{image_2}} You can easily change this recipe to fit your needs. If you want gluten-free pasta, use rice or corn pasta. These options work well and taste great. For a vegan dish, skip the feta cheese. You can also use plant-based dressings. Adding proteins makes this salad even better. Try cooked chicken or shrimp for extra flavor and nutrition. Just make sure to cut them into small pieces. Mix them in with the pasta and veggies. You can add local Mexican flavors to this pasta salad. For instance, try using fresh corn instead of frozen. Fresh corn adds a sweet crunch. You can also add spices like smoked paprika for a deeper taste. Experiment with different beans and veggies, too. Black beans are common, but pinto or kidney beans work well, too. Adding diced zucchini or bell peppers gives more color and texture. These small changes can make the salad unique and fun. To keep your Mexican Pasta Salad fresh, store it in an airtight container. This will prevent odors and moisture from affecting the salad. Before sealing the container, make sure the salad has cooled down to room temperature. In the fridge, this salad lasts about three to five days. If you notice any signs of spoilage, like an off smell or discoloration, it’s best to discard it. You can serve leftovers cold or at room temperature. If you prefer warm pasta salad, heat it gently in a pan on low. Stir often to avoid burning. Pair your Mexican Pasta Salad with grilled chicken or fish. This adds protein and makes it a full meal. You can also serve it alongside tortilla chips for a fun crunch. Yes, you can make this salad ahead of time. It tastes even better after the flavors meld together. Here are some tips for pre-making and storing: - Make the salad: Follow the recipe up to mixing in the cilantro. - Store in the fridge: Keep it in an airtight container. It will stay fresh for about 3 days. - Add avocado later: To keep the avocado green, add it right before serving. - Toss with dressing again: If the salad seems dry, mix in more dressing when serving. If you don't like cilantro, don’t worry! Here are some alternative herbs and seasoning suggestions: - Parsley: It adds a fresh taste and bright color. - Basil: This herb gives a sweet and aromatic flavor. - Mint: If you want a cool twist, mint works well too. - Green onion: Use chopped green onion for a mild onion taste. Experiment with these to find your favorite flavor! Yes, you can make this salad gluten-free. Here’s how: - Choose gluten-free pasta: Look for options made from rice, quinoa, or corn. - Check labels: Ensure that other ingredients, like canned beans and corn, are gluten-free. With these swaps, everyone can enjoy this tasty dish! In this article, we explored how to make a delicious Mexican Pasta Salad. We discussed key ingredients, from pasta types to essential vegetables. I shared step-by-step cooking instructions and tips to enhance flavor and presentation. You can customize the salad to fit your dietary needs and even try regional variations. Remember to store it properly for freshness. With these insights, you can enjoy a tasty, colorful dish any time. Dive into this recipe, and have fun creating your perfect salad!

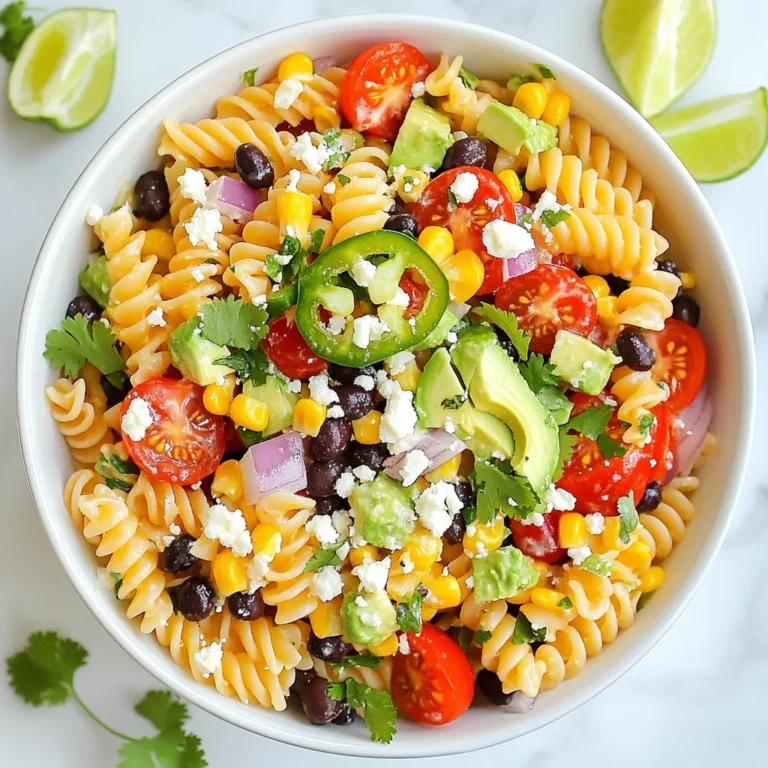
Mexican Pasta Salad Easy and Flavorful Recipe

- 4 boneless, skinless chicken breasts - 1 cup fresh pineapple, diced - 1/2 cup brown sugar - 1/4 cup soy sauce - 2 tablespoons olive oil The main ingredients in Brown Sugar Pineapple Chicken create a sweet and savory dish. Chicken breasts provide lean protein, while fresh pineapple adds a juicy, tropical touch. Brown sugar brings sweetness, and soy sauce adds depth. Olive oil helps to sear the chicken, locking in flavor. - 1 teaspoon garlic powder - 1 teaspoon ginger powder - Salt and pepper to taste The spices elevate the dish. Garlic powder gives a savory note, while ginger powder adds warmth. Salt and pepper balance the flavors, making each bite pop. Together, these spices turn basic chicken into a flavorful feast. - 2 green onions, sliced (for garnish) - Sesame seeds (optional, for garnish) Garnishes make the dish appealing. Green onions add a fresh crunch and a burst of color. Sesame seeds sprinkle a nutty flavor on top. These simple touches enhance the look and taste of your meal. Exploring these ingredients allows you to create a dish bursting with flavor. Enjoy the process! {{ingredient_image_1}} - In a medium bowl, combine: - 1/2 cup brown sugar - 1/4 cup soy sauce - 1 teaspoon garlic powder - 1 teaspoon ginger powder - A pinch of salt and pepper Mix these ingredients with a whisk. Keep whisking until the sugar dissolves. This creates a smooth marinade that packs a punch. - Grab a large zip-lock bag. - Place 4 boneless, skinless chicken breasts inside. - Pour the marinade over the chicken. - Seal the bag tight, making sure the chicken is well coated. Refrigerate this for at least 30 minutes. For more flavor, let it sit for up to 4 hours. - Preheat your oven to 375°F (190°C). - Heat 2 tablespoons of olive oil in a large oven-safe skillet over medium-high heat. - Take the chicken out of the marinade and keep the marinade for later. - Sear the chicken in the hot skillet for 3-4 minutes on each side. Look for a golden brown color. Now, pour the reserved marinade and 1 cup of diced pineapple over the chicken in the skillet. Bring this mix to a simmer. - Transfer the skillet to your preheated oven. - Bake for 20-25 minutes. The chicken should reach an internal temperature of 165°F (75°C). After baking, let the chicken rest for 5 minutes. This helps keep it juicy. Before serving, garnish with sliced green onions and sesame seeds if you like. Enjoy your meal! To make the best marinade, soak the chicken for at least 30 minutes. For more flavor, let it marinate for up to 4 hours. This longer time helps the chicken soak up all the tasty goodness. You can also add spices like cayenne pepper or paprika for a little heat. A dash of lime juice can brighten the flavor too. When searing chicken, heat your skillet until hot. Use medium-high heat to get a nice brown color. Sear each side for 3-4 minutes. To check for doneness, use a meat thermometer. The chicken is safe to eat when it reaches 165°F (75°C). If you don't have a thermometer, cut into the thickest part. The meat should be white, not pink. Garnishing adds flair to your dish. Use sliced green onions for a fresh touch. Sprinkle sesame seeds on top for a nice crunch. For serving, pair the chicken with rice or a salad for balance. You can also add extra pineapple chunks to the plate for a bright look. Pro Tips Marinate for Maximum Flavor: Allow the chicken to marinate for at least 2 hours, or overnight if possible, to enhance the flavor and tenderness. Use Fresh Pineapple: Fresh pineapple adds a vibrant sweetness and acidity that complements the dish better than canned pineapple. Check for Doneness: Always use a meat thermometer to ensure the chicken reaches an internal temperature of 165°F (75°C) for safe consumption. Serve with Rice: This dish pairs beautifully with steamed rice or quinoa, which helps soak up the delicious sauce. {{image_2}} For those who want a low-sugar version, swap brown sugar for a sugar substitute. You can use stevia or monk fruit sweetener. These options keep the sweetness but cut down on calories. If you want to change the protein, use tofu or shrimp. Both options soak up the marinade well. They add a tasty twist to this dish. Want some heat? Add chili flakes to the marinade. Start with a pinch and adjust to your taste. The heat balances the sweetness of the brown sugar. For a fresh flavor, add chopped herbs. Cilantro or basil work great. These herbs give the dish a nice lift. If you prefer using a slow cooker, pour the marinade over the chicken in the cooker. Cook on low for 4-6 hours. This method makes the chicken really tender. Grilling is another option. Marinate the chicken as usual. Then, grill it for about 6-7 minutes on each side. You’ll get a nice char and smoky flavor. Baking works well, but grilling adds a fun twist. To store leftover Brown Sugar Pineapple Chicken, place it in an airtight container. Make sure to refrigerate it within two hours of cooking. This helps keep the chicken fresh and safe. It will stay good in the fridge for up to three days. If you want to save some for later, freezing is a great option. First, let the chicken cool completely. Then, place it in a freezer-safe bag. Make sure to remove as much air as possible before sealing. You can freeze it for up to three months. When you're ready to eat, thaw the chicken in the fridge overnight. When it’s time to enjoy your chicken again, there are a few ways to reheat it. You can use the oven, microwave, or stovetop. If using the oven, set it to 350°F (175°C) and heat for about 20 minutes. This keeps the chicken moist. If using the microwave, heat it in short bursts, checking often. Always ensure the chicken reaches 165°F (75°C) to be safe. Yes, you can use frozen chicken. Just remember to thaw it first. Place the chicken in the fridge overnight. If you're in a hurry, use the microwave. Defrost it on the low setting. Once thawed, follow the marinating steps as usual. This ensures the chicken absorbs the flavors well. Brown Sugar Pineapple Chicken pairs great with several sides. Here are some tasty options: - Steamed rice - Quinoa - Stir-fried vegetables - A fresh green salad - Mashed potatoes These sides will balance the sweet and savory flavors of the chicken. Yes, you can make a vegetarian version. Use tofu or tempeh instead of chicken. Press the tofu to remove extra water. Then, marinate it just like the chicken. Cook it in the skillet, following the same steps. You can also use seitan for a meat-like texture. To check if the chicken is fully cooked, use a meat thermometer. The internal temperature should reach 165°F (75°C). If you don't have a thermometer, cut into the thickest part. The meat should be white, not pink. Juices should run clear, not red. This blog post shared a simple, tasty recipe for Brown Sugar Pineapple Chicken. You learned about the main ingredients, spices, and garnishes that bring flavor. The step-by-step instructions guide you through marinating and cooking. Tips on perfecting the dish enhance your cooking skills. You explored variations to suit dietary needs and preferences. Lastly, storage and reheating advice ensures your leftovers stay fresh. Embrace this dish's versatility, and enjoy experimenting with flavors in your kitchen!

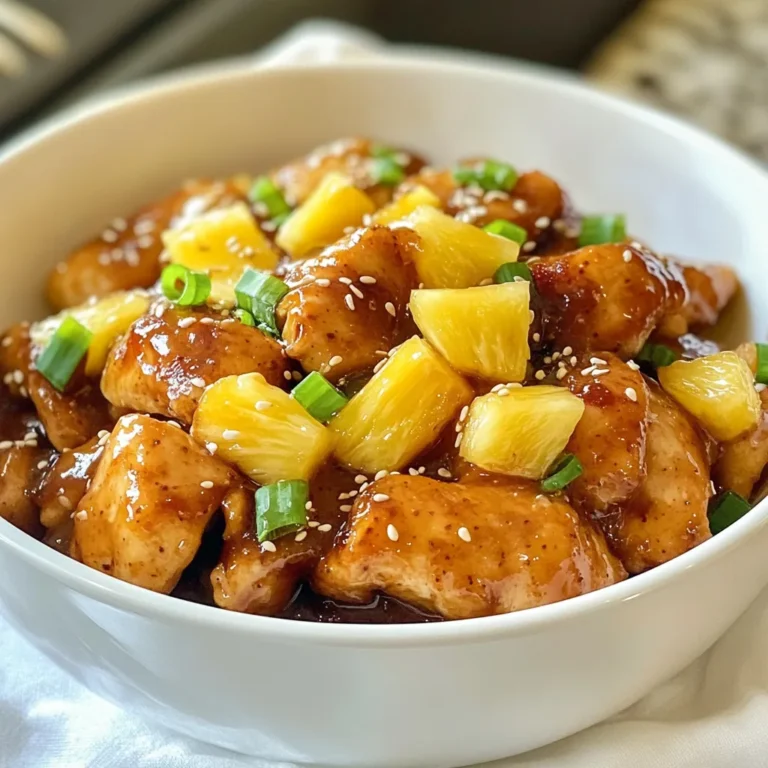
Brown Sugar Pineapple Chicken Flavorful Dinner Delight

- 1 lb large shrimp, peeled and deveined - 3 tablespoons olive oil - Zest of 1 lemon - 2 tablespoons fresh lemon juice - 2 cloves garlic, minced - 1 tablespoon fresh parsley, chopped - 1 tablespoon fresh dill, chopped - 1 teaspoon dried oregano - Salt and black pepper to taste - Lemon wedges for garnish - Additional fresh herbs Gather these ingredients before you start. Fresh shrimp makes a big difference. I like to use large shrimp for grilling. They stay juicy and tender. The olive oil adds richness, while lemon brings brightness. The garlic gives the shrimp a nice kick. Fresh parsley and dill add a lovely green flavor. Oregano adds depth to the dish. Don’t forget to season with salt and pepper. These spices help bring all the flavors together. For garnish, lemon wedges add a nice touch. They look great on the plate and give a burst of flavor. Fresh herbs can also enhance the look and taste. This dish is all about fresh flavors and simple ingredients. {{ingredient_image_1}} In a mixing bowl, combine the following ingredients: - 3 tablespoons olive oil - Zest of 1 lemon - 2 tablespoons fresh lemon juice - 2 cloves garlic, minced - 1 tablespoon fresh parsley, chopped - 1 tablespoon fresh dill, chopped - 1 teaspoon dried oregano - Salt and black pepper to taste Whisk them together well. This mix is full of bright flavors. The olive oil adds richness, while lemon gives a fresh taste. The herbs add layers of flavor. Take your shrimp, about 1 pound, peeled and deveined. Coat them in the marinade. Make sure each shrimp gets covered well. Cover the bowl with plastic wrap. Place it in the fridge for 30 minutes to 1 hour. This step is key. It helps the shrimp absorb all those yummy flavors. Before grilling, preheat your grill to medium-high heat. If you use wooden skewers, soak them in water for 30 minutes. This keeps them from burning. Thread the marinated shrimp onto the skewers, about 5-6 shrimp each. They should be close but not crowded. Place the skewers on the grill. Cook for 2-3 minutes on each side. Watch closely! The shrimp should turn opaque and pink. Do not overcook them. Remove the skewers from the grill and let them rest for a couple of minutes. Enjoy your flavorful dish! Marinate shrimp for at least 30 minutes but no more than 1 hour. This time helps the shrimp soak up all the fresh flavors from the herbs and lemon. If you marinate too long, the shrimp can become mushy. For perfect shrimp, preheat your grill to medium-high heat, about 400°F. Grill the shrimp for 2-3 minutes on each side. Watch closely to avoid overcooking. When shrimp turn opaque and pink, they are done. Overcooked shrimp become tough and chewy. Pair lemon herb grilled shrimp with light sides like a green salad or rice. You could also serve them with grilled vegetables for extra color and taste. For a fun twist, serve the shrimp in tacos. Add some fresh salsa and a squeeze of lime for a zesty kick. Pro Tips Perfectly Cooked Shrimp: Shrimp cook quickly, so keep a close eye on them. They’re done when they turn opaque and pink. Overcooking can make them tough. Flavor Variations: Feel free to experiment with different herbs like basil or cilantro, or add a pinch of red pepper flakes for some heat. Skewering Tips: If using wooden skewers, soak them in water for at least 30 minutes before grilling to prevent burning. Metal skewers can be used without soaking. Marinating Time: For best flavor, marinate the shrimp for at least 30 minutes, but not longer than 1 hour to prevent the acid from breaking down the shrimp too much. {{image_2}} To spice things up, add cayenne or smoked paprika to the marinade. These spices boost the flavor and add a nice kick. You can also swap out herbs. Try fresh basil for a sweet touch or cilantro for a fresh twist. Each herb brings its own flavor, making your shrimp unique. If you don’t have a grill, don’t worry! You can broil or sauté the shrimp instead. Broiling gives you a nice char without the grill. Sautéing in a hot pan keeps the shrimp juicy. You can also make a lemon herb shrimp stir-fry. Just toss the marinated shrimp in a hot skillet with veggies for a quick meal. Want a gluten-free option? This recipe is already safe for you. For low-carb eaters, enjoy the shrimp as is. If you want a vegan dish, use tofu or portobello mushrooms. Marinate them just like the shrimp. Then grill or sauté for a delicious meal. To store grilled shrimp, let them cool first. Place them in an airtight container. This helps keep the shrimp fresh. Use a container that seals well to prevent air from getting in. Glass or plastic containers work best. When reheating shrimp, do it gently. Use a skillet over low heat. Add a little olive oil or butter to keep the shrimp moist. You can also use the microwave. Heat for short bursts of 15-20 seconds. Check often to avoid overcooking. Yes, you can freeze grilled shrimp! First, let them cool completely. Then, place them in a freezer bag. Remove as much air as possible before sealing. For thawing, move the shrimp to the fridge overnight. This keeps their texture and flavor. I recommend marinating shrimp for 30 minutes to 1 hour. This time lets the shrimp soak up all the flavors from the marinade. If you marinate them too long, they can become mushy. You want that perfect balance of flavor and texture. Grilled shrimp can turn tough for a few reasons. Overcooking is the main culprit. Shrimp cook quickly and should only grill for 2-3 minutes on each side. Another reason could be using low-quality shrimp. Always use fresh or high-quality shrimp for the best results. Yes, you can use frozen shrimp! Just make sure to thaw them properly. The best way is to let them sit in the fridge overnight. If you're in a hurry, place them in cold water for about 20-30 minutes. Once thawed, pat them dry before marinating. This helps the marinade stick better. Lemon herb grilled shrimp combines simple ingredients for an amazing dish. You learned how to prepare the marinade, marinate the shrimp, and grill it to perfection. Following key tips can enhance flavor and texture. You can also enjoy various cooking methods and creative variations. Remember to store leftovers properly and reheat carefully. With these steps, you can make delicious shrimp that everyone will love. Get cooking and enjoy your meal!

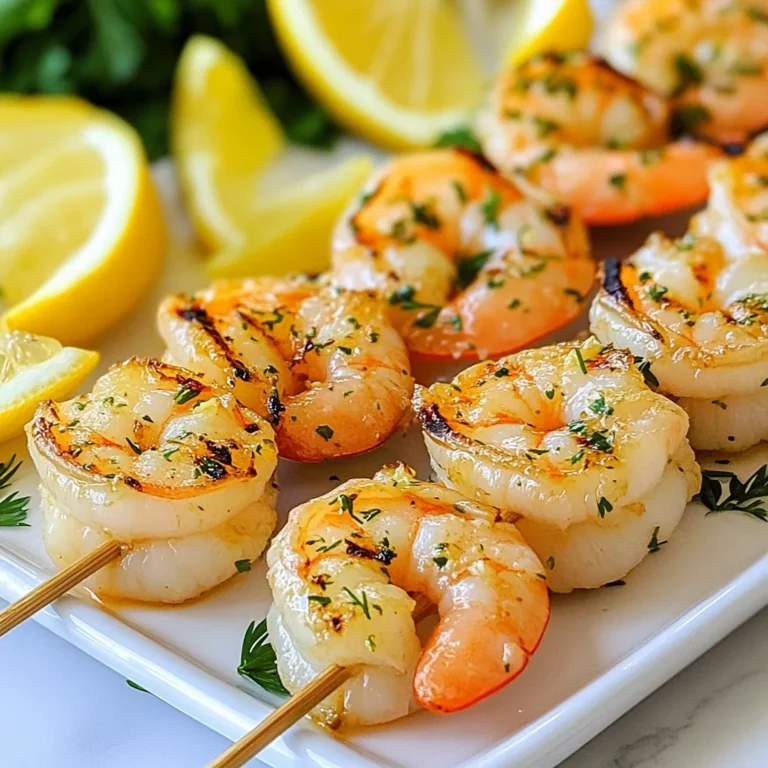
Lemon Herb Grilled Shrimp Fresh and Flavorful Dish

- 4 boneless, skinless chicken breasts - 2 cups mushrooms, sliced (button or cremini) - 1 medium onion, finely chopped - 3 cloves garlic, minced - 1 cup Greek yogurt - 1 cup chicken broth - 2 tablespoons olive oil - 1 tablespoon Dijon mustard - 1 teaspoon paprika - 1 teaspoon dried thyme - Salt and pepper to taste - Fresh parsley, chopped (for garnish) - 8 ounces egg noodles The first step to making baked chicken stroganoff is gathering your ingredients. You need chicken breasts as the main protein. I suggest using boneless and skinless ones for ease. Next, you will need mushrooms, like button or cremini. These add a rich, earthy flavor that pairs well with the chicken. Onions and garlic are key for building flavor. Chop one medium onion and mince three cloves of garlic. They will form the base of your sauce. For the creamy part, Greek yogurt works wonders. It gives a nice texture and tang. You will also need chicken broth to keep everything moist and flavorful. For seasoning, Dijon mustard gives a slight kick. Paprika adds warmth, while dried thyme brings a nice herbal note. Don't forget salt and pepper to taste! Finally, fresh parsley is a great garnish that adds color. To serve, you will need egg noodles. They soak up the sauce and make each bite delicious. With these ingredients ready, you are set to create a comforting dish that warms the heart. {{ingredient_image_1}} - Preheat your oven to 375°F (190°C). - In a large skillet, heat 2 tablespoons of olive oil over medium heat. - Add 1 medium onion, finely chopped, and 3 cloves of minced garlic. - Sauté until the onion is translucent, which takes about 3-4 minutes. - Add 2 cups of sliced mushrooms to the skillet. - Cook until they soften and release their moisture, about 5-6 minutes. - In a bowl, mix 1 cup of Greek yogurt with 1 cup of chicken broth. - Add 1 tablespoon of Dijon mustard, 1 teaspoon of paprika, 1 teaspoon of dried thyme, salt, and pepper to taste. - Stir until well combined. - Place 4 boneless, skinless chicken breasts at the bottom of a baking dish. - Pour the mushroom mixture over the chicken, coating them well. - Spread the yogurt sauce evenly over the chicken and mushrooms. - Cover the dish with aluminum foil and bake for 25 minutes. - While the chicken bakes, cook 8 ounces of egg noodles according to the package instructions until al dente. - After 25 minutes, remove the foil from the baking dish. - Bake uncovered for an additional 15 minutes, allowing the top to turn golden. - Once done, serve the baked chicken stroganoff over the cooked egg noodles and garnish with fresh parsley. To make sure your chicken stays juicy, use boneless, skinless chicken breasts. These cook evenly and stay moist. Keep an eye on the cooking time. Bake for 25 minutes covered, then 15 minutes uncovered. This gives you the best texture. Boost the flavor with a few extra spices. Try adding garlic powder or onion powder. They add depth without much effort. You can also use fresh herbs like thyme or parsley. Fresh herbs brighten the dish and make it pop. For a creamy finish, Greek yogurt works great. It’s thicker than regular yogurt and adds a nice tang. If you prefer a richer sauce, try sour cream or heavy cream. To adjust the thickness, add more chicken broth if needed. This keeps the sauce smooth. Pro Tips Marinate the Chicken: For extra flavor, marinate the chicken breasts in a mixture of yogurt, Dijon mustard, and spices for at least 30 minutes before baking. Use Fresh Herbs: Fresh thyme or parsley can elevate the dish's flavor, so consider using them instead of dried herbs for a brighter taste. Adjust the Creaminess: If you prefer a creamier sauce, you can add a splash of heavy cream or sour cream to the yogurt mixture. Perfect Pasta: To ensure the egg noodles don't become mushy, cook them just until al dente and toss them with a little olive oil before serving. {{image_2}} You can switch up the protein in your baked chicken stroganoff. Try using turkey instead of chicken. Turkey gives a nice, hearty flavor. It also cooks well and stays juicy. If you want a vegetarian dish, replace the chicken with tofu or tempeh. Both options soak up flavors well and add a nice texture. Mushrooms add depth to the dish. You can choose between cremini and button mushrooms. Cremini mushrooms have a richer taste, while button mushrooms are milder. If you can't find fresh mushrooms, dried mushrooms are a great option. Just soak them in warm water first to rehydrate them. This makes them soft and full of flavor. When serving baked chicken stroganoff, consider pairing it with sides. Steamed broccoli or green beans complement the dish well. You can also serve a simple salad for a fresh crunch. For garnishes, fresh parsley adds color and brightness. You can sprinkle it on top just before serving to enhance the dish’s look and taste. After you finish your meal, let the baked chicken stroganoff cool down. Place leftovers in a container with a tight lid. You want to keep it fresh! Store it in the fridge for up to three days. If you plan to eat it later, make sure to keep some sauce on top. This will help keep the chicken moist. Yes, you can freeze baked chicken stroganoff! Just make sure it has cooled completely. Pack it in a freezer-safe container or a zip-top bag. Remove as much air as possible to prevent freezer burn. It will stay good for about three months. When you are ready to eat it, place it in the fridge to thaw overnight. You can reheat it in the oven or microwave. For the oven, set it to 350°F (175°C). Place the stroganoff in a baking dish and cover with foil. Heat it for about 20 minutes. This keeps it creamy and warm. In the microwave, use a microwave-safe bowl. Heat in short bursts, stirring in between. This way, it warms evenly and stays creamy. Enjoy your meal again just like it was fresh! Yes, you can use other types of pasta. Here are some good options: - Penne - Fusilli - Farfalle - Spaghetti These shapes hold the sauce well. Just cook them according to the package instructions. This recipe offers a good balance of nutrition. Here's a quick breakdown: - Chicken: Lean protein source. - Mushrooms: Low in calories, high in nutrients. - Greek yogurt: Adds creaminess with less fat than sour cream. - Olive oil: A healthy fat that supports heart health. Overall, it’s a comforting dish that can fit into a balanced diet. Yes, you can prep this dish in advance. Here are some tips: - Assemble ahead: Layer the chicken and sauce, then cover and refrigerate. - Storage: Keep it in an airtight container for up to two days. - Baking: When ready, bake it straight from the fridge, adding a few extra minutes to the time. This makes it perfect for busy nights! This blog post covered a tasty chicken recipe with easy steps and helpful tips. You learned about the ingredients, cooking methods, and great variations. Remember, using fresh ingredients makes your dish even better. Feel free to switch up proteins or mushrooms for your taste. Store leftovers well and reheating is simple. With practice, you’ll master this dish. Enjoy your cooking, and share your results with friends!

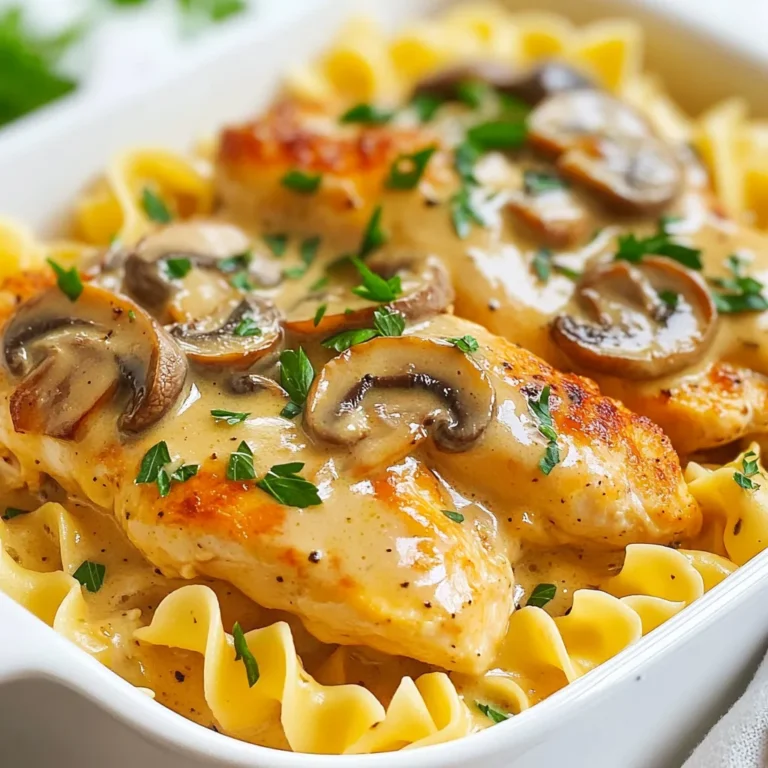
Baked Chicken Stroganoff Flavorful Comfort Dish

To make these tasty donuts, gather these main ingredients: - 1 can (16 oz) refrigerated biscuit dough - 1/4 cup granulated sugar - 1 tablespoon ground cinnamon - 1/4 cup unsalted butter, melted These simple items create a fun treat. The biscuit dough gives a soft base. Sugar and cinnamon provide that classic sweet flavor. You can change up the flavors with these suggested ingredients: - Vanilla extract for extra flavor - Nutmeg for a warm spice note - Maple syrup instead of sugar for a different sweet taste These small swaps can make your donuts unique. Try adding different spices to find your favorite mix. You may want to dress up your donuts with these optional toppings: - Powdered sugar for a light dusting - Chocolate glaze for a rich finish - Sprinkles for fun color and crunch Adding toppings can make your donuts look fancy. They also add a new flavor twist, making each bite special. {{ingredient_image_1}} First, you need to preheat your air fryer. Set it to 350°F (175°C). Let it heat for about 5 minutes. This step is key for getting the donuts nice and golden. Next, grab your can of refrigerated biscuit dough. Open it carefully on a clean surface. Separate the biscuits. Use a small round cutter or a bottle cap to cut a hole in each biscuit. This will give you the perfect donut shape. Don’t forget to keep the holes! They make tasty donut holes. Now we get to the fun part! In a small bowl, mix granulated sugar with ground cinnamon. This is your sweet topping. Dip each donut and donut hole into melted butter. Make sure they get a good coat. Then, roll them in the cinnamon sugar mix. Ensure they are fully covered for that extra flavor. It’s time to cook your donuts! Place them in the air fryer basket in a single layer. Make sure they don’t touch each other to cook evenly. You might need to do this in batches. Air fry them at 350°F (175°C) for about 5-7 minutes. Flip them halfway for nice browning. When they look golden brown, they are done! Let them cool a bit on a wire rack. If you like, dust them with powdered sugar for a sweet touch. Enjoy your homemade treats! To get soft and fluffy donuts, use fresh biscuit dough. The dough should be cold but not frozen. Cut the dough quickly for the best rise. Make sure not to overmix the dough when cutting. This keeps air in and helps them puff up while cooking. When cooking, place the donuts in a single layer. Donuts should not touch each other. If your air fryer is small, cook in batches. This ensures they brown evenly and cook through. Overcrowding can lead to uneven cooking and soggy spots. Store leftover donuts in an airtight container. Keep them at room temperature for up to two days. For longer storage, you can freeze them. Wrap each donut in plastic wrap, then place them in a freezer bag. When ready to eat, let them thaw at room temperature. Pro Tips Use Fresh Dough: Ensure your biscuit dough is fresh for the best texture and flavor. Check the expiration date for optimal results. Adjusting Sugar Levels: Feel free to adjust the amount of cinnamon and sugar to your taste. You can even add a pinch of nutmeg for extra warmth. Donut Hole Delight: Don’t discard the donut holes! They are delicious and can be coated in the same cinnamon sugar mixture for a tasty treat. Cooling Tips: Allow the donuts to cool on a wire rack to prevent them from becoming soggy. This keeps them crispy and delightful. {{image_2}} You can add a sweet twist to your air fryer donuts. Melt some chocolate chips in a bowl. Once the donuts cool, dip each donut in the melted chocolate. Let the chocolate set before serving. This chocolate glaze gives a rich taste that kids will love. Fall is the perfect season for pumpkin spice donuts. Mix 1 teaspoon of pumpkin pie spice into the cinnamon sugar. You can also add a touch of pure vanilla extract to the melted butter. Coat your donuts in this spiced mixture for a cozy flavor. For nut-free options, stick to basic ingredients. Make sure your biscuit dough and toppings are nut-free. You can use coconut oil instead of butter for a different taste. This keeps the recipe safe for those with nut allergies, while still being delicious. To keep your Air Fryer Cinnamon Sugar Donuts fresh, store them in an airtight container. This helps them stay soft and tasty. Place them at room temperature for up to two days. If you want them to last longer, consider refrigerating them. Just remember, they may lose some of their crunchy texture. If you want to save some donuts for later, freezing is a great option. First, let the donuts cool completely. Then, place them in a single layer on a baking sheet and freeze for about one hour. Once frozen, transfer the donuts to a freezer-safe bag. They will stay fresh for up to three months. Just make sure to label the bag with the date. When you're ready to enjoy your frozen donuts, reheating is easy. Preheat your air fryer to 350°F (175°C). Place the donuts in the basket in a single layer. Heat them for about 3-5 minutes. This will help them regain their delightful crunch. You can also microwave them for about 10-15 seconds if you prefer a softer texture. Enjoy your delicious, warm donuts! Yes, you can use other dough types. You may try cake mix or donut dough. Each type gives a unique taste and texture. Just keep an eye on cooking times. Cooking times can vary. Most air fryers cook at 350°F for 5-7 minutes. Always check your donuts. They should be golden brown and fluffy. Adjust time based on your air fryer model. If you lack a cutter, use a small bottle cap. Press it in the dough to form holes. You can also shape them by hand into rounds. This method can be fun and creative! Yes, you can. Use gluten-free biscuit dough instead of regular dough. Make sure to check the labels for gluten-free options. They will still taste great! To make more donuts, simply double or triple the ingredients. Keep the same cooking time but check them closely. Cook in batches to avoid overcrowding. This ensures even cooking every time. Air fryer cinnamon sugar donuts are simple and fun to make. We covered the key ingredients, easy steps, and helpful tips. You can also try tasty variations like chocolate glazed or pumpkin spice. Store leftover donuts properly to enjoy later. With these insights, you can make delicious air fryer donuts that everyone will love. Enjoy your baking adventure and share your tasty results!

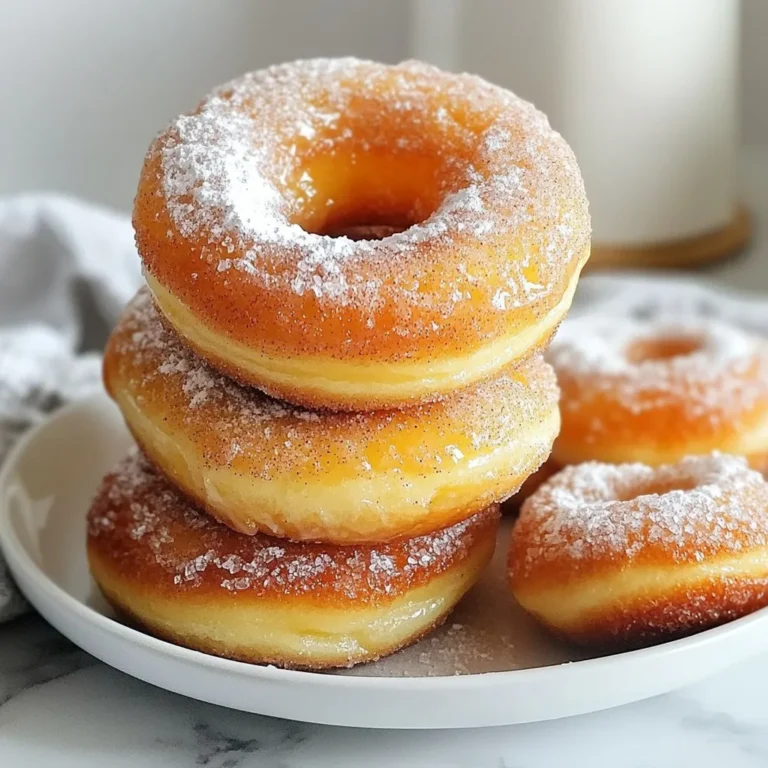
Air Fryer Cinnamon Sugar Donuts Delightful Recipe

To make delicious cinnamon sugar pretzel bites, gather these ingredients. Each plays a key role in creating the perfect snack. - 1 ½ cups warm water (110°F to 115°F) - 2 tablespoons granulated sugar - 1 packet (2 ¼ teaspoons) active dry yeast - 4 cups all-purpose flour - 1 teaspoon salt - ½ cup baking soda (for boiling) - ½ cup unsalted butter, melted - ½ cup granulated sugar (for coating) - 1 tablespoon ground cinnamon - Pinch of salt (for coating) These ingredients blend together to form soft, chewy bites. The warm water activates the yeast, making the dough rise. Sugar adds sweetness, while salt enhances the flavor. Baking soda gives pretzel bites their classic texture when boiled. Butter, cinnamon, and sugar create that irresistible coating. Each ingredient matters, so measure carefully for the best results. {{ingredient_image_1}} First, grab a mixing bowl. Pour in 1 ½ cups of warm water. Make sure it’s between 110°F and 115°F. Add 2 tablespoons of granulated sugar. Next, sprinkle in 1 packet of active dry yeast. Stir gently, then let it sit for 5-10 minutes. You want to see it froth up. This shows the yeast is alive and ready. In a large bowl, mix 4 cups of all-purpose flour with 1 teaspoon of salt. Once your yeast mixture is frothy, add it to the flour mix. Stir until a dough forms. Now, place the dough on a floured surface. Knead it for about 5-7 minutes. You want it smooth and elastic. After kneading, place it in a greased bowl. Cover it with a damp cloth and let it rise for about 1 hour. It should double in size. While the dough rises, preheat your oven to 425°F. Line a baking sheet with parchment paper. In a large pot, bring 8 cups of water to a boil. Add ½ cup of baking soda to the water. This step is key for making soft pretzels. Once the dough has risen, punch it down. Turn it out onto a floured surface. Roll it into a long rope about 1 inch thick. Cut it into 1-inch pieces. Drop 6-8 pieces into the boiling water for 30 seconds. Use a slotted spoon to remove them and place them on the baking sheet. In a separate bowl, mix ½ cup of granulated sugar, 1 tablespoon of ground cinnamon, and a pinch of salt. Brush the boiled pretzel bites with ½ cup of melted butter. Sprinkle the cinnamon-sugar mixture generously over them. Bake in the oven for 12-15 minutes. Look for a golden brown color. Once done, let them cool slightly before serving. To make great pretzel bites, kneading is key. Kneading helps develop gluten. This makes your dough strong and elastic. Aim for about 5 to 7 minutes of kneading. You want the dough to feel smooth and soft. After kneading, rise the dough in a warm spot. Cover it with a damp cloth. Let it sit for about an hour. The dough should double in size. This gives it the fluffy texture we love. Boiling the pretzel bites is important. It gives them that classic pretzel texture. Boil the bites for exactly 30 seconds. This timing helps create a chewy outside. The baking soda in the water also affects color and flavor. It gives the pretzels a beautiful golden brown finish. Skipping this step will change the taste and texture. For dipping, try melted chocolate or cream cheese. These options add a tasty twist. You can also serve them with a sweet glaze. Presentation matters, too! Serve the pretzel bites warm in a wooden bowl. A sprinkle of cinnamon sugar on top makes them look nice. This also hints at the yummy flavor inside. Pro Tips Use Warm Water: Ensure the water temperature is between 110°F to 115°F to activate the yeast properly, helping your pretzel bites to rise beautifully. Knead Thoroughly: Knead the dough for 5-7 minutes until it’s smooth and elastic. This develops the gluten, which gives the pretzels their classic chewy texture. Boil for Flavor: The baking soda bath is crucial for achieving that authentic pretzel flavor and golden-brown color. Don’t skip this step! Serve Fresh: Pretzel bites are best enjoyed warm right out of the oven. If you have leftovers, reheat them briefly in the oven for the best taste. {{image_2}} To make gluten-free pretzel bites, swap out regular flour for gluten-free options. You can use almond flour or a gluten-free all-purpose blend. Make sure the blend contains xanthan gum to help the dough stick together. Adjust the liquid as needed, since gluten-free flours absorb moisture differently. Start with the same water amount, then add more if the dough feels too dry. For vegan pretzel bites, replace the butter with plant-based margarine or coconut oil. Use coconut sugar or maple syrup instead of regular sugar to keep it plant-based. For the egg, substitute with 1 tablespoon of ground flaxseed mixed with 2.5 tablespoons of water. Let it sit until it thickens. This will help bind the dough just like an egg does. You can add fun flavors to your pretzel bites. Mix spices like nutmeg or ginger into the dough for a unique twist. For toppings, try adding chocolate chips or crushed nuts. If you want a savory option, sprinkle some garlic powder or grated cheese on top before baking. These small changes can turn a simple snack into a gourmet treat! To keep your cinnamon sugar pretzel bites fresh, store them in an airtight container. Make sure they are completely cool before sealing. This will help prevent moisture and keep them tasty. You can also wrap them in plastic wrap for extra protection. Store them in the fridge for up to three days. When it comes to reheating, the oven works best. Preheat the oven to 350°F (175°C). Place the pretzel bites on a baking sheet and heat for about 5-10 minutes. This method keeps them soft and warm. The microwave is quicker but can make them chewy. If you must use the microwave, heat them for about 15-20 seconds at a time. To freeze pretzel bites, let them cool completely first. Then, place them in a single layer on a baking sheet. Freeze them for about an hour until solid. After that, transfer the bites to a freezer-safe bag. They will keep well for up to three months. For thawing, just leave them in the fridge overnight. Reheat them in the oven or microwave after thawing. This way, they taste fresh and delicious even after freezing. Yes, you can use instant yeast. Instant yeast works faster than active dry yeast. You do not need to proof it in water. Just mix it directly with the flour. Use the same amount, about 2 ¼ teaspoons. This swap makes the process quicker. These pretzel bites stay fresh for about 2 to 3 days. Store them in an airtight container. Keep them at room temperature. If you want them to last longer, refrigerate them. They may lose some softness when stored this way. You can skip boiling, but I don’t recommend it. Boiling gives pretzels their classic chewy texture. It also adds a nice shine to the crust. Without boiling, the bites may turn out softer and less flavorful. Many sauces pair well with pretzel bites. Here are a few popular options: - Cheese sauce: Melted cheddar is a classic. - Mustard: Both yellow and honey mustard work well. - Chocolate: For a sweet twist, try melted chocolate. - Cream cheese: Whipped cream cheese is smooth and tasty. Check for a golden brown color. The bites should feel firm and slightly crisp. If you tap them, they should sound hollow. Baking usually takes about 12 to 15 minutes at 425°F. Always keep an eye on them to avoid burning. In this article, we covered the key ingredients and steps for making cinnamon sugar pretzel bites. You learned how to activate yeast, create the dough, boil for texture, and bake to perfection. We also explored tips for great results, variations for different diets, and storage methods. Enjoying these bites fresh or with dipping sauces enhances their taste. Remember, with practice, you’ll master these treats in no time. Happy baking!

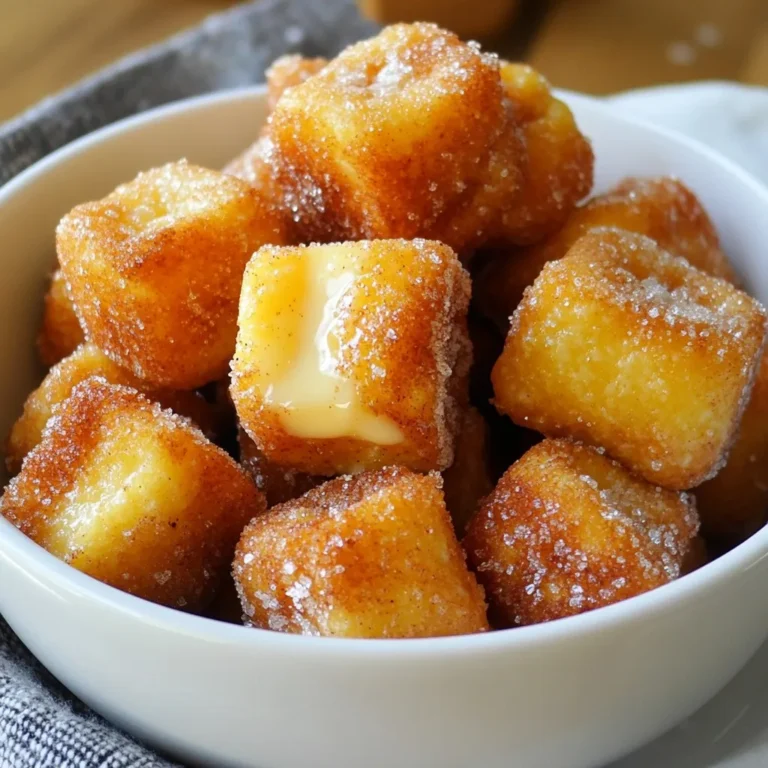
Cinnamon Sugar Pretzel Bites Irresistible Snack Idea

To make these tasty Garlic Herb Dinner Rolls, gather the following ingredients: - 3 cups all-purpose flour - 1 packet (2 ¼ tsp) instant yeast - 1 teaspoon salt - 1 tablespoon sugar - 1 cup warm water (110°F) - 3 tablespoons olive oil - 4 cloves garlic, minced - 1 tablespoon fresh parsley, chopped - 1 tablespoon fresh rosemary, chopped - 1 teaspoon dried oregano - 1 tablespoon melted butter (for brushing) These ingredients work together to create soft, fluffy rolls. The all-purpose flour gives the rolls structure. Instant yeast helps them rise quickly. The salt and sugar enhance flavor and balance. Warm water activates the yeast for a great rise. Olive oil adds moisture and richness. Minced garlic makes these rolls pop with flavor. Fresh parsley and rosemary bring a bright taste. Dried oregano adds depth to the mix. Finally, brushing with melted butter gives a lovely shine and taste. Use these simple ingredients to create rolls that impress everyone at your table. {{ingredient_image_1}} Start by combining warm water, sugar, and yeast in a large bowl. Make sure the water is about 110°F. This warmth helps the yeast wake up and get active. Let it sit for about 5 minutes. You’ll know it’s ready when it becomes frothy and bubbly. Next, add in the olive oil, salt, and 2 cups of flour. Stir this mix until a dough starts to form. Gradually add the rest of the flour. Keep mixing until the dough pulls away from the sides of the bowl. Now, transfer the dough to a lightly floured surface. Knead it for about 5 to 7 minutes. You want it to be smooth and elastic. While kneading, prepare your herb mix. In a small bowl, combine minced garlic, chopped parsley, chopped rosemary, and oregano. Once the herb mix is ready, knead it into the dough. Make sure it spreads evenly throughout. This will give the rolls their tasty flavor. After mixing in the herbs, form the dough into a ball. Place it in a greased bowl and cover it with a clean kitchen towel. Let it rise in a warm spot for 1 hour, or until it doubles in size. Once risen, punch down the dough gently. Divide it into 12 equal pieces. Shape each piece into a roll and place them in a greased 9x13-inch baking dish. Cover the rolls again and let them rise for another 30 minutes. Preheat your oven to 375°F. Before baking, brush the tops of the rolls with melted butter. This gives them a nice golden color. Bake for 20 to 25 minutes or until the tops are golden brown. Once baked, take them out and let them cool for a bit before serving. Enjoy the fresh, fluffy rolls! To get soft and fluffy rolls, kneading is key. Knead the dough for 5-7 minutes. This builds gluten, which gives the rolls structure. Do not rush this step. Pay attention to how smooth the dough feels in your hands. Rising conditions also matter. Find a warm spot in your kitchen. I like to turn on the oven for a minute, then turn it off. Place the covered dough inside. This creates a cozy environment for the dough to rise. It should double in size in about an hour. Want to jazz up your rolls? You can add more herbs and spices. Try thyme or basil for a fresh twist. Feel free to mix in some crushed red pepper for a bit of heat. If you love garlic, you can adjust the intensity. Add more minced garlic if you want a stronger flavor. For a milder taste, use fewer cloves. Taste and tweak until it’s just right for you. Presentation is fun! Serve the rolls warm in a bread basket lined with a clean towel. This keeps them soft. For a classy touch, garnish with a sprig of rosemary or a sprinkle of fresh parsley. These rolls pair well with soups, stews, or salads. You can also dip them in olive oil or balsamic vinegar. They make a great side for any meal. Enjoy your warm, fresh rolls! Pro Tips Kneading Technique: Ensure you knead the dough until it is smooth and elastic; this helps create a light and airy texture in your rolls. Flavor Boost: For an extra burst of flavor, consider adding a pinch of grated Parmesan cheese to the herb mixture before kneading it into the dough. Perfect Rising: If your kitchen is cool, preheat your oven to the lowest temperature for a few minutes, then turn it off. Place the dough inside to rise efficiently. Storage Tip: To keep the rolls fresh, store them in an airtight container at room temperature. For longer storage, freeze them in a resealable bag. {{image_2}} You can make these rolls extra yummy by adding cheese. I like to use mozzarella or cheddar. To do this, follow these steps: - Prepare the dough as usual. - After kneading in the herbs, flatten a piece of dough. - Place a small chunk of cheese in the center. - Fold the dough over the cheese and shape it into a roll. - Let it rise again before baking. This method gives you a gooey, cheesy surprise in each bite. For a healthier option, try whole wheat flour. It adds great flavor and nutrition. Replace half of the all-purpose flour with whole wheat flour. You may need a bit more water because whole wheat absorbs more moisture. Mix and knead as you would with the regular recipe. These rolls will still be soft and flavorful. If you need gluten-free rolls, use a gluten-free flour blend. Look for one that has xanthan gum added. This helps the rolls rise and hold their shape. Mix the dough as in the original recipe, but let it rise longer. Gluten-free dough can be stickier, so keep your hands floured. These rolls will still taste great with garlic and herbs. To keep your garlic herb dinner rolls fresh, store them at room temperature. Place them in a bread bag or a container with a lid. This method keeps them soft for up to 2 days. If you want to store them longer, the fridge is not ideal. Cold air can dry them out. Instead, use the fridge only if your kitchen is very warm. When it's time to enjoy leftover rolls, soft and fluffy is the goal. The best way to reheat them is in the oven. Preheat your oven to 350°F (175°C). Wrap the rolls in foil to keep moisture in. Heat them for about 10-15 minutes until warm. You can also use a microwave. Place them on a plate, cover with a damp paper towel, and heat for 15-20 seconds. This method keeps them tender. Freezing your garlic herb dinner rolls is easy. First, let them cool completely. Then, wrap each roll in plastic wrap. This keeps them fresh and prevents freezer burn. Place the wrapped rolls in a freezer bag and seal tightly. They can last up to 3 months in the freezer. To thaw, move them to the fridge overnight. For a warm treat, heat them in the oven at 350°F (175°C) for about 10 minutes after thawing. This restores their soft texture beautifully. Homemade garlic herb dinner rolls stay fresh for about 2-3 days at room temperature. To keep them soft, store them in an airtight bag. If you want them to last longer, freeze them. They can last up to three months in the freezer. Just remember to thaw them before serving. Yes, you can use fresh herbs! Fresh herbs add a bright flavor to your rolls. If you choose fresh parsley or rosemary, use about three times more than dried. This means if the recipe calls for 1 teaspoon of dried herb, use 1 tablespoon of fresh. If your dough does not rise, it could be due to the yeast. Make sure your yeast is fresh. Check the water temperature; it should be warm, around 110°F, but not hot. If it still does not rise, give it more time. Sometimes, dough needs extra warmth to grow. Yes, you can prepare the dough ahead of time. After kneading, cover the dough and place it in the fridge. It can stay there for up to 24 hours. When you're ready to bake, let it warm up at room temperature before shaping the rolls. You can tell the rolls are done when they turn golden brown on top. You can also tap the bottom; it should sound hollow. If you have a kitchen thermometer, the inside should reach 190°F. Cool them slightly before serving for the best flavor. Making garlic herb dinner rolls is simple and satisfying. You need just a few ingredients and follow straightforward steps. From mixing the dough to baking, each part adds flavor and texture. Remember to knead well and let the rolls rise properly for the best results. Feel free to try variations and freezing methods. Enjoy these rolls fresh with any meal. You’ll impress everyone with your baking skills. Now, gather your ingredients and start your baking adventure!

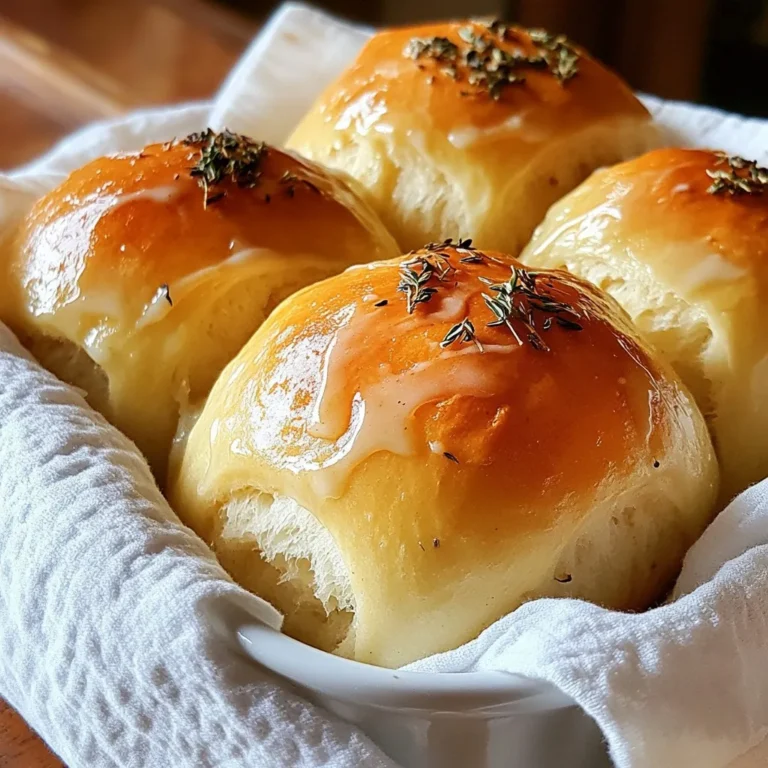
Garlic Herb Dinner Rolls Fresh and Fluffy Delight

PREV 1 … 81 82 83 … 86 NEXT
tasty trail blazer

explore

DessertsDinnerAppetizersDrinks

Our Policies

  • Cookie Policy
  • Copyright Policy
  • Disclaimer
  • GDPR Policy
  • Terms Of Use
Back to Top
  • About
  • Contact Us
  • Privacy Policy
© 2026 tasty trail blazer