FREE DINNER EBOOK! Get your copy!
  • Cookie Policy
  • GDPR Policy
  • Disclaimer
  • Terms Of Use
  • Visit my other site: Fun Cookie Recipes
tasty trail blazer
  • Home
  • Dinner
  • Desserts
  • Drinks
  • Appetizers
  • Contact
  • About
  • Privacy Policy
  • Home
  • Dinner
  • Desserts
  • Drinks
  • Appetizers
  • Contact
  • About
  • Privacy Policy
  • Cookie Policy
  • GDPR Policy
  • Disclaimer
  • Terms Of Use
Visit my other site: Fun Cookie Recipes

HOME / CATEGORIES /

Latest

- 2 pounds chicken wings - 1/4 cup Sriracha sauce - 1/4 cup honey - 2 tablespoons soy sauce - 2 tablespoons vegetable oil - 1 tablespoon garlic powder - 1 teaspoon ground ginger - 1/2 teaspoon black pepper - 1/4 teaspoon salt - 1 tablespoon sesame seeds (for garnish) - 2 green onions, chopped (for garnish) Each serving of Spicy Sriracha Honey Wings has about 400 calories. The wings contain protein, fats, and carbohydrates. You get around 25 grams of protein, 20 grams of fat, and 30 grams of carbs. This balance makes them a tasty snack that fills you up. - Baking sheet - Mixing bowls - Measuring spoons and cups When you gather these ingredients and tools, you set yourself up for success. Each item plays a key role in bringing those crispy, spicy wings to life. Enjoy the process and the wonderful smells as you cook! {{ingredient_image_1}} First, set your oven to 425°F (220°C). This high heat helps the wings get crispy. Line a baking sheet with aluminum foil or parchment paper. This makes cleanup easy. Take a large bowl and add the chicken wings. Pour in the vegetable oil, garlic powder, ground ginger, black pepper, and salt. Mix everything well. Make sure each wing is coated evenly. This step adds flavor to every bite. In a separate bowl, combine the Sriracha sauce, honey, and soy sauce. Stir until the mixture is smooth and well blended. This sauce will give the wings their spicy and sweet kick. Once the wings are coated, pour half of the Sriracha-honey sauce over them. Toss the wings to make sure they are fully covered. Arrange the wings in a single layer on the baking sheet. Bake for about 30 minutes. Flip them halfway through to ensure they cook evenly. After 30 minutes, take the wings out of the oven. Brush the remaining Sriracha-honey sauce over the wings. Return them to the oven for an extra 10 to 15 minutes. This step helps caramelize the sauce and makes the wings crispy. Once done, let the wings rest for a few minutes. Transfer them to a serving platter. Sprinkle sesame seeds and chopped green onions on top. This adds a pop of color and flavor. Serve them on a rustic wooden board or a bright platter. Enjoy with extra Sriracha sauce for dipping! To get crispy wings, keep your oven at 425°F. This high heat helps them cook fast and evenly. Bake for 30 minutes, flipping halfway through. This step is key to a crunchy outside and juicy inside. After 30 minutes, brush on more sauce and bake for another 10 to 15 minutes. This caramelizes the wings and adds a nice glaze. Want to spice things up? Consider adding smoked paprika for a smoky flavor. You could also mix in chili powder for extra heat. If you love garlic, try adding minced garlic to the sauce for a richer taste. A splash of lime juice can brighten the flavors too. Get creative and make these wings your own! These wings shine when served with sides. Try pairing them with crunchy celery or carrot sticks. A cool ranch or blue cheese dip balances the heat well. For a fun twist, serve them with a side of sweet potato fries. You can even add some pickles for a tangy crunch. Present them on a bright platter with a small bowl of extra sauce for dipping. Pro Tips Marinate for More Flavor: For an extra punch of flavor, marinate the chicken wings in the seasoning mix for at least 30 minutes, or overnight if possible. Use High-Quality Honey: The quality of honey can significantly affect the taste. Opt for raw, unfiltered honey for a richer flavor. Keep an Eye on Crispiness: Ovens can vary, so check the wings a few minutes before the recommended baking time to ensure they don’t burn. Experiment with Heat Levels: Adjust the amount of Sriracha based on your heat preference. You can also mix in other hot sauces for a unique twist. {{image_2}} Adding minced garlic to the sauce makes these wings even better. Garlic brings a rich flavor that blends perfectly with the sweet and spicy mix. To do this, finely chop two cloves of garlic. Mix it with the Sriracha, honey, and soy sauce. Stir until well combined. This small change adds depth and a comforting aroma. You will love how the garlic enhances each bite. You can choose to bake or fry your wings. Baking is healthier and easier. It requires less oil and gives crispy wings with a nice glaze. Baking also helps keep the kitchen clean. On the other hand, frying gives wings a different, crunchy texture. Fried wings tend to be juicier but can be greasy if not done right. Both methods can be delicious, so pick what suits your taste! If you want to switch things up, try using different sweeteners. Maple syrup can give a unique flavor. It adds a hint of earthiness that works well with spicy Sriracha. Agave nectar is another option. It’s sweeter and lighter than honey. Both options keep the wings tasty while changing the flavor profile a bit. These sweeteners can help cater to different diets, too. After cooking your spicy Sriracha honey wings, let them cool. Place the wings in an airtight container. Store them in the fridge for up to three days. Make sure they are fully cooled before sealing to avoid condensation. This keeps the wings fresh and tasty. To freeze the wings, first, cool them completely. Arrange the wings in a single layer on a baking sheet. Freeze them for about one hour. This prevents the wings from sticking together. Once frozen, transfer them to a freezer bag. They can stay frozen for up to three months. When ready to enjoy, thaw in the fridge overnight before reheating. For the best crispy wings, use the oven. Preheat your oven to 375°F (190°C). Spread the wings on a baking sheet in a single layer. Bake for about 15-20 minutes, flipping halfway through. This method revives the crispiness and flavor. If you’re in a hurry, you can use a microwave, but it may make them soft. Yes, you can use frozen chicken wings. Just make sure to thaw them first. Thaw wings in the fridge overnight or use cold water to speed up the process. Cooking time may change a bit. Always check that they reach an internal temperature of 165°F (74°C). If you need a substitute for Sriracha, try using another hot sauce. You can also mix chili paste or hot pepper sauce with honey. This will give you a similar sweet and spicy kick. You can even use a blend of ketchup and hot sauce for a milder option. To make these wings less spicy, use less Sriracha. Start with a tablespoon and add more if needed. You can also mix in some extra honey to balance the heat. Another option is to add a touch of yogurt or sour cream to the sauce for a creamy, cooling effect. You now have a delicious and easy recipe for Sriracha honey wings. We covered all the ingredients, equipment, and steps needed to make this dish. You learned tips for better wings and ways to store them. Whether you're hosting a party or having a quiet night, these wings are a great choice. Experiment with flavors and enjoy your cooking. With practice, you’ll make wings that impress everyone. Get cooking and enjoy every bite!

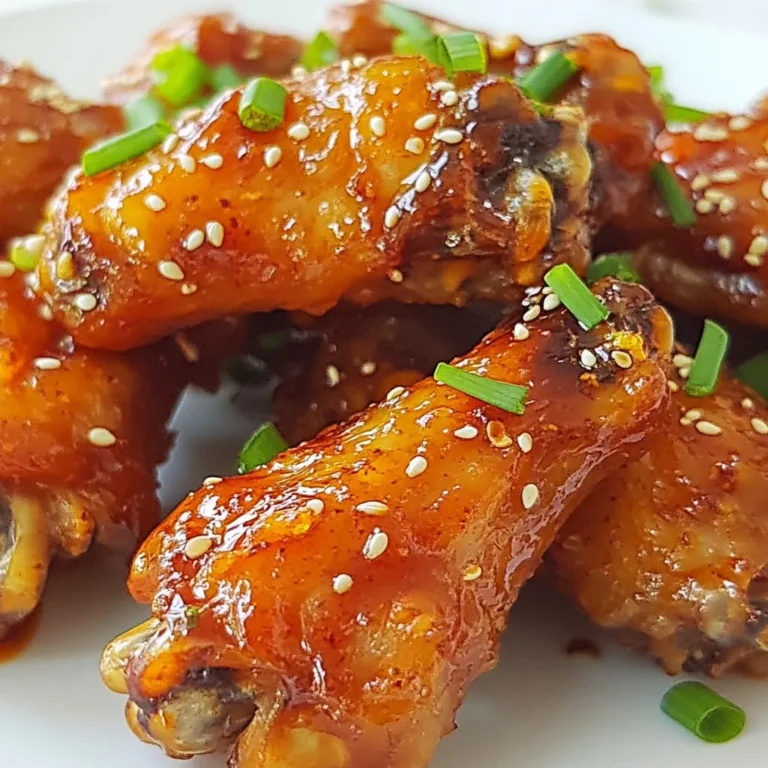
Spicy Sriracha Honey Wings Irresistibly Finger-Licking

- 1 lb boneless, skinless chicken breast, thinly sliced - 1 red bell pepper, sliced - 1 yellow bell pepper, sliced - 1 cup broccoli florets - 1 cup snap peas, trimmed - 1 medium carrot, julienned The main ingredients in this stir fry create a colorful and healthy dish. The chicken breast gives you lean protein. The bell peppers add sweetness and crunch. Broccoli florets bring fiber and vitamins. Snap peas add a nice snap, while carrots add a hint of earthiness. - 3 tablespoons soy sauce - 1 tablespoon sesame oil - 3 garlic cloves, minced - 1 inch ginger, grated - Salt and pepper to taste The seasoning and oils give this dish its bold flavor. Soy sauce adds saltiness and umami. Sesame oil gives a nutty taste. Fresh garlic and ginger enhance the aroma. Salt and pepper help balance the dish. - 1 tablespoon sesame seeds - Chopped green onions Garnishing is key to a great presentation. Sesame seeds add a nice crunch. Chopped green onions add freshness. They also make your dish look inviting. You can serve this stir fry in a large bowl or on a vibrant plate to impress your guests. {{ingredient_image_1}} How to slice chicken and vegetables To start, take your chicken breast. Place it on a cutting board. Use a sharp knife to slice it thinly. Aim for strips about half an inch wide. This helps the chicken cook fast. Next, grab your veggies. Slice the red and yellow bell peppers into strips. Cut the carrot into thin sticks, called julienne. For the broccoli, break it into small florets. Trim the snap peas by removing the ends. Tips for measuring ingredients When measuring, use a standard measuring cup for liquids. For small amounts, like soy sauce, use a tablespoon. Keep your ingredients ready before cooking. This makes the process smooth and quick. Heating and seasoning the chicken Heat a large wok or frying pan over medium-high heat. Add olive oil and let it warm up. Next, add your sliced chicken to the pan. Season it lightly with salt and pepper. Stir-fry the chicken for 5 to 7 minutes. It should turn golden brown and be fully cooked. Once done, remove the chicken and set it aside. Stir-frying vegetables and incorporating flavors In the same pan, add minced garlic and grated ginger. Stir them for about 30 seconds until you smell their aroma. Add the sliced bell peppers, broccoli, snap peas, and carrots. Stir-fry for 4 to 5 minutes. Make sure the veggies stay crisp and colorful. After they soften a bit, return the chicken to the pan. Pour in the soy sauce and sesame oil. Stir well to mix all the flavors. Thicken sauce with cornstarch To thicken your sauce, take a small bowl. Mix cornstarch with water until smooth. Add this mixture to the pan. Stir continuously as it cooks. In just 1 to 2 minutes, the sauce will thicken. It should coat the chicken and vegetables nicely. Garnishing and serving suggestions Take your stir fry off the heat. Sprinkle sesame seeds and chopped green onions on top for garnish. Serve it in a large bowl or on a bright plate. For a full meal, pair it with steamed rice or noodles. Enjoy your colorful, tasty chicken vegetable stir fry! To make a great chicken stir fry, follow these tips: - Cut the chicken thin. Thin slices cook fast and stay juicy. - Heat the pan well. A hot pan helps to sear the chicken. - Don’t overcrowd the pan. Cook in batches if needed to avoid steaming. - Add veggies in stages. Softer veggies like bell peppers can cook with the chicken. - Keep veggies crisp. Stir-fry for just a few minutes until they are bright. Want to amp up the taste? Here are some ideas: - Add spices. Try chili flakes for heat or paprika for smokiness. - Incorporate herbs. Fresh basil or cilantro can add a fresh twist. - Experiment with sauces. Use teriyaki or hoisin sauce for a different flavor. Choosing the right tools makes stir-frying easier: - Use a wok or a large pan. A wok heats evenly and gives you space to stir. - Select thin spatulas. A flat spatula helps flip the chicken and veggies well. - Keep measuring spoons handy. Precise amounts of sauces make a big difference. Pro Tips Prep Your Ingredients: Before you start cooking, ensure all your ingredients are prepped and ready to go. This makes the stir-fry process much smoother and quicker. High Heat is Key: Stir-frying requires high heat to quickly cook the food while retaining its color and crunch. Make sure your wok or pan is hot before adding the ingredients. Don’t Overcrowd the Pan: Cooking in batches if necessary ensures that the chicken and vegetables fry evenly and don’t steam. This helps achieve a better texture. Experiment with Veggies: Feel free to swap in your favorite vegetables or those in season. This dish is versatile and can adapt to whatever you have on hand! {{image_2}} You can switch up the protein in this stir fry. Tofu or shrimp work great. Tofu gives it a nice texture and absorbs flavors well. You can use firm or extra-firm tofu for the best results. Just press it to remove excess moisture before cooking. Shrimp adds a sweet and delicate taste. Just be sure to cook them until they turn pink. If you prefer a meat-free dish, you can use a mix of mushrooms and nuts. They add a hearty feel and lots of flavor. Feel free to get creative with your veggies! Seasonal favorites like zucchini, asparagus, or bok choy can really enhance your dish. You can also add some colorful carrots, snap peas, or bean sprouts. Mixing different textures and colors makes your stir fry pop! Think about what you like. Broccoli, bell peppers, and carrots are always a hit. Try combinations like broccoli and carrots or bell peppers with snap peas for added crunch. You can make your sauce at home or use store-bought options. For a quick homemade sauce, mix soy sauce, garlic, and a splash of rice vinegar. If you want something spicy, add a bit of chili paste. Store-bought sauces can save time. Look for teriyaki or sweet and sour sauces for different flavors. Just remember to check the label for added sugars. Mixing sauces can also create a fun twist. Try blending hoisin with soy sauce for a unique taste. To store leftovers, let the stir fry cool first. Place it in an airtight container. This keeps it fresh for later. Chicken vegetable stir fry lasts about 3-4 days in the fridge. Always check for any strange smells or colors before eating. For freezing, make sure it cools down completely. Use freezer-safe containers or bags. Remove as much air as possible before sealing. Chicken vegetable stir fry can stay good for about 2-3 months in the freezer. When you’re ready to eat, thaw it in the fridge overnight. To reheat, I recommend using the stovetop. It helps keep the texture nice. Just add a splash of water or oil and stir until hot. The microwave works too, but it may make the veggies softer. Heat on medium for 2-3 minutes, stirring halfway through. Enjoy your meal just like when it was fresh! Can I use frozen vegetables? Yes, you can use frozen vegetables for this stir fry. They are quick and easy. Just remember to thaw them first. This helps them cook evenly. Frozen veggies may take a minute longer to cook. What can I serve with chicken vegetable stir fry? You can serve this stir fry with steamed rice or noodles. Both options soak up the sauce well. Try adding a side of spring rolls for extra crunch. Is chicken vegetable stir fry healthy? Yes, chicken vegetable stir fry is a healthy dish. It has lean protein from chicken and many veggies. This mix gives you vitamins and fiber. It can fit well in a balanced diet. Caloric content per serving Each serving has about 300 calories. This number may change based on the oil used or added sides. You can lower the calories by using less oil. What to do if the chicken is undercooked? If the chicken is undercooked, return it to the pan. Cook it for a few more minutes. Make sure it reaches 165°F (75°C) for safety. Cut it into smaller pieces to help it cook faster. How to fix an overly salty dish? If your dish is too salty, add more veggies or cooked rice. These will balance the flavor. You can also add a little water to dilute the saltiness. Just remember to stir well. This blog post covered all you need for a great chicken vegetable stir fry. We discussed key ingredients like chicken, veggies, and seasonings. You learned step-by-step instructions for preparation and cooking. I shared helpful tips for perfect results and variations to try. In closing, stir fry is simple and fun. Explore different flavors and make it your own. Enjoy your cooking adventure!

Chicken Vegetable Stir Fry Flavorful and Quick Meal

- 1 lb ground beef or turkey - 1 can (15 oz) black beans, drained and rinsed - 1 can (15 oz) diced tomatoes with green chilies - 1 packet taco seasoning - 1 cup corn kernels (fresh, frozen, or canned) - 2 cups tortilla chips, crushed - 2 cups shredded cheddar cheese - 1 cup sour cream or Greek yogurt - 1/2 cup green onions, chopped - Fresh cilantro for garnish (optional) Gather these ingredients before you start. Ground beef or turkey gives great flavor and protein. Black beans and diced tomatoes add fiber and taste. Taco seasoning brings a kick, while corn adds sweetness. Tortilla chips are the base for crunch, and cheese makes it rich and gooey. Sour cream or Greek yogurt adds creaminess, and green onions plus cilantro give freshness. - Sliced avocado or jalapeños - Different cheese options like Monterey Jack or queso fresco Feel free to add extra toppings! Avocado provides creaminess, while jalapeños add heat. You can also switch cheeses to mix things up. These small changes can make a big difference in taste and texture. Enjoy customizing your taco casserole to match your preferences! {{ingredient_image_1}} 1. Preparing the ground meat: Start by heating a large skillet over medium heat. Add 1 pound of ground beef or turkey. Cook until it is brown and no longer pink. If there is extra fat, drain it. This keeps your dish from being greasy. 2. Draining and rinsing beans and tomatoes: While the meat cooks, grab 1 can of black beans and 1 can of diced tomatoes with green chilies. Drain the beans in a colander. Rinse them under cold water. This step helps reduce sodium and improves taste. 1. Sautéing the meat and adding seasonings: Once the meat is cooked, lower the heat. Stir in 1 packet of taco seasoning. Then add the drained beans, diced tomatoes (with juices), and 1 cup of corn. Season with salt and pepper. Mix well and cook for about 5 minutes. 2. Combining ingredients in the skillet: Ensure all the ingredients are heated through. The mixture should be warm and fragrant. This blend of flavors makes the casserole special. 1. Layering chips, meat mixture, and cheese: In a large baking dish, layer half of the crushed tortilla chips on the bottom. Spread half of the meat mixture over the chips. Top it with half of the shredded cheddar cheese. 2. Final layer and baking instructions: Repeat the layers. Add the remaining chips, meat mixture, and cheese on top. Preheat your oven to 350°F (175°C) and bake for 25 to 30 minutes. The cheese should be bubbly and golden. Allow it to cool for a few minutes before serving. Enjoy your delicious taco casserole! To make your taco casserole perfect, ensure even layering. Start with half the crushed chips at the bottom. Then, add half the meat mixture and half the cheese. Repeat these layers. This method helps each bite taste great. Adjusting the seasoning is key. Feel free to add more taco seasoning or salt if needed. Taste the mixture as you cook. This way, you can match it to your family's preference. Prep your ingredients before cooking. Chop the green onions and measure the cheese ahead of time. This cuts down on cooking time and makes serving easier. Using rotisserie chicken saves time too. Just shred the chicken and mix it into your meat mixture. This shortcut gives you more flavor without all the work. Pro Tips Use Lean Meat: Opt for lean ground beef or turkey to reduce fat content and make the dish lighter. Add Extra Veggies: Incorporate diced bell peppers or zucchini into the meat mixture for added nutrition and flavor. Make It Spicy: For a kick, add sliced jalapeños or a dash of hot sauce to the meat mixture. Customize Your Toppings: Feel free to add avocado, salsa, or olives on top for extra flavor and texture. {{image_2}} For a tasty vegetarian twist, you can swap out the meat. Use beans or lentils instead. Black beans add protein and fiber. Lentils provide a nice texture too. You can also add more veggies. Bell peppers and zucchini work great in this dish. They bring color and flavor. Just chop them and mix them in with the other ingredients. If you love heat, make it spicy! Add jalapeños or your favorite hot sauce. This brings a nice kick to the casserole. You can also use pepper jack cheese instead of cheddar. It melts well and adds more spice. Just sprinkle it on top in the last layer. Your taste buds will thank you! For a gluten-free meal, choose gluten-free tortilla chips. They hold up well in the casserole. You can also find gluten-free taco seasoning at stores. This way, you can enjoy all the flavors without worry. Another great idea is to serve it with lettuce wraps. Just scoop the filling into the wraps instead of using chips. It’s a fresh and fun way to eat! After enjoying your taco casserole, cool it down first. This step keeps the food safe. Then, transfer the casserole to airtight containers. Make sure to seal them well. In the fridge, taco casserole lasts about 3 to 4 days. Always check for any off smells or mold before eating. You can freeze taco casserole for later. First, let it cool completely. Cut it into portions for easy use. Wrap each piece tightly in plastic wrap. Then, place them in freezer bags. This keeps the flavor fresh. When ready to eat, thaw it in the fridge overnight. Reheat in the oven at 350°F until hot. Avoid using the microwave as it may change the texture. Enjoy your tasty meal anytime! Yes, you can use other meats in this taco casserole. Ground chicken or ground pork work well. If you prefer a plant-based option, try using lentils or black beans instead of meat. Each choice adds a unique flavor. Just remember to adjust cooking times if needed. You can make this casserole in advance! Prepare the meat mixture as directed. Layer it in the baking dish with chips and cheese. Cover it and store it in the fridge for up to 24 hours. When you're ready to bake, just pop it in the oven. You may need to add a few extra minutes to the baking time if it's cold. There are many great sides to serve with taco casserole. Rice pairs nicely, adding a hearty touch. A fresh salad adds color and crunch. Guacamole brings creaminess and flavor. You can also serve it with tortilla chips for extra crunch. Choose what you like best! This blog post shows how to create a tasty taco casserole. We covered essential ingredients, cooking steps, and tips for the perfect dish. Consider variations like vegetarian or spicy options to suit your taste. Remember to store leftovers properly for future meals. This easy recipe can feed a crowd and satisfy cravings. Enjoy making it your own, and share it with family and friends! You’ll find it fun and rewarding to create your own version.

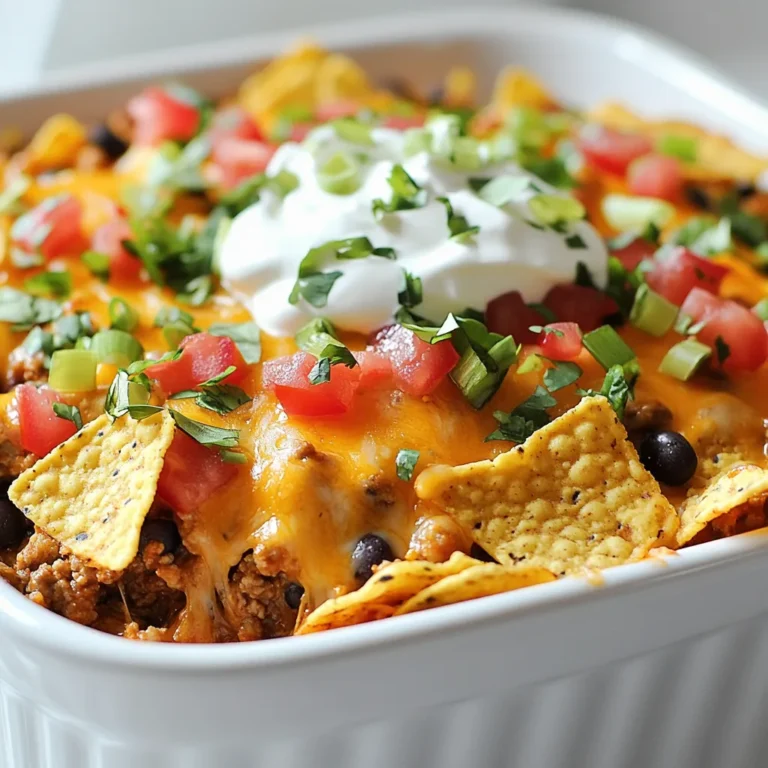
Easy Taco Casserole Simple and Flavorful Meal Idea

- 1 lb boneless, skinless chicken breasts - 1 can (15 oz) white beans, drained and rinsed - 1 can (15 oz) corn, drained - 1 medium onion, finely chopped - 2 cloves garlic, minced - 1 can (4 oz) diced green chilies - 2 cups chicken broth - 1 teaspoon cumin - 1 teaspoon chili powder - ½ teaspoon oregano - Salt and pepper to taste - ¼ cup fresh cilantro, chopped (for garnish) - Optional toppings: avocado slices, shredded cheese, sour cream Each ingredient plays a key role in the flavor of the chili. The chicken gives it a hearty base. The white beans and corn add texture and sweetness. Onions and garlic bring a strong, savory note. Green chilies add depth and a mild heat. For spices, cumin and chili powder provide warmth. Oregano adds a nice herbal touch. Adjust the salt and pepper to suit your taste. Lastly, cilantro adds freshness when you serve it. You can also use toppings like avocado, cheese, or sour cream for extra flavor and creaminess. Gather these ingredients before you start. They are easy to find and make the dish special. This white chicken chili is simple yet full of flavor. You will love how every bite feels satisfying and warm. {{ingredient_image_1}} - Arrange chicken at the bottom of the slow cooker. - Layer white beans, corn, onion, garlic, and chilies on top. - Add chicken broth and sprinkle spices evenly. I love starting with the chicken. I place the boneless, skinless chicken breasts right in the slow cooker’s bottom. This way, the chicken cooks tender and juicy. Next, I layer the white beans, corn, chopped onion, minced garlic, and diced green chilies over the chicken. These ingredients add so much flavor and texture. Now, I pour the chicken broth over everything. It binds all the flavors together. Then I sprinkle cumin, chili powder, oregano, salt, and pepper on top. These spices bring warmth and depth to the dish. - Set slow cooker on low for 6-8 hours or high for 3-4 hours. - Shred chicken and combine all ingredients after cooking. I set my slow cooker to low for 6 to 8 hours. If I’m in a hurry, I choose high for 3 to 4 hours. The slow cooking lets the flavors mix and the chicken become fork-tender. After cooking, I carefully remove the chicken. I use two forks to shred it into bite-sized pieces. Then, I return the shredded chicken to the slow cooker. I stir it in, making sure everything blends well. - Adjust seasoning if needed. - Garnish and serve hot. Before serving, I taste the chili. If it needs more flavor, I add a pinch of salt or pepper. Finally, I serve it hot, garnished with fresh cilantro. You can also add avocado, cheese, or sour cream for extra delight. This chili is warm, filling, and perfect for any meal. Using fresh ingredients is key. Fresh chicken makes the dish juicy and tasty. Fresh herbs like cilantro add bright flavor. Always check for quality when you shop. Adjust the spice levels to fit your taste. Start with less spice, then add more if you like heat. You can even add jalapeños for extra kick. A slow cooker does magic with flavors over time. Cooking on low for 6-8 hours gives the best taste. If you're short on time, cook on high for 3-4 hours. To keep chicken moist, avoid opening the lid often. Moisture escapes, which can dry out your chicken. Serve your chili with crispy tortilla chips or warm bread. Cornbread pairs well too! Garnish with fresh cilantro for color. You can add avocado slices, shredded cheese, or sour cream for creaminess. These toppings will enhance the flavor and texture. Enjoy your delicious chili with friends or family! Pro Tips Use Frozen Chicken: If you're short on time, frozen chicken breasts can be added directly to the slow cooker without thawing. Just increase the cooking time by about an hour. Spice It Up: Adjust the amount of chili powder and cumin to suit your heat preference. Adding a pinch of cayenne pepper can also give it an extra kick! Fresh Herbs: For a burst of freshness, add chopped cilantro or parsley just before serving. This enhances the flavor and adds a nice color to the dish. Storage Tips: This chili can be stored in the refrigerator for up to 4 days or frozen for up to 3 months. Make sure to cool it completely before transferring to airtight containers. {{image_2}} You can easily swap out the chicken for turkey. It works just as well. If you want a meatless option, use beans instead. Chickpeas and black beans both add protein and flavor. You can also try different types of beans. Pinto or kidney beans give a nice twist. For grains, quinoa or rice can add some texture and heartiness. To boost the flavor, add more vegetables like bell peppers or zucchini. These add color and nutrients. If you like heat, toss in some jalapeños or use hotter spices. You can also add a dash of hot sauce at the end for an extra kick. This will make your chili even more enjoyable. For a vegetarian or vegan version, replace chicken broth with vegetable broth. Use plant-based proteins like tofu or lentils instead of chicken. This keeps it filling and tasty. If you need it gluten-free, simply check your broth and spices. Most are safe, but it’s always good to verify. Enjoy your meal with everyone at the table! To keep your Crockpot White Chicken Chili fresh, follow these steps: - Refrigeration: Store leftover chili in an airtight container. It can last up to 3-4 days in the fridge. - Freezing: For longer storage, freeze the chili. Use freezer-safe containers or bags. It can stay good for up to 3 months. Just make sure to leave space in the container for expansion. When you're ready to enjoy your chili again, reheating is key: - Best methods: The microwave works well. Heat in 1-minute intervals, stirring in between. You can also reheat on the stove over medium heat. Stir often to avoid burning. - Repurposing leftovers: Try using leftover chili as a filling for burritos or tacos. You can also serve it over rice or pasta for a new meal. Adding fresh toppings can change the flavor too! Can I use frozen chicken for this recipe? Yes, you can use frozen chicken. Just add about an hour to the cooking time. The chicken will cook through and become tender. How can I make this chili thicker? To thicken the chili, mash some of the white beans. You can also add a cornstarch slurry. Mix one tablespoon of cornstarch with two tablespoons of water. Stir it in and let it cook for a bit. What should I serve with white chicken chili? White chicken chili pairs well with cornbread or tortilla chips. You might also enjoy it with a fresh salad or rice for a complete meal. How long does this recipe stay good in the fridge? The chili stays good for about three to four days in the fridge. Store it in an airtight container for the best results. Can I make this recipe on the stove instead of a crockpot? Yes, you can. Just sauté the onion and garlic in a pot, then add the other ingredients. Simmer for about 30 minutes until the chicken is cooked. What are some good toppings for white chicken chili? Some tasty toppings include avocado slices, shredded cheese, and sour cream. Fresh cilantro adds great flavor too! This blog post covered a tasty white chicken chili recipe made in a slow cooker. You learned about key ingredients, simple steps, and helpful tips. Remember to use fresh ingredients for the best taste. Feel free to swap proteins or adjust spices to fit your taste. Whether you make it spicy or keep it mild, this chili is a hit. Proper storage and reheating keep flavors intact. Enjoy making your chili and sharing it with friends and family!

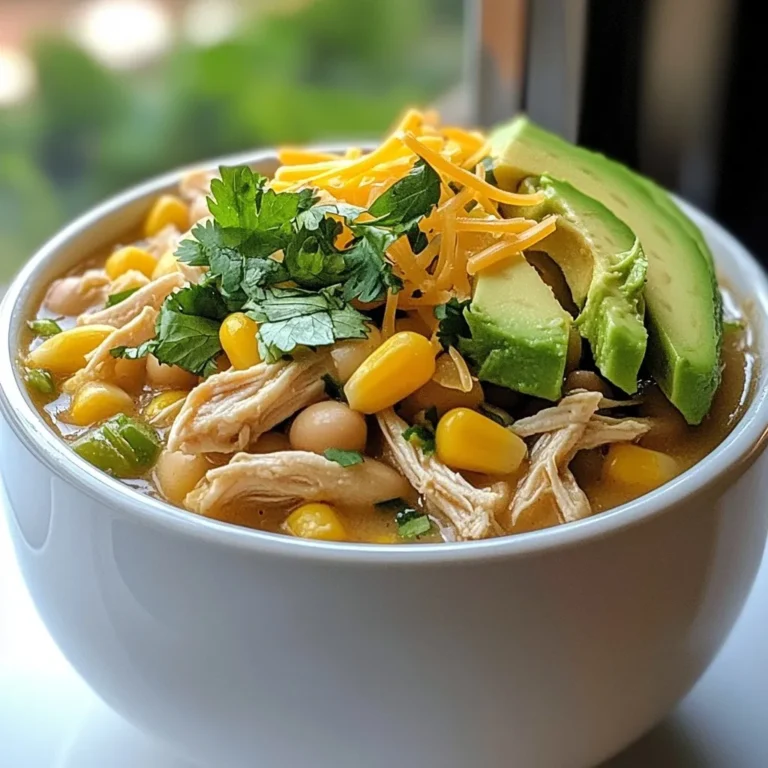
Crockpot White Chicken Chili Flavorful and Simple Dish

To make these tasty cookies, you need: - 2 ¾ cups all-purpose flour - 2 teaspoons cream of tartar - 1 teaspoon baking soda - 1 teaspoon ground cinnamon - 1 teaspoon pumpkin pie spice - ½ teaspoon salt - 1 cup unsalted butter, softened - 1 ½ cups granulated sugar - ¼ cup brown sugar, packed - 1 large egg - 1 teaspoon vanilla extract These ingredients work together to create a soft and chewy cookie with a warm flavor. You can add a few extra touches for more flavor: - ½ cup chopped nuts (like pecans or walnuts) - ½ cup chocolate chips for a sweet twist - A pinch of nutmeg to enhance the spice profile These options can make your cookies even more delicious and fun! If you're missing an ingredient, here are some easy swaps: - Use baking powder instead of cream of tartar (just add 1 teaspoon) - Substitute coconut oil or margarine for butter - Swap the egg for ¼ cup applesauce for a vegan option These substitutions can help you make the cookies based on what you have at home. Enjoy your baking! {{ingredient_image_1}} Start by preheating your oven to 350°F (175°C). Line two baking sheets with parchment paper. In a medium bowl, mix 2 ¾ cups of all-purpose flour, 2 teaspoons of cream of tartar, 1 teaspoon of baking soda, 1 teaspoon of ground cinnamon, 1 teaspoon of pumpkin pie spice, and ½ teaspoon of salt. This mix adds flavor and helps the cookies rise. Set this bowl aside. Next, take a large bowl and add 1 cup of softened unsalted butter, 1 ½ cups of granulated sugar, and ¼ cup of brown sugar. Beat this mixture until it is light and fluffy. This should take about 3 minutes. Then, add in 1 large egg and 1 teaspoon of vanilla extract. Mix until everything blends well. Gradually stir in your dry mix until a soft dough forms. In a small bowl, combine 2 tablespoons of sugar with 1 teaspoon of pumpkin pie spice. This will be your rolling mix. Scoop tablespoons of your dough and roll them into balls about 1.5 inches wide. After rolling, coat each ball in the cinnamon-sugar mixture until it is fully covered. This step adds a sweet crunch to your cookies. Place the dough balls on the prepared baking sheets. Make sure to space them about 2 inches apart. This gives them room to spread while baking. Bake the cookies in your preheated oven for 10 to 12 minutes. You want the edges to turn lightly golden. When they are done, remove them from the oven. Let them cool on the baking sheets for 5 minutes. After that, transfer them to wire racks to cool completely. Enjoy the sweet aroma as they cool, filling your kitchen with a warm, inviting scent. To make the best pumpkin spice snickerdoodles, use room temperature butter. This helps the butter mix well with sugar. Cream the butter and sugars until the mix is light. This step adds air for fluffy cookies. When adding dry ingredients, mix gently. Over-mixing can make the cookies tough. Roll the dough balls in the cinnamon-sugar mix well. This gives them a nice crust. Bake just until the edges turn golden. This keeps the center soft and chewy. One common mistake is not measuring flour correctly. Too much flour can make dry cookies. Use the spoon and level method for precise measuring. Another mistake is baking for too long. Keep an eye on the cookies; they will continue to cook after you take them out. Lastly, don't skip the cooling step. Letting them cool on the baking sheet helps them set perfectly. To serve your pumpkin spice snickerdoodles nicely, use a colorful platter. Add a sprinkle of pumpkin spice on top for flair. Pair the cookies with warm cider or tea. This makes a cozy treat for any gathering. You can also stack them high for an eye-catching display. A few cinnamon sticks nearby add a nice touch too! Pro Tips Chill the Dough: For thicker and chewier cookies, chill the dough for at least 30 minutes before baking. This helps prevent spreading and enhances the flavors. Use Fresh Spices: Ensure your pumpkin pie spice and cinnamon are fresh for the best flavor. Old spices can lose their potency and diminish the cookie's taste. Experiment with Mix-ins: Add chocolate chips, nuts, or dried cranberries for a fun twist on these snickerdoodles. They add texture and flavor complexity. Perfect Baking Time: Keep an eye on the cookies as they bake. They should be lightly golden around the edges but still soft in the center for the perfect texture. {{image_2}} You can add chocolate chips to your pumpkin spice snickerdoodles. This twist brings a rich, sweet flavor that pairs well with the warm spices. Simply fold in one cup of semi-sweet or dark chocolate chips into your dough after mixing the wet and dry ingredients. Bake as usual, and enjoy the delightful combination of chocolate and pumpkin spice. Nuts add a nice crunch to your cookies. You can use walnuts, pecans, or even almonds. Chop about half a cup of your chosen nuts and mix them into the dough when you combine the wet and dry ingredients. This variation adds texture and a nutty flavor that balances the sweetness of the cookie. For a gluten-free option, swap the all-purpose flour with a gluten-free all-purpose blend. Be sure to choose a blend that includes xanthan gum for the best texture. Follow the same steps in the recipe. You will have delicious gluten-free pumpkin spice snickerdoodles that everyone can enjoy! To keep your Pumpkin Spice Snickerdoodles fresh, place them in an airtight container. Line the bottom with parchment paper to absorb moisture. This method keeps them soft and tasty. Store them at room temperature for up to a week. If you want to enjoy them longer, freezing is the way to go. Freezing your cookies is simple and effective. First, let the cookies cool completely. Then, place them in a single layer on a baking sheet. Freeze for about two hours. Once frozen, transfer them to a freezer bag. Remove as much air as possible to prevent freezer burn. These cookies can last up to three months in the freezer. When you're ready to enjoy a cookie, preheat your oven to 350°F (175°C). Place the cookies on a baking sheet and heat for about 5 minutes. This warms them up and revives their original texture. You can also use a microwave. Heat for about 10-15 seconds. Just be careful not to overheat, or they will become hard. Enjoy your cozy treat! Yes, you can make pumpkin spice snickerdoodles ahead of time. You can mix the dough and chill it. This makes the dough easier to handle. Chill it for at least one hour. You can also roll the dough into balls and freeze them. Just bake them straight from the freezer. This saves time when you want fresh cookies! The best way to enjoy pumpkin spice snickerdoodles is warm. They are soft and chewy right out of the oven. Pair them with a warm drink like cider or tea. You can also sprinkle a bit of extra pumpkin spice on top for more flavor. Sharing them with friends or family makes it even better! You can buy pumpkin spice snickerdoodles at bakeries or coffee shops in the fall. Some grocery stores may also carry them. If you want them fresh, I recommend baking at home. This way, you can control the taste and enjoy them warm! You learned about making Pumpkin Spice Snickerdoodles in this post. We covered ingredients, steps, tips, and variations. With the right ingredients, the perfect dough, and baking techniques, you can craft tasty cookies. Remember to store them correctly to keep them fresh. Making variations keeps the fun alive. Enjoy serving these cookies to friends and family. Now, it’s your turn to bake. Happy baking!

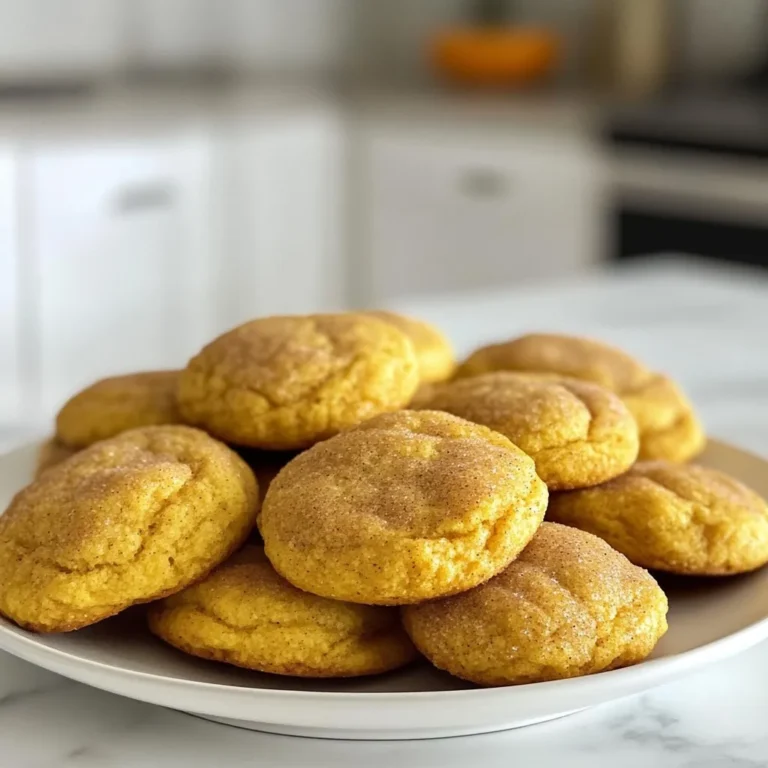
Pumpkin Spice Snickerdoodles Easy and Delicious Treat

To make this creamy spinach and orzo dish, gather these ingredients: - 1 cup orzo pasta - 2 cups fresh spinach, roughly chopped - 1 cup heavy cream - 1 cup vegetable broth - 1 tablespoon olive oil - 1 small onion, finely chopped - 2 garlic cloves, minced - 1/2 cup grated Parmesan cheese - Salt and pepper, to taste - Optional: A pinch of nutmeg You will need a few simple tools to prepare this meal: - A large skillet - A wooden spoon or spatula - A measuring cup - A knife and cutting board This dish serves four people. Each serving has: - Calories: About 450 - Protein: 12g - Carbohydrates: 45g - Fat: 25g - Fiber: 2g - Sodium: Varies with added salt This creamy spinach and orzo dish is not only tasty but also brings some good nutrients to your table. It combines carbs, healthy fats, and protein to keep you feeling full and satisfied. {{ingredient_image_1}} Start by gathering your ingredients. You will need: - 1 cup orzo pasta - 2 cups fresh spinach, roughly chopped - 1 cup heavy cream - 1 cup vegetable broth - 1 tablespoon olive oil - 1 small onion, finely chopped - 2 garlic cloves, minced - 1/2 cup grated Parmesan cheese - Salt and pepper, to taste - Optional: A pinch of nutmeg Chop the onion and garlic. You want them small enough to mix well but not too small. 1. Heat the olive oil in a large skillet over medium heat. 2. Add the chopped onion. Sauté it for about 3-4 minutes until it looks clear. 3. Stir in the minced garlic. Cook it for one more minute. Watch out, so it does not burn. 4. Add the orzo pasta to the skillet. Stir it well to coat the grains with oil and onion. 5. Pour in the vegetable broth. Bring it to a light simmer. Cook for about 8-10 minutes, stirring now and then. You want the orzo to be slightly firm, or al dente. 6. Turn the heat down low. Slowly mix in the heavy cream until it blends completely. 7. Fold in the chopped spinach. Cook it until it wilts, which takes about 2-3 minutes. 8. Stir in the grated Parmesan cheese. Add salt, pepper, and nutmeg if you want. Adjust to your taste. 9. Let it cook for 2 more minutes. This helps the sauce thicken a bit. Once everything is cooked, remove the skillet from the heat. Let it sit for a minute. This gives the flavors time to settle. Serve the creamy spinach and orzo in shallow bowls. You can sprinkle more Parmesan cheese and some cracked pepper on top for a nice look. Enjoy your tasty dinner delight! To get that smooth, dreamy texture in your creamy spinach and orzo, follow these steps. First, use heavy cream. It gives the dish richness that lighter creams can't match. Once you add the cream, keep the heat low. This helps it blend well without curdling. Stir slowly to mix in the spinach and cheese. This way, everything melts together nicely. If you want a thicker sauce, let it cook a bit longer. Just remember to stir often to avoid sticking. Seasoning makes a big difference in flavor. Start with salt and pepper. They enhance the natural taste of the ingredients. Then, add a pinch of nutmeg if you like. Nutmeg gives a warm, cozy note. You can also try garlic powder for more garlic flavor. If you want a kick, add red pepper flakes. Fresh herbs like basil or parsley can brighten the dish. Taste as you go to find your perfect mix. Avoid cooking the orzo too long. If overcooked, it becomes mushy and loses its bite. Make sure to stir the orzo while it cooks. This helps it cook evenly. Also, don’t skip the resting time after cooking. Letting it sit for a minute helps the sauce thicken. Lastly, don’t forget to taste before serving. This checks if it needs more seasoning. Following these tips will help you create a creamy, flavorful dish every time. Pro Tips Use Fresh Spinach: Fresh spinach enhances the flavor and texture of the dish, making it more vibrant and nutritious. Flavor Boost: Adding a pinch of nutmeg not only complements the creaminess but also adds a subtle depth to the dish. Perfectly Cooked Orzo: Keep an eye on the orzo while it simmers, stirring occasionally to prevent it from sticking to the bottom of the skillet. Serving Suggestion: Garnish with freshly cracked pepper and additional Parmesan cheese for a restaurant-quality presentation. {{image_2}} You can turn creamy spinach and orzo into a heartier meal by adding protein. Chicken and shrimp work great. For chicken, use cooked, diced pieces. You can add it when you mix in the spinach. For shrimp, sauté them in the skillet before adding the orzo. Cook until they turn pink, then follow the rest of the recipe. Both options add a nice texture and flavor to the dish. If you want to change up the veggies, there are many options. You can try kale instead of spinach. It gives a richer flavor. Another choice is broccoli. Just chop it into small pieces and add it with the orzo. You can even mix in peas for a sweet bite. These swaps keep the dish fresh and fun. You can make this dish vegan without losing its creamy charm. Replace heavy cream with coconut milk or a plant-based cream. Use nutritional yeast instead of Parmesan for a cheesy taste. Also, swap the vegetable broth for a homemade vegan broth. These changes keep the dish rich and delicious while being plant-based. Store your creamy spinach and orzo in an airtight container. Let it cool down first. Once cool, cover it tightly and place it in the fridge. This dish will stay fresh for up to three days. To reheat, take out the portion you want. Place it in a skillet over low heat. Add a splash of vegetable broth or cream to help bring back the creamy texture. Stir often until heated through. You can also use a microwave. Place it in a microwave-safe bowl. Heat in short bursts, stirring in between, until warm. Freezing is a great option if you have extra. For best results, freeze it in individual portions. Use freezer-safe bags or containers. Make sure to remove as much air as possible. This dish can last up to three months in the freezer. Thaw it in the fridge overnight before reheating. Yes, you can use other small pasta types. Try using ditalini or even small shells. Just adjust the cooking time as needed. Make sure to check the package for the right time. This way, your pasta will cook perfectly with the creamy sauce. If you want a lighter option, use half-and-half or whole milk. You can also try coconut milk for a dairy-free option. Keep in mind that the texture may change a bit. The dish may not be as rich, but it will still taste great. Creamy spinach and orzo can last up to three days in the fridge. Store it in an airtight container to keep it fresh. Reheat it gently on the stove or in the microwave. Add a splash of broth or water to keep it creamy while reheating. You’ve learned about the key ingredients and step-by-step instructions for making this dish. We discussed how to achieve a creamy texture and shared tips to avoid common mistakes. You also explored fun variations and learned how to store leftovers for later use. With this knowledge, you can create a tasty meal that suits your taste. Enjoy your cooking journey and make it your own!

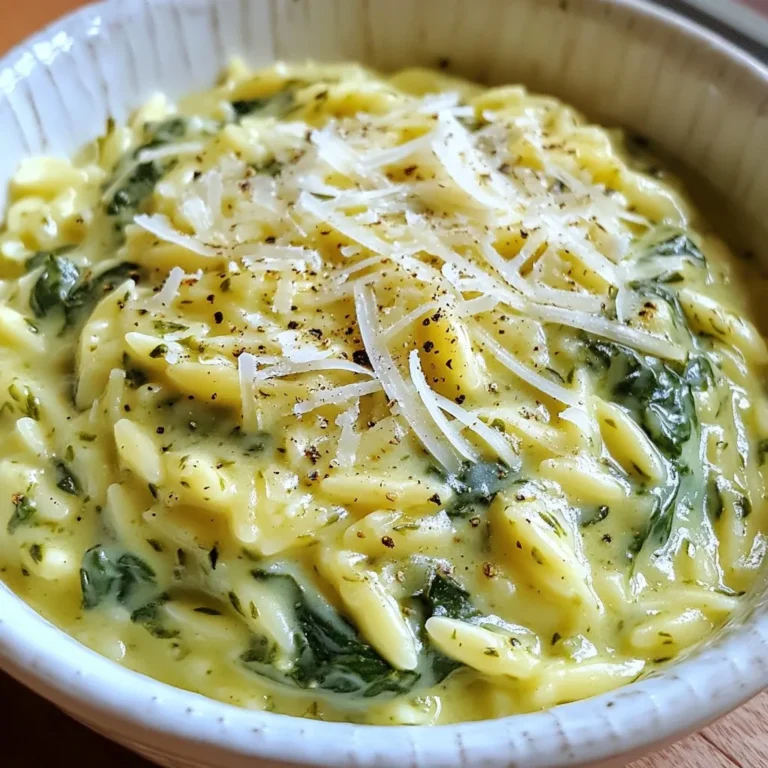
Creamy Spinach and Orzo Tasty Dinner Delight

- 1 pound ground beef (80/20 for best flavor) - 1/2 cup almond flour - 1 large egg - 3 cloves garlic, minced - 1 teaspoon onion powder - 1 teaspoon Italian seasoning - Salt and pepper to taste - 1/4 cup grated Parmesan cheese - 2 tablespoons fresh parsley, chopped (for garnish) Choosing the right ground beef is key. I recommend 80/20 ground beef. This blend has the right fat for flavor and keeps the meatballs juicy. Almond flour is another star in this dish. It is low in carbs and adds great texture. Unlike wheat flour, almond flour helps you stay on track with your Keto diet. It also adds a slight nutty taste, which pairs well with the garlic and beef. Using fresh ingredients makes a big difference. Always choose fresh garlic over powders when you can. Fresh garlic has more flavor and health benefits. {{ingredient_image_1}} Preheating the oven and lining the baking sheet First, turn your oven to 400°F (200°C). This step is crucial for even cooking. While your oven heats, grab a baking sheet. Line it with parchment paper. This makes cleanup a breeze. Mixing the meatball ingredients In a large bowl, add the ground beef, almond flour, and egg. Then, toss in the minced garlic, onion powder, and Italian seasoning. Don’t forget to add salt and pepper to taste. Finally, mix in the grated Parmesan cheese. Use your hands to blend these ingredients. Be gentle and don’t overmix; this keeps the meatballs tender. Forming the meatballs Now, it's time to shape the mixture. Take a handful of the meat mixture and roll it into balls. Each meatball should be about 1.5 inches wide. Place them on the lined baking sheet, giving them some space. Baking the meatballs and checking for doneness Put the baking sheet in the oven. Bake the meatballs for 15 to 20 minutes. They should be browned and cooked through. To check doneness, use a meat thermometer. The internal temperature should hit 160°F (70°C). Preparing the garlic butter sauce While the meatballs bake, let’s make the garlic butter. In a saucepan over medium heat, melt the unsalted butter. Once melted, add the minced garlic. Sauté the garlic for 1 to 2 minutes. Watch closely to avoid burning it. Combining meatballs with garlic butter When the meatballs are done, take them out of the oven. Drizzle the garlic butter over the meatballs. For a better coating, toss them in the sauce. This adds flavor and richness. Mixing the meat mixture is key to good meatballs. I like to use my hands for this. It gives me control. Combine the ground beef, almond flour, egg, garlic, and spices gently. You want to blend them without overmixing. If you mix too much, the meatballs can become tough. Aim for a nice, even mix. When you shape the meatballs, your hands might get sticky. To avoid this, wet your hands with a little water or oil. This helps with shaping and keeps the mixture from sticking to your hands. Make each meatball about 1.5 inches wide. Place them evenly on the baking sheet. You can add spices or herbs to boost flavor. Try adding a pinch of red pepper flakes for heat, or a bit of smoked paprika for depth. Fresh herbs like thyme or basil can also make a difference. Butter plays a big role in flavor too. I prefer using unsalted butter. This way, I can control the saltiness of the dish. You can also try garlic-infused butter for an extra kick. One common mistake is overmixing the meat. This makes meatballs tough and chewy. Mix until just combined for the best texture. Another mistake is burning the garlic in the sauce. Garlic can turn bitter if cooked too long. Keep an eye on it while it cooks in the butter. Just a minute or two is enough to get the great flavor. Pro Tips Use Fresh Garlic: Freshly minced garlic will give your meatballs a more intense flavor compared to pre-minced or jarred garlic. Don’t Overmix: When combining the ingredients, mix just until combined. Overmixing can lead to tough meatballs. Check for Doneness: Use a meat thermometer to ensure the internal temperature of the meatballs reaches 160°F (70°C) for safe consumption. Experiment with Seasonings: Feel free to customize the spices and herbs to your taste. Adding crushed red pepper flakes can give a nice kick! {{image_2}} You can change up the protein in these meatballs. Ground turkey or pork works great. Both options keep the dish juicy and tasty. You can also use dairy-free or low-carb cheese. This is perfect if you want to avoid dairy. Nutritional yeast can add a nice cheesy flavor without the dairy. Pair these meatballs with side dishes for a full meal. Zucchini noodles are a great choice. They add color and a healthy touch. You can serve the meatballs on a big platter. Drizzle extra garlic butter on top for a rich look. Garnish with fresh parsley to make it pop. Want to play with flavors? Try an Asian twist. Add soy sauce and ginger to the meat mix. This gives a fun new taste. For a Mediterranean flair, mix in some feta cheese and olives. You can even add herbs like oregano or basil for a fresh touch. These swaps make the dish exciting and keep it fresh. To keep your Keto garlic butter meatballs fresh, use airtight containers. Glass or plastic containers work well. You can also use resealable bags. Store them in the fridge for up to three days. If you want to keep them longer, freeze them. Meatballs can last in the freezer for about three months. When reheating, the goal is to keep the meatballs moist. The best method is to use the oven. Preheat your oven to 350°F (175°C). Place the meatballs on a baking sheet. Cover them with foil to keep moisture in. Heat for about 10-15 minutes until warm. You can also use a microwave, but this may dry them out. If using the microwave, add a little water to the dish and cover it. You can freeze meatballs before or after cooking. To freeze raw meatballs, shape them and place them on a baking sheet. Freeze until firm, then transfer to a bag. This way, you can cook them later directly from frozen. For cooked meatballs, let them cool completely. Then, place them in a container or bag. Label it with the date. This helps you keep track of how long they’ve been in the freezer. Yes, you can use other Keto-friendly flours. Almond flour is great because it is low in carbs. You can also try coconut flour. Just remember, coconut flour absorbs more moisture. You may need less of it. Another option is flaxseed meal, which adds fiber and healthy fats. To check if your meatballs are done, use a meat thermometer. The inside should reach 160°F (70°C). If you don't have a thermometer, cut one in half. The meat should be brown and hot all the way through. No pink should remain. If garlic is a no-go, try using shallots. They have a mild taste and can add flavor. You can also use garlic powder in small amounts. Another option is to use herbs like thyme or rosemary for a different flavor. They will not taste the same but can still be tasty. This blog covers how to make delicious meatballs using basic and optional ingredients. We also discussed the importance of ingredient quality and shared step-by-step cooking instructions. I gave tips for perfecting your meatballs and shared variations to keep things exciting. Lastly, I covered storage and reheating methods to enjoy your leftovers. With these insights, you can create tasty meatballs that suit any diet and preference. Enjoy making your own flavorful version at home!

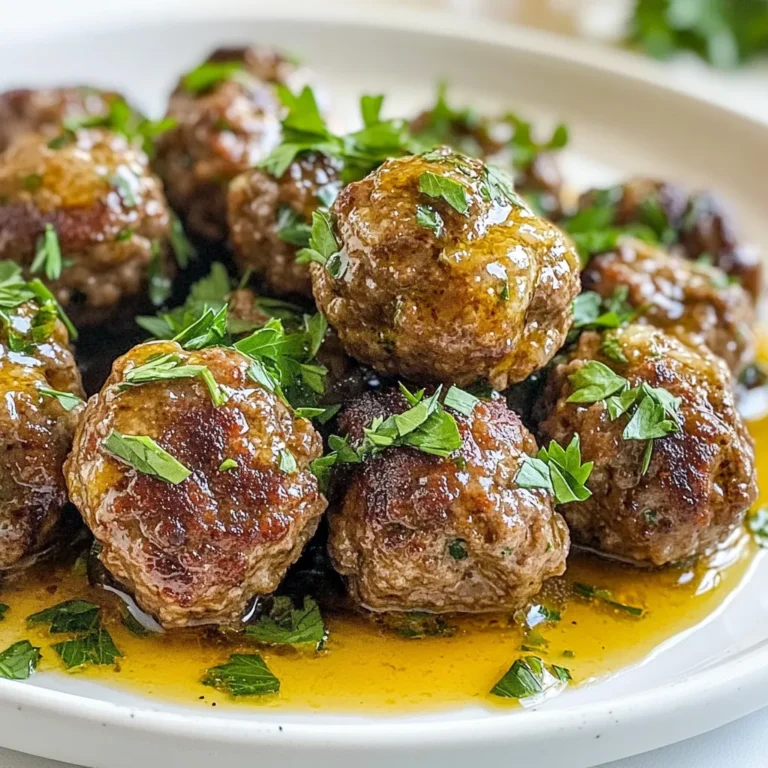
Keto Garlic Butter Meatballs Satisfying and Simple Dish

- 2 cups heavy cream - 1 cup whole milk - 3/4 cup granulated sugar - 1 tablespoon vanilla extract - 1/2 cup cherries, pitted and chopped - 1/2 cup semi-sweet chocolate chips I love using heavy cream in this recipe. It makes the ice cream rich and creamy. Whole milk adds a nice balance, keeping the texture smooth. Granulated sugar is key for sweetness. It helps bring out the flavors of the cherries and vanilla. Vanilla extract adds a warm, sweet touch. It blends well with all the other flavors. Cherries are the star here. Make sure they're ripe and juicy for the best taste. I suggest pitting and chopping them before adding. This way, you get bursts of cherry in every bite. Semi-sweet chocolate chips give a delightful crunch. They add rich chocolate flavor to the mix. Together, these ingredients create a delicious Cherry Garcia ice cream that you can enjoy at home. {{ingredient_image_1}} - Mixing the Cream, Milk, and Sugar In a large bowl, start by adding 2 cups of heavy cream, 1 cup of whole milk, and 3/4 cup of granulated sugar. Whisk them together. Keep whisking until the sugar dissolves completely. This step is key for a smooth base. - Adding Vanilla Extract Next, stir in 1 tablespoon of vanilla extract. This adds a sweet flavor that pairs well with the cherries. Make sure it mixes well and blends into the cream. - Using an Ice Cream Maker Pour your mixture into an ice cream maker. Follow the machine's instructions for best results. This is where the magic happens! - Ideal Churning Time Let it churn for about 20 to 25 minutes. You want it to reach a soft-serve consistency. Keep an eye on it to avoid over-churning. - Preparing the Cherries While the ice cream churns, take your 1/2 cup of cherries. Pit and chop them into small pieces. If you want, toss them with a little sugar to make them sweeter. - Folding in Cherries and Chocolate Chips When the ice cream is ready, gently fold in the chopped cherries and 1/2 cup of semi-sweet chocolate chips. Use a spatula to mix them in evenly. This adds bursts of flavor in every scoop. - Storing in an Airtight Container Transfer the ice cream to an airtight container. Smooth the top with your spatula. This helps keep the ice cream fresh. - Time Required for Freezing Freeze the ice cream for at least 4 hours. This will allow it to harden. You can wait longer if you want it firmer. Serve it in bowls, and enjoy your homemade treat! - Importance of Churning Time: Churning makes the ice cream smooth. If you churn too little, it may be icy. Aim for 20-25 minutes for the best results. - Tips on Freezing Techniques: After churning, put the ice cream in an airtight container. Smooth the top for even freezing. Freeze for at least 4 hours to harden it well. - Additional Flavoring Suggestions: You can add almond extract for a nutty twist. A pinch of sea salt can also enhance the flavors. - Sweetening Cherries Method: Toss the chopped cherries with a teaspoon of sugar. This brings out their sweetness and makes them taste even better in your ice cream. - Serving Suggestions for Visual Appeal: Scoop the ice cream into colorful bowls. This makes it look more fun and inviting. - Garnishing Ideas: Top with extra cherries and chocolate shavings. A sprig of mint adds a nice pop of color too! Pro Tips Fresh Cherries: Use ripe, fresh cherries for the best flavor. If they're out of season, frozen cherries can be a good alternative. Chilling the Base: Chill your ice cream mixture in the refrigerator for a couple of hours before churning. This helps achieve a creamier texture. Customize Your Mix-ins: Feel free to experiment with different mix-ins like nuts or other fruits to create your own unique flavor combinations. Serving Tips: Let the ice cream sit at room temperature for a few minutes before scooping. This will make it easier to serve and enjoy! {{image_2}} You can change this recipe to fit your taste. Adding nuts, like walnuts or almonds, gives a nice crunch. You can also try other fruits. Strawberries or raspberries mix well with cherries. They add a fresh twist to your dessert. If you want a different chocolate flavor, consider dark chocolate. It adds a rich taste. You can also use white chocolate chips for a creamy sweetness. Each option changes the ice cream's vibe, so feel free to experiment. Want a dairy-free treat? You can swap heavy cream and milk for coconut cream and almond milk. These options taste great and keep the ice cream creamy. For the sugar, maple syrup works well as a sweetener. It adds a hint of caramel flavor. When using dairy-free options, the texture may differ. Coconut cream makes it rich and smooth. Almond milk can make it a bit lighter. Try different combos to find your favorite. You can adjust the sugar in this recipe. If you like it less sweet, use half the amount. This lets the cherry flavor shine through. If you want it sweeter, add more sugar or use honey. Natural sweeteners are also a good choice. Agave nectar or stevia can replace granulated sugar. Each sweetener brings its own flavor, so test what you like best. This way, you can make the ice cream just right for you. - Airtight Containers Necessity To keep your Cherry Garcia ice cream fresh, use airtight containers. This step helps block air and moisture. Air can lead to ice crystals, which ruin the smooth texture. - Understanding Ice Crystals and Texture Ice crystals form when air mixes with ice cream. Smaller ice crystals mean creamier ice cream. Churning well helps reduce these crystals. The right container also aids in keeping your ice cream creamy. - How Long Will It Last in the Freezer? Properly stored, your Cherry Garcia ice cream can last about 2 to 3 weeks. After that, flavors and texture may change. For best taste, enjoy it fresh! - Signs of Ice Cream Going Bad Look for ice crystals on top or an off smell. If it tastes icy or has a strange texture, it's time to toss it. Quality matters, so discard if unsure. - Can You Refreeze Ice Cream? Yes, but only if it has not melted fully. If it melts, refreezing can cause large ice crystals. This affects texture and taste. - Tips for Maintaining Quality If you need to refreeze, do it quickly. Transfer it back to the freezer right away. Use an airtight container to limit air exposure. This keeps your Cherry Garcia tasting great! Yes, you can make Cherry Garcia ice cream without an ice cream maker. Pour the mixed ingredients into a shallow dish. Place it in the freezer. Every 30 minutes, stir the mixture with a fork. This breaks up ice crystals. Keep doing this for about 3-4 hours until it’s firm and creamy. To make a lower sugar version, reduce the sugar to 1/2 cup or less. You can also use natural sweeteners like honey or agave syrup. Another option is to use a sugar substitute. Just check for the right amount on the product label. Some common problems include ice crystals forming and the ice cream being too hard. Ice crystals form from not churning enough or freezing too slowly. To avoid this, churn the mix well and freeze it quickly. If it’s too hard, let it sit out for a few minutes before serving. Yes, you can use frozen cherries! They work well if thawed and chopped first. Drain any excess liquid to avoid making the ice cream too watery. This way, you keep that sweet cherry flavor without losing texture. To churn ice cream by hand, use a large bowl and a whisk or a spatula. After mixing the base, pour it into a bowl. Stir the mix every 30 minutes. This helps develop a creamy texture. Do this for 3-4 hours until it is thick and smooth. This blog post covered how to make ice cream using simple ingredients. You learned about choosing heavy cream, whole milk, and sweetening it with sugar. I shared tips for churning, adding cherries and chocolate, and freezing for the best texture. You can customize flavors and manage sweetness levels easily. Remember, store your ice cream in airtight containers to keep it fresh. Now, you're ready to create your own delicious ice cream at home. Enjoy every scoop!

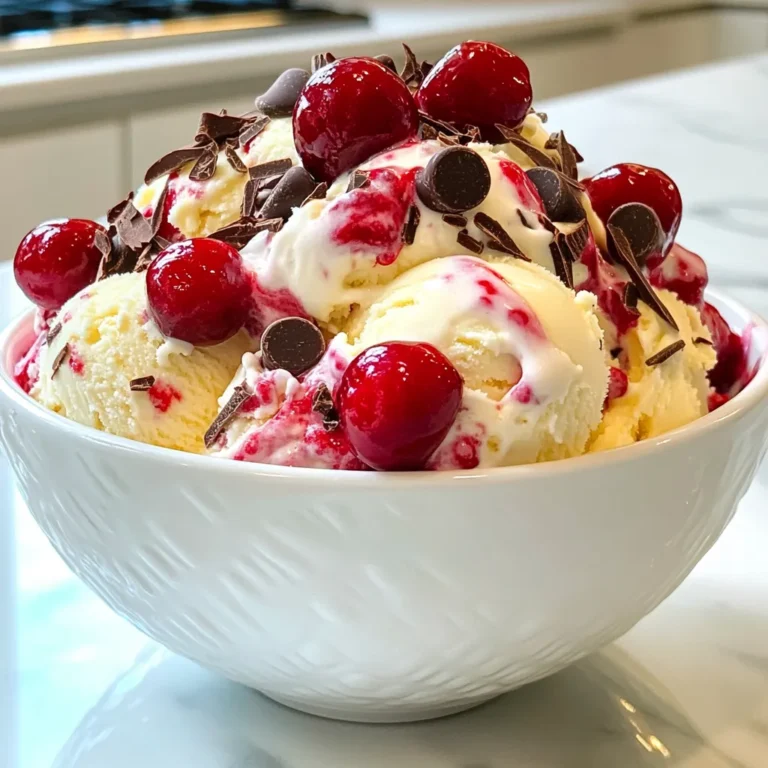
Cherry Garcia Ice Cream Copycat Delicious and Easy Recipe

To make delicious Kielbasa Potato Soup, gather these ingredients: - 1 lb kielbasa, sliced into rounds - 4 medium potatoes, peeled and diced - 1 medium onion, chopped - 3 cloves garlic, minced - 4 cups chicken broth - 1 cup heavy cream - 1 teaspoon smoked paprika - Salt and pepper to taste - 2 tablespoons olive oil - 1 cup frozen corn (optional) - Fresh parsley, chopped (for garnish) When measuring ingredients, use dry measuring cups for solids. For liquids, opt for a liquid measuring cup. Remember to level off dry ingredients with a straight edge. This helps ensure your soup turns out just right. For spices, a good rule is to use a teaspoon for small amounts and a tablespoon for larger ones. Measuring accurately gives your soup the best flavor. Choose high-quality kielbasa from a trusted source. Look for brands with natural ingredients and minimal fillers. For potatoes, Yukon Golds work well. They are creamy and hold their shape nicely. Fresh garlic and onion make a big difference in taste. If possible, opt for homemade chicken broth for richer flavor. If you like a fresh touch, use organic parsley for garnish. Quality ingredients make this soup a true comfort dish. {{ingredient_image_1}} 1. Gather your ingredients. You need kielbasa, potatoes, onion, garlic, and chicken broth. 2. Peel and dice the potatoes. Aim for small, even pieces for uniform cooking. 3. Chop one medium onion and mince three cloves of garlic. 4. Slice the kielbasa into rounds. This will help it cook evenly in the soup. 1. In a large pot, heat two tablespoons of olive oil over medium heat. 2. Add the chopped onion. Sauté for about five minutes until it is soft and clear. 3. Stir in the minced garlic and sliced kielbasa. Cook for four to five minutes until the kielbasa gets a bit brown. 4. Add the diced potatoes to the pot, then pour in four cups of chicken broth. 5. Bring the mixture to a boil. Once it boils, lower the heat and let it simmer. 6. Stir in one teaspoon of smoked paprika. Let the soup simmer for 15 to 20 minutes until the potatoes are soft. 7. If you want corn, add one cup during the last five minutes of cooking. 8. Use an immersion blender to puree some of the soup. This gives it a creamy feel but keeps some chunks. 9. Pour in one cup of heavy cream, then add salt and pepper to taste. Heat it for another five minutes. 1. Ladle the soup into bowls. 2. Sprinkle fresh parsley on top for a nice color and flavor. 3. Serve with crusty bread. It’s perfect for soaking up that delicious broth! To make the best Kielbasa Potato Soup, focus on a few key steps. Start by sautéing the onion until it turns soft. This adds sweetness and depth to your soup. When adding garlic, stir it in quickly. You want it fragrant, not burnt. Use good-quality kielbasa; it makes a big difference in flavor. For a rich taste, add smoked paprika early. This lets its flavor bloom as the soup cooks. When blending, only puree part of the soup. This keeps some potatoes chunky for texture. Finally, add cream at the end to keep it smooth and rich. Many people rush the cooking time. Don't skip letting the potatoes simmer long enough. They should be soft and tender for the best soup. Overcooking garlic can make it bitter, so watch it closely. Using too much broth can dilute the flavor. Stick to the recipe amounts for the best taste. Don’t forget to taste and adjust the salt and pepper. This small step can change your soup from good to great. Serve your Kielbasa Potato Soup hot in deep bowls. A sprinkle of fresh parsley adds a nice touch and bright color. Crusty bread or rolls are perfect for dipping. You can also offer a side salad for a fresh contrast. This soup pairs well with a light white wine, bringing out its flavors. Enjoy it with friends or family for a cozy meal. Each bowl is a warm hug on a chilly day! Pro Tips Use Quality Kielbasa: For the best flavor, select a high-quality kielbasa with a good balance of spices. This will enhance the overall taste of your soup. Perfect Potato Texture: Opt for waxy potatoes like Yukon Gold for a creamy texture that holds its shape well. Avoid starchy potatoes that may break down too much. Enhance with Herbs: Add fresh herbs like thyme or dill for an extra layer of flavor. Stir them in right before serving for the best aroma. Adjust Creaminess: For a lighter soup, reduce the amount of heavy cream or substitute half-and-half. This keeps the soup rich without being overly heavy. {{image_2}} You can swap kielbasa for other meats like smoked sausage or turkey sausage. If you want a vegetarian option, use mushrooms or a plant-based sausage. Instead of potatoes, try sweet potatoes for a different flavor. You can also add diced carrots or bell peppers to enhance the taste and texture. Frozen corn adds sweetness, but you can use peas instead if you prefer. For a lighter soup, replace heavy cream with half-and-half or milk. If you are lactose intolerant, almond milk or coconut cream works well too. To make the soup gluten-free, ensure your broth is certified gluten-free. For a low-sodium version, choose low-sodium broth and limit added salt. You can also add more veggies for added fiber and nutrients. Serve the soup in bowls with a sprinkle of fresh parsley on top. Pair it with crusty bread for dipping. You can also top it with shredded cheese for extra flavor. For a fun twist, serve it in a bread bowl. Enjoy it with a side salad for a balanced meal. If you like spice, add a dash of hot sauce before serving. To keep your soup fresh, let it cool first. Transfer the soup to an airtight container. It stays good in the fridge for up to three days. Make sure to label the container with the date. This way, you won't forget how old it is. Reheat the soup on the stove for best results. Pour the soup into a pot and heat it over medium. Stir often until it is hot. You can also use the microwave. Place the soup in a microwave-safe bowl. Heat in 30-second bursts, stirring in between. Freezing works well for this soup. Use freezer-safe containers or heavy-duty bags. Leave some space in the container for expansion. Kielbasa Potato Soup can freeze for up to three months. When ready to eat, thaw it overnight in the fridge before reheating. Yes, you can use different sausages. Try smoked sausage, turkey sausage, or even chorizo. Each type will add its own flavor to the soup. Just slice them the same way as kielbasa. This change can make your soup unique and exciting. To thicken the soup, you have a few options. You can mash some of the potatoes in the pot. This adds creaminess without extra steps. Another way is to add a slurry of cornstarch and water. Mix them in a small bowl before adding to the soup. Let it cook for a few minutes to thicken it up. Kielbasa Potato Soup pairs well with crusty bread. This helps to soak up the tasty broth. You can also serve a simple salad on the side. A light green salad adds freshness and crunch. If you want something warm, try a slice of garlic bread too. Kielbasa Potato Soup lasts about 3 to 4 days in the fridge. Store it in an airtight container to keep it fresh. If you want to keep it longer, consider freezing it. Just make sure to leave some space in the container for expansion. This blog post covered the key ingredients for Kielbasa Potato Soup and how to prepare it. We discussed measuring tips, quality suggestions, and step-by-step instructions for cooking. You learned how to avoid common mistakes and explored variations to suit different diets. Storage tips help keep your soup fresh and tasty. Remember, great soup comes from fresh ingredients and careful cooking. Enjoy the process and share with friends!

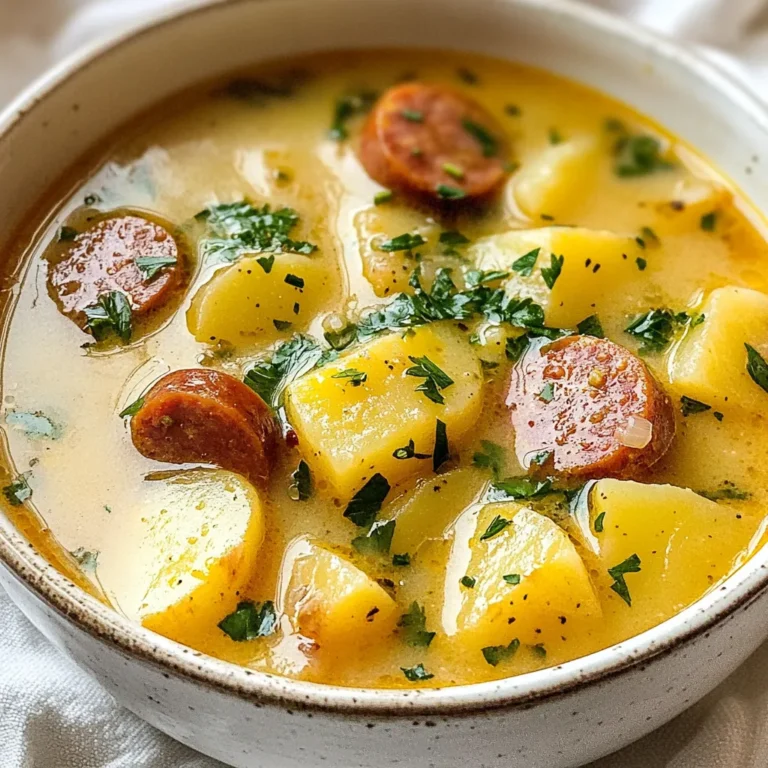
Kielbasa Potato Soup Hearty and Comforting Bowl

- 4 boneless, skinless chicken breasts - 1/2 cup feta cheese, crumbled - 1/4 cup hot honey (store-bought or homemade) - 2 tablespoons olive oil - 1 teaspoon garlic powder - 1 teaspoon onion powder - 1 teaspoon smoked paprika - Salt and pepper to taste - Fresh parsley, chopped (for garnish) These main ingredients create a juicy and tasty dish. The chicken brings a nice, tender bite. Feta cheese adds creaminess and a bit of salt. Hot honey gives a sweet and spicy kick! - Lemon juice (for brightness) - Fresh herbs like thyme or oregano - Red pepper flakes (for extra heat) Adding lemon juice can brighten the dish. Fresh herbs add depth and aroma. Red pepper flakes can bring more heat if you like it spicy! - Large mixing bowl - Baking dish - Whisk or spoon for mixing - Meat thermometer (to check chicken doneness) Having the right tools makes cooking easier. A meat thermometer helps ensure your chicken is safe to eat. A baking dish is key for roasting your flavorful chicken! {{ingredient_image_1}} Start by preheating your oven to 400°F (200°C). In a large bowl, mix together 2 tablespoons of olive oil, 1 teaspoon of garlic powder, 1 teaspoon of onion powder, and 1 teaspoon of smoked paprika. Add salt and pepper to taste. This blend will give your chicken great flavor. Next, add 4 boneless, skinless chicken breasts to the marinade. Make sure each piece is well coated. Let the chicken sit in the marinade for about 15 minutes. This time helps the flavors soak in. While the chicken marinates, prepare your baking dish. Lightly grease it with olive oil or non-stick spray. Place the marinated chicken in the dish. Drizzle 1/4 cup of hot honey over the chicken and sprinkle 1/2 cup of crumbled feta cheese on top. Bake for 25-30 minutes. Check that the chicken reaches an internal temperature of 165°F (75°C). After baking, let the chicken cool for a few minutes. Drizzle with extra hot honey and garnish with fresh parsley before serving. Enjoy your meal! To cook chicken perfectly, pay attention to the thickness of the breasts. If they are uneven, pound them down. This helps them cook evenly. Always check the internal temperature with a meat thermometer. The chicken should reach 165°F (75°C). This ensures it is safe to eat and juicy. Marinating the chicken makes it tasty and tender. Use a bowl that fits all the chicken. Coat each piece well with the marinade. Let it sit for at least 15 minutes. For deeper flavor, marinate for up to 2 hours. Avoid marinating too long, as the acid can change the chicken's texture. Serve your Hot Honey Feta Chicken on a large platter. Add some roasted veggies or a fresh salad on the side. Drizzle extra hot honey on top for that sweet touch. Sprinkle fresh parsley over everything. This makes the dish look bright and appealing! Pro Tips Marinate Longer for Depth: If time allows, marinating the chicken for up to 2 hours enhances the flavor even more, making it juicier and more aromatic. Use Fresh Feta: For the best taste and texture, opt for fresh feta cheese rather than pre-crumbled versions, which often contain preservatives. Oven Thermometer Check: Use an oven thermometer to ensure accurate temperature, as some ovens can be off, affecting cooking times. Customize the Heat: Adjust the amount of hot honey based on your spice preference; feel free to use less or add a pinch of chili flakes for extra heat. {{image_2}} To make this dish low-carb or keto-friendly, skip the hot honey. Instead, use a sugar-free honey substitute. You can also add more spices to keep the flavor strong. Try using more smoked paprika or add chili powder for heat. This keeps your meal tasty while staying within your diet. Adding vegetables makes this meal balanced and colorful. You can roast some bell peppers, zucchini, or broccoli. Toss them in olive oil, salt, and pepper. Place them around the chicken in the baking dish. They will soak up the flavors and cook perfectly together. You may also serve a fresh salad on the side for added crunch. While feta is the star, you can try other cheeses. Goat cheese adds a tangy taste, while mozzarella gives a creamy texture. If you like stronger flavors, use blue cheese. Crumble it on top before baking. Each cheese brings a unique twist to the classic dish. To keep your Hot Honey Feta Chicken fresh, store leftovers in an airtight container. Let the chicken cool to room temperature first. Then, seal it tightly and place it in the fridge. It will stay good for up to 3 days. If you want to keep it longer, consider freezing it. When you’re ready to enjoy your leftovers, preheat your oven to 350°F (175°C). Place the chicken in an oven-safe dish. Cover it with foil to keep it moist. Heat for about 20-25 minutes. You can also use a microwave for quick reheating. In that case, cover with a damp paper towel and heat for 2-3 minutes. If you decide to freeze your chicken, slice it into portions first. Wrap each piece tightly in plastic wrap, then place them in a freezer bag. Don't forget to squeeze out as much air as you can. This method helps avoid freezer burn. Your Hot Honey Feta Chicken can last up to 3 months in the freezer. When you're ready to eat, thaw it in the fridge overnight before reheating. Hot honey is a mix of honey and spicy peppers. It gives sweet and heat in one bite. You can buy hot honey in stores or make it at home. To make your own, warm honey on low heat. Add sliced chili peppers or red pepper flakes. Let it sit for about 30 minutes. This will infuse the honey with heat. Strain the mixture to remove the solids. Now, you have hot honey ready for your dishes! Yes, you can use chicken thighs. They are juicier and have more flavor. Thighs cook well with this recipe. Just adjust the cooking time slightly. Make sure the internal temperature reaches 165°F (75°C). The result will still be delicious! To add more spice, increase the amount of hot honey. You can also add fresh chopped chili peppers. Mix in some cayenne pepper or crushed red pepper flakes into the marinade. These options will boost the heat level. Just be careful not to overpower the dish! Hot Honey Feta Chicken pairs well with many sides. Here are some great options: - Roasted vegetables like carrots, bell peppers, or zucchini - A fresh garden salad with mixed greens - Creamy mashed potatoes or rice to balance the heat - Quinoa or couscous for a healthy touch These sides will complement the flavors and complete your meal! This article covered the best ways to make Hot Honey Feta Chicken. You learned about key ingredients, cooking steps, and useful tips. I shared ways to personalize the dish and how to store leftovers. Finally, I answered common questions to enhance your cooking experience. By following these steps, you can create a tasty meal that impresses everyone. Enjoy making this dish again and again!

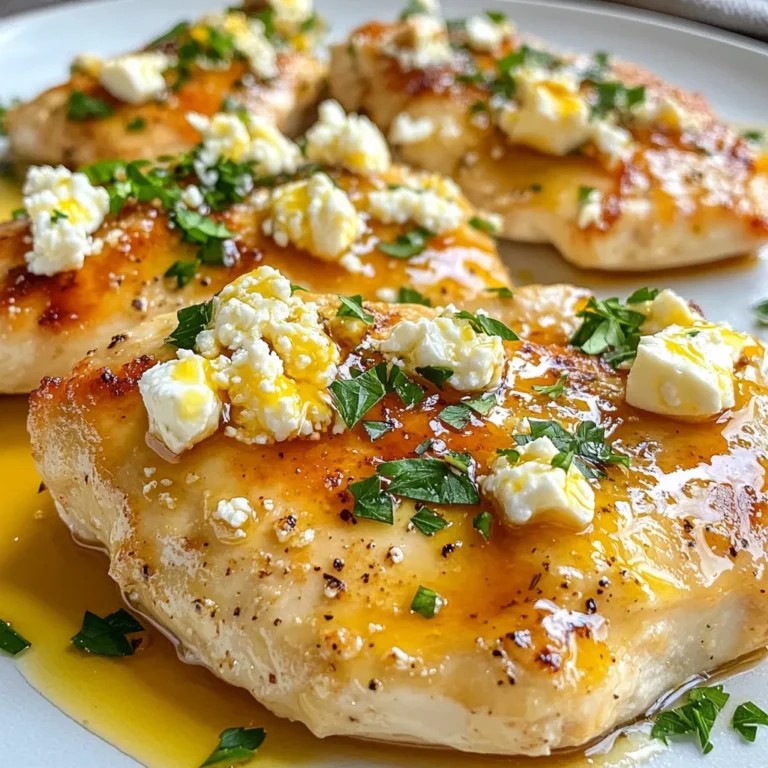
Hot Honey Feta Chicken Flavorful Dinner Delight

PREV 1 … 83 84 85 86 NEXT
tasty trail blazer

explore

DessertsDinnerAppetizersDrinks

Our Policies

  • Cookie Policy
  • Copyright Policy
  • Disclaimer
  • GDPR Policy
  • Terms Of Use
Back to Top
  • About
  • Contact Us
  • Privacy Policy
© 2026 tasty trail blazer