FREE DINNER EBOOK! Get your copy!
  • Cookie Policy
  • GDPR Policy
  • Disclaimer
  • Terms Of Use
  • Visit my other site: Fun Cookie Recipes
tasty trail blazer
  • Home
  • Dinner
  • Desserts
  • Drinks
  • Appetizers
  • Contact
  • About
  • Privacy Policy
  • Home
  • Dinner
  • Desserts
  • Drinks
  • Appetizers
  • Contact
  • About
  • Privacy Policy
  • Cookie Policy
  • GDPR Policy
  • Disclaimer
  • Terms Of Use
Visit my other site: Fun Cookie Recipes

HOME / CATEGORIES /

Latest

- 2 boneless, skinless chicken breasts - 2 tablespoons honey - 2 tablespoons chipotle sauce (or 1 chipotle pepper in adobo, minced) - 1 tablespoon olive oil - 1 teaspoon garlic powder - 1 teaspoon smoked paprika - Salt and pepper to taste - 1 cup brown rice (or quinoa for a lighter option) - 1 can black beans, rinsed and drained - 1 cup corn (fresh or frozen) - 1 avocado, sliced - 1 small red onion, thinly sliced - Fresh cilantro, chopped (for garnish) - Lime wedges (for serving) You can swap out chicken for other meats like turkey or pork. If you want a meat-free meal, use tofu or tempeh. For grains, quinoa gives a nice twist. You can skip black beans and add chickpeas instead. If you need a spicy kick, add more chipotle sauce or fresh jalapeños. This recipe makes about 2-3 servings. Each serving has roughly: - Calories: 540 - Protein: 35g - Carbohydrates: 65g - Fiber: 15g - Fat: 18g This meal is a good balance of protein, carbs, and healthy fats, making it great for any time of day. {{ingredient_image_1}} Start by marinating the chicken. In a bowl, mix 2 tablespoons of honey, 2 tablespoons of chipotle sauce, 1 teaspoon of garlic powder, 1 teaspoon of smoked paprika, 1 tablespoon of olive oil, and salt and pepper. This mix gives the chicken great flavor. Add the chicken breasts to the bowl and turn them to coat well. Let them marinate for 30 minutes. For more flavor, you can marinate for up to 2 hours in the fridge. While the chicken marinates, cook your rice or quinoa. Use 1 cup of brown rice or quinoa, depending on your choice. Follow the package instructions for cooking. Brown rice usually takes longer than quinoa. Make sure it’s fluffy and ready for your bowl. Next, cook the marinated chicken. Heat a skillet over medium heat. Add the chicken breasts to the skillet and cook for 6-7 minutes on each side. The chicken should be golden brown and reach an internal temperature of 165°F. Once cooked, remove the chicken and let it rest for a few minutes. After resting, slice the chicken into strips. Now it’s time to assemble your bowls. Start with a base of the cooked brown rice or quinoa. Top it with the sliced chicken, then add rinsed black beans, corn, sliced avocado, and thinly sliced red onion. If you want more flavor, drizzle the remaining marinade over the bowl. Don’t forget to garnish with fresh cilantro and serve with lime wedges for a zesty touch. For the best taste, marinate your chicken well. I suggest using a bowl. Mix honey, chipotle sauce, garlic powder, smoked paprika, olive oil, salt, and pepper. Ensure the chicken is fully covered in the marinade. Let it sit for at least 30 minutes. For deeper flavor, marinate it for two hours in the fridge. This step makes each bite burst with flavor. Cooking chicken right is key. Use medium heat in a skillet. Place the marinated chicken breasts in the skillet. Cook for 6-7 minutes on each side. Look for a golden brown color. The chicken should reach an internal temperature of 165°F. Let it rest for a few minutes before slicing. This keeps it juicy and tender. Start with a base of brown rice or quinoa in your bowl. Top it with sliced chicken, black beans, corn, and avocado. Add red onion for crunch and color. Drizzle extra marinade or honey chipotle sauce over the top. Garnish with fresh cilantro for a pop of green. Serve with lime wedges on the side. This adds a nice zing and makes the dish shine. Pro Tips Marinate Longer for Flavor: For a richer taste, marinate the chicken for up to 2 hours in the refrigerator. This allows the flavors to penetrate the meat more deeply. Adjust Spice Level: If you prefer a milder dish, reduce the amount of chipotle sauce or use less of the minced chipotle pepper. You can also add some sour cream to balance the heat. Use a Meat Thermometer: To ensure the chicken is perfectly cooked, use a meat thermometer. The internal temperature should reach 165°F (75°C) for safety and juiciness. Fresh Ingredients Matter: Opt for fresh corn and ripe avocados for the best texture and flavor in your bowls. Fresh ingredients enhance the overall quality of the dish. {{image_2}} You can easily switch up the protein. For a vegetarian option, try using grilled tofu. Marinate the tofu just like the chicken. It will soak up all the flavor. If you want a vegan version, use tempeh. Its nutty taste pairs well with the chipotle sauce. While brown rice is great, you can try quinoa for a lighter feel. Quinoa cooks faster and adds a nice texture. You can also use cauliflower rice for a low-carb option. This is a fun way to add veggies without losing flavor. To add more flavor, try adding a dollop of sour cream or plain yogurt. A sprinkle of feta cheese adds a nice salty kick. Fresh jalapeños give a spicy crunch. Don't forget to add lime juice; it brightens up every bite. A dash of hot sauce can also kick up the heat. To store your leftover Honey Chipotle Chicken Bowls, first let everything cool down. Once cool, place the chicken, rice or quinoa, and toppings in separate airtight containers. This helps keep each item fresh. You can store them in the fridge for up to three days. Make sure to cover the bowls tightly. This keeps the flavors from mixing too soon. When you're ready to enjoy your leftovers, reheating is easy. For the chicken and rice, use a microwave-safe dish. Add a splash of water to keep moisture. Heat in the microwave for about 1-2 minutes. Stir halfway through to heat evenly. If you prefer the oven, heat at 350°F (175°C) until warm, about 10-15 minutes. Use a food thermometer to check that the chicken reaches 165°F (75°C) again. If you want to save your bowls for later, freezing is a great option. Pack the chicken, rice, and toppings in freezer-safe bags or containers. Squeeze out as much air as you can. This helps prevent freezer burn. You can freeze them for up to three months. When you’re ready to eat, thaw overnight in the fridge. Reheat as mentioned above. Enjoy that sweet and spicy flavor again! You can use maple syrup or agave nectar instead of honey. Both options give a sweet flavor. If you want a sugar option, brown sugar works well too. Each will change the taste slightly but still taste good with chipotle. Yes, you can use pork, beef, or turkey. For a vegetarian option, try tofu or tempeh. Just make sure to adjust cooking times. Always check for doneness to keep your meal safe. To make it milder, use less chipotle sauce or omit it. If you love heat, add more chipotle sauce or fresh jalapeños. You can also mix in some cayenne pepper for extra kick. Always taste as you go to find your perfect level. This blog post covered how to make a delicious meal from start to finish. We talked about key ingredients, fun variations, and ways to store leftovers. Use the marination tips for great flavor. Perfect your cooking to get juicy chicken every time. Try out different grains for variety. With the right toppings, you can impress anyone. Keep this guide handy for quick and tasty meals anytime. Enjoy your cooking journey!

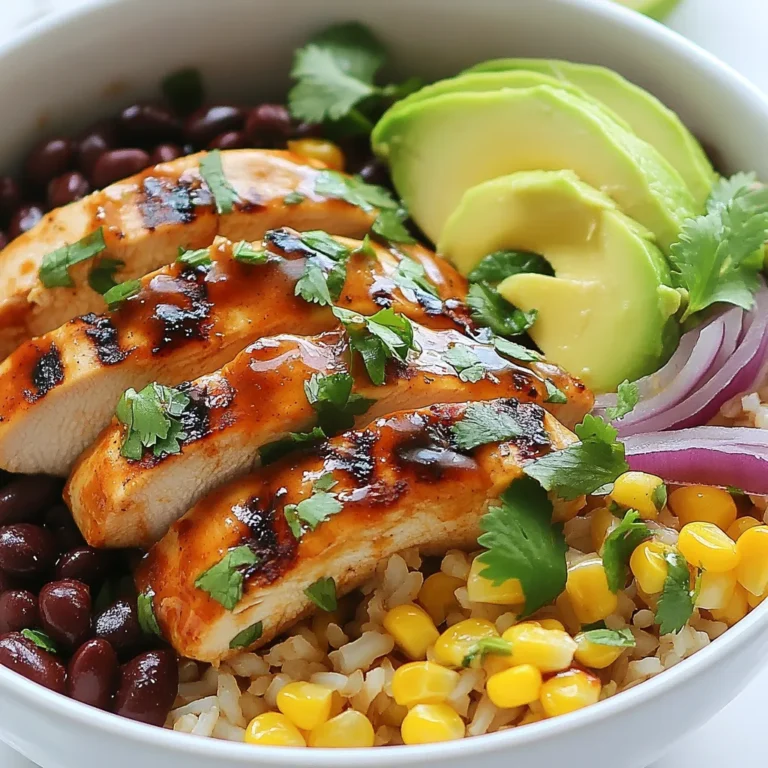
Honey Chipotle Chicken Bowls Delightful and Easy Meal

- 4 salmon fillets (6 oz each) - 2 cups broccoli florets - 1 red bell pepper, sliced into strips - 1 cup snap peas - 1 carrot, julienned - 1/4 cup soy sauce (low sodium preferred) - 2 tablespoons honey or maple syrup - 1 tablespoon freshly grated ginger - 2 cloves garlic, minced - 1 tablespoon sesame oil - 1 teaspoon cornstarch mixed with 2 tablespoons water (for thickening) - 2 tablespoons sesame seeds - Green onions, sliced (for garnish) - Salt and pepper, to taste - Cooked rice, for serving - Additional garnishes like sesame seeds or sliced green onions You will love how simple this recipe is! The main ingredients create a colorful, healthy meal. The salmon fillets are rich in omega-3s. Fresh vegetables add crunch and flavor. The teriyaki sauce ties everything together with a sweet and savory taste. For a complete meal, serve it over warm cooked rice. Rice soaks up the sauce and enhances the dish. You can also add green onions or sesame seeds for an extra touch. Enjoy your tasty and healthy sheet pan meal! {{ingredient_image_1}} - Preheat the Oven: Start by preheating your oven to 400°F (200°C). This step helps everything cook evenly. Line a large sheet pan with parchment paper. This will prevent sticking and make cleanup easy. - Prepare the Teriyaki Sauce: In a small bowl, whisk together 1/4 cup of soy sauce, 2 tablespoons of honey or maple syrup, 1 tablespoon of freshly grated ginger, and 2 cloves of minced garlic. Add 1 tablespoon of sesame oil for flavor. To thicken, mix 1 teaspoon of cornstarch with 2 tablespoons of water, then add it to the sauce. Whisk until blended. - Marinate the Salmon: Place 4 salmon fillets on one side of your sheet pan. Pour half of the teriyaki sauce over the salmon. Let it marinate for about 10 minutes. This adds flavor. - Arrange the Vegetables: On the other side of the sheet pan, place 2 cups of broccoli florets, 1 sliced red bell pepper, 1 cup of snap peas, and 1 julienned carrot. Drizzle the remaining teriyaki sauce over the veggies and toss them to coat. Season with salt and pepper for extra taste. - Baking Process: Place the sheet pan in your preheated oven. Bake for 15-20 minutes. The salmon should be cooked through, and the vegetables should be tender-crisp. - Garnishing and Serving: Once done, remove the pan from the oven carefully. Sprinkle 2 tablespoons of sesame seeds and sliced green onions over the salmon and veggies. Serve warm over a bed of cooked rice for a complete meal. Enjoy! Perfectly Cooked Salmon To cook salmon well, start with fresh fillets. I recommend using salmon that is bright and firm. Marinating the salmon helps infuse flavor. The teriyaki sauce adds sweetness and depth. Bake the salmon for 15-20 minutes. It should flake easily with a fork when done. If you want a crispier skin, broil it for the last few minutes. Keep an eye on it to avoid burning. Achieving Tender-Crisp Vegetables For the best veggies, cut them into uniform sizes. This ensures they cook evenly. Broccoli, bell pepper, snap peas, and carrots work well together. Toss them in the remaining teriyaki sauce before baking. This gives them a nice flavor. Bake them for about 15-20 minutes as well. They should be bright and slightly tender but still have a bit of crunch. Additional Spices or Ingredients You can boost flavor by adding spices like black pepper or red pepper flakes. These add heat and depth. If you want to change it up, try adding garlic powder or onion powder. Fresh herbs, like cilantro or basil, also add a nice touch. They give a fresh burst of flavor. Alternative Sauces While teriyaki is fantastic, you can switch it up. Try using hoisin sauce for a sweeter taste. A mix of soy sauce and orange juice can give a citrusy twist. If you enjoy a little kick, sriracha mixed with soy sauce works well. Each option brings out new flavors in your dish. Pro Tips Marinate for Flavor: For an even more intense flavor, marinate the salmon for at least 30 minutes before baking. This allows the teriyaki sauce to penetrate the fish more deeply. Veggie Variations: Feel free to substitute any of the vegetables with your favorites! Asparagus, zucchini, or bell peppers in different colors can add variety to this dish. Check Salmon Doneness: Salmon is done when it flakes easily with a fork and the internal temperature reaches 145°F (63°C). Use a meat thermometer for accuracy. Serve with Sides: This dish pairs wonderfully with a side of steamed rice or quinoa, and you can also add a light salad for extra freshness. {{image_2}} You can replace the salmon with other proteins. Chicken breasts work well. They cook nicely and soak up the teriyaki flavor. Firm tofu is a great choice for a plant-based meal. It offers protein and absorbs the marinade well. Feel free to change up the veggies. Asparagus or zucchini adds a nice crunch. Cauliflower also roasts well and adds a different texture. You can use bell peppers in any color for a fun twist. Just remember to slice them into similar sizes for even cooking. If you like heat, add some red pepper flakes. You can mix in sriracha to the teriyaki sauce. This gives your dish a sweet and spicy kick. Another option is to add pineapple chunks. They bring a sweet contrast to the savory salmon. To switch it up, try adding some sesame oil to the marinade. This enhances the nutty flavor. You can also sprinkle some hoisin sauce over the veggies before baking. This adds depth and a touch of sweetness. For a fresh twist, finish with fresh cilantro or Thai basil after baking. - Storing Leftovers: After enjoying your meal, let the salmon and veggies cool down. Place them in an airtight container. This helps keep them fresh and tasty. - Duration for Freshness: Store your leftovers in the fridge. They stay good for about 3 days. After that, they may lose flavor and texture. If you want to keep them longer, consider freezing. - Best Methods for Reheating: The oven works best for reheating. Preheat it to 350°F (175°C). Place the salmon and veggies on a baking sheet. Heat them for about 10-15 minutes. This will help maintain the nice texture. - Keeping Ingredients Flavorful and Fresh: To keep the flavor, add a splash of water to the pan. This adds moisture and keeps everything juicy. You can also cover with foil to lock in heat and flavor. How to know when the salmon is fully cooked? You can check if salmon is done by looking for its color. Cooked salmon turns from bright pink to a pale pink. It should flake easily with a fork. The internal temperature should reach 145°F (63°C). If you have a meat thermometer, use it for best results. Can I make the teriyaki sauce ahead of time? Yes, you can make the teriyaki sauce ahead of time. Store it in the fridge for up to a week. Just give it a good stir before using. This will save you time on busy nights. Gluten-Free Options To make this dish gluten-free, use tamari instead of soy sauce. Tamari is a great gluten-free alternative. Check labels to ensure no gluten is present in other ingredients. Low-Carb Variations If you want a low-carb meal, skip the rice. Instead, serve the salmon and veggies over a bed of leafy greens. You can also add nuts or seeds for extra crunch and flavor. Essential Tools for Preparation You will need a large sheet pan and parchment paper for easy cleanup. A whisk is great for mixing the sauce. A sharp knife helps with cutting the vegetables. Recommended Sheet Pan Types Choose a sturdy, rimmed sheet pan for even cooking. Non-stick pans are good for easy removal of food. If you prefer, use aluminum pans that can withstand high heat. You now know how to make a tasty salmon dish using fresh ingredients. We explored main components like salmon, veggies, and teriyaki sauce. You learned key cooking steps, tips for the best results, and delicious variations to try. Don't hesitate to experiment with flavors or swap ingredients based on your needs. Store your leftovers properly to keep them fresh. Cooking can be fun and rewarding, so enjoy every bite!

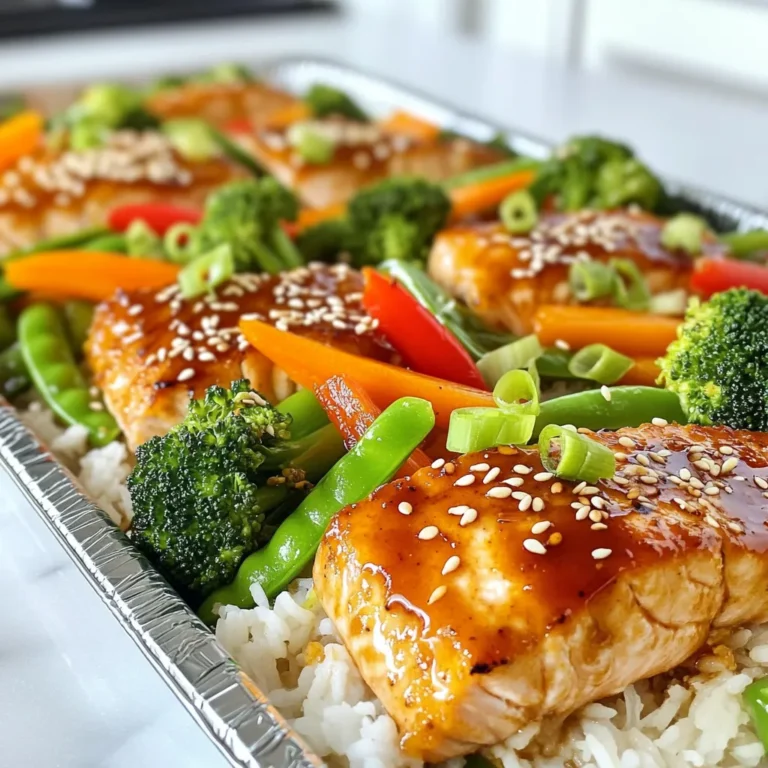
Sheet Pan Teriyaki Salmon and Veggies Healthy Meal

To make a great Buffalo Chicken Dip, you need a few key items: - 2 cups shredded cooked chicken - 1 (8 oz) package cream cheese, softened - 1 cup buffalo sauce (pick based on how spicy you like it) - 1/2 cup ranch dressing (or blue cheese dressing if you prefer) - 1 cup shredded cheddar cheese - 1/2 cup crumbled blue cheese (optional) - 2 green onions, chopped (for garnish) - Tortilla chips or celery sticks for serving These ingredients blend to create a rich flavor. The cream cheese adds a creamy base. The buffalo sauce gives it that spicy kick. The chicken provides protein, making it filling. I often use specific brands for the best flavor. For cream cheese, I like Philadelphia. It has a smooth texture that mixes well. For buffalo sauce, Frank's RedHot is a favorite. It strikes the right balance between heat and flavor. For ranch dressing, Hidden Valley is a solid choice, but any brand you enjoy works. For cheese, I recommend Tillamook for cheddar. It melts beautifully and tastes rich. You can change this dip to fit your taste. Add more spices like garlic powder or onion powder for extra flavor. If you love heat, add diced jalapeños or use a hotter buffalo sauce. You can also mix in other cheeses like pepper jack for a twist. If you want to make it healthier, swap in Greek yogurt for cream cheese. This keeps it creamy but adds a protein boost. {{ingredient_image_1}} To start, gather your ingredients. You need: - 2 cups shredded cooked chicken - 1 (8 oz) package cream cheese, softened - 1 cup buffalo sauce - 1/2 cup ranch dressing - 1 cup shredded cheddar cheese - 1/2 cup crumbled blue cheese (optional) - 2 green onions, chopped - Tortilla chips or celery sticks First, preheat your oven to 350°F (175°C). In a large mixing bowl, mix the softened cream cheese and buffalo sauce until smooth. This step is key. It blends the flavors well. Next, add the shredded chicken and ranch dressing. Stir it all together until the chicken is fully coated. Then, fold in the shredded cheddar cheese. If you like blue cheese, add that too! Once you have your mix ready, transfer it into a baking dish. Spread it evenly. This ensures every bite gets that rich flavor. Now, place it in the preheated oven. Bake for 20 to 25 minutes. You want it hot and bubbling. After baking, be careful when you take it out. Let it cool for a minute. This helps avoid burns when you serve it. For serving, you can use tortilla chips or celery sticks. Both add a nice crunch. To make it look great, garnish with chopped green onions on top. This adds color and flavor. You can serve it right in the baking dish for a casual vibe. Or, scoop it into a nice serving bowl for a fancier look. Enjoy this creamy dip at your next gathering! You can make Buffalo Chicken Dip a day before your party. Follow the recipe but stop before baking. Place the dip in a baking dish and cover it. Store it in the fridge until you're ready to bake. When it's time to serve, just pop it in the oven. This saves time and lets the flavors blend. Not everyone loves spice the same way. To make it milder, use less buffalo sauce. You can also pick a milder sauce. If you want more heat, add more buffalo sauce. A splash of hot sauce can also help. Taste as you mix to find the right balance for your guests. Mix your dip well to ensure every bite has flavor. Use a sturdy spatula to blend the cream cheese and buffalo sauce smoothly. This makes the dip creamy. When baking, keep an eye on the dip. It should be hot and bubbly, usually around 20-25 minutes. Let it cool for a few minutes before serving. This keeps it from burning your mouth! Pro Tips Adjust the Spice Level: Modify the amount of buffalo sauce to suit your heat preference. Start with less and add more as needed. Make it Ahead: Prepare the dip in advance and store it in the refrigerator. Just bake it when you're ready to serve! Experiment with Cheeses: Feel free to mix different cheeses like Monterey Jack or pepper jack for added flavor and texture. Perfect Pairings: Serve with a variety of dippers like pita chips, carrots, or cucumber slices for a refreshing crunch alongside the dip. {{image_2}} You can make a tasty vegetarian version. Replace the chicken with shredded jackfruit or tempeh. These ingredients soak up flavors well. Use the same cream cheese and buffalo sauce. This swap keeps the dip rich and creamy. Add more veggies like spinach or bell peppers for crunch. Your guests won’t miss the meat! Cheese is key in Buffalo Chicken Dip. Try mixing different cheeses for a twist. Use pepper jack for a spicy kick. Goat cheese adds a tangy flair. You can also mix mozzarella to make it stretchier. Blend cheeses to find your favorite combo. Each mix brings a new taste to the table. You can enjoy this dip even if you avoid dairy. Use a dairy-free cream cheese. Many brands offer good taste and texture. Swap regular ranch dressing with a dairy-free version. Nutritional yeast can add a cheesy flavor. To keep it creamy, use coconut milk or cashew cream. Your guests will love this version just as much! To store leftover Buffalo chicken dip, let it cool first. Then, scoop it into an airtight container. Make sure it is sealed tightly to keep it fresh. Place the container in the fridge. It will last for about three to four days. Always check for any off smells before serving. You can freeze Buffalo chicken dip for later use. First, let it cool completely. Then, transfer it to a freezer-safe container. Leave some space at the top because the dip will expand. It can be frozen for up to three months. When ready to eat, thaw it in the fridge overnight. To reheat Buffalo chicken dip, preheat your oven to 350°F (175°C). Place the dip in an oven-safe dish. Heat it for about 20 minutes or until hot. Stir it halfway through to warm it evenly. You can also use a microwave. Heat in short bursts, stirring in between, until it's warm throughout. Yes, you can make Buffalo chicken dip in a slow cooker. Just combine all the ingredients in the slow cooker. Set it on low for about 2 hours. Stir it occasionally, and enjoy the warm, creamy dip. Buffalo chicken dip can last about 3 to 4 days in the fridge. Store it in an airtight container. Make sure it cools down before you put it in the fridge. You can serve Buffalo chicken dip with many tasty options. Some favorites are: - Tortilla chips - Celery sticks - Carrot sticks - Crackers - Pita bread These dippers add crunch and flavor to your meal. Yes, you can use canned chicken. It saves time and works well. Just drain the chicken and shred it before mixing. This makes the dip quick and easy to prepare. Buffalo chicken dip is fun and easy to make. You learned about key ingredients, step-by-step instructions, and tips for perfecting this dish. I shared ways to customize it and how to store leftovers. You can also adapt the recipe for different diets. Enjoy this dip at parties or snacks. With these tips, you’ll impress everyone. Now, get cooking and have a great time enjoying your delicious dip!

Buffalo Chicken Dip Rich and Creamy Party Pleaser

To make sweet and sticky steak bites, gather these key ingredients: - 1 lb sirloin steak, cut into bite-sized cubes - 1/4 cup honey - 1/4 cup soy sauce (or tamari for gluten-free) - 2 tablespoons sesame oil - 3 cloves garlic, minced - 1 teaspoon freshly grated ginger - 1 tablespoon cornstarch - 2 tablespoons water - 1/4 teaspoon black pepper - 1 green onion, finely sliced for garnish - Sesame seeds for garnish These ingredients work together to create a sweet and savory flavor. The sirloin steak offers a tender bite, while honey gives it sweetness. You might want to add some optional ingredients to boost flavor: - Red pepper flakes for heat - Lime juice for extra tang - Fresh herbs like cilantro for freshness These options add layers to your dish. Feel free to mix and match based on your taste. If you have dietary needs, here are some substitutions: - Use tamari instead of soy sauce for gluten-free options. - Replace honey with maple syrup for a vegan version. - Swap sirloin for chicken or tofu for different proteins. These swaps help make the recipe more versatile. You can enjoy sweet and sticky steak bites no matter your diet. {{ingredient_image_1}} To start, grab a medium bowl. In this bowl, whisk together the honey, soy sauce, sesame oil, minced garlic, grated ginger, and black pepper. Mix these well until they blend nicely. This marinade adds flavor and makes the steak so tasty! Now, it's time for the steak. Cut your sirloin steak into bite-sized cubes. Once you have your cubes, add them to the marinade. Toss the steak well to coat each piece. Cover the bowl and place it in the fridge. Let it marinate for at least 30 minutes. If you have time, let it sit for up to 2 hours. This step is key for bold flavor! When you're ready to cook, heat a large skillet or wok over medium-high heat. Take the steak out of the marinade but keep the marinade for later. Add the steak cubes to the skillet. Cook them for about 3-4 minutes. Stir often to get them browned on all sides. You can cook them to your liking. After cooking, pour the reserved marinade into the skillet. Bring it to a simmer. In a small bowl, mix cornstarch with water to make a slurry. Stir this slurry into the simmering marinade. Let it thicken for about 1-2 minutes, stirring all the while. This will give you a sticky sauce that clings to the steak. Once thickened, remove the skillet from heat. Let the steak bites cool slightly. Now, you can garnish with green onions and sesame seeds before serving. Enjoy your sweet and sticky steak bites! To make sweet and sticky steak bites shine, balance is key. You want a mix of sweet and salty. Honey brings sweetness while soy sauce adds saltiness. Use fresh garlic and ginger for a punch of flavor. Marinating the steak is vital. Let it sit for at least 30 minutes, but longer is even better. This helps the meat soak up all the tasty goodness. For best results, use a hot skillet or wok. This ensures your steak bites sear nicely. Searing gives them a lovely crust while keeping the inside juicy. Don't overcrowd the pan; cook in batches if needed. This way, they brown well without steaming. Once cooked, add the reserved marinade to the pan. Let it simmer and thicken for a glossy finish. Start with a good cut of meat. I prefer sirloin for its flavor and tenderness. Cut the steak into even cubes for uniform cooking. Always marinate before cooking to help break down the meat fibers. Cook on high heat for a short time. This keeps the steak tender and juicy. If you follow these steps, your steak bites will be soft and flavorful. Pro Tips Choose the Right Cut: Sirloin is great for this recipe, but you can also use ribeye for extra tenderness and flavor. Don’t Skip the Marinade: Marinating for at least 30 minutes enhances the flavor significantly; if time allows, marinate for up to 2 hours. High Heat is Key: Cooking on medium-high heat ensures a nice sear and keeps the steak juicy; avoid overcrowding the skillet. Perfect Garnish: Sliced green onions and sesame seeds not only add flavor but also a beautiful presentation to your dish. {{image_2}} You can easily swap steak for chicken in this recipe. Use about 1 pound of boneless chicken breast or thighs. Cut the chicken into bite-sized pieces. Marinate just like you would the steak. Cook the chicken bites for about 5-7 minutes or until they are fully cooked. The honey and soy sauce mix will still give a sweet and sticky finish. If you want a meat-free option, tofu works great. Use firm or extra-firm tofu for best results. Cut the tofu into cubes and press it to remove excess water. Marinate it the same way you do with steak. Cook the tofu in a skillet until golden brown, about 4-5 minutes. The sauce will stick nicely, making it a tasty vegetarian treat. Sweet and sticky steak bites pair well with many sides. Serve them over steamed rice or noodles to soak up the sauce. You can also add a fresh salad or roasted veggies for a balanced meal. Try a simple cucumber salad for a crunch. These combinations make your dinner not just tasty, but colorful too. To keep your steak bites fresh, store them in an airtight container. Place a paper towel inside to soak up extra moisture. This helps keep your steak bites from getting soggy. Store them in the fridge for up to three days. For the best flavor when reheating, use a skillet. Heat the skillet over medium heat. Add the steak bites and a splash of water to keep them moist. Stir often for about 3-4 minutes, until they are warmed through. You can also use the microwave, but it may dry them out. Heat in short bursts and check often. If you want to save steak bites for later, freezing works well. Let them cool completely before freezing. Place them in a freezer-safe bag or container. Remove as much air as possible to avoid freezer burn. They can last up to three months in the freezer. To thaw, move them to the fridge overnight before reheating. You should marinate the steak for at least 30 minutes. For more flavor, let it sit for up to 2 hours. The longer it sits, the more the steak absorbs the sweet and savory flavors. Just remember to keep it in the refrigerator while it marinates. Yes, you can use a different cut of steak. While sirloin works well, cuts like ribeye or flank steak also fit nicely. Just make sure the pieces are bite-sized. This way, they cook evenly and soak up all that sweet sauce. These steak bites pair well with many sides. You can serve them with steamed rice or noodles. For a fresh touch, add a side salad or some roasted veggies. They also go great with a dipping sauce for extra flavor. Enjoy mixing and matching! You now have all the tools to make sweet and sticky steak bites with ease. We covered the key ingredients, helpful cooking methods, and tips for great flavor. You learned how to marinate, cook, and store your bites. Remember, a few small changes can make a big taste difference. Try other meats or even tofu for fun. Enjoy serving these bites at your next gathering. They will surely impress your friends and family. Happy cooking!

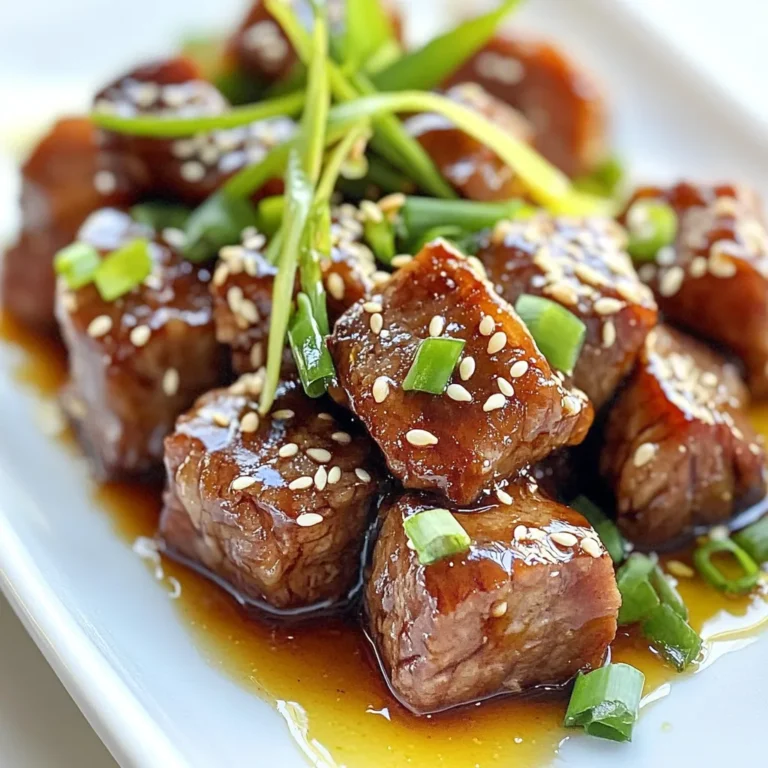
Sweet and Sticky Steak Bites Flavorful Dinner Delight

- 4 chicken thighs, bone-in, and skin-on - 1 cup fresh pineapple, diced - 1 red bell pepper, sliced - 1 yellow bell pepper, sliced - 1 red onion, cut into wedges - 1 tablespoon olive oil - 1 tablespoon soy sauce - 1 tablespoon honey - 3 cloves garlic, minced - 1 teaspoon fresh ginger, grated - 1 teaspoon sesame oil - Salt and pepper to taste - Green onions, chopped (for garnish) - Sesame seeds (for garnish) The main ingredients for this dish highlight the chicken and fresh produce. The chicken thighs bring a juicy texture and rich flavor. I love using bone-in and skin-on thighs because they stay moist during cooking. The fresh pineapple adds a sweet, tropical taste that pairs perfectly with the savory chicken. The colorful bell peppers and red onion not only make the dish look great but add crunch and flavor. Slicing them thin lets them cook evenly. The marinade ingredients bring depth to the chicken. Olive oil adds richness, while soy sauce gives it an umami kick. Honey balances the saltiness with a touch of sweetness. Minced garlic and grated ginger add warmth and zest. Sesame oil provides a nutty flavor that ties everything together. This dish is not just about taste but also presentation. The vibrant colors of the vegetables and the golden chicken make it a feast for the eyes. When you serve this, your guests will be amazed at how beautiful and flavorful it is! {{ingredient_image_1}} To start, gather a large mixing bowl. In this bowl, combine: - 1 tablespoon olive oil - 1 tablespoon soy sauce - 1 tablespoon honey - 3 cloves garlic, minced - 1 teaspoon fresh ginger, grated - 1 teaspoon sesame oil Mix these ingredients well to form a tasty marinade. Now, take your 4 chicken thighs and add them to the bowl. Make sure each piece is well-coated. Let the chicken soak in the marinade for about 15-20 minutes. This step really boosts the flavor. While your chicken marinates, it’s time to prep the sheet pan. First, grab your parchment paper. Line the sheet pan with it for easy cleanup later. Next, take your diced pineapple, sliced red and yellow bell peppers, and red onion wedges. Spread these colorful veggies evenly on the prepared sheet pan. Sprinkle with salt and pepper, then toss gently to combine. Now, preheat your oven to 400°F (200°C). Once it's ready, place the marinated chicken thighs on top of the vegetables and pineapple. Slide the sheet pan into the oven and bake for 25-30 minutes. You want the chicken to reach an internal temperature of 165°F (74°C) and show a nice golden brown color on the skin. If you want some extra crispiness, broil for an additional 2-3 minutes. Just keep a close eye on it to prevent burning. Once done, take it out and let it rest for a few minutes before serving. To ensure your chicken is safe to eat, always check for an internal temperature of 165°F (74°C). You can use a meat thermometer for accuracy. Insert it into the thickest part of the chicken. If it reads 165°F, your chicken is done. After baking, let the chicken rest for a few minutes. Resting allows the juices to redistribute. This step keeps your chicken moist and tasty. Using parchment paper is a game-changer for cleanup. It helps with easy removal of food from the pan. Just lift the edges, and your meal is ready to serve. To minimize dishes during prep, use one bowl for the marinade. Mix all the ingredients there. Then, place the marinated chicken in the same bowl. This way, you cut down on washing extra dishes. For extra flavor, consider adding spices like cayenne pepper or smoked paprika. These can add warmth and depth to your dish. A pinch of red pepper flakes can also give a nice kick. Marinating your chicken for longer than 20 minutes can make a big difference. If you have time, let it marinate for a few hours. This extra time helps the flavors soak in deeply, making your chicken even more delicious. Pro Tips Marinate Longer for More Flavor: For even more intense flavor, consider marinating the chicken thighs for 1-2 hours or overnight in the refrigerator. Use Fresh Ingredients: Fresh pineapple and vegetables not only enhance the flavor but also provide a better texture compared to canned or frozen options. Check Chicken Temperature: Always use a meat thermometer to ensure your chicken reaches 165°F (74°C) for safe consumption. Customize Vegetables: Feel free to add or substitute your favorite vegetables such as zucchini or snap peas to suit your taste! {{image_2}} You can switch up the chicken in this dish. Using chicken breasts or thighs works great. Chicken thighs stay juicy and flavorful. Chicken breasts cook faster but can dry out if overcooked. You can also use seafood. Shrimp cooks quickly and adds a sweet taste. Fish like salmon or tilapia pairs well with the marinade. Just adjust the cooking time as seafood cooks faster than chicken. Feel free to get creative with your vegetables. You can use seasonal options like zucchini, broccoli, or carrots. These add color and nutrition to your meal. Adding leafy greens like spinach or kale gives extra health benefits. Toss them on the sheet pan for the last few minutes of baking. They will wilt but still hold their flavor and nutrients. Mix it up with different fruits. Mango adds a tropical twist, while sweet potatoes bring a hearty touch. Both pair well with the marinade and add sweetness. You can also try different marinades. Use teriyaki or barbecue sauce for a new flavor. These options will change the taste while keeping the meal fun and exciting. To keep your Hawaiian Chicken Sheet Pan fresh, use airtight containers. First, let the dish cool down. Once cooled, place the chicken and veggies in a container. Seal it tightly to keep moisture inside. Store in the fridge for up to three days. This way, you can enjoy the flavors later without losing quality. When it’s time to reheat, moisture is key. For best results, use an oven. Preheat it to 350°F (175°C). Place the chicken on a baking sheet and cover it with foil. This keeps the chicken juicy. Heat for about 15-20 minutes. If you use a microwave, set it at medium power. Heat in short bursts, checking to avoid drying it out. Freezing is a great way to save portions for later. Cut the chicken and veggies into meal-sized pieces. Use freezer-safe bags or airtight containers. Remove as much air as possible. Label the bags with the date. To thaw, place it in the fridge overnight. For reheating, use the oven or microwave as mentioned before. Enjoy your meal with ease! Cooking Hawaiian Chicken on a sheet pan takes about 25 to 30 minutes. First, you need to prepare the chicken and veggies. This takes about 20 minutes. So, the total time is around 50 minutes. Preheat your oven to 400°F (200°C) before you start. This helps the chicken cook evenly. Make sure the chicken's internal temperature hits 165°F (74°C) to know it's ready to eat. Yes, you can use skinless chicken. Skin adds flavor and keeps the meat moist. Without skin, the chicken may dry out faster. If you choose skinless chicken, try marinating it longer. This helps add flavor and moisture. You can also brush a little extra olive oil on the chicken as it cooks. You can serve many sides with Hawaiian Chicken. Here are some ideas: - Steamed rice: It soaks up the tasty juices. - Quinoa: A healthy and filling option. - Coconut rice: For a tropical twist. - Grilled corn on the cob: A fun summer side. - Coleslaw: Adds crunch and freshness. For a beach-themed meal, think about adding tropical fruit salad or a refreshing cucumber salad. These sides bring a bright touch to your dinner and make it feel like a mini-vacation. Enjoy your meal! This blog post covered how to make Hawaiian Chicken on a sheet pan. You learned about key ingredients, the marinating process, and how to cook it perfectly. Tips on storage, reheating, and variations gave you options to try. Remember, cooking is fun and creative. Don’t hesitate to change up ingredients or flavors. Enjoy your cooking and share this delicious dish with others. Happy cooking!

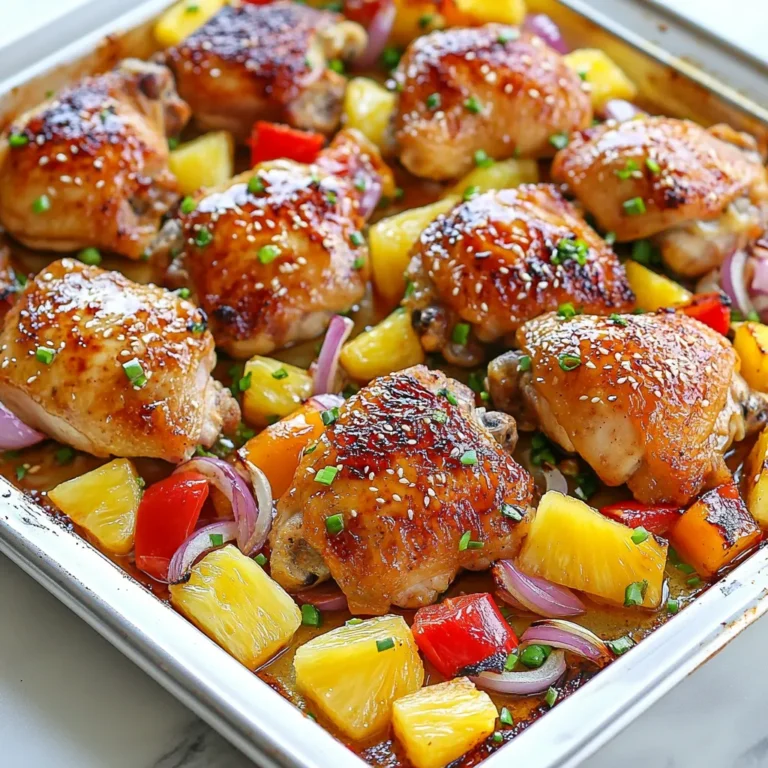
Hawaiian Chicken Sheet Pan Flavorful Dinner Delight

- 2 boneless, skinless chicken breasts - 1/4 cup honey - 2 tablespoons lime juice - 1 tablespoon soy sauce - 1 teaspoon minced garlic - 1 teaspoon ground cumin - 1 ripe avocado, diced - 1/4 cup red onion, finely chopped - 1/2 cup cherry tomatoes, halved - 1 cup jasmine rice - 2 cups chicken broth (or water) - Salt and pepper to taste - Fresh cilantro for garnish When making Honey Lime Chicken Avocado Rice, I focus on fresh and simple ingredients. Each item plays a key role in making this dish flavorful and satisfying. The chicken breasts are the star. They soak up the honey-lime marinade, which adds sweetness and zest. Honey gives a rich flavor, while lime juice brightens every bite. The soy sauce adds depth, and garlic provides a savory note. For the rice, jasmine rice is my go-to. It cooks fluffy and fragrant. Pairing it with chicken broth enhances the flavor. The salad includes ripe avocado, red onion, and cherry tomatoes. They add color, crunch, and freshness. Finally, fresh cilantro on top brightens the dish and adds a pop of green. Using these fresh ingredients makes this meal healthy and delicious. It’s simple, yet full of flavor. You can easily find these items at your local grocery store. {{ingredient_image_1}} First, gather your marinade ingredients. In a shallow dish, mix the honey, lime juice, soy sauce, minced garlic, ground cumin, salt, and pepper. This blend creates a sweet and tangy flavor. Next, add the chicken breasts to the dish. Make sure they are coated well with the marinade. Cover the dish with plastic wrap and place it in the fridge. For the best flavor, let the chicken marinate for at least 30 minutes. If you have more time, marinate for up to 2 hours. While the chicken marinates, rinse the jasmine rice in cold water. Rinsing removes excess starch and keeps the rice fluffy. After rinsing, bring chicken broth to a boil in a medium saucepan. Add the rinsed rice to the boiling broth. Cover the pot and reduce the heat to low. Let it simmer for about 15 minutes. When the rice is done, remove it from heat and let it sit covered for another 5 minutes. This step helps the rice absorb any remaining liquid. Now it’s time to cook the chicken. Heat a grill pan or skillet over medium-high heat. Remove the chicken from the marinade and discard any leftover marinade. Place the chicken in the hot pan. Cook it for about 6-7 minutes on each side. You want nice grill marks and the chicken to be cooked through. Once done, let the chicken rest for a few minutes before slicing it. Resting helps keep the chicken juicy. In a large bowl, combine the cooked rice, diced avocado, finely chopped red onion, and halved cherry tomatoes. Mix gently to avoid mashing the avocado. This salad adds fresh flavors and textures. For more zing, drizzle a splash of lime juice over the salad. This will brighten all the flavors. To serve, take a plate and layer the avocado rice mixture. On top, place the sliced honey lime chicken. Finally, garnish your dish with fresh cilantro. This adds a pop of color and freshness. Enjoy your meal! - Ensuring juicy chicken: Marinate your chicken for at least 30 minutes. If you have time, let it sit for up to 2 hours. This adds flavor and helps keep the chicken moist. - Perfect rice texture: Rinse the jasmine rice until the water runs clear. This helps remove excess starch and keeps the rice from being sticky. Cook it in chicken broth for added flavor, and let it sit covered for 5 minutes after cooking. - Suggested spices for sautéing: Try adding a pinch of smoked paprika or cayenne pepper to the chicken marinade. It adds a nice depth to the flavor. - Additional toppings for serving: You can add crumbled feta cheese or sliced jalapeños to the dish. These toppings give an extra kick and a burst of flavor. - Creative serving ideas: Use large bowls to serve the rice salad. Layer the chicken on top for a beautiful display. You can also make individual portions for a fun touch. - Using colorful dishes: Serve in vibrant plates or bowls to make the dish pop. The colors of the avocado, tomatoes, and cilantro look great against a bright background. Pro Tips Marinate for Maximum Flavor: Let the chicken marinate for at least 2 hours to allow the flavors to penetrate deeply, resulting in a juicier and more flavorful dish. Perfectly Cooked Rice: Always rinse jasmine rice to remove excess starch, which helps achieve a fluffy texture. Following the simmering time, let it rest covered to further enhance its texture. Rest Your Chicken: Allowing the grilled chicken to rest for a few minutes before slicing helps retain its juices, ensuring every bite is tender and moist. Customize Your Salad: Feel free to add other ingredients like corn, black beans, or bell peppers to the avocado rice mixture for added flavor and nutrition. {{image_2}} You can switch out the chicken for other proteins. Tofu works great for a plant-based meal. If you love seafood, try grilled fish. Both options will absorb the tasty marinade. When it comes to rice, jasmine rice is a classic choice. However, you can use brown rice for a heartier option. Quinoa is also a fun substitute. It adds a nice texture and boosts protein. Want to change the flavor? Add a bit of heat! Mix in some red pepper flakes or hot sauce for a spicy kick. For a sweeter twist, use more honey or add pineapple chunks. Feel free to play with herbs and spices. Cilantro adds freshness. You could also try fresh basil or mint for a unique touch. Experiment and find what you love! You can make this dish even better with extra veggies. Bell peppers, corn, or zucchini add color and flavor. Just chop them up and toss them in. For a crunchy bite, add nuts or seeds. Sliced almonds or pumpkin seeds bring a nice texture. They also boost nutrition. Get creative and make this meal your own! To keep your Honey Lime Chicken Avocado Rice fresh, store it in an airtight container. This method prevents air from drying out your food. You can place the chicken and rice salad in separate containers. This keeps the flavors intact. The maximum shelf life for this dish in the fridge is about three days. After that, the avocado may brown and lose its fresh taste. When you're ready to eat leftovers, avoid drying them out. You can reheat the chicken in a skillet over low heat. Add a splash of chicken broth to keep it moist. For the rice salad, warm it in the microwave. Cover it with a damp paper towel to trap steam. This helps maintain flavor and texture. If the salad feels dry, add a bit of lime juice before serving. Enjoy your tasty meal again! You can use maple syrup or agave nectar instead of honey. Both will add sweetness. Maple syrup offers a rich flavor, while agave is milder. You may also try brown sugar mixed with water. It gives a caramel-like taste. Adjust the amount based on your taste. Yes, you can meal prep this dish! Store the chicken and rice in separate containers. Keep the avocado salad in a different container to avoid browning. This dish stays fresh in the fridge for up to four days. You can reheat the chicken and rice when ready to eat. To make this recipe gluten-free, use tamari instead of soy sauce. It has a similar taste without gluten. For the rice, stick with jasmine or brown rice. Both are naturally gluten-free and great options. Ensure all ingredients are labeled gluten-free. This dish pairs well with a simple green salad. You can also serve it with grilled vegetables for added flavor. A side of corn on the cob adds sweetness too. Try serving with tortilla chips and salsa for a fun twist! This dish has about 400 calories per serving. The chicken and rice provide great protein and carbs. The avocado adds healthy fats. To manage calories, adjust your portion size. Enjoy this meal without worrying too much about calories! This recipe for Honey Lime Chicken with Avocado Rice is fun and easy to make. You learned how to marinate chicken, cook jasmine rice, and create a tasty salad. With helpful tips for cooking and serving, this dish is sure to impress. Feel free to mix in your favorite ingredients and explore different flavors. Enjoy your meal and impress your friends or family with this colorful and tasty dish!

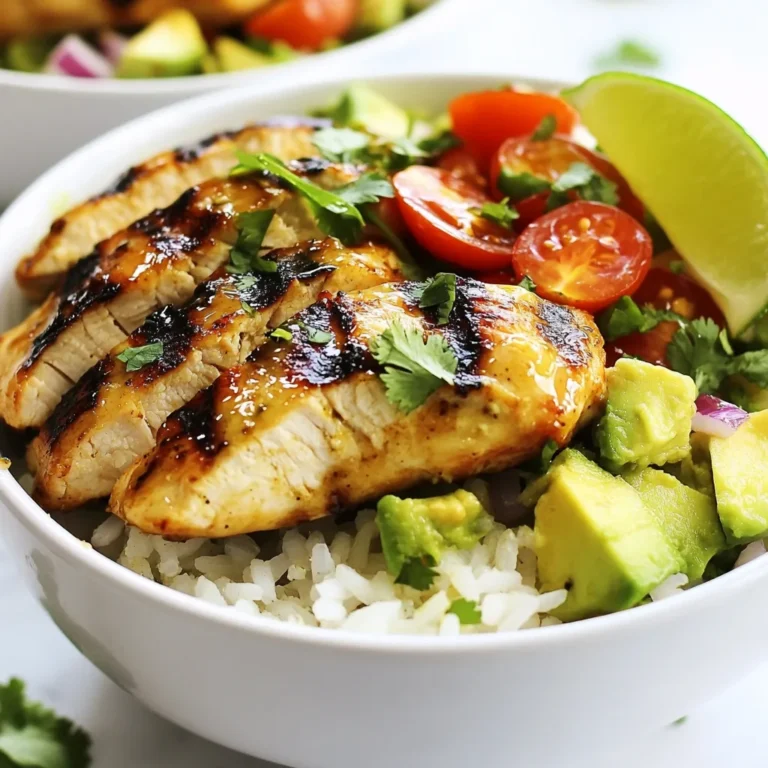
Honey Lime Chicken Avocado Rice Simple and Tasty Meal

- 1 lb ground beef or lamb - 2 cups mixed vegetables (peas, carrots, corn) - 4 large potatoes, peeled and diced - 1/2 cup milk - 4 tablespoons butter For this recipe, you will need some basic ingredients. First, choose your meat. Ground beef or lamb works best. I like a mix for flavor. Next, get mixed vegetables. Frozen peas, carrots, and corn make this dish colorful and tasty. Potatoes are key, so pick four large ones. For creaminess, add milk and butter. - 1 cup shredded cheddar cheese - 1 teaspoon dried thyme - 1 teaspoon dried rosemary For extra flavor, consider cheese. Shredded cheddar adds a nice touch. You can also use dried thyme and rosemary. These spices bring warmth to the dish. - Swap ground beef/lamb for a vegetarian option - Use alternative vegetables or cheese options If you're vegetarian, swap the meat for lentils or mushrooms. They give a hearty feel. You can also change the vegetables. Try green beans or bell peppers for variety. If you want a different cheese, mozzarella works well too. {{ingredient_image_1}} Start by peeling and dicing your potatoes into small chunks. Place them in a pot of salted water. Boil the potatoes for about 15 to 20 minutes. You want them tender but not mushy. To check, poke a potato with a fork. If it slides off easily, they are done. Drain the potatoes and set them aside. This helps prevent excess water in your mash. Take a large skillet and heat over medium heat. Add your ground beef or lamb to the pan. Break it apart with a spoon as it cooks. Cook until the meat is browned all over. This should take about 5 to 7 minutes. Once done, drain any excess fat from the skillet. This step keeps your pie from being greasy. Next, add the finely chopped onion and minced garlic to the skillet. Sauté these together for about 5 minutes. You want the onion to turn soft and translucent. After that, stir in your mixed vegetables, tomato paste, and Worcestershire sauce. Season with thyme, rosemary, salt, and pepper. Cook this mixture for another 5 minutes. This will make your filling rich and flavorful. Return the drained potatoes to the pot. Add in the milk and butter. Now, mash the potatoes until they are smooth and creamy. Use a potato masher or a fork for this. If you prefer, you can also use an electric mixer for a fluffier texture. Don't forget to season with salt and pepper to taste. This step makes the potatoes extra tasty for your pie. Before you assemble, preheat your oven to 400°F (200°C). In a baking dish, spread the meat and vegetable mixture evenly. Then, carefully top it with the creamy mashed potatoes. Use a spatula to spread the potatoes out smoothly. If you like cheese, sprinkle shredded cheddar on top for a cheesy crust. This adds a nice flavor and texture. Place your assembled pie in the preheated oven. Bake for about 20 to 25 minutes. You want the top to become golden and crispy. Keep an eye on it to prevent burning. Once done, let it cool slightly before serving. This will help the layers set, making it easier to scoop out portions. Enjoy your warm, comforting Shepherd's Pie! - Overcooking the potatoes: This makes them watery. Boil for 15-20 minutes only. - Not seasoning adequately: A pinch of salt and pepper can elevate flavors greatly. - Layering techniques: Spread the meat mixture first. Then, add the mashed potatoes on top. - Choosing the right baking dish: A deep dish works best. It holds everything well and prevents spills. - Using fresh herbs vs. dried: Fresh herbs add a bright taste. Dried herbs work too but use less. - Suggestions for additional toppings: Try adding breadcrumbs or a sprinkle of paprika for a crispy topping. Pro Tips Use Leftover Meat: If you have leftover roast meat, you can easily substitute it for the ground beef or lamb for an even quicker meal. Make It Vegetarian: For a vegetarian version, swap the meat for lentils or a mix of beans, and use vegetable broth for added flavor. Customize Your Vegetables: Feel free to use any vegetables you have on hand. Frozen mixed vegetables work great, or try adding mushrooms or bell peppers for extra flavor. Add Herbs Fresh: If possible, use fresh herbs instead of dried for a more vibrant flavor, especially thyme and rosemary. {{image_2}} For a meatless version, swap the ground beef or lamb with lentils or mushrooms. These ingredients provide a hearty texture. You can also use black beans for a different flavor. Add a mix of your favorite veggies like spinach or zucchini. This adds color and nutrients. For a creamy feel, include some mashed cauliflower with your potatoes. To make Shepherd's Pie gluten-free, use cornstarch or arrowroot starch for thickening. Both work well and keep the filling rich. Always check labels for gluten in sauces like Worcestershire. To avoid cross-contamination, use clean utensils and surfaces. This ensures a safe meal for those with gluten allergies. Make your Shepherd's Pie unique by adding spices from your culture. For example, curry powder adds warmth, while cumin gives a smoky taste. You can also try adding Kimchi for a spicy kick. Consider using local vegetables, such as sweet potatoes or squash, to give the dish a fresh twist. Each variation makes the dish special and personal. To keep your shepherd's pie fresh, store it in the fridge or freezer. For the fridge, use an airtight container. This method keeps your pie tasty for up to three days. If you want to save it longer, freezing works well too. Use a freezer-safe container or wrap it in foil. This keeps it good for about three months. When reheating, avoid drying out the pie. Use the oven at 350°F (175°C). Cover the dish with foil to trap moisture. Heat for about 20-25 minutes or until warmed through. You can add a splash of broth or gravy while reheating for extra flavor. Stir gently to keep the filling moist. In the fridge, shepherd's pie lasts about three days. Check for any signs of spoilage, like off smells or mold. In the freezer, it stays fresh for about three months. When thawing, do it in the fridge overnight for best results. Always check before eating. Yes, you can prepare Shepherd's Pie in advance. This makes meal prep easy. You can assemble it and store it in the fridge. If you want to freeze it, wrap it well in plastic wrap. Make sure to use a freezer-safe dish. When you're ready to eat, just bake it straight from the freezer. Shepherd's Pie pairs well with many sides. Here are some ideas: - Steamed green beans - Garlic bread - A fresh garden salad For drinks, a light red wine works well. You can also serve sparkling water with lemon for a refreshing touch. You can use other meats like pork or turkey. Each meat gives a different taste. For pork, the flavor is sweeter and richer. Turkey offers a lighter, leaner option. Adjust the seasoning based on the meat you choose. If using turkey, you may need to add more spices for flavor. Shepherd's Pie is simple and flexible. We explored the main and optional ingredients, plus tasty swaps. You learned how to prepare, cook, and assemble the dish. I shared tips to avoid mistakes and enhance flavor. You can adapt it for vegetarian or gluten-free needs, too. Enjoy leftovers with proper storage and reheating methods. Your Shepherd’s Pie will always be a hit. With practice, you'll create your own perfect version. Get cooking and share it with those you love!

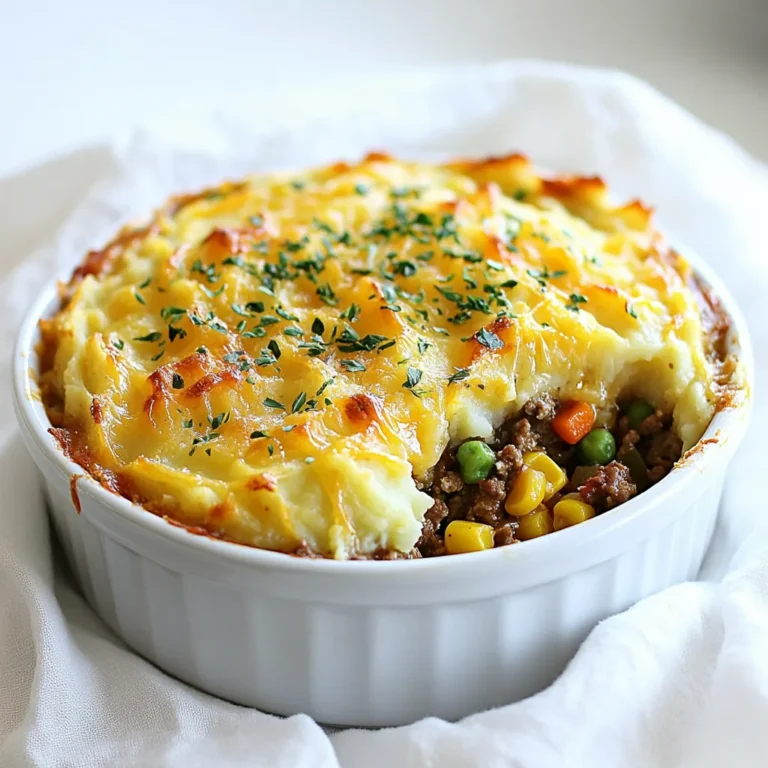
Easy Shepherd’s Pie Simple and Savory Comfort Food

- Beef and mushroom specifics - 2 pounds beef chuck, cut into 1-inch cubes - 8 ounces cremini mushrooms, sliced - Vegetables and aromatics - 1 large onion, diced - 3 cloves garlic, minced - 4 carrots, chopped - 2 stalks celery, chopped - Liquids and seasonings - 4 cups beef broth (low sodium) - 1 tablespoon tomato paste - 2 teaspoons dried thyme - 1 teaspoon paprika - 1 bay leaf - 2 tablespoons olive oil - Salt and pepper to taste - 2 tablespoons fresh parsley, chopped (for garnish) When I create this savory beef and mushroom stew, I focus on quality. Using fresh ingredients makes a big difference. The beef chuck gives the stew a rich flavor. I love cremini mushrooms for their earthiness. They add depth to each bite. For vegetables, I choose a classic mix. The onion and garlic provide a strong base. Carrots and celery add sweetness and crunch. This mix makes the stew colorful and tasty. Next, I add liquids and seasonings. Low-sodium beef broth keeps it hearty without excess salt. Tomato paste adds a hint of sweetness and richness. Thyme and paprika round out the dish with warmth. Finally, a bay leaf brings fragrant notes. Remember to season with salt and pepper to taste. Fresh parsley is the perfect garnish. It adds a pop of color and freshness to the dish. This blend of ingredients creates a stew that warms the soul. {{ingredient_image_1}} Browning the beef First, heat 2 tablespoons of olive oil in a large Dutch oven over medium-high heat. Cut 2 pounds of beef chuck into 1-inch cubes. Season the beef with salt and pepper. Add the beef in batches to the pot. Brown the meat on all sides. Once browned, remove the beef and set it aside. Sautéing the vegetables In the same pot, add 1 large diced onion, 4 chopped carrots, and 2 chopped stalks of celery. Sauté for about 5 minutes until softened. Stir in 3 minced garlic cloves and 8 ounces of sliced cremini mushrooms. Cook for another 3-4 minutes until the mushrooms are tender. Combining and simmering Add 1 tablespoon of tomato paste, 2 teaspoons of dried thyme, and 1 teaspoon of paprika. Mix well to coat the vegetables. Return the browned beef to the pot and pour in 4 cups of low-sodium beef broth. Stir everything to combine. Bring the stew to a boil, then reduce the heat to low. Cover and let it simmer for 1.5 to 2 hours. Stir occasionally until the beef is tender. Adjust with salt and pepper to taste. Preparing the ingredients Start by browning the beef as before. After browning, transfer the beef to a slow cooker. Sauté the vegetables in the same way and add them to the slow cooker. Cooking settings and times Pour in the beef broth and add all the spices. Cover the slow cooker. Set it on low for 6 to 8 hours, or high for 3 to 4 hours. Final adjustments Once cooked, taste the stew and adjust seasoning. You may remove the bay leaf before serving. Initial sauté function Use the sauté function on the Instant Pot. Add olive oil and brown the beef as before. Remove the beef and sauté the vegetables in the pot. Cooking pressure and time Return the beef to the pot. Pour in the broth and add all seasonings. Close the lid and seal the vent. Set the pressure to high for 35 minutes. Quick release tips Once the time is up, perform a quick release of pressure. Carefully open the lid. Check the seasoning and adjust if needed. To make beef and mushroom stew shine, focus on spices and herbs. Use dried thyme, paprika, and bay leaves for depth. Fresh parsley adds a bright touch at the end. You can also add a splash of red wine or a dash of Worcestershire sauce for extra flavor. For tenderness, browning the beef is key. Heat olive oil in your pot. Brown the beef in batches, ensuring even color. This step builds flavor. After browning, sauté your vegetables in the same pot. The leftover bits from the beef add richness to your stew. Pair your stew with crusty bread or fluffy mashed potatoes. These sides soak up the tasty broth, making each bite delightful. You can also serve it with a fresh salad for a lighter side. This stew works well for cozy dinners or gatherings. It’s perfect for chilly days or special occasions. Serve it at family meals or when hosting friends. Everyone loves a warm, hearty dish! To thicken your stew, you can mix a bit of cornstarch with cold water. Stir it in about 10 minutes before serving. This gives the stew a nice, rich texture. If you want a heartier dish, reduce the liquid. Let it simmer longer with the lid off. This way, the broth thickens and the flavors deepen. Adjust until it meets your preference! Pro Tips Choose the Right Cut: For the best flavor and tenderness, use beef chuck, which breaks down beautifully during long cooking times. Don’t Rush the Browning: Take your time to brown the beef properly. This adds depth of flavor to the stew. Adjust Seasoning Later: Wait until the end to adjust the seasoning. The flavors will concentrate as the stew simmers. Make It Ahead: This stew tastes even better the next day! Make it ahead and let the flavors meld overnight in the fridge. {{image_2}} You can swap the beef with other meats. Try using chicken or pork. They bring different flavors but still taste great. You can also use ground meat for a new twist. For those who prefer plant-based meals, consider using mushrooms or lentils. These choices are hearty and filling. To change the taste, add red wine or beer. This gives depth to the stew. You can also add more vegetables. Try bell peppers, zucchini, or even potatoes. Each will add a unique flavor and texture to your dish. If you need a gluten-free stew, use gluten-free broth. This keeps the dish safe for those with gluten allergies. To lower sodium, use low-sodium broth and skip added salt. You can still enjoy a tasty stew without the extra sodium. To keep your beef and mushroom stew fresh, cool it quickly. After cooking, let it sit for no more than two hours at room temperature. Transfer it to an airtight container. Glass or plastic containers work well. Leave some space at the top for expansion. Store the stew in the fridge for up to three days. You can freeze beef and mushroom stew for later. Let it cool completely before freezing. Use freezer-safe containers or heavy-duty freezer bags. Remove as much air as you can to prevent freezer burn. This stew can last for up to three months in the freezer. When you’re ready to eat, thaw it overnight in the fridge. To reheat, warm it on the stove over low heat until hot. Stir often to avoid sticking. In the fridge, your stew is good for three days. If frozen properly, it lasts up to three months. Check for signs of spoilage before eating. Look for off smells, changes in color, or mold. If you see any of these, it’s best to throw it away. Always prioritize safety when it comes to food! Yes, you can make this stew ahead of time. Preparing it in advance saves you time on busy days. When you let the stew sit, the flavors blend well. This makes each bite even tastier. You can cook it a day or two before serving. Just heat it up when you are ready to eat. This stew lasts about three to four days in the fridge. To keep it fresh, store it in an airtight container. Make sure it cools first before you put it in the fridge. If you see any signs of mold or bad smell, it's best to throw it away. Yes, you can use dried mushrooms. They have a strong flavor, so soak them in warm water first. This helps them rehydrate and soften. You may need to adjust the amount, as dried mushrooms are more potent. Use about half the amount of dried mushrooms as fresh. Making a tasty beef and mushroom stew is easy with the right steps and tips. We covered essential ingredients, the best cooking methods, and simple ways to enhance flavors. You can explore variations to suit your taste and dietary needs. Proper storage keeps your stew fresh for longer. Remember, experimenting with ingredients helps make each stew unique. Try different methods and flavors to find your favorite! Enjoy your cooking adventure, and share your favorite recipes with others!

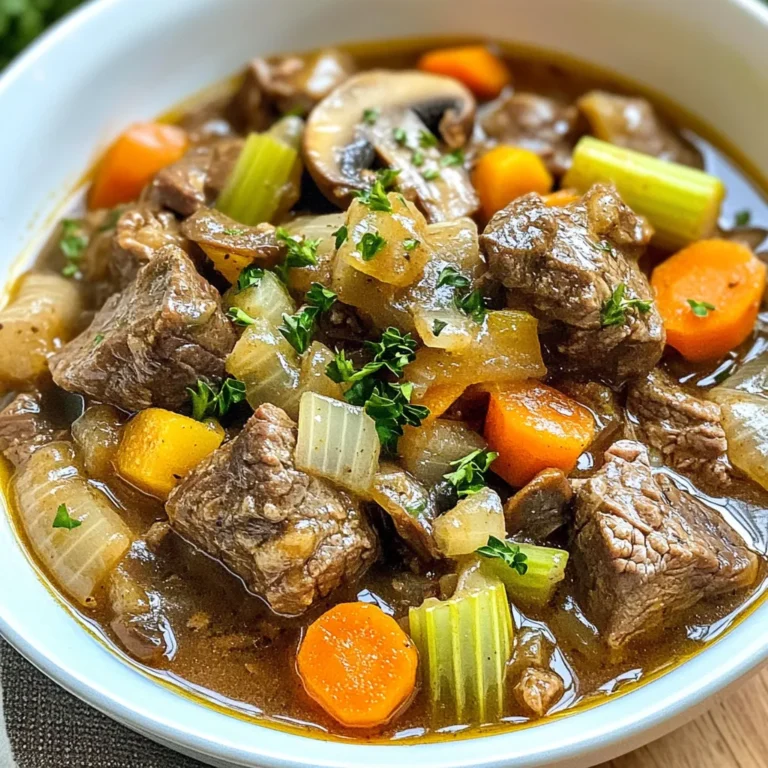
Savory Beef and Mushroom Stew Easy and Flavorful Meal

To make a delicious cheeseburger soup, you need the right ingredients. Here’s what you will need: - 1 lb ground beef - 1 medium onion, diced - 2 cloves garlic, minced - 2 medium potatoes, diced - 3 cups beef broth - 1 cup shredded carrots - 1 cup frozen peas - 1 teaspoon Worcestershire sauce - 2 tablespoons tomato paste - 1 teaspoon paprika - Salt and pepper to taste - 1 cup heavy cream - 2 cups shredded cheddar cheese - 6 slices of crispy cooked bacon, crumbled (optional) - Fresh parsley, chopped (for garnish) Using fresh ingredients really makes a difference in flavor. The ground beef provides a rich base. Onions and garlic add depth. Potatoes make the soup hearty, while beef broth brings everything together. Worcestershire sauce and tomato paste add a savory kick. Paprika gives a warm, smoky flavor. Heavy cream makes it rich and creamy, while cheddar cheese melts into gooey goodness. If you love bacon, crumbled pieces add a tasty crunch. Finally, fresh parsley brightens the dish and adds color. Grab these ingredients, and you’re ready to cook a comforting bowl of cheeseburger soup! {{ingredient_image_1}} First, take your large pot and place it on medium heat. Add 1 pound of ground beef. Cook it until it is brown and fully cooked. Make sure to stir it often to break it apart. Once the meat is done, drain any extra fat. This keeps your soup from being too greasy. Next, add 1 diced medium onion and 2 minced garlic cloves to the pot. Stir this mix for about 2 to 3 minutes. You want the onions to turn soft and clear. After that, add 2 diced medium potatoes and 1 cup of shredded carrots. These veggies will make your soup hearty. Now, pour in 3 cups of beef broth. Add 1 teaspoon of Worcestershire sauce, 2 tablespoons of tomato paste, and 1 teaspoon of paprika. Season with salt and pepper to your taste. Mix everything well. Bring this to a boil. Once it boils, lower the heat. Let it simmer for 15 to 20 minutes. This cooks the potatoes until they are tender. After the potatoes are soft, it’s time to add richness. Stir in 1 cup of heavy cream and 2 cups of shredded cheddar cheese. Keep stirring until the cheese melts. This makes your soup creamy and delicious. If you want, add crumbled bacon and 1 cup of frozen peas. Stir them in and let the soup heat up for about 5 more minutes. Finally, taste your soup and adjust the seasoning if needed. Serve it hot and enjoy! To make your cheeseburger soup really shine, start with good beef. Use fresh ground beef for the best taste. Brown it well to add depth to your soup. Next, add fresh onions and garlic. They build a strong flavor base. Cook them until soft and fragrant. Don't rush this step; it’s key for flavor. A creamy texture is what makes this soup special. Use heavy cream to achieve that rich, smooth feel. Add it slowly after simmering the other ingredients. This way, it blends in perfectly. Make sure to stir well as you mix in the cheese. It melts quickly and adds to the creaminess. Want to kick your soup up a notch? Add crumbled bacon for a smoky touch. It brings a nice crunch, too! You can also mix in some diced jalapeños for heat. Another option is to toss in a splash of your favorite hot sauce. These extras offer different layers of flavor, making every bowl exciting. Pro Tips Use Lean Ground Beef: Opt for lean ground beef to reduce excess fat and make the soup lighter while still retaining its rich flavor. Customize the Veggies: Feel free to add or substitute your favorite vegetables like bell peppers or corn for a personal touch and extra nutrition. Cheese Melting Tips: For a smoother cheese texture, add the cheese in batches and stir continuously to avoid clumping. Make Ahead: This soup can be made ahead of time and reheated. Just be aware that the potatoes may absorb some liquid, so you might need to add a bit more broth when reheating. {{image_2}} You can make a veggie version of cheeseburger soup. Start by swapping the ground beef for lentils or mushrooms. Both options add great texture. Use vegetable broth instead of beef broth for a rich taste. Add more vegetables, like bell peppers and zucchini. This soup stays creamy with heavy cream or coconut milk. It’s a delightful twist that everyone can enjoy. If you like heat, spicy cheeseburger soup is for you. Add diced jalapeños or a teaspoon of cayenne pepper. This brings a nice kick. You can also use pepper jack cheese instead of cheddar. For extra flavor, mix in some hot sauce. This version warms you up and excites your taste buds. For a low-carb version, skip the potatoes. Instead, use cauliflower. Cauliflower adds creaminess without the carbs. You can also use ground turkey instead of beef for a leaner option. Stick with heavy cream and cheese to keep it rich. This version is perfect for those watching their carbs but still craving comfort food. You can store leftover cheeseburger soup in an airtight container. Let the soup cool first. Once cool, place it in the fridge. It will stay fresh for about 3 to 4 days. For best taste, eat it within this time. To freeze the soup, use freezer-safe containers. Leave some space at the top for expansion. The soup can last in the freezer for up to 3 months. When ready to eat, thaw it in the fridge overnight before reheating. Reheat the soup on the stove over low heat. Stir often to prevent sticking. You can also use the microwave. Heat in short bursts, stirring in between. Make sure it is hot all the way through before serving. If it seems too thick, add a splash of broth or cream. You can use half-and-half or whole milk. For a thicker soup, mix in flour. Coconut cream also works if you want a dairy-free option. These substitutes will change the flavor slightly but will still taste great. Yes! Ground turkey or chicken can replace beef. You can even use sausage for a spicy twist. Each meat adds a unique flavor to the soup. To make it dairy-free, use coconut milk or almond milk. Also, skip the cheese or use a dairy-free cheese. Adjust the seasonings to keep it tasty. Crusty bread or garlic toast goes well with this soup. A simple side salad adds freshness. You can also serve it with a side of pickles or chips for crunch. The soup lasts about three to four days in the fridge. Make sure to store it in an airtight container. You can freeze it for up to three months, but the texture might change. This blog post shared how to make a tasty cheeseburger soup. We covered ingredients, steps, tips, and variations. You learned how to brown meat and cook veggies for rich flavor. We discussed options like vegetarian or spicy soup, too. Proper storage keeps leftovers fresh and tasty. Enjoy trying new flavors and techniques with this recipe. Cheeseburger soup is fun and easy to make, perfect for any meal. Now, get cooking and enjoy your delicious creation!

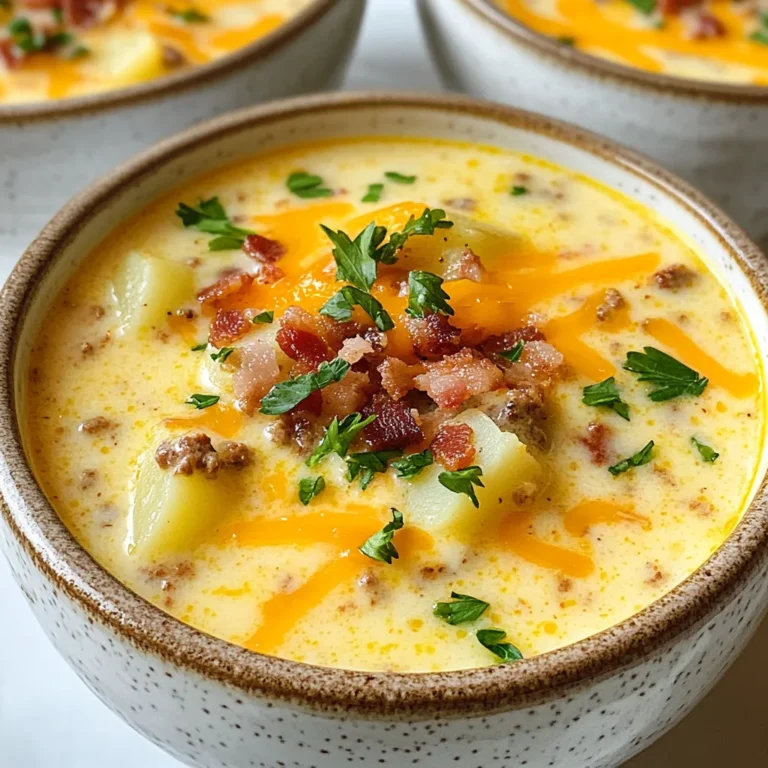
Cheeseburger Soup Flavorful and Easy Comfort Dish

To make Ham & Havarti Sliders, you need a few simple ingredients. Here’s the list: - 12 slider buns - 12 slices of smoked ham - 12 slices of Havarti cheese - 1/2 cup unsalted butter, melted - 2 tablespoons Dijon mustard - 1 tablespoon honey - 1 teaspoon garlic powder - 1/2 teaspoon onion powder - 1/2 teaspoon poppy seeds - Salt and pepper to taste - Fresh arugula or spinach leaves (for garnish) Each ingredient plays a key role in making these sliders tasty. The smoked ham adds a rich flavor. The Havarti cheese melts beautifully and gives a creamy texture. The butter mixture enhances everything, making it golden and crisp. Fresh greens like arugula add crunch and color. You can find these ingredients in your local grocery store. Make sure to pick fresh arugula or spinach for the best taste. The combination of flavors here makes each slider a delight. Enjoy gathering these ingredients; they will come together for a truly delicious treat! {{ingredient_image_1}} - Preheating the Oven Start by preheating your oven to 350°F (175°C). This step is key for even cooking. - Making the Butter Mixture In a small bowl, whisk together the melted butter, Dijon mustard, honey, garlic powder, onion powder, poppy seeds, salt, and pepper. This mixture adds a rich flavor to the sliders. - Assembling the Sliders Slice the slider buns in half horizontally. Place the bottom halves in a greased baking dish. Layer each bun with a slice of ham and then a slice of Havarti cheese. For a fresh touch, add some arugula or spinach leaves on top of the cheese. Finally, place the top halves of the buns over the fillings. - Baking Process Brush the prepared butter mixture evenly over the top of the buns. Cover the baking dish with aluminum foil. Bake in the preheated oven for 15 minutes. Then, remove the foil and bake for another 10 minutes. This will make the buns golden brown, and the cheese will melt nicely. - Cooling and Slicing the Sliders Once baked, remove the dish from the oven. Let the sliders cool slightly. Then, slice them into individual servings. - Presentation Tips Arrange the sliders on a wooden board or platter. Garnish with fresh herbs or microgreens for a pop of color. Serve with a side of pickles for extra crunch! - Suggested Ingredient Swaps: You can swap the smoked ham for turkey or chicken. For a vegetarian twist, use grilled veggies or a plant-based meat. If you want a different cheese, try cheddar or gouda instead of Havarti. - Spice and Flavor Enhancements: Add a pinch of red pepper flakes for heat. Mix in fresh herbs like thyme or rosemary for extra flavor. For a tangy kick, use spicy mustard instead of Dijon. - Ensuring Even Cooking: Make sure the slider buns fit snugly in the baking dish. This helps them cook evenly. Rotate the dish halfway through baking for consistent warmth. - Tips for Melting Cheese Perfectly: Cover the sliders with foil during the first bake. This keeps the steam in and helps the cheese melt faster. For a golden top, remove the foil for the last few minutes of baking. Pro Tips Use Fresh Ingredients: For the best flavor, use freshly sliced ham and high-quality Havarti cheese. This will elevate your sliders and make them more delicious. Customize Your Toppings: Feel free to add other toppings like sliced tomatoes, pickles, or jalapeños for an extra kick and variety in flavor. Make Ahead: You can prepare the sliders in advance and store them in the fridge before baking. Just brush with the butter mixture right before baking for convenience. Experiment with Spices: Don’t hesitate to adjust the spices in the butter mixture. Adding herbs like thyme or rosemary can give your sliders a unique twist. {{image_2}} You can switch the Havarti cheese for other cheeses. Try using Swiss or cheddar for a different taste. Each cheese brings its own flavor. Gouda also melts well and adds a rich, smoky taste. For meat lovers, add turkey or roast beef. Both pair nicely with the cheese and mustard mix. You can also use a mix of meats for more flavor. Don't forget to adjust the cooking time if you use thicker slices. For the holidays, add cranberry sauce or stuffing. These flavors give the sliders a festive twist. You can also sprinkle some sage for an aromatic touch. This makes them perfect for holiday gatherings. In summer, add grilled veggies like peppers and zucchini. They add color and fresh taste to your sliders. You can even use BBQ sauce instead of mustard for a smoky flavor. These sliders are great for outdoor picnics and cookouts. To keep your Ham & Havarti Sliders fresh, store them right. - Refrigeration Guidelines: Place the sliders in an airtight container. They stay good in the fridge for up to three days. If you want to keep them longer, consider freezing them. - Freezing Instructions: Wrap the sliders tightly in plastic wrap. Then place them in a freezer-safe bag. They can last for up to three months. When ready to eat, just thaw them overnight in the fridge. Reheating your sliders is easy and quick. - Best Methods to Reheat Sliders: Preheat your oven to 350°F (175°C). Place the sliders on a baking sheet. Cover them with foil to keep them moist. Heat for about 15 minutes. If you prefer a crispier top, remove the foil for the last five minutes. You can also use a microwave, but they may turn out a bit soggy. Can I make Ham & Havarti Sliders ahead of time? Yes, you can prepare these sliders ahead of time. Assemble them and cover with foil. Store in the fridge for up to a day. When ready to bake, just pop them in the oven. This saves time for busy days! How do I keep sliders from getting soggy? To avoid soggy sliders, coat the buns lightly with butter. Use fresh ingredients and don't over-saturate them with the butter mixture. Baking them covered for a short time helps keep them warm without making them wet. What sides pair well with these sliders? Ham & Havarti sliders go great with many sides. Try serving them with: - Crispy pickles - Fresh vegetable sticks - A simple green salad - Sweet potato fries Can I use different types of mustard? Absolutely! You can switch Dijon for yellow mustard or spicy brown mustard. Each type brings a new flavor twist to your sliders. Feel free to be creative with your choices. Are there vegetarian alternatives for this recipe? Yes, you can make these sliders vegetarian. Replace the ham with roasted vegetables or mushrooms. Use a tasty cheese like cheddar or mozzarella. This way, you keep the flavors fun and fresh! We covered tasty Ham & Havarti Sliders, exploring ingredients, preparation, and serving tips. You learned how to modify the recipe and store leftovers properly. Remember, these sliders can adapt to any occasion, making them perfect for gatherings or a cozy meal. Enjoy experimenting with flavors, and don’t hesitate to try new ideas. You’ll impress your guests and delight your taste buds. Now, grab those sliders and have fun cooking!

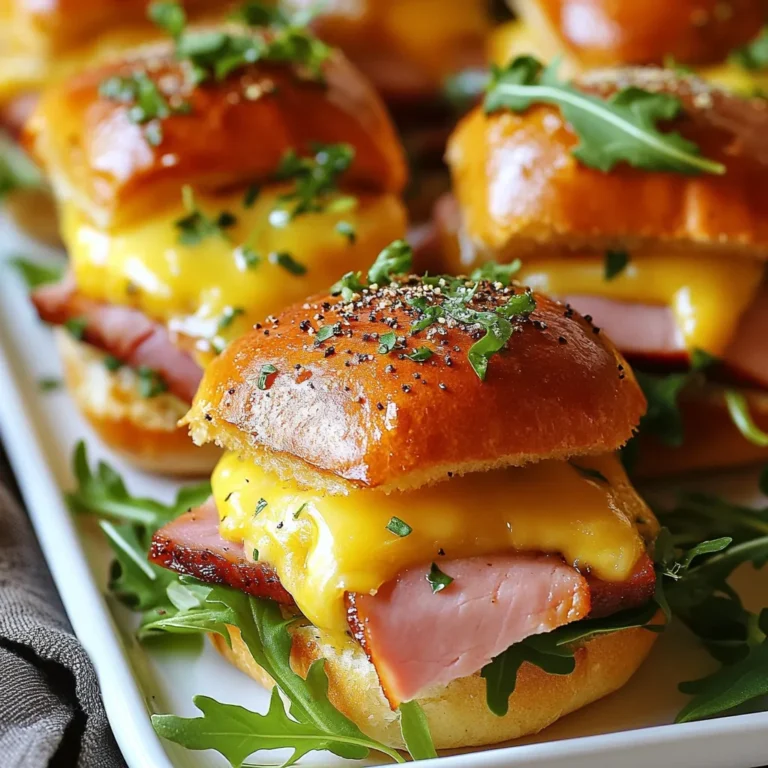
Ham & Havarti Sliders Tasty and Simple Delight

PREV 1 … 85 86
tasty trail blazer

explore

DessertsDinnerAppetizersDrinks

Our Policies

  • Cookie Policy
  • Copyright Policy
  • Disclaimer
  • GDPR Policy
  • Terms Of Use
Back to Top
  • About
  • Contact Us
  • Privacy Policy
© 2026 tasty trail blazer