
Welcome to the wonderful world of scones! In this post, I'll show you how to make Buttery Garlic Herb Scones that are both savory and flaky. Imagine tearing into a warm, golden scone packed with rich garlic flavor and fresh herbs. Whether you want to impress your friends, elevate your brunch, or enjoy a tasty snack, these scones will hit the spot. Let’s dive into the simple ingredients and steps to create this delightful treat!
Why I Love This Recipe
- Delicious Flavor Combination: The buttery richness combined with garlic and fresh herbs creates a flavorful scone that’s hard to resist.
- Easy to Make: This recipe requires minimal prep time and is straightforward, making it perfect for both beginners and experienced bakers.
- Perfect for Any Occasion: These scones are versatile; serve them as a brunch item, a side for soup, or a snack any time of day.
- Customizable: You can easily modify the herbs and cheese to suit your taste, making this recipe a great base for experimentation.
Ingredients
List of Required Ingredients
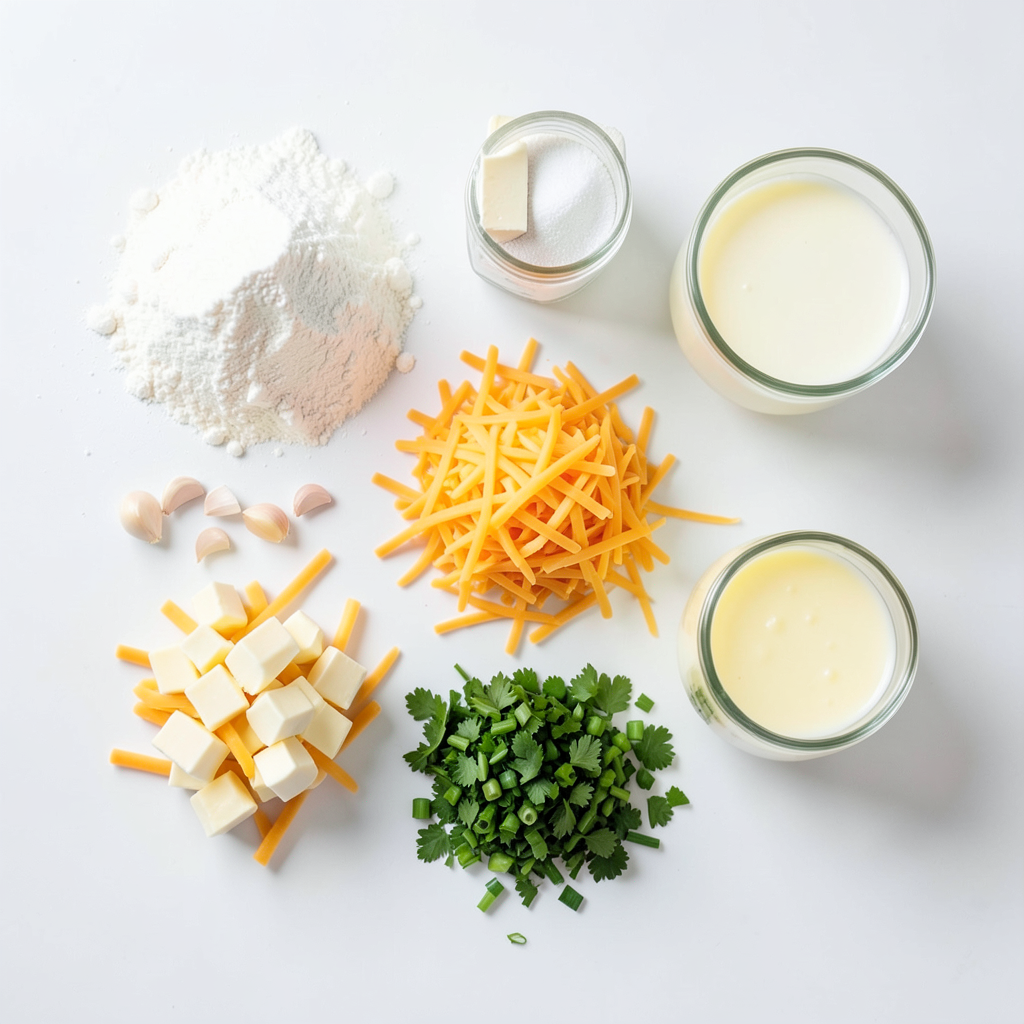
To make these buttery garlic herb scones, gather these key items:
- 2 cups all-purpose flour
- 1 tablespoon baking powder
- 1/2 teaspoon baking soda
- 1 teaspoon salt
- 1/4 cup cold unsalted butter, cubed
- 1/2 cup shredded sharp cheddar cheese
- 2 cloves garlic, minced
- 2 tablespoons fresh parsley, finely chopped
- 1 tablespoon fresh chives, finely chopped
- 3/4 cup buttermilk (or regular milk with 1 tablespoon lemon juice added)
- 1 tablespoon melted butter (for brushing on top)
Optional Ingredients for Customization
You can add your own twist to the scones! Here are some fun options:
- A pinch of red pepper flakes for heat
- Other cheese types, like feta or mozzarella
- Dried herbs, such as thyme or oregano
- Cooked bacon bits for extra flavor
Notes on Ingredient Quality
Using fresh, high-quality ingredients will make a big difference. Here’s why:
- Butter: Choose unsalted butter for the best taste. Cold butter helps create flaky layers.
- Cheese: Sharp cheddar adds a nice flavor punch. Grate it fresh for better melt.
- Garlic: Fresh garlic gives a stronger, more vibrant taste than dried.
- Herbs: Fresh herbs bring brightness and flavor. If you use dried herbs, use less since they are stronger.
These choices ensure your scones turn out delicious and full of flavor.
Step-by-Step Instructions
Preparation Steps
Start by preheating your oven to 400°F (200°C). This step is key for a crispy outside. Next, take a baking sheet and line it with parchment paper. This makes for easy cleanup later.
Mixing the Dough
In a large bowl, whisk together 2 cups of all-purpose flour, 1 tablespoon of baking powder, 1/2 teaspoon of baking soda, and 1 teaspoon of salt. This mix gives the scones their lift.
Now, add 1/4 cup of cold, cubed unsalted butter. Use your fingers or a pastry cutter to mix it in. You want the mix to look like coarse crumbs.
Next, stir in 1/2 cup of shredded sharp cheddar cheese, 2 cloves of minced garlic, 2 tablespoons of finely chopped parsley, and 1 tablespoon of finely chopped chives. Mix well to spread the flavors evenly.
Make a well in the center of the dry mix. Pour in 3/4 cup of buttermilk. If you don't have buttermilk, use regular milk with 1 tablespoon of lemon juice. Mix gently with a fork until just combined. Don't overmix, or your scones will be tough.
Turn the dough onto a floured surface. Knead it a couple of times until it holds together. Pat it into a round disk about 1 inch thick.
Baking Instructions
Cut the disk into 8 equal wedges. Place them on the prepared baking sheet. Brush the tops with 1 tablespoon of melted butter. This gives the scones a lovely golden finish.
Bake the scones for 15 to 20 minutes. Look for a lightly golden top and a cooked-through feel. Let them cool slightly on the baking sheet before serving. Enjoy the savory aroma and flaky texture of these delightful scones!
Tips & Tricks
Achieving the Perfect Texture
To get the best scones, you need the right texture. Start with cold butter. Cut it into small cubes. This helps create a flaky texture. When mixing, avoid overworking the dough. The dough should be soft and slightly sticky. A gentle touch keeps it light. Also, make sure your buttermilk is cold. Cold ingredients help the scones rise nicely.
Storage and Reheating Tips
To store leftover scones, place them in an airtight container. They stay fresh for about two days at room temperature. If you want to keep them longer, freeze them. Wrap each scone in plastic wrap and place them in a freezer bag. They can last up to three months in the freezer. When ready to eat, thaw them overnight in the fridge. Reheat them in a warm oven to bring back their flaky texture.
Common Mistakes to Avoid
Many people make mistakes when baking scones. Here are a few to watch for:
- Using warm butter: Always use cold butter for the best texture.
- Overmixing the dough: Mix just until combined to keep them fluffy.
- Skipping the flour on the surface: This can make the dough stick, making it hard to cut.
- Not preheating the oven: Make sure your oven is hot before baking. This helps the scones rise well.
By following these tips, you can enjoy perfect buttery garlic herb scones every time!
Pro Tips
- Chill Your Ingredients: Keeping the butter and buttermilk cold helps create flaky layers in your scones.
- Don’t Overmix: Gently combine the dough to maintain a light texture; overmixing can lead to dense scones.
- Use Fresh Herbs: Fresh parsley and chives add vibrant flavor; dried herbs can be used in a pinch but may lack potency.
- Serve Warm: Enjoy these scones warm for the best taste; they pair wonderfully with a pat of butter or jam.
Variations
Different Cheese Options
You can change the cheese in these scones. Instead of sharp cheddar, try mozzarella or feta. Mozzarella gives a milder taste and a nice stretch. Feta adds a tangy flavor that makes the scones unique. You can even mix cheeses for a fun twist. Just remember to keep the amount the same. This ensures the scones stay fluffy and light.
Herb Substitutions
If you want to switch up the herbs, feel free! Fresh basil or thyme works well. Basil brings a sweet, aromatic taste. Thyme adds a more earthy flavor. You can also use dried herbs if you don’t have fresh ones. Just use less, about a teaspoon of dried herbs, since they are stronger. Experiment with different herb blends to find your favorite mix!
Adding Other Flavor Enhancements
Adding extras can make these scones even better. Try adding sun-dried tomatoes for a burst of flavor. You can also add cooked bacon bits or olives for a savory twist. For a kick, mix in a pinch of red pepper flakes. Each added ingredient brings its own taste. Just be sure not to add too much, so the scones stay flaky. These simple changes can take your scones to the next level!
Storage Info
How to Store Leftover Scones
To keep your scones fresh, store them in an airtight container. Place parchment paper between layers to avoid sticking. They stay best at room temperature for up to two days. If you want them to last longer, refrigerate them. But, this may make them a bit dry.
Freezing Guidelines
You can freeze the scones if you have extras. To freeze, let them cool completely. Wrap each scone in plastic wrap. Then, place them in a freezer bag. Make sure to remove as much air as possible. Scones can last up to three months in the freezer.
Shelf Life and Best Practices
When stored properly, these scones can last for about two days at room temperature. If refrigerated, they’ll stay good for about a week. For the best taste and texture, enjoy them fresh. Reheat leftovers in the oven for a few minutes. This will bring back their warm, flaky goodness.
FAQs
Can I make these scones ahead of time?
Yes, you can make these scones ahead of time. Simply prepare the dough and cut it into wedges. Place the wedges on a baking sheet and cover them with plastic wrap. Keep them in the fridge for up to 24 hours. When you’re ready to bake, just preheat your oven and bake them straight from the fridge. This method saves time and gives you fresh scones whenever you want.
What is the best way to serve Buttery Garlic Herb Scones?
I love to serve these scones warm. You can add a sprinkle of fresh herbs or cheese on top for a pop of color. They pair well with herb-infused butter. Just spread a little on each scone for extra flavor. You can also serve them alongside soups or salads. Their flaky texture and savory taste make them a great side dish.
How can I make these scones gluten-free?
To make gluten-free scones, use a gluten-free flour blend. Look for one that has xanthan gum or add a teaspoon of it to the mix. Replace the buttermilk with a non-dairy milk if needed. Follow the same steps in the recipe, and you’ll have tasty gluten-free scones. They may be a bit denser, but they will still be delicious!
In this article, we've covered everything you need to make buttery garlic herb scones. We explored essential and optional ingredients, shared step-by-step baking instructions, and offered tips for the best texture. We discussed variations to personalize your scones, along with proper storage methods. Remember, practice makes perfect. Don’t hesitate to experiment with ingredients. Enjoy your baking journey and impress others with your delicious scones!