
Looking for a quick and tasty meal? This Cheesy Cauliflower Rice Skillet is a perfect choice. In just a few steps, you can whip up a warm, comfort dish that’s both cheesy and nutritious. I’ll share easy ingredients, simple instructions, and great tips. Plus, you’ll find ways to customize it to your taste. Ready to dive into this simple meal that will satisfy your cravings? Let’s get cooking!
Ingredients
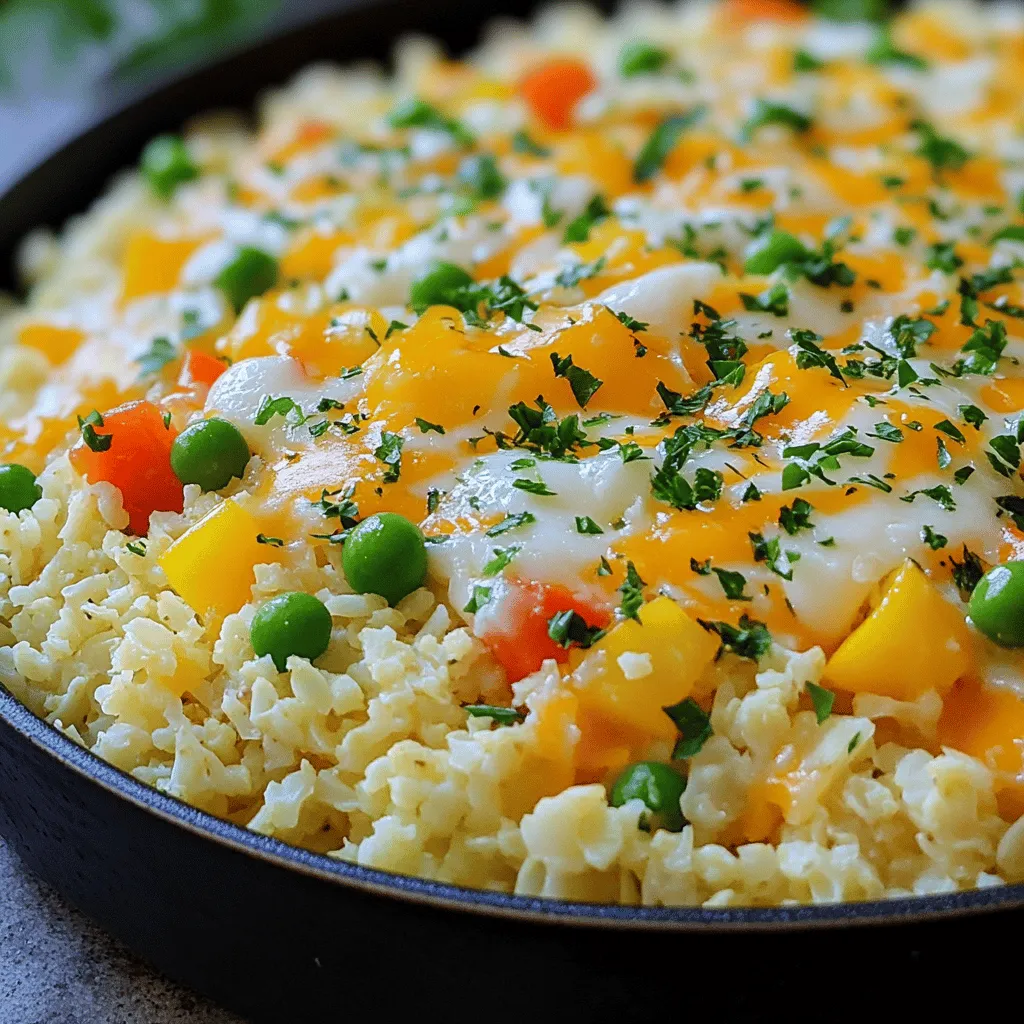
List of ingredients for Cheesy Cauliflower Rice Skillet
– Cauliflower rice preparation details:
You need one medium head of cauliflower. Remove the outer leaves and stem. Cut it into florets. Use a food processor or a box grater to make it look like rice. You should have about four cups of riced cauliflower.
– Cheese types and quantities:
This dish uses two types of cheese. You will need one cup of shredded cheddar cheese. Also, add one cup of shredded mozzarella cheese. Mixing these cheeses gives a nice flavor and creamy texture.
– Other vegetables and seasonings included:
You will add a small diced onion and two minced garlic cloves for a strong taste. One diced bell pepper adds texture and color. Include one cup of frozen peas for sweetness. For flavor, use one teaspoon of smoked paprika, half a teaspoon of onion powder, and half a teaspoon of garlic powder. Finish with salt and pepper to taste. Lastly, fresh chopped parsley will be your garnish.
Step-by-Step Instructions
Preparing the cauliflower rice
First, take your medium head of cauliflower. Remove all the leaves and the stem. Cut the cauliflower into small florets. You can use a food processor to pulse the florets. Pulse until they look like rice grains. If you prefer, use a box grater to grate the cauliflower. This will give you a nice rice-like texture.
Cooking the base ingredients
Next, heat one tablespoon of olive oil in a large skillet over medium heat. Add the diced onion and let it cook for about 3-4 minutes. You want the onion to turn soft and clear. Then, stir in two cloves of minced garlic and one diced bell pepper. Cook these for another 2-3 minutes. The bell pepper should be tender by now.
Now, add the riced cauliflower to the skillet. Mix it well with the other veggies. Cook for about 5-7 minutes. You want the cauliflower to become tender, but still firm. After that, sprinkle one teaspoon of smoked paprika, half a teaspoon of onion powder, and half a teaspoon of garlic powder over the mix. Add salt and pepper to taste. Stir everything well to spread the flavors evenly.
Combining and finishing the dish
For the final steps, stir in one cup of frozen peas. Cook for another 2-3 minutes until the peas are warm. Then, take the skillet off the heat. Layer one cup of shredded cheddar and one cup of shredded mozzarella cheese over the top. Cover the skillet with a lid. Let it sit for 2-3 minutes. This helps the cheese melt perfectly.
Once the cheese is gooey and melted, remove the lid. Gently toss the mixture to combine all the flavors and textures. To serve, chop some fresh parsley and sprinkle it on top for a burst of color and flavor. Enjoy your cheesy cauliflower rice skillet!
Tips & Tricks
How to achieve the best texture
To get the best texture for your Cheesy Cauliflower Rice Skillet, start with fresh cauliflower. Ricing the cauliflower well is key. Use a food processor or box grater for this. You want the pieces to be small but not mushy. Cook the cauliflower just until tender. This keeps a nice bite in each bite. Stir it gently to avoid breaking it down too much.
Flavor enhancements and spices
Adding flavor is fun and easy. I love using smoked paprika for a warm, smoky taste. It adds depth without being too spicy. Onion powder and garlic powder boost the overall taste. Feel free to add a pinch of red pepper flakes for heat. Fresh herbs like parsley brighten the dish. Just sprinkle them on top before serving.
Ingredients substitution options
You can swap ingredients based on what you have. If you don’t have cheddar, try gouda or Swiss cheese. For a vegan option, use plant-based cheese or nutritional yeast. If you can’t find fresh peas, frozen peas work just as well. Bell peppers can be any color, so use what you like. Don’t be afraid to get creative with what’s in your fridge!

Variations
Vegetarian and vegan adaptations
You can easily make Cheesy Cauliflower Rice Skillet vegetarian. Just skip the cheese or choose dairy-free options. Nutritional yeast adds a nice cheesy flavor without dairy. For a vegan dish, use plant-based cheese. You can also add more veggies like spinach or mushrooms for added texture and taste.
Adding protein options (chicken, shrimp, etc.)
If you want to boost protein, add cooked chicken or shrimp. Simply chop cooked meat into small pieces and stir it in right before adding the cheese. You can also use beans like black beans or chickpeas for plant-based protein. This makes the dish heartier and more filling.
Seasonal vegetable recommendations
In spring, add asparagus or green beans for a fresh crunch. Summer is great for zucchini or corn, which pair well with the cheese. In fall, consider adding chopped kale or butternut squash for warmth. Winter may call for hearty root veggies like carrots and parsnips. These seasonal ingredients keep the dish exciting and flavorful.
Storage Info
How to store leftovers
After enjoying your cheesy cauliflower rice skillet, let it cool down. Once it’s cool, place it in an airtight container. This helps keep it fresh. Store the container in the fridge. The leftovers will last for about 3 to 4 days. Make sure to label the container with the date. This way, you know when you made it.
Reheating instructions
To reheat, take the leftover skillet out of the fridge. You can use a microwave or a skillet. If you use a microwave, place it in a bowl and cover it. Heat it in short bursts. Stir in between to avoid hot spots. If you prefer the skillet, warm it over low heat. Stir it gently until it’s hot. You may add a splash of water or broth if it feels dry. This keeps it moist and tasty.
Freezing tips for long-term storage
If you want to store the skillet for longer, freezing is a great option. First, let the dish cool completely. Then, transfer it to a freezer-safe container or bag. Remove as much air as possible. This helps avoid freezer burn. Label the bag or container with the date. You can freeze it for up to 2 months. To enjoy later, thaw it overnight in the fridge before reheating.
FAQs
Can I make Cheesy Cauliflower Rice Skillet ahead of time?
Yes, you can prepare this dish ahead of time. Cook the cauliflower rice and mix in the other ingredients. Once done, let it cool. Store it in an airtight container in the fridge. When you’re ready to eat, reheat it in a skillet or microwave. Add the cheese at the end to get that gooey melt.
What can I serve with this dish?
This cheesy cauliflower rice skillet pairs well with many sides. You can serve it with grilled chicken or fish for protein. A fresh salad adds a nice crunch. If you want something heartier, try it with crusty bread or garlic bread.
Is it possible to make this recipe dairy-free?
Yes, you can make this dish dairy-free. Use dairy-free cheese alternatives for the cheddar and mozzarella. Nutritional yeast is another great option for a cheesy flavor without dairy. Swap the butter for olive oil or a vegan butter substitute.
Additional common questions related to the recipe
Can I add more veggies? Absolutely! Bell peppers, spinach, or carrots work great. Feel free to mix in your favorites. How do I store leftovers? Place them in a sealed container in the fridge for up to three days. You can also freeze it for longer storage.
This blog post explored making a Cheesy Cauliflower Rice Skillet. We covered ingredients, step-by-step cooking, and tips for great texture and flavor. You learned about variations, storage, and answered common questions.
Now, you have all the tools to create this tasty dish. Whether you follow my recipe or make your own changes, enjoy the process and the flavors. Happy cooking!
