WANT TO SAVE THIS RECIPE?
Are you ready to whip up a dessert that brings smiles to everyone? My classic banana pudding recipe is both delightful and simple. You’ll savor layers of creamy pudding, sweet bananas, and fluffy whipped cream. This treat is perfect for any gathering or just a cozy night in. Follow me for easy steps, tips, and tasty variations that will make your banana pudding a hit!

Why I Love This Recipe
- Comforting and Nostalgic: This classic banana pudding recipe brings back memories of family gatherings and summer picnics, making it a comforting dessert for any occasion.
- Easy to Make: With minimal ingredients and straightforward steps, this recipe is perfect for both novice bakers and seasoned pros looking for a quick dessert.
- Deliciously Creamy: The combination of whipped cream and banana pudding creates a rich, creamy texture that is incredibly satisfying with every bite.
- Customizable Layers: Feel free to add your favorite ingredients, like chopped nuts or chocolate chips, to make it your own and elevate the classic flavor.
Ingredients
List of Ingredients
To make classic banana pudding, you will need:
– 4 ripe bananas, sliced
– 1 box (vanilla) instant pudding mix
– 2 cups cold milk
– 1 cup heavy cream
– 1/2 cup powdered sugar
– 1 teaspoon vanilla extract
– 1 box vanilla wafers
– Fresh mint leaves for garnish (optional)
Optimal Ingredient Selection
Choosing the right ingredients is key. Start with ripe bananas. Look for bananas with a few brown spots. This means they are sweet and flavorful. The vanilla pudding mix should be instant for quick prep. Use cold milk to help the pudding set. Choose heavy cream with a high fat content. This will make your whipped cream rich and fluffy. Fresh mint leaves add a nice touch at the end.
Substitutions for Dietary Restrictions
If you have dietary needs, you can make swaps. Use dairy-free milk for a lighter option. There are many great plant-based puddings available too. If you can’t have heavy cream, try coconut cream. It will still give you a nice texture. For a gluten-free version, choose gluten-free wafers. Always check labels to ensure your ingredients fit your needs.
Step-by-Step Instructions
Preparing the Pudding Mixture
To start, grab a large mixing bowl. In this bowl, add the box of vanilla pudding mix and the cold milk. Use a whisk and mix them together. Whisk until the mixture thickens. This usually takes about 2 to 3 minutes. Once it thickens, set it aside. This pudding is the heart of your dessert.
Making the Whipped Cream
Next, take another bowl. In this bowl, add the heavy cream, powdered sugar, and vanilla extract. Use an electric mixer to beat the mixture. Beat it until soft peaks form. This means the cream should have a nice, fluffy texture. Once done, gently fold this whipped cream into the pudding mixture. Mix until you see no white streaks. This step gives your pudding a rich and creamy taste.
Layering the Banana Pudding
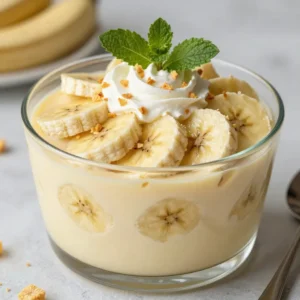
Now comes the fun part—layering! You can use a trifle dish or individual cups. Start by adding a layer of vanilla wafers at the bottom. Then, add a layer of the pudding mixture on top. Next, place a layer of sliced bananas. Repeat these layers until you use all the ingredients. Finish with a layer of pudding on top. For a nice touch, crush a few extra vanilla wafers and sprinkle them over the top. This adds a bit of crunch. Cover your dish and refrigerate it for at least 4 hours. If you can wait overnight, do it! This helps all the flavors blend. Before serving, you can add fresh mint leaves for a colorful garnish.
Tips & Tricks
How to Select Ripe Bananas
To pick the right bananas, look for ones that are yellow with a few brown spots. This means they are sweet and ready to eat. Avoid green bananas, as they will not be sweet. You want bananas that feel firm but give slightly when you press them. This ripeness adds great flavor to your pudding.
Ensuring the Right Consistency of Pudding
When you mix the pudding, whisk it well with cold milk. You should whisk for about 2-3 minutes until it thickens. If your pudding is too runny, it may need more time to set. You can also add a bit more pudding mix to help it thicken. The goal is a smooth, creamy texture that holds its shape in layers.
Best Practices for Whipping Cream
When you whip the cream, use a cold bowl and cold beaters. This helps the cream whip faster and better. Start at a low speed and gradually increase it to medium. Mix until soft peaks form, which takes just a few minutes. Be careful not to over-whip, or it will turn into butter. Adding powdered sugar and vanilla gives it a nice sweet flavor.
Pro Tips
- Use Ripe Bananas: The riper the bananas, the sweeter and more flavorful your pudding will be. Look for bananas with brown spots for the best taste!
- Chill the Bowls: For an extra fluffy whipped cream, chill your mixing bowl and beaters in the freezer for about 10 minutes before whipping the cream.
- Layer with Care: To prevent the bananas from browning, layer them just before serving or apply a bit of lemon juice on them.
- Make Ahead: This dessert tastes even better the next day! Make it a day in advance to allow the flavors to meld and the wafers to soften perfectly.
Variations
Different Types of Pudding Mixes
You can change the flavor of your banana pudding by using different pudding mixes. Chocolate pudding adds a rich twist. Butterscotch pudding gives a sweet, buttery taste. You can even try cheesecake pudding for a creamy flavor. Each mix changes the final dish and keeps it fun.
Adding Fruits or Flavors
Fruits can make your banana pudding unique. Try adding strawberries or blueberries for a fruity kick. You can also use peach slices for a summer vibe. For an extra pop, add a splash of almond or coconut extract. These small changes make a big impact on taste.
Using Alternative Cookies or Wafers
Vanilla wafers are classic, but you can experiment with other cookies. Chocolate cookies add depth and richness. You might also try graham crackers for a crunchy texture. Even ginger snaps can bring a spicy twist to your pudding. These swaps can surprise your taste buds.
Storage Info
Proper Refrigeration Techniques
To keep your banana pudding fresh, store it in the fridge. Use an airtight container or cover it tightly with plastic wrap. This helps keep the pudding moist and stops it from absorbing other smells. Make sure your fridge is set to 40°F or lower for the best results.
How Long Does Banana Pudding Last?
Banana pudding lasts about 3 to 4 days in the fridge. After that, the bananas may turn brown and mushy. Always check for freshness before serving. If you see any signs of spoilage, it’s best to toss it out.
Freezing Banana Pudding
You can freeze banana pudding, but it may change texture. The cream and pudding may separate when thawed. If you decide to freeze it, do not add the bananas or wafers. Instead, freeze just the pudding mixture. You can layer in fresh bananas and wafers after thawing. To freeze, place the pudding in a freezer-safe container. It lasts about 2 months in the freezer. Be sure to label the container with the date. When ready to eat, thaw it in the fridge overnight.
FAQs
Can I use fresh whipped cream instead of instant pudding?
Yes, you can use fresh whipped cream. It adds a light and fluffy texture. Just remember to whip it until soft peaks form. Mix it into the pudding carefully. This will help keep it airy and sweet. You can also use homemade pudding for more flavor.
What can I do if my pudding is too runny?
If your pudding is too runny, don’t worry. You can add more instant pudding mix. Just sprinkle a little in and mix well. Let it sit for a few minutes to thicken. If needed, you can also chill it longer in the fridge. This will help it set up nicely.
Is it necessary to refrigerate before serving?
Yes, refrigerating is a key step. It helps flavors blend and the wafers soften. Aim for at least 4 hours in the fridge. Overnight is even better for a creamier texture. Serving it cold makes every bite refreshing and delicious.
This blog post covered how to make delicious banana pudding. We explored ingredient choices and altered recipes for dietary needs. I shared clear steps for mixing and layering your pudding and tips for selecting ripe bananas. You learned ways to add flavors and manage storage.
In closing, enjoy making your banana pudding. Each bite should be a deligh
Classic Banana Pudding
A delicious layered dessert featuring bananas, vanilla pudding, and wafers.
Prep Time 20 minutes mins
Total Time 4 hours hrs 20 minutes mins
Course Dessert
Cuisine American
Servings 6
Calories 250 kcal
- 4 none ripe bananas, sliced
- 1 box vanilla instant pudding mix
- 2 cups cold milk
- 1 cup heavy cream
- 1 half cup powdered sugar
- 1 teaspoon vanilla extract
- 1 box vanilla wafers
- optional none fresh mint leaves for garnish
In a large mixing bowl, whisk together the vanilla pudding mix and cold milk until thickened, about 2-3 minutes. Set aside.
In another bowl, using an electric mixer, beat the heavy cream, powdered sugar, and vanilla extract until soft peaks form.
Gently fold the whipped cream into the pudding mixture until well combined.
In a trifle dish or individual serving cups, layer the ingredients starting with a layer of vanilla wafers, followed by a layer of the pudding mixture, then a layer of sliced bananas.
Repeat the layers until all ingredients are used, finishing with a layer of pudding on top.
Crush a few extra vanilla wafers and sprinkle them over the top for added crunch and decoration.
Cover and refrigerate the banana pudding for at least 4 hours, or overnight to allow the flavors to meld and the wafers to soften.
Before serving, garnish with fresh mint leaves for a pop of color if desired.
Chill overnight for best flavor.
Keyword banana pudding, dessert, layered dessert
WANT TO SAVE THIS RECIPE?