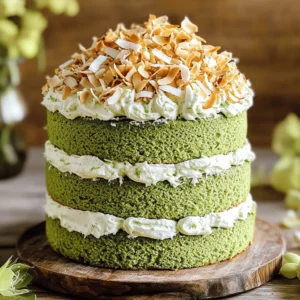
Ready to impress your friends with a treat they won’t forget? This Matcha Coconut Layer Cake is not just delicious; it’s easy to make, too! With its vibrant green layers and creamy coconut frosting, it’s a perfect blend of unique flavors. I’ll guide you step-by-step, making sure you create a stunning dessert that’s great for any occasion. Let’s dive into this delightful recipe and elevate your baking skills!

Ingredients
Cake Ingredients
– 2 cups all-purpose flour
– 1 cup granulated sugar
– 1/2 cup unsweetened coconut flakes
– 1 tablespoon matcha powder
– 1 teaspoon baking powder
– 1/2 teaspoon baking soda
– 1/4 teaspoon salt
– 1 cup coconut milk
– 1/2 cup vegetable oil
– 3 large eggs
– 1 teaspoon vanilla extract
Frosting Ingredients
– 1 cup heavy whipping cream
– 1/2 cup coconut cream (chilled)
– 1/4 cup powdered sugar
– 1 teaspoon vanilla extract
– Toasted coconut flakes for garnish
Optional Garnishes
– Fresh berries for a pop of color
– Edible flowers for a fancy touch
– Drizzle of chocolate for extra sweetness
Step-by-Step Instructions
Preparing the Cake Batter
Start by preheating your oven to 350°F (175°C). Grease and flour three 8-inch round cake pans. In a large bowl, mix the dry ingredients. Combine 2 cups of all-purpose flour, 1 cup of granulated sugar, 1/2 cup of unsweetened coconut flakes, 1 tablespoon of matcha powder, 1 teaspoon of baking powder, 1/2 teaspoon of baking soda, and 1/4 teaspoon of salt. Whisk these together until they are well mixed.
In another bowl, add the wet ingredients. Beat together 1 cup of coconut milk, 1/2 cup of vegetable oil, 3 large eggs, and 1 teaspoon of vanilla extract. Mix until it is smooth. Gradually pour the wet mix into the dry mix. Stir until just combined. Be careful not to overmix, as this can affect the cake’s texture.
Baking the Cake Layers
Divide the batter evenly among the three prepared cake pans. Tap each pan gently on the counter to remove air bubbles. Bake the layers for 25-30 minutes. To check if they are done, insert a toothpick into the center. It should come out clean. After baking, let the cakes cool in the pans for 10 minutes. Then, transfer them to a wire rack to cool completely.
Making the Coconut Cream Frosting
While the cakes cool, prepare the coconut cream frosting. Take a large bowl and add 1 cup of heavy whipping cream, 1/2 cup of chilled coconut cream, 1/4 cup of powdered sugar, and 1 teaspoon of vanilla extract. Use an electric mixer to whip the mixture. Whip until soft peaks form. Be careful not to overwhip, or the frosting may become grainy.
Assembling the Layer Cake
Once the cakes are cool, begin to assemble. Place one cake layer on a serving plate. Spread a generous amount of the coconut cream frosting on top. Stack the second layer on top and repeat. Add the third layer on top last. Cover the cake with the remaining frosting. Use a spatula to smooth the frosting on the top and sides for a clean finish. For the final touch, sprinkle toasted coconut flakes on top for added flavor and texture.
Tips & Tricks
Baking Tips
To get the best cake texture, follow these tips:
– Use fresh ingredients. Old baking powder or flour can affect your cake.
– Measure flour correctly. Spoon it into your cup and level it off with a knife.
– Do not overmix your batter. Mix until just combined for a light cake.
– Make sure your oven is preheated. This helps the cake rise evenly.
– Tap the pans gently on the counter. This helps remove air bubbles for a smoother texture.
Frosting Tips
For the perfect coconut cream frosting:
– Chill your mixing bowl and beaters. This helps the cream whip better.
– Whip the heavy cream until soft peaks form. Stop before it gets grainy.
– Mix the coconut cream and sugar slowly. This helps blend the flavors well.
– Apply frosting between layers generously. This keeps the cake moist and tasty.
– Use a spatula to smooth the frosting. This gives your cake a nice finish.
Presentation Tips
Make your cake shine with these ideas:
– Add toasted coconut flakes on top. This gives a nice crunch and look.
– Use fresh fruit as a garnish. Berries or slices of mango add color.
– Place the cake on a decorative stand. This makes it a showpiece.
– Use edible flowers for a pretty touch. They add color and elegance.
– Cut slices neatly for serving. This helps guests enjoy every bite.

Variations
Flavor Variations
You can easily change the taste of your matcha coconut layer cake. Adding citrus flavors like lemon or orange zest gives a nice twist. The bright notes of citrus will balance the rich coconut. If you love chocolate, try adding cocoa powder to the cake batter. This mix pairs well with the matcha and creates a beautiful color contrast. You can even swirl some melted chocolate into the frosting for a delightful surprise.
Dietary Modifications
If you need a gluten-free cake, swap the all-purpose flour for a gluten-free blend. Just make sure it has a good mix of flours. For a vegan version, replace the eggs with applesauce or flaxseed meal. Use almond or soy milk instead of coconut milk. You can also find vegan whipping cream for the frosting. These changes keep the cake tasty while meeting dietary needs.
Layer and Portion Options
You can change the size and shape of your cake too. If you want a smaller cake, use two 6-inch pans instead of three 8-inch pans. For a fun twist, bake the batter in a cupcake pan for cute cupcakes. You can also make a sheet cake by spreading the batter in a 9×13-inch pan. Just adjust the baking time to around 20-25 minutes. Each shape offers a new way to enjoy your matcha coconut flavor!
Storage Info
Short-term Storage
To keep your Matcha Coconut Layer Cake fresh, refrigerate any leftovers. Place the cake in an airtight container. If you don’t have one, wrap it tightly in plastic wrap. This keeps moisture in and prevents the cake from drying out. It will last up to five days in the fridge. Enjoy the flavors as they meld together!
Long-term Storage
For long-term storage, freezing is your best bet. First, let the cake cool completely. Then, slice it into portions if you prefer. Wrap each piece in plastic wrap, then in aluminum foil. This double wrapping prevents freezer burn. You can store the cake in the freezer for up to three months. Label the packages with the date for easy tracking.
Reheating Tips
When you’re ready to enjoy your frozen cake, take it out of the freezer. Remove the foil and plastic wrap. Let it thaw in the fridge overnight for the best results. If you need it faster, leave it on the counter for about 2-3 hours. To revive the cake’s texture, warm it slightly in the oven. Set the oven to 300°F (150°C) and heat for about 10 minutes. This will make it taste fresh and soft again!
FAQs
How to make my cake more moist?
To make your cake moist, try these tips:
– Add coconut milk: It adds rich flavor and moisture.
– Use oil: Vegetable oil keeps the cake moist compared to butter.
– Don’t overmix: Mix your batter just until combined. Overmixing can dry it out.
– Bake at a lower temperature: A slower bake helps keep moisture in.
– Use simple syrup: Brush it on layers after baking for added moisture.
These steps help ensure your Matcha Coconut Layer Cake stays soft and delicious.
Can I use a different type of milk?
Yes, you can use other types of milk. Here are a few options:
– Almond milk: Adds a light flavor and keeps the cake moist.
– Soy milk: Works well and offers a slightly nutty taste.
– Oat milk: Adds creaminess and is great for a rich texture.
Each milk alternative will change the flavor a bit, but your cake will still taste great.
What’s the best way to prevent the cake from collapsing?
To keep your cake from collapsing, follow these tips:
– Properly measure ingredients: Use a scale for accuracy.
– Ensure even mixing: Mix wet and dry ingredients thoroughly, but don’t overdo it.
– Use fresh baking powder: Old leavening agents can cause collapse.
– Don’t open the oven door: This can let heat escape and affect rising.
By following these steps, you can achieve a stable and well-risen Matcha Coconut Layer Cake.
You now have a complete guide to making a perfect layer cake. We covered key ingredients, from the cake itself to the frosting and garnishes. I shared detailed steps for mixing, baking, and layering the cake. Don’t forget the tips and tricks to achieve that perfect texture. Try out different flavors and make it your own! Store your cake right, so it stays fresh longer. With this knowledge, you’re ready to impress friends and family with your baking skills. Enjoy every bite!