WANT TO SAVE THIS RECIPE?
Indulge in a sweet treat with my Mocha Chip Icebox Cake! This delightful no-bake recipe combines rich coffee flavors and chocolate chips for a perfect dessert. Whether you’re a kitchen novice or a seasoned pro, this easy-to-follow guide will help you impress your friends and family. Get ready to dive into a world of layers and flavors that will cool you down and satisfy your sweet tooth—no baking required!

Why I Love This Recipe
- Decadent Flavor: This Mocha Chip Icebox Cake combines the rich flavors of coffee and chocolate, making it a delightful dessert for any chocolate lover.
- No-Bake Convenience: Perfect for hot days or quick gatherings, this icebox cake requires no baking, allowing you to enjoy a delicious treat without the heat.
- Easy Preparation: With just a few simple steps, this recipe is accessible for both novice and experienced bakers, ensuring everyone can make it with ease.
- Make-Ahead Delight: This cake can be prepared in advance and stored in the fridge, making it a great option for parties or family gatherings.
Ingredients
Main Ingredients for Mocha Chip Icebox Cake
– 1 cup strong brewed coffee, cooled
– 2 tablespoons cocoa powder
– 1 cup heavy whipping cream
– ½ cup powdered sugar
– 1 teaspoon vanilla extract
– 2 cups chocolate chip cookies (store-bought or homemade)
– 1 cup mini chocolate chips for layering
– Cocoa powder for dusting (optional)
These ingredients come together to create a rich and creamy dessert. The strong brewed coffee adds depth, while the cocoa powder enhances the chocolate flavor. Heavy whipping cream provides the lightness that balances the cake’s richness.
Optional Ingredients
You can make this cake even more fun with some optional items:
– Whipped cream for topping
– Chocolate syrup for drizzling
– Fresh berries, like raspberries or strawberries
These extra touches can elevate the dessert. They can add color and flavor, making it visually appealing and delicious.
Suggested Substitutions
If you want to change things up, consider these substitutions:
– Use decaf coffee if you prefer no caffeine.
– Swap the heavy cream for coconut cream for a dairy-free option.
– Use almond or oat milk instead of heavy cream for a lighter version.
These swaps let you customize the cake to fit your taste and dietary needs.
Step-by-Step Instructions
Preparing the Coffee-Cocoa Mixture
Start by brewing a cup of strong coffee. Allow it to cool. In a small bowl, mix the cooled coffee with cocoa powder. Stir until the cocoa dissolves. This mixture adds a rich flavor to your cake.
Whipping the Cream
In a large bowl, pour in the heavy cream. Add the powdered sugar and vanilla extract. Use an electric mixer to whip the cream. Mix until you see soft peaks form. Be careful not to whip it too much. You want it fluffy, not grainy.
Layering the Cake
Take a chocolate chip cookie and dip it into the coffee-cocoa mixture. Let any extra liquid drip off. Place the dipped cookie at the bottom of a 9×9 inch dish. Spread a layer of whipped cream over the cookie. Sprinkle mini chocolate chips on top.
Repeat the process of dipping cookies, layering cream, and adding chocolate chips. Keep going until you run out of ingredients. Finish with a layer of whipped cream on top. Cover with plastic wrap and refrigerate for at least 4 hours. For best taste, let it chill overnight. Before you serve, dust the top lightly with cocoa powder.
Tips & Tricks
Best Practices for Whipping Cream
Whipping cream is simple, but a few tips help. Start with cold cream. Cold cream whips faster and better. Use a large bowl to avoid splatter. An electric mixer works best. Beat the cream until it forms soft peaks. Soft peaks bend over but still hold shape. This is key for the cake.
How to Avoid Overwhipping
Overwhipping can turn cream into butter. Watch the texture closely. Stop mixing as soon as the cream reaches soft peaks. If you whip too long, the cream becomes grainy. If this happens, you can save it. Fold in a little fresh cream to fix it. This helps restore the smoothness.
Tips for Layering Cookies and Cream
Dipping cookies in the coffee-cocoa mix is fun. But don’t soak them too long. A quick dip keeps cookies firm. Layer the dipped cookies closely together. This helps create a solid base. Alternate layers of whipped cream and mini chocolate chips. This adds texture and flavor. Finish with a layer of whipped cream on top. Dust with cocoa powder for a nice touch.
Pro Tips
- Chill the Bowl: Before whipping the cream, chill your mixing bowl and beaters in the freezer for about 15 minutes. This helps the cream whip faster and achieve a better volume.
- Layering Technique: When layering the cookies and cream, ensure you evenly distribute the mini chocolate chips for a consistent flavor in every bite.
- Overnight Rest: For the best flavor and texture, allow the icebox cake to chill overnight. The cookies will absorb moisture and become perfectly soft.
- Serving Suggestion: Top each slice with a dollop of freshly whipped cream and a sprinkle of cocoa powder for an appealing presentation.
Variations
Different Flavors to Incorporate
You can change the flavor of your mocha chip icebox cake by using different extracts. Try almond extract for a nutty taste. You can also use flavored coffee, like hazelnut or vanilla, to mix things up. For a fruity twist, add a layer of fresh berries between the whipped cream layers. Chocolate lovers could use dark chocolate cookies instead of regular ones. Each change brings a new taste to enjoy!
Gluten-Free Cookie Options
If you want a gluten-free version, use gluten-free chocolate chip cookies. Many brands offer tasty options that work great in this cake. You can even make your cookies at home using gluten-free flour. Just follow your favorite cookie recipe and swap regular flour with gluten-free flour. This way, everyone can enjoy a slice without worry!
Vegan Adaptations
To make a vegan mocha chip icebox cake, swap the heavy cream for coconut cream. Chill a can of coconut milk, then scoop out the solid part and whip it. Use maple syrup instead of powdered sugar for sweetness. Choose vegan chocolate chip cookies to complete the recipe. This version is just as creamy and delicious!
Storage Info
How to Properly Store the Cake
To store your mocha chip icebox cake, cover it tightly with plastic wrap. This keeps the cake fresh and prevents it from drying out. You can also use an airtight container. Make sure the cake stays in the fridge until you are ready to serve. This cake tastes best chilled.
Tips for Freezing Leftovers
If you have leftover cake, you can freeze it. First, slice the cake into squares. Wrap each slice in plastic wrap. Then place the wrapped slices in a freezer-safe bag or container. This way, you can enjoy a piece later. Thaw it overnight in the fridge before serving.
Serving Suggestions After Refrigeration
When you are ready to serve the cake, take it out of the fridge. You can dust the top with cocoa powder for a nice look. Add a dollop of whipped cream on each slice. Sprinkle some mini chocolate chips on top for extra flavor. This makes each bite even more delightful!
FAQs
Can I use other types of cookies?
Yes, you can use other cookies! Vanilla wafers or graham crackers work well too. Feel free to get creative with flavors. Just remember to dip them in the coffee-cocoa mixture. This keeps the cake moist and tasty.
How long does an icebox cake last in the fridge?
An icebox cake can last about 3 to 5 days in the fridge. Cover it well with plastic wrap. The longer it sits, the more the cookies soak up the flavors. This can make the cake even better!
Is it necessary to use heavy cream?
Heavy cream gives the cake a rich, creamy texture. You can use whipped topping as a substitute. However, it won’t be as rich. If you want a lighter option, try using Greek yogurt. It adds creaminess and a bit of tang.
This recipe for Mocha Chip Icebox Cake is simple and fun. You learned about key ingredients, easy steps, and helpful tips. Variations and storage tips allow for creativity and longer enjoyment. Make this cake your own by trying different flavors or adapting it for special diets. Enjoying this dessert is just a few steps away! Whether you’re sharing or savoring alone, you’ll find joy in every bit
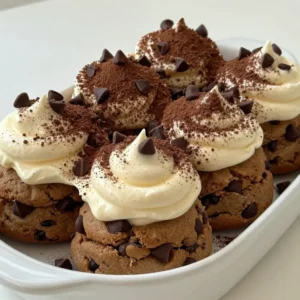
Mocha Chip Icebox Cake
A delicious no-bake dessert combining coffee, cocoa, and chocolate chip cookies.
Prep Time 20 minutes mins
Total Time 4 hours hrs
Course Dessert
Cuisine American
Servings 8
Calories 250 kcal
- 1 cup strong brewed coffee, cooled
- 2 tablespoons cocoa powder
- 1 cup heavy whipping cream
- ½ cup powdered sugar
- 1 teaspoon vanilla extract
- 2 cups chocolate chip cookies (store-bought or homemade)
- 1 cup mini chocolate chips for layering
- to taste cocoa powder for dusting (optional)
In a small bowl, mix the cooled brewed coffee with cocoa powder until dissolved. Set aside.
In a large mixing bowl, use an electric mixer to whip the heavy cream, powdered sugar, and vanilla extract until soft peaks form. Be careful not to overwhip.
Take a chocolate chip cookie and dip it quickly into the coffee-cocoa mixture, allowing the excess to drip off.
Layer the dipped cookie on the bottom of a 9x9 inch dish or a similar-sized serving platter.
Spread a layer of the whipped cream mixture over the cookie layer, followed by a sprinkle of mini chocolate chips.
Repeat the process: dip the cookies, layer them over the whipped cream, add more whipped cream, and chocolate chips until ingredients are used up, finishing with a layer of whipped cream on top.
Cover the dish with plastic wrap and refrigerate for at least 4 hours, or overnight for best results, allowing the cookies to soften and meld the flavors.
Before serving, dust the top with a light sprinkle of cocoa powder for an added touch.
For best results, refrigerate overnight.
Keyword chocolate, icebox cake, mocha, no-bake
WANT TO SAVE THIS RECIPE?