No Bake Chocolate Peanut Butter Cups Delightful Treat

WANT TO SAVE THIS RECIPE?

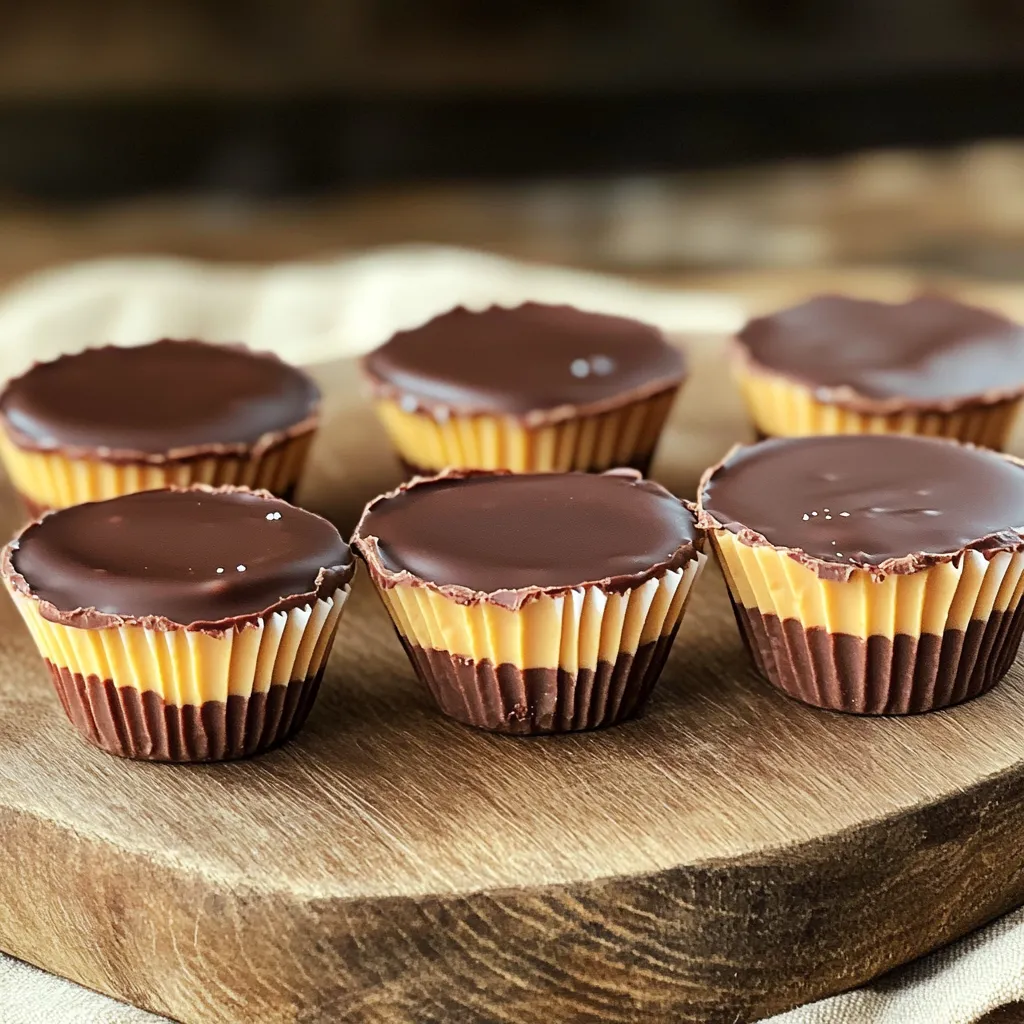
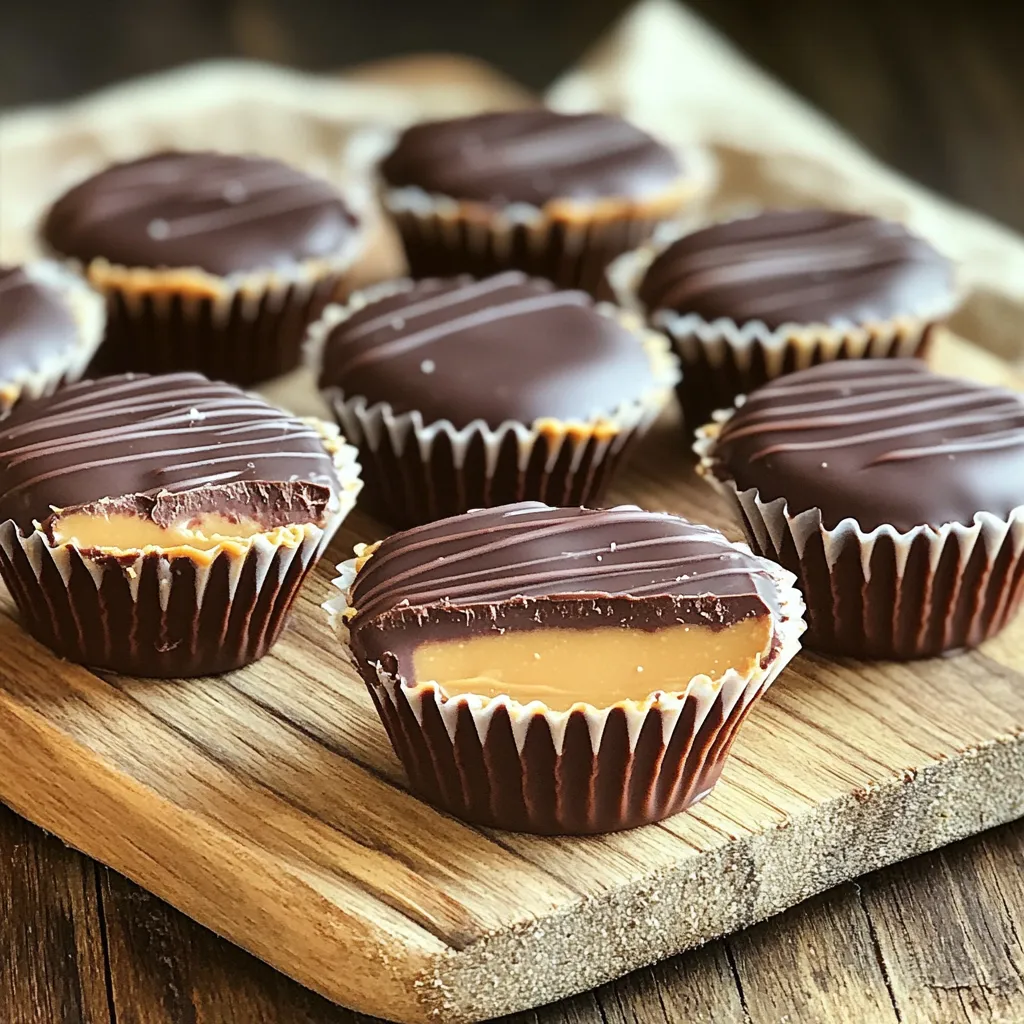
If you love quick and easy treats, you’re in the right place! Today, I’m sharing how to make No Bake Chocolate Peanut Butter Cups. They are rich, creamy, and take just minutes to prepare. With simple ingredients like peanut butter and chocolate, you can create a delightful dessert that everyone will adore. Ready to make these tasty bites? Let’s dive right into this sweet adventure!

To make these no-bake chocolate peanut butter cups, you'll need some simple items. Here’s a list to get you started: - 1 cup creamy peanut butter - 1/2 cup powdered sugar - 1 cup semi-sweet chocolate chips - 1 tablespoon coconut oil - 1/2 teaspoon vanilla extract - Pinch of sea salt - Mini muffin liners (12 count) These ingredients come together to create a rich and tasty treat. The creamy peanut butter gives a smooth texture. The powdered sugar adds sweetness, while the chocolate brings a delightful richness. Coconut oil helps the chocolate melt easily and set well. Vanilla extract boosts the flavor, and sea salt balances the sweetness. Using mini muffin liners makes serving easy and fun. Each cup is a perfect bite of joy! To start, gather your mixing bowl. Add 1 cup of creamy peanut butter. Then, pour in 1/2 cup of powdered sugar. Next, add 1/2 teaspoon of vanilla extract and a pinch of sea salt. Mix everything together until it’s smooth. This mixture will be the heart of your cups. Now it’s time to melt the chocolate. Take 1 cup of semi-sweet chocolate chips and 1 tablespoon of coconut oil. If you use a microwave, heat it in 30-second bursts. Stir after each burst until melted. If you prefer, use a double boiler on the stove. Melt it over low heat while stirring. The goal is a smooth chocolate mix. Once the chocolate is melted, it’s assembly time. Grab your mini muffin liners. Spoon about 1 tablespoon of melted chocolate into each liner. Use the back of a small spoon to spread it out. Cover the bottom well. Then, refrigerate the liners for about 10 minutes. This sets the chocolate base. After the base sets, scoop 1 tablespoon of the peanut butter mixture into each cup. Spread it gently. Finally, pour another tablespoon of melted chocolate on top. Make sure to cover the peanut butter fully. Tap the muffin tin on the counter to smooth the tops. Place the muffin tins back in the fridge. Let them chill for another 15 to 20 minutes. This time allows the chocolate to harden completely. Once done, carefully peel the peanut butter cups from the liners. Enjoy your no-bake chocolate peanut butter cups! You can swap out ingredients for your taste. Try crunchy peanut butter for extra texture. Use maple syrup instead of powdered sugar for a healthier option. If you need a dairy-free treat, choose dairy-free chocolate chips. Always make sure your substitutes fit your diet. To get smooth chocolate, melt it slowly. Use short bursts in the microwave. Stir often so it heats evenly. If you use a double boiler, keep the water simmering, not boiling. This gives you a nice, creamy finish. These treats shine at parties! Serve them on a festive platter. You can add toppings like chopped nuts or sprinkles. For a fun twist, serve them with fresh fruit. Everyone loves a sweet surprise! {{image_2}} You can make these no bake chocolate peanut butter cups even better by adding nuts. Chopped peanuts or almonds give a nice crunch. Simply mix a handful of chopped nuts into your peanut butter layer. This adds texture and flavor. You can also sprinkle some crushed nuts on top of the melted chocolate. The extra crunch makes each bite more fun and exciting. Want to change the flavor? You can add different extracts to the peanut butter mix. A splash of almond extract can give it a nutty twist. If you like coconut, try coconut extract. Just a little goes a long way. These flavor boosts can make your treats unique and special. Feel free to experiment with other extracts too, like mint or orange. Toppings can change the look and taste of your cups. Instead of just chocolate, you can drizzle white chocolate on top. This adds a sweet contrast to the dark chocolate. You can also use sprinkles or sea salt. They add color and extra flavor. For a fun twist, try using mini chocolate chips or shredded coconut as toppings. Get creative and make your cups your own! To keep your no bake chocolate peanut butter cups fresh, store them in an airtight container. Place parchment paper between layers to prevent sticking. Keep them in the fridge for the best taste and texture. The cool temperature helps maintain their shape and flavor. When stored properly, these treats last about one week in the fridge. After a week, they may start to lose their taste and texture. If you notice any changes in smell or appearance, it's best to toss them out. Always trust your senses! You can freeze these cups for longer storage. Wrap each cup in plastic wrap or foil before placing them in a freezer-safe container. They can last up to three months in the freezer. To enjoy them, thaw in the fridge overnight. This keeps them tasty and ready to eat! Yes, you can use crunchy peanut butter. It adds a nice texture. You may find the bites more fun with the crunchy pieces. Just replace creamy peanut butter with an equal amount of crunchy peanut butter. The flavor stays great, and the cups will still set well. To make these cups dairy-free, choose dairy-free chocolate chips. Look for brands labeled vegan or dairy-free. You can find these in health food stores or online. This way, you keep the taste while making it suitable for a dairy-free diet. If you don’t have coconut oil, use vegetable oil or butter. Both options will work well for melting the chocolate. They help keep the chocolate smooth and easy to pour. You can also use shortening for a similar texture. To prevent chocolate from cracking, ensure it melts slowly and evenly. Stir it often while melting. Avoid heating it too much, as that can cause it to harden. Let the cups chill in the fridge gently. This will help them set evenly without cracks. You learned how to make tasty no-bake chocolate peanut butter cups. We covered ingredients, steps, helpful tips, and cool variations. Remember, you can mix in nuts or different flavors to make them your own. Store them right for fresh snacks any time. I hope you enjoy making these treats as much as I do. Happy cooking!

Ingredients

To make these no-bake chocolate peanut butter cups, you’ll need some simple items. Here’s a list to get you started:

– 1 cup creamy peanut butter

– 1/2 cup powdered sugar

– 1 cup semi-sweet chocolate chips

– 1 tablespoon coconut oil

– 1/2 teaspoon vanilla extract

– Pinch of sea salt

– Mini muffin liners (12 count)

These ingredients come together to create a rich and tasty treat. The creamy peanut butter gives a smooth texture. The powdered sugar adds sweetness, while the chocolate brings a delightful richness. Coconut oil helps the chocolate melt easily and set well. Vanilla extract boosts the flavor, and sea salt balances the sweetness.

Using mini muffin liners makes serving easy and fun. Each cup is a perfect bite of joy!

Step-by-Step Instructions

Preparing the Peanut Butter Mixture

To start, gather your mixing bowl. Add 1 cup of creamy peanut butter. Then, pour in 1/2 cup of powdered sugar. Next, add 1/2 teaspoon of vanilla extract and a pinch of sea salt. Mix everything together until it’s smooth. This mixture will be the heart of your cups.

Melting the Chocolate

Now it’s time to melt the chocolate. Take 1 cup of semi-sweet chocolate chips and 1 tablespoon of coconut oil. If you use a microwave, heat it in 30-second bursts. Stir after each burst until melted. If you prefer, use a double boiler on the stove. Melt it over low heat while stirring. The goal is a smooth chocolate mix.

Assembling the Peanut Butter Cups

Once the chocolate is melted, it’s assembly time. Grab your mini muffin liners. Spoon about 1 tablespoon of melted chocolate into each liner. Use the back of a small spoon to spread it out. Cover the bottom well. Then, refrigerate the liners for about 10 minutes. This sets the chocolate base.

After the base sets, scoop 1 tablespoon of the peanut butter mixture into each cup. Spread it gently. Finally, pour another tablespoon of melted chocolate on top. Make sure to cover the peanut butter fully. Tap the muffin tin on the counter to smooth the tops.

Setting the Cups

Place the muffin tins back in the fridge. Let them chill for another 15 to 20 minutes. This time allows the chocolate to harden completely. Once done, carefully peel the peanut butter cups from the liners. Enjoy your no-bake chocolate peanut butter cups!

Tips & Tricks

Ingredient Substitutions

You can swap out ingredients for your taste. Try crunchy peanut butter for extra texture. Use maple syrup instead of powdered sugar for a healthier option. If you need a dairy-free treat, choose dairy-free chocolate chips. Always make sure your substitutes fit your diet.

Ensuring Perfectly Smooth Chocolate

To get smooth chocolate, melt it slowly. Use short bursts in the microwave. Stir often so it heats evenly. If you use a double boiler, keep the water simmering, not boiling. This gives you a nice, creamy finish.

Serving Suggestions

These treats shine at parties! Serve them on a festive platter. You can add toppings like chopped nuts or sprinkles. For a fun twist, serve them with fresh fruit. Everyone loves a sweet surprise!

Variations

Adding Crunch with Nuts

You can make these no bake chocolate peanut butter cups even better by adding nuts. Chopped peanuts or almonds give a nice crunch. Simply mix a handful of chopped nuts into your peanut butter layer. This adds texture and flavor. You can also sprinkle some crushed nuts on top of the melted chocolate. The extra crunch makes each bite more fun and exciting.

Flavor Enhancements with Extracts

Want to change the flavor? You can add different extracts to the peanut butter mix. A splash of almond extract can give it a nutty twist. If you like coconut, try coconut extract. Just a little goes a long way. These flavor boosts can make your treats unique and special. Feel free to experiment with other extracts too, like mint or orange.

Alternative Toppings

Toppings can change the look and taste of your cups. Instead of just chocolate, you can drizzle white chocolate on top. This adds a sweet contrast to the dark chocolate. You can also use sprinkles or sea salt. They add color and extra flavor. For a fun twist, try using mini chocolate chips or shredded coconut as toppings. Get creative and make your cups your own!

Storage Info

Best Storage Practices

To keep your no bake chocolate peanut butter cups fresh, store them in an airtight container. Place parchment paper between layers to prevent sticking. Keep them in the fridge for the best taste and texture. The cool temperature helps maintain their shape and flavor.

Shelf Life of No Bake Chocolate Peanut Butter Cups

When stored properly, these treats last about one week in the fridge. After a week, they may start to lose their taste and texture. If you notice any changes in smell or appearance, it’s best to toss them out. Always trust your senses!

Freezing Options

You can freeze these cups for longer storage. Wrap each cup in plastic wrap or foil before placing them in a freezer-safe container. They can last up to three months in the freezer. To enjoy them, thaw in the fridge overnight. This keeps them tasty and ready to eat!

FAQs

Can I use crunchy peanut butter?

Yes, you can use crunchy peanut butter. It adds a nice texture. You may find the bites more fun with the crunchy pieces. Just replace creamy peanut butter with an equal amount of crunchy peanut butter. The flavor stays great, and the cups will still set well.

How can I make these dairy-free?

To make these cups dairy-free, choose dairy-free chocolate chips. Look for brands labeled vegan or dairy-free. You can find these in health food stores or online. This way, you keep the taste while making it suitable for a dairy-free diet.

What can I substitute for coconut oil?

If you don’t have coconut oil, use vegetable oil or butter. Both options will work well for melting the chocolate. They help keep the chocolate smooth and easy to pour. You can also use shortening for a similar texture.

How do I prevent the chocolate from cracking?

To prevent chocolate from cracking, ensure it melts slowly and evenly. Stir it often while melting. Avoid heating it too much, as that can cause it to harden. Let the cups chill in the fridge gently. This will help them set evenly without cracks.

You learned how to make tasty no-bake chocolate peanut butter cups. We covered ingredients, steps, helpful tips, and cool variations. Remember, you can mix in nuts or different flavors to make them your own. Store them right for fresh snacks any time. I hope you enjoy making these treats as much as I do. Happy cooking!

To make these no-bake chocolate peanut butter cups, you'll need some simple items. Here’s a list to get you started: - 1 cup creamy peanut butter - 1/2 cup powdered sugar - 1 cup semi-sweet chocolate chips - 1 tablespoon coconut oil - 1/2 teaspoon vanilla extract - Pinch of sea salt - Mini muffin liners (12 count) These ingredients come together to create a rich and tasty treat. The creamy peanut butter gives a smooth texture. The powdered sugar adds sweetness, while the chocolate brings a delightful richness. Coconut oil helps the chocolate melt easily and set well. Vanilla extract boosts the flavor, and sea salt balances the sweetness. Using mini muffin liners makes serving easy and fun. Each cup is a perfect bite of joy! To start, gather your mixing bowl. Add 1 cup of creamy peanut butter. Then, pour in 1/2 cup of powdered sugar. Next, add 1/2 teaspoon of vanilla extract and a pinch of sea salt. Mix everything together until it’s smooth. This mixture will be the heart of your cups. Now it’s time to melt the chocolate. Take 1 cup of semi-sweet chocolate chips and 1 tablespoon of coconut oil. If you use a microwave, heat it in 30-second bursts. Stir after each burst until melted. If you prefer, use a double boiler on the stove. Melt it over low heat while stirring. The goal is a smooth chocolate mix. Once the chocolate is melted, it’s assembly time. Grab your mini muffin liners. Spoon about 1 tablespoon of melted chocolate into each liner. Use the back of a small spoon to spread it out. Cover the bottom well. Then, refrigerate the liners for about 10 minutes. This sets the chocolate base. After the base sets, scoop 1 tablespoon of the peanut butter mixture into each cup. Spread it gently. Finally, pour another tablespoon of melted chocolate on top. Make sure to cover the peanut butter fully. Tap the muffin tin on the counter to smooth the tops. Place the muffin tins back in the fridge. Let them chill for another 15 to 20 minutes. This time allows the chocolate to harden completely. Once done, carefully peel the peanut butter cups from the liners. Enjoy your no-bake chocolate peanut butter cups! You can swap out ingredients for your taste. Try crunchy peanut butter for extra texture. Use maple syrup instead of powdered sugar for a healthier option. If you need a dairy-free treat, choose dairy-free chocolate chips. Always make sure your substitutes fit your diet. To get smooth chocolate, melt it slowly. Use short bursts in the microwave. Stir often so it heats evenly. If you use a double boiler, keep the water simmering, not boiling. This gives you a nice, creamy finish. These treats shine at parties! Serve them on a festive platter. You can add toppings like chopped nuts or sprinkles. For a fun twist, serve them with fresh fruit. Everyone loves a sweet surprise! {{image_2}} You can make these no bake chocolate peanut butter cups even better by adding nuts. Chopped peanuts or almonds give a nice crunch. Simply mix a handful of chopped nuts into your peanut butter layer. This adds texture and flavor. You can also sprinkle some crushed nuts on top of the melted chocolate. The extra crunch makes each bite more fun and exciting. Want to change the flavor? You can add different extracts to the peanut butter mix. A splash of almond extract can give it a nutty twist. If you like coconut, try coconut extract. Just a little goes a long way. These flavor boosts can make your treats unique and special. Feel free to experiment with other extracts too, like mint or orange. Toppings can change the look and taste of your cups. Instead of just chocolate, you can drizzle white chocolate on top. This adds a sweet contrast to the dark chocolate. You can also use sprinkles or sea salt. They add color and extra flavor. For a fun twist, try using mini chocolate chips or shredded coconut as toppings. Get creative and make your cups your own! To keep your no bake chocolate peanut butter cups fresh, store them in an airtight container. Place parchment paper between layers to prevent sticking. Keep them in the fridge for the best taste and texture. The cool temperature helps maintain their shape and flavor. When stored properly, these treats last about one week in the fridge. After a week, they may start to lose their taste and texture. If you notice any changes in smell or appearance, it's best to toss them out. Always trust your senses! You can freeze these cups for longer storage. Wrap each cup in plastic wrap or foil before placing them in a freezer-safe container. They can last up to three months in the freezer. To enjoy them, thaw in the fridge overnight. This keeps them tasty and ready to eat! Yes, you can use crunchy peanut butter. It adds a nice texture. You may find the bites more fun with the crunchy pieces. Just replace creamy peanut butter with an equal amount of crunchy peanut butter. The flavor stays great, and the cups will still set well. To make these cups dairy-free, choose dairy-free chocolate chips. Look for brands labeled vegan or dairy-free. You can find these in health food stores or online. This way, you keep the taste while making it suitable for a dairy-free diet. If you don’t have coconut oil, use vegetable oil or butter. Both options will work well for melting the chocolate. They help keep the chocolate smooth and easy to pour. You can also use shortening for a similar texture. To prevent chocolate from cracking, ensure it melts slowly and evenly. Stir it often while melting. Avoid heating it too much, as that can cause it to harden. Let the cups chill in the fridge gently. This will help them set evenly without cracks. You learned how to make tasty no-bake chocolate peanut butter cups. We covered ingredients, steps, helpful tips, and cool variations. Remember, you can mix in nuts or different flavors to make them your own. Store them right for fresh snacks any time. I hope you enjoy making these treats as much as I do. Happy cooking!

No Bake Chocolate Peanut Butter Cups

Indulge your sweet tooth with these easy No Bake Chocolate Peanut Butter Cups! This simple recipe combines creamy peanut butter and rich chocolate for a delicious treat that requires no oven time. Perfect for parties or a quick dessert fix, follow our step-by-step guide to make your own in just 45 minutes. Click through to discover how to create these mouthwatering delights that will satisfy your cravings!

Ingredients
  

1 cup creamy peanut butter

1/2 cup powdered sugar

1 cup semi-sweet chocolate chips

1 tablespoon coconut oil

1/2 teaspoon vanilla extract

Pinch of sea salt

Mini muffin liners (12 count)

Instructions
 

In a mixing bowl, combine the creamy peanut butter, powdered sugar, vanilla extract, and a pinch of sea salt. Stir until smooth and well combined.

    Melt the semi-sweet chocolate chips and coconut oil together. You can do this by using a microwave, heating in 30-second intervals and stirring in between until completely melted, or by using a double boiler on the stove.

      Once melted, take about one tablespoon of the chocolate mixture and spoon it into the bottom of each mini muffin liner to form the base. Use the back of a small spoon to spread it slightly and cover the bottom.

        Place the muffin liners in the refrigerator for about 10 minutes, or until the chocolate has set.

          After setting, remove the liners from the refrigerator and scoop about one tablespoon of the peanut butter mixture on top of the hardened chocolate layer in each liner.

            Spoon another tablespoon of melted chocolate over the peanut butter layer to cover it completely.

              Gently tap the muffin tins on the counter to smooth out the tops and remove any air bubbles.

                Refrigerate for another 15-20 minutes, or until the chocolate has fully hardened.

                  Once set, carefully remove the peanut butter cups from the liners and enjoy!

                    Prep Time: 15 minutes | Total Time: 45 minutes | Servings: 12 cups

                      WANT TO SAVE THIS RECIPE?