Want a sweet treat that’s super easy to make? These No-Bake Cookies and Cream Bars are the answer! With just a few simple ingredients, you can whip up a chilled delight that will impress family and friends. This recipe is quick, fun, and doesn’t require any baking. So grab your crushed cookies and let’s dive into making this creamy, tasty dessert! You won’t regret it!

Ingredients
Main Ingredients
– 2 cups crushed chocolate sandwich cookies
– 1 cup cream cheese, softened
– 1/2 cup powdered sugar
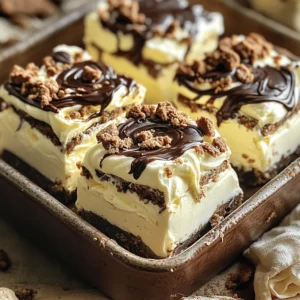
The main ingredients make this treat rich and creamy. I use chocolate sandwich cookies, like Oreos, for the base. Their crunchiness adds great texture. Cream cheese gives the bars a smooth, creamy layer. The powdered sugar adds just the right sweetness.
Additional Ingredients
– 1 cup whipped cream
– 1 teaspoon vanilla extract
– 1 cup chocolate chips, melted
For extra fluffiness, I fold in whipped cream. It makes the mixture light and airy. A touch of vanilla adds a nice flavor boost. The melted chocolate chips create a beautiful swirl on top, making it visually stunning.
Toppings
– Extra crushed cookies for garnish
I love adding extra crushed cookies on top. It gives the bars a nice crunch and looks pretty. These toppings help make every bite fun. Enjoying the mix of textures makes this dessert even better.
Step-by-Step Instructions
Preparation Steps
1. Start by taking a large mixing bowl. Add 2 cups of crushed chocolate sandwich cookies.
2. Next, add 1 cup of softened cream cheese and 1/2 cup of powdered sugar. Mix until you have a smooth blend.
3. Now, gently fold in 1 cup of whipped cream and 1 teaspoon of vanilla extract. Make sure everything is fluffy and well mixed.
Assembling the Bars
1. Line an 8×8 inch square baking dish with parchment paper. Leave some paper over the edges. This makes it easy to lift out later.
2. Spread the cookies and cream mixture evenly into the dish. Use a spatula to smooth the top.
3. Drizzle 1 cup of melted chocolate chips over the mixture. Take a knife or spatula to create swirls in the chocolate.
Chilling and Serving
1. Cover the dish with plastic wrap. Place it in the refrigerator for at least 4 hours. You want it firm.
2. After chilling, lift the bars out using the parchment paper. Cut them into squares and serve. Enjoy your sweet treat!
Tips & Tricks
Time-Saving Tips
Using store-bought whipped cream can cut your prep time. It saves you from whipping cream yourself. If you prepare ingredients in advance, it makes the whole process faster. Crush the cookies and soften the cream cheese the night before. This way, you can mix everything quickly when you’re ready.
Perfecting Texture and Flavor
Make sure your cream cheese is fully softened. This step helps create a smooth mix. If it’s cold, you’ll end up with lumps, which is not what we want. When you fold in the whipped cream, aim for a fluffy consistency. Too much mixing can deflate it, so be gentle.
Presentation Suggestions
Get creative with how you serve your bars. You can layer them on a decorative platter. This adds a nice touch to any gathering. Use fun plates that match your theme, or even simple white ones to let the bars shine. Sprinkling extra crushed cookies on top adds texture and looks great!

Variations
Flavor Variations
You can change the flavor of these bars easily. Use different cookie types for fun. Golden Oreos add a sweet twist. Peanut butter cookies give a nutty taste. You can also try flavor extracts. Almond extract adds a nice touch. Mint extract gives a refreshing kick.
Alternate Toppings
Toppings can make these bars even better. Sprinkles add color and fun. A drizzle of caramel gives a sweet surprise. You can also use nuts for crunch. Chopped almonds or walnuts work great. Shredded coconut adds a tropical vibe.
Dietary Swaps
If you have dietary needs, there are swaps. For a gluten-free option, use gluten-free cookies. This keeps the taste but fits your diet. If you want vegan bars, swap cream cheese for vegan cream cheese. These swaps keep the bars tasty and enjoyable for everyone.
Storage Info
Refrigeration Guidelines
To keep your cookies and cream bars fresh, store them in airtight containers. This helps prevent moisture and keeps them tasty. I recommend refrigerating the bars for up to one week. The extra time in the fridge allows the flavors to blend well.
Freezing Tips
If you want to save the bars for later, freezing is a great option. Wrap each piece in plastic wrap and place them in a freezer-safe bag. This way, they stay fresh for up to three months. Before serving, take the bars out and let them thaw in the fridge for a few hours. This keeps them cool and creamy for your next treat.
FAQs
How long do no-bake cookies and cream bars last?
No-bake cookies and cream bars last about 4 to 5 days in the fridge. Store them in an airtight container to keep them fresh. If you freeze them, they can last up to 2 months. Just wrap them tightly in plastic wrap, then place them in a freezer-safe bag. Thaw them in the fridge before serving.
Can I use whipped topping instead of whipped cream?
Yes, you can use whipped topping instead of whipped cream. Whipped topping is often lighter and sweeter. It mixes well into your bars. If you prefer a richer taste, stick with whipped cream. Both options give a nice texture. Just ensure you measure the same amount.
What if I don’t have parchment paper?
If you don’t have parchment paper, use aluminum foil. Grease the foil lightly with cooking spray. This helps the bars lift out easily. You can also use wax paper, but do not bake it. If you are in a pinch, you can simply grease the baking dish well. This will help prevent sticking.
This article covered how to make delicious no-bake cookies and cream bars. We discussed the main and extra ingredients, along with step-by-step instructions. I shared helpful tips for perfecting texture and presentation, plus tasty variations to try.
Remember, these bars are flexible and fun. You can swap ingredients or add toppings based on your taste. Enjoy making these treats and impress your friends and family!