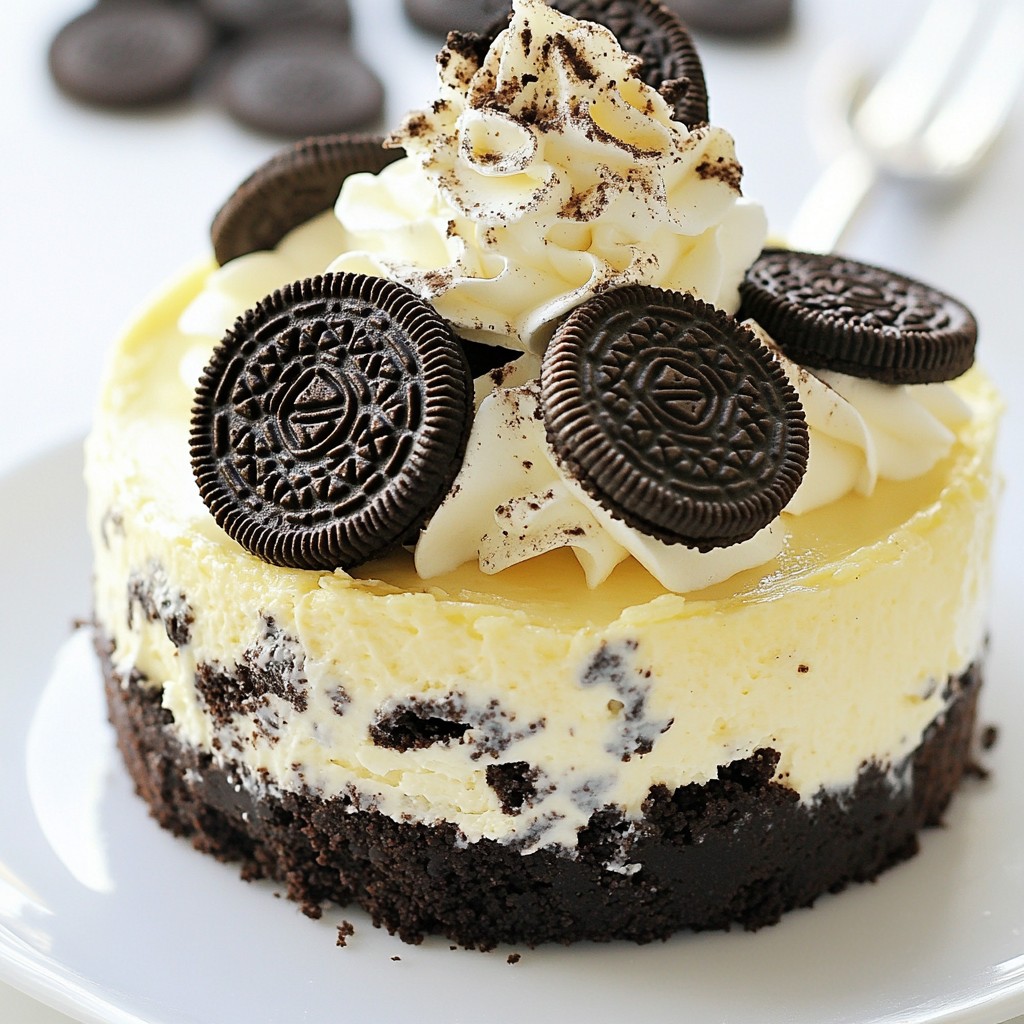
Looking for a quick and easy dessert that everyone will love? I have just the treat for you: No-Bake Oreo Cheesecake! This creamy, dreamy dessert combines the rich flavor of Oreos with a smooth cheesecake filling. No baking, no fuss—just deliciousness in every bite. Join me as I guide you through this simple recipe that’s sure to impress friends and family alike. Let's dive in!
Why I Love This Recipe
- Decadent Flavor: This cheesecake is rich and creamy, with the perfect balance of sweetness and chocolatey goodness from the Oreos.
- No-Bake Convenience: No need to turn on the oven! This recipe is perfect for warm days or when you want a quick dessert.
- Easy to Make: With just a few simple steps and ingredients, this cheesecake comes together effortlessly.
- Impressive Presentation: This stunning dessert looks beautiful on any table and is sure to wow your guests!
Ingredients
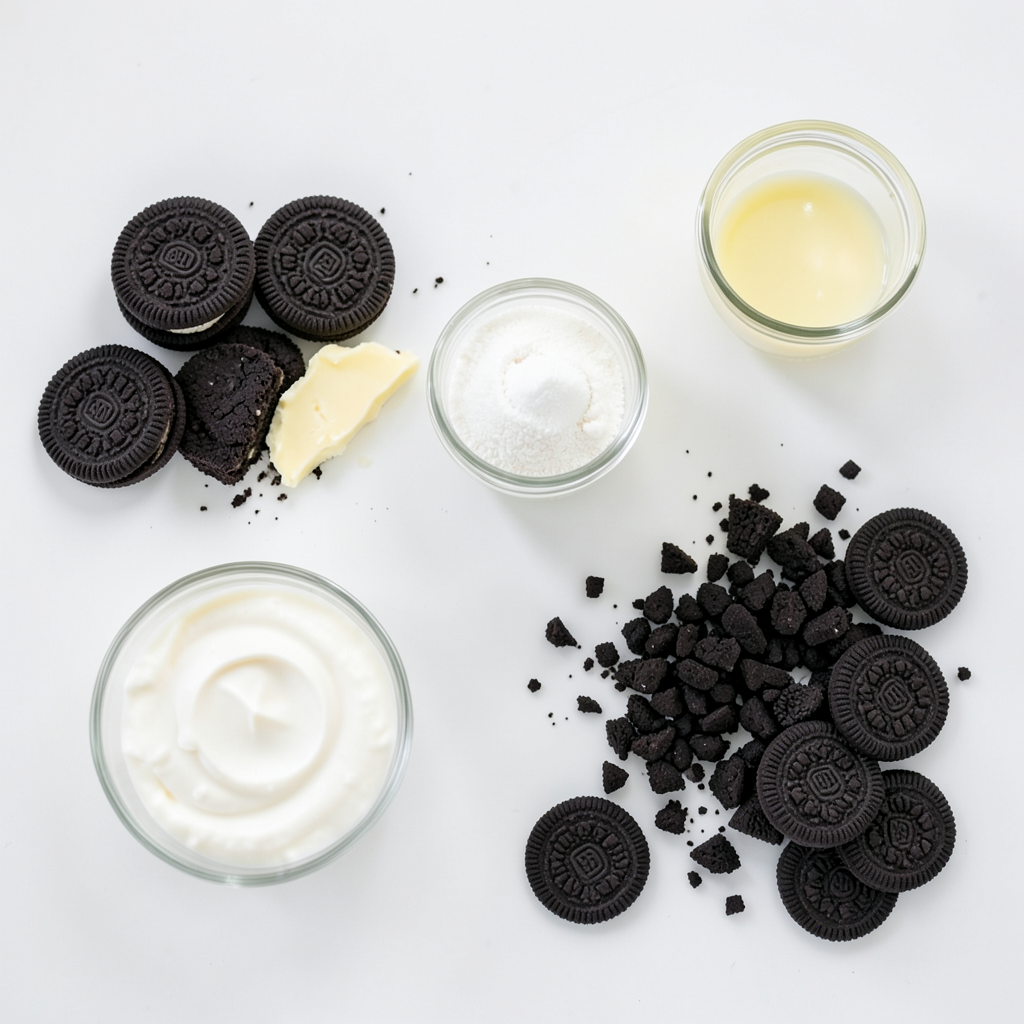
To make a No-Bake Oreo Cheesecake, you need simple yet tasty items. Here’s what you’ll need:
- 24 Oreo cookies, crushed
- 4 tablespoons unsalted butter, melted
- 16 oz cream cheese, softened
- 1/2 cup granulated sugar
- 1 teaspoon vanilla extract
- 2 cups heavy whipping cream
- 10 Oreo cookies, roughly chopped (for filling)
- Additional Oreo cookies for topping
These ingredients come together to create a creamy, rich dessert. The Oreo cookies give both the crust and filling a great flavor. The cream cheese makes the cheesecake smooth. Heavy whipping cream adds lightness and fluff. Each ingredient plays a key role in making this dessert a hit.
Make sure to have everything ready before you start. This way, you can enjoy the process of mixing and creating without any stress. Happy baking!
Step-by-Step Instructions
Preparing the Crust
To start, grab a medium bowl. In this bowl, combine 24 crushed Oreo cookies with 4 tablespoons of melted butter. Mix them well until the cookies are coated. This mixture forms the base of your cheesecake. Next, take a 9-inch springform pan and press the cookie mixture firmly into the bottom. Make sure it is even all around. Once pressed, place the pan in the refrigerator to help it set.
Making the Cheesecake Filling
Now, let’s make the filling. In a large mixing bowl, beat 16 ounces of softened cream cheese. Keep mixing until it's creamy and smooth. Slowly add in 1/2 cup of granulated sugar and 1 teaspoon of vanilla extract. Continue beating until the mixture is well combined. In another bowl, whip 2 cups of heavy cream until stiff peaks form. This will give your cheesecake a light and fluffy texture.
Assembling the Cheesecake
Time to put it all together! Gently fold the whipped cream into the cream cheese mixture. Make sure they combine fully. Then, add 10 roughly chopped Oreo cookies into the mix and fold them in too. This gives extra flavor and crunch. Pour the filling over the crust and spread it evenly.
Setting the Cheesecake
Now, it’s time for the cheesecake to chill. Place it in the refrigerator for at least 4 hours. This helps it set properly. To check if it's set, gently press the center of the cheesecake with a finger. If it feels firm, it’s ready to enjoy!
Tips & Tricks
Achieving the Perfect Texture
To get a smooth cheesecake, use room temperature ingredients. Cold cream cheese can clump. Let it sit out for about 30 minutes before you start. This makes it easier to mix.
Next, let's talk about whipped cream. When you whip it, make sure you beat it until stiff peaks form. This means it holds its shape well. When you fold it into the cream cheese mix, be gentle. Use a spatula and lift the mixture from the bottom. This keeps the air in and makes your cheesecake fluffy.
Presentation Suggestions
Garnishing your cheesecake can make it even more special. Top it with whole Oreo cookies. You can also crush some and sprinkle them on top for a nice look. Serve slices on dessert plates. A dollop of whipped cream next to the slice adds a nice touch.
For special occasions, consider adding a drizzle of chocolate sauce or fresh berries. This makes it more colorful and fun. Your guests will love the look and taste!
Pro Tips
- Chill Your Tools: Before whipping the heavy cream, chill your mixing bowl and beaters in the freezer for about 10 minutes. This helps the cream whip faster and achieve a better volume.
- Use Room Temperature Ingredients: Make sure your cream cheese is at room temperature before mixing. This ensures a smooth and creamy cheesecake filling without lumps.
- Don’t Overmix: When folding the whipped cream into the cream cheese mixture, be gentle. Overmixing can deflate the whipped cream, leading to a denser cheesecake.
- Customize Your Toppings: Feel free to get creative with the toppings! You can add chocolate drizzle, crushed nuts, or even a layer of chocolate ganache for an extra indulgent touch.
Variations
Flavor Modifications
You can easily change the flavor of your No-Bake Oreo Cheesecake. Try using different cookie flavors, like chocolate or peanut butter. These flavors add a fun twist to the classic taste. You can also mix in fruits like strawberries or blueberries. Drizzling chocolate sauce on top makes it even more special.
Another great option is to add flavored extracts. For instance, mint or almond extract can elevate your cheesecake. You can also replace some of the Oreo cookies with other cookies like chocolate chip or graham crackers. This makes each bite unique and exciting.
Dietary Alternatives
If you need gluten-free options, use gluten-free Oreo cookies. This way, everyone can enjoy your cheesecake without worry. You can also make a vegan version. For this, swap cream cheese for a plant-based cream cheese. Use coconut cream instead of heavy whipping cream.
These changes keep the taste delicious while meeting different dietary needs. No matter your choice, your cheesecake will still be a hit!
Storage Info
Best Storage Practices
To store leftovers, place the cheesecake in the fridge. Cover it tightly with plastic wrap. This keeps it fresh and prevents odors from other foods. If you want to freeze it, slice the cheesecake first. Wrap each slice in plastic wrap. Then, put the slices in a freezer bag. This way, you can enjoy a piece anytime!
Shelf Life
The cheesecake lasts about 5 days in the fridge. After that, it may start to lose flavor. Watch for signs of spoilage, like a sour smell or a change in texture. If the surface looks dry or cracked, it’s best to throw it away. Always trust your senses when it comes to food safety!
FAQs
Can I use low-fat cream cheese?
Yes, you can use low-fat cream cheese. It will change the texture and flavor. The cheesecake may be less creamy and rich. This change can make it a bit lighter, but it might not be as smooth. If you want the best taste, stick with full-fat cream cheese.
How can I make a smaller portion?
You can easily scale down the recipe. To make a smaller cheesecake, use half the ingredients. This will give you about five servings. Use a smaller pan, like a 6-inch springform pan, to keep the same height. Just remember to adjust the chilling time too.
Can I use a different type of cookie?
Yes, you can use other cookies! For the crust, try chocolate, vanilla, or even graham crackers. If you want a twist, use peanut butter cookies. Each cookie will change the taste. Just make sure they are crunchy enough to hold the crust together.
You learned how to make a delicious Oreo cheesecake. We covered the ingredients, steps, and helpful tips. Remember to use room temperature cream cheese for the best texture. You can easily customize the flavor to fit your taste. Store leftovers properly and check for spoilage. Knowing these details ensures a great dessert every time. Enjoy sharing this treat on special occasions. Now, get your baking gear ready, and create a masterpiece!