
If you love cookies that are both easy and scrumptious, you’re in for a treat! Peanut Butter Blossom Cookies are a delightful blend of sweet and savory. With just a few simple ingredients like creamy peanut butter and chocolate kisses, you can whip up a batch in no time. Get ready to impress your friends and family with these melt-in-your-mouth cookies that will have everyone coming back for more! Let’s dive into the recipe!
Ingredients
To make Peanut Butter Blossom Cookies, you will need the following ingredients:
– 1 cup creamy peanut butter
– 1 cup granulated sugar
– 1 large egg
– 1 teaspoon vanilla extract
– 1 teaspoon baking soda
– 1/2 teaspoon salt
– 1/4 cup brown sugar, packed
– 1/2 cup granulated sugar (for rolling)
– 24 milk chocolate kisses, unwrapped
Each ingredient plays a key role. The creamy peanut butter gives these cookies their classic flavor. The sugars help create a sweet and crunchy exterior. The egg binds everything together for a nice texture. Vanilla adds warmth, while baking soda helps the cookies rise. The salt balances the sweetness. Using brown sugar adds richness. Finally, the chocolate kisses provide a delightful finish that makes these cookies special.
Make sure to measure each ingredient carefully for best results. This will help you achieve the perfect cookie every time.
Step-by-Step Instructions
Preparation Steps
1. First, preheat your oven to 350°F (175°C). Line your baking sheet with parchment paper.
2. In a mixing bowl, combine these wet ingredients:
– 1 cup creamy peanut butter
– 1 cup granulated sugar
– 1/4 cup brown sugar, packed
– 1 large egg
– 1 teaspoon vanilla extract
Mix them well until creamy.
3. In another bowl, whisk together:
– 1 teaspoon baking soda
– 1/2 teaspoon salt
Add this mix to the peanut butter mixture. Stir until smooth.
Baking Process
4. Now, scoop out portions of dough using a tablespoon. Roll each portion into a ball.
5. Roll each ball in 1/2 cup granulated sugar. Place them on the baking sheet, leaving about 2 inches apart.
6. Bake the cookies for 8-10 minutes. Look for lightly golden edges.
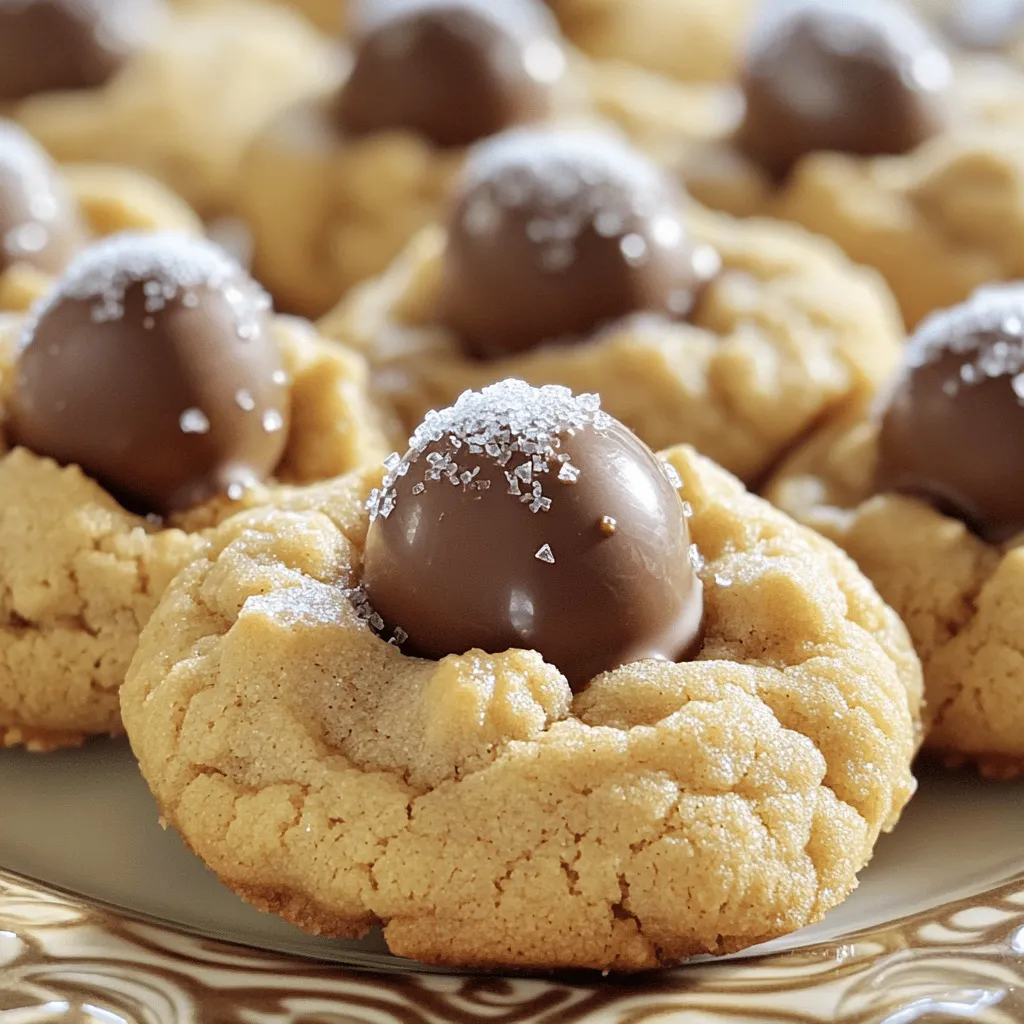
7. As soon as they come out, press a chocolate kiss gently into the center of each cookie.
Cooling and Serving
8. Let the cookies cool on the baking sheet for 5 minutes.
9. Transfer them to a wire rack to cool completely.
Enjoy these cookies with a glass of milk!
Tips & Tricks
Achieving the Perfect Texture
To get soft and chewy cookies, use creamy peanut butter. This gives your cookies a nice, rich flavor. Make sure your butter is at room temperature before mixing. This helps the dough blend well. If your ingredients are cold, they can make the cookies hard.
Techniques for Rolling
When rolling the dough into balls, keep them the same size. This helps them bake evenly. Use a tablespoon to scoop the dough. Roll each ball in the granulated sugar. This adds sweetness and a nice crunch to the outside.
Baking Tips
Bake your cookies at 350°F (175°C) for about 8-10 minutes. Keep an eye on them. They should be lightly golden around the edges. An oven thermometer can help you check your oven’s true heat. This ensures your cookies bake perfectly every time.

Variations
Flavor Enhancements
You can change up the flavor of your Peanut Butter Blossom Cookies. Adding nuts gives a nice crunch. Think about using chopped peanuts or walnuts. Oats can also make the cookies chewier. Just mix in a cup of oats with the dough.
You might want to try different types of chocolate too. Instead of milk chocolate kisses, use dark chocolate or even white chocolate. Each choice brings a new taste to the cookie.
Diet-Friendly Options
If you need gluten-free cookies, it’s easy. Use gluten-free flour in place of regular flour. This small switch keeps the cookies tasty and safe for those who can’t eat gluten.
For vegan versions, swap the egg for a flax egg. Mix one tablespoon of ground flaxseed with three tablespoons of water. Let it sit for a few minutes, and it will thicken. You can also use maple syrup instead of granulated sugar.
Themed Cookies
You can make these cookies special for any holiday. Try adding red and green sprinkles for Christmas. For Halloween, use orange and black sprinkles or chocolate candies.
You can also customize the toppings. Instead of a chocolate kiss, try a caramel candy or a peanut butter cup. This way, you make each cookie unique and fun!
Storage Info
Short-term Storage
To keep your peanut butter blossom cookies fresh, store them in an airtight container. This helps keep the cookies soft. You can use a plastic or glass container with a tight lid. Place a piece of parchment paper between layers to avoid sticking.
Long-term Freezing
To freeze cookies, first, let them cool completely. Next, place them in a single layer on a baking sheet and freeze for a few hours. Once frozen, transfer them to a freezer bag. Remove as much air as you can. For the best taste, use them within three months. When you want to enjoy them, take them out and let them thaw at room temperature. You can also reheat them in an oven at 350°F for a few minutes for a fresh-baked taste.
Shelf Life Expectation
Peanut butter blossom cookies can last about a week at room temperature. If stored well, they maintain their best taste and texture during this time. In the freezer, they can last up to three months without losing flavor. Enjoying them soon after baking is always the best choice for flavor!
FAQs
Common Questions
What can I substitute for peanut butter?
You can use almond butter or sunflower seed butter. These options give a similar taste. Just ensure they are creamy and smooth.
How can I prevent cookies from spreading?
Chill the dough for 30 minutes before baking. This helps keep their shape. Also, do not overmix the dough.
Can I make these cookies ahead of time?
Yes, you can prepare the dough and refrigerate it. Form the balls and chill before baking.
Ingredient-Specific Queries
What type of peanut butter works best?
Creamy peanut butter works best for these cookies. Natural peanut butter can alter the texture.
Are brown sugar and granulated sugar interchangeable?
Not exactly. Brown sugar adds moisture and a slight chew. Granulated sugar makes them crispier.
Baking Technique Inquiries
How do I know when the cookies are done?
Look for light golden edges. The centers should be soft but not wet.
Should I use a silicone baking mat?
You can, but parchment paper works just as well. Both keep cookies from sticking.They bring joy to any gathering. Let’s dive into the recipe!
Ingredients
– 1 cup creamy peanut butter
– 1 cup granulated sugar
– 1 large egg
– 1 teaspoon vanilla extract
– 1 teaspoon baking soda
– 1/2 teaspoon salt
– 1/4 cup brown sugar, packed
– 1/2 cup granulated sugar (for rolling)
– 24 milk chocolate kisses, unwrapped
Step-by-Step Instructions
1. Preheat the oven to 350°F (175°C). Line a baking sheet with parchment paper.
2. Mix the wet ingredients. In a bowl, add creamy peanut butter, 1 cup of granulated sugar, brown sugar, egg, and vanilla. Mix until smooth.
3. Combine the dry ingredients. In another bowl, whisk baking soda and salt. Add this mix to the peanut butter mix. Stir well until smooth.
4. Form the dough. Take a tablespoon of dough and roll it into a ball.
5. Roll in sugar. Coat each ball in the 1/2 cup of granulated sugar. Place them on the baking sheet, about 2 inches apart.
6. Bake the cookies. Bake for 8-10 minutes until edges are light golden.
7. Add chocolate kisses. Press a chocolate kiss into the center of each cookie right after baking.
8. Cool the cookies. Let them cool on the baking sheet for 5 minutes. Then, move them to a wire rack to cool fully.
Presentation Tips
Arrange the cookies on a nice plate. You can sprinkle a bit of extra granulated sugar on top for sparkle. Add a few extra chocolate kisses around the plate for a sweet touch. These cookies are tasty with a glass of milk!
You learned how to make delicious Peanut Butter Blossom Cookies. We covered the ingredients, step-by-step instructions, and tips for the perfect bake. Variations let you get creative, while storage info keeps cookies fresh for longer. These cookies are simple to make and fun to share. Enjoy experimenting with flavors and techniques to make them your own. Happy baking!
