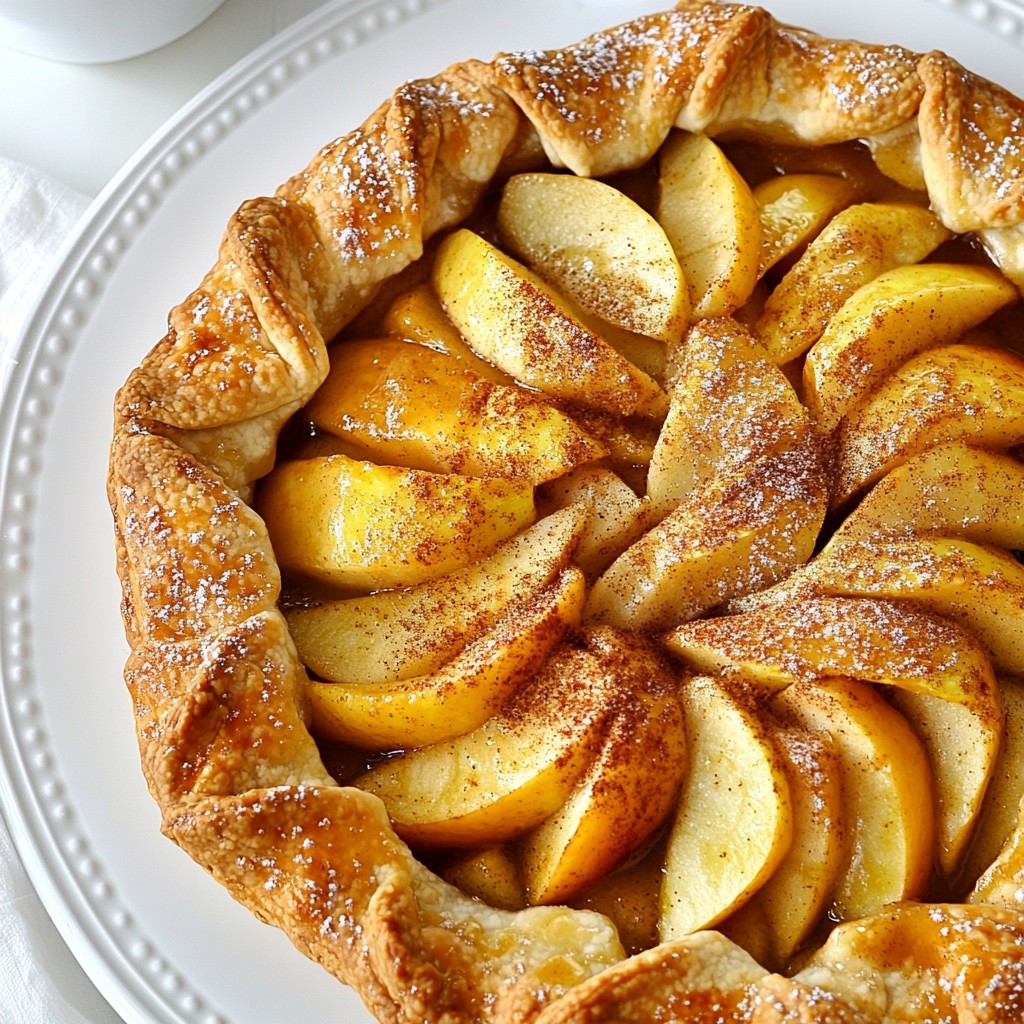
Indulge in the cozy flavors of fall with my Rustic Apple Cinnamon Galette. This dessert combines sweet apples and warm spices wrapped in a crispy crust. It’s easy to make and perfect for gatherings or simply treating yourself. With straightforward steps and tips, you’ll impress everyone with your baking skills. Ready to create this irresistible delight? Let’s dive into the ingredients and get started!
Why I Love This Recipe
- Simple Ingredients: This galette uses basic pantry staples and fresh apples, making it easy to whip up any time of year.
- Rustic Charm: The free-form shape gives this dessert a homemade, rustic appeal that is visually stunning.
- Versatile Filling: You can easily substitute different fruits or spices based on what you have on hand, allowing for endless variations.
- Perfect for Sharing: The galette is great for gatherings, serving a generous portion that is sure to impress family and friends.
Ingredients
Dry Ingredients
- 2 cups all-purpose flour
- 1/2 teaspoon salt
- 1 tablespoon sugar
For the crust, I use all-purpose flour as the base. The salt adds flavor, and a bit of sugar gives it a nice touch.
Wet Ingredients
- 1/2 cup cold unsalted butter, cubed
- 6-8 tablespoons cold water
- 1 tablespoon lemon juice
- 1 egg, beaten (for egg wash)
Cold unsalted butter is key for a flaky crust. Cold water helps bind the dough. Lemon juice brightens the apple filling, and the egg wash gives a lovely golden color.
Filling Ingredients
- 4 medium apples (preferably Granny Smith or Honeycrisp), peeled, cored, and thinly sliced
- 1/4 cup brown sugar
- 1 teaspoon cinnamon
- 1/4 teaspoon nutmeg
- 1 tablespoon cornstarch
- Turbinado sugar for sprinkling
I love using Granny Smith or Honeycrisp apples. They balance sweetness and tartness perfectly. Brown sugar, cinnamon, and nutmeg create that warm, cozy flavor. Cornstarch thickens the filling, and turbinado sugar adds a crunchy finish.
Step-by-Step Instructions
Prepare the Dough
1. In a large mixing bowl, whisk together 2 cups of all-purpose flour, 1/2 teaspoon of salt, and 1 tablespoon of sugar.
2. Add 1/2 cup of cold, cubed unsalted butter. Use a pastry cutter or your fingers to mix it until it looks like coarse crumbs.
3. Slowly add 6-8 tablespoons of cold water, one tablespoon at a time. Mix until the dough sticks together.
4. Shape the dough into a disk, wrap it in plastic, and chill it for at least 30 minutes.
Prepare the Filling
1. In a separate bowl, toss 4 medium apples with 1 tablespoon of lemon juice, 1/4 cup of brown sugar, 1 teaspoon of cinnamon, 1/4 teaspoon of nutmeg, and 1 tablespoon of cornstarch.
2. Mix well and set aside. Let the flavors blend for a few minutes.
Roll Out the Dough
1. Preheat your oven to 400°F (200°C).
2. On a floured surface, roll the chilled dough into a rough circle about 12 inches wide.
3. Carefully transfer the rolled dough to a parchment-lined baking sheet.
Assemble the Galette
1. Spoon the apple mixture into the center of the dough, leaving a 2-inch border.
2. Fold the edges of the dough over the apples, creating pleats for a rustic look.
3. Brush the exposed dough with 1 beaten egg and sprinkle turbinado sugar on top for extra crunch.
Bake
1. Place the galette in the hot oven.
2. Bake for 35-40 minutes, until the crust is golden brown and the apples are soft.
Cool and Serve
1. Let the galette cool for 10-15 minutes before slicing it.
2. Serve warm or at room temperature. It pairs well with vanilla ice cream or whipped cream.
Tips & Tricks
Best Apple Varieties
For the best flavor and texture, I love using Granny Smith or Honeycrisp apples. Granny Smith gives a nice tartness. Honeycrisp offers a sweet crunch. You can mix them for depth. Other solid choices include Fuji or Braeburn. Each adds unique notes to your galette.
Dough Handling Tips
Keeping your dough cold is key. Cold butter makes a flaky crust. Chill your dough for 30 minutes before rolling. This helps maintain the right texture. When rolling, use plenty of flour on your surface. This prevents sticking. If it sticks, just sprinkle more flour and try again.
Flavor Enhancements
For extra flavor, try adding vanilla extract or a drizzle of caramel. Vanilla gives a warm, sweet aroma. Caramel adds a rich, buttery taste. Both elevate your galette. You can also sprinkle some nuts for crunch. This adds a new layer of flavor and texture.
Pro Tips
- Chill Your Ingredients: Make sure your butter and water are very cold. This helps create a flaky crust by preventing the butter from melting too quickly during baking.
- Mix Apples for Flavor: Use a combination of apple varieties for a more complex flavor. Granny Smith provides tartness, while Honeycrisp adds sweetness and crunch.
- Don’t Overfill: While it’s tempting to pile on the apple filling, leaving enough space at the edges ensures that the galette can be folded without breaking.
- Experiment with Spices: Feel free to customize the spice blend! Adding a pinch of ginger or cardamom can elevate the flavor profile of your galette.
Variations
Gluten-Free Option
You can make this galette gluten-free. Use a blend of gluten-free flour. Brands like Bob's Red Mill or King Arthur Flour work great. You may need to add a bit of xanthan gum for texture. Just one teaspoon will do the trick.
Seasonal Variations
Change up the fruit based on the season. In fall, use pears with apples. In summer, try peaches or berries. Each fruit adds its own twist. Pair flavors to enhance your galette. A sprinkle of ginger with peaches or a squeeze of lime with berries makes a fun twist.
Vegan Adaptations
For a vegan galette, skip the egg wash. Use a mixture of almond milk and maple syrup instead. It gives a nice shine. For butter, use a dairy-free option like coconut oil or vegan butter. This keeps the rich taste without the dairy.
Storage Info
Storing Leftovers
To keep your galette fresh, wrap it tightly in plastic wrap or aluminum foil. Place it in the fridge. This method helps keep the crust crisp and the filling tasty. Enjoy your leftovers within three days for the best flavor.
Freezing Instructions
You can freeze your galette for longer storage. First, let it cool completely. Wrap it well in plastic wrap, then in aluminum foil. This prevents freezer burn. When you're ready to eat it, thaw in the fridge overnight. Reheat in a 350°F (175°C) oven for about 15-20 minutes. This restores its lovely texture.
Freshness Tips
Your galette lasts up to three days in the fridge. In the freezer, it stays good for about two months. Just remember, the longer it's stored, the more the flavors change. For the best taste, enjoy it fresh!
FAQs
What is a rustic galette?
A rustic galette is a free-form pie. It has a simple, homey look. The dough folds over the filling, showing off the fruit. This style makes it easy to prepare. You don’t need a pie dish. It’s perfect for any skill level in cooking.
Can I use other fruits for the galette?
Yes, you can use many fruits! Berries, peaches, and pears all work well. Each fruit adds a unique flavor. Mix and match to find your favorite. Just keep the filling juicy and sweet. Adjust sugar based on the fruit's tartness.
How do I know when the galette is done baking?
Look for a golden crust. The apples should be tender and bubbly. If the edges are brown, it's ready. You can also poke the apples with a fork. They should feel soft but not mushy. These signs tell you it's time to enjoy!
Can I make the dough in advance?
You can! Make the dough ahead of time. Wrap it well and store it in the fridge. It will stay fresh for up to three days. You can also freeze it for up to a month. Just thaw it in the fridge before using.
How to serve galette?
Serve your galette warm or at room temp. It pairs well with vanilla ice cream or whipped cream. A drizzle of caramel sauce adds extra sweetness. You can also sprinkle some nuts for crunch. Each bite will be a delight!
This blog post covered all you need to know about making a delicious rustic galette. We explored the right ingredients, including dry and wet components. I offered step-by-step instructions, tips for perfecting your dough, and variations to suit any diet.
In conclusion, baking a galette is fun and flexible. You can tailor it to your taste and the season. Enjoy crafting this delightful dessert that brings joy to any table. Happy baking!