
If you crave a dish that combines simplicity and flavor, the Rustic Tomato Galette is the answer. This easy recipe turns ripe tomatoes into a gourmet delight. I’ll guide you through each step, from making the flaky crust to baking it to golden perfection. Whether you’re a seasoned chef or just starting, you’ll impress everyone at your table. Let’s get cooking this tasty treat that celebrates summer tomatoes!
Why I Love This Recipe
- Fresh Ingredients: This galette highlights the vibrant flavors of ripe tomatoes, making it a perfect dish for summer gatherings.
- Easy to Make: The rustic crust is simple to prepare, requiring minimal ingredients and effort, perfect for both beginners and seasoned cooks.
- Versatile Dish: Feel free to add other seasonal vegetables or herbs to customize the galette to your taste, making it a flexible recipe.
- Beautiful Presentation: The pleated edges and colorful filling create an impressive dish that is sure to wow your guests.
Ingredients
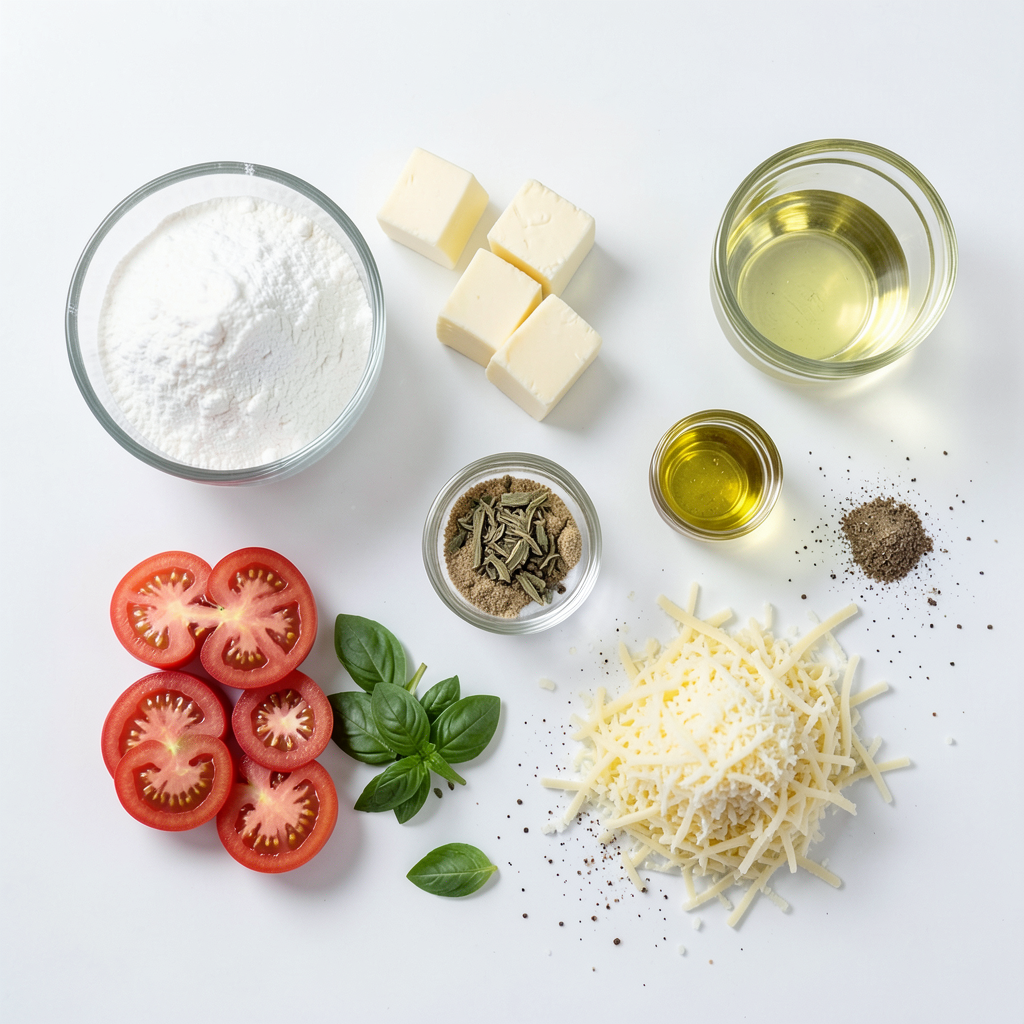
To make a Rustic Tomato Galette, you need a few simple ingredients that create a big flavor. Here’s the list:
- 1 1/4 cups all-purpose flour
- 1/4 teaspoon salt
- 1/4 cup cold unsalted butter, cubed
- 3-4 tablespoons ice water
- 2-3 medium ripe tomatoes, sliced
- 1 teaspoon olive oil
- 1/2 teaspoon dried basil
- 1/4 teaspoon garlic powder
- 1/2 cup shredded mozzarella cheese
- 1/4 cup grated Parmesan cheese
- Fresh basil leaves for garnish
- Salt and pepper to taste
Using fresh ingredients makes a difference. Ripe tomatoes are key to a tasty galette. Their sweetness shines through when baked. The cheeses add a creamy, savory touch that balances the tomatoes. Each ingredient plays a role, giving you layers of flavor.
Make sure your butter is cold. This helps the crust become flaky. Ice water also keeps the dough from getting tough. Remember, the right amount of salt enhances all these flavors.
With these ingredients ready, you’re set to create a delightful Rustic Tomato Galette. Enjoy the process, and savor every bite!
Step-by-Step Instructions
Preparing the Dough
- Combine 1 1/4 cups of all-purpose flour and 1/4 teaspoon of salt in a bowl.
- Next, mix in 1/4 cup of cold unsalted butter, cubed. Use your fingers or a pastry cutter.
- Add 3-4 tablespoons of ice water gradually. Mix until the dough comes together.
Prepping the Tomato Filling
- Slice 2-3 medium ripe tomatoes. Place them in a bowl.
- Drizzle with 1 teaspoon of olive oil. Season with 1/2 teaspoon of dried basil, 1/4 teaspoon of garlic powder, and salt and pepper to taste.
Assembling the Galette
- Roll out the dough on a floured surface into a 12-inch wide circle.
- Transfer the dough to a parchment-lined baking sheet.
- Sprinkle 1/2 cup of shredded mozzarella cheese evenly on the dough.
- Layer the marinated tomato slices on top of the cheese, overlapping them slightly.
- Sprinkle 1/4 cup of grated Parmesan cheese over the tomatoes.
Baking the Galette
- Preheat your oven to 400°F (200°C).
- Bake the galette for 30-35 minutes until the crust turns golden brown.
- Let it cool for a few minutes before serving.
Tips & Tricks
Perfecting the Dough
To make great dough, focus on the butter. Use cold unsalted butter. Cut it into small cubes. This helps get a flaky crust. I like to keep the butter in the fridge until I’m ready.
Chilling the dough is key. After mixing, form it into a disk. Wrap it in plastic wrap. Let it rest in the fridge for at least 30 minutes. This makes the dough easier to roll and helps it hold its shape.
Choosing the Right Tomatoes
For the best flavor, use ripe tomatoes. I recommend medium-sized tomatoes like Roma or heirloom. They have a rich taste and good texture. If it’s summer, grab fresh tomatoes from the farmer's market. They taste the best when in season.
You can also mix types of tomatoes. Try using both yellow and red for color and taste. This adds a fun twist to your galette.
Enhancing Flavor
To amp up the taste, add fresh herbs. Basil works great with tomatoes. You can also use thyme or oregano for a different flavor. Just sprinkle them over the tomatoes before baking.
Cheese can change the dish too. If you want a twist, try goat cheese instead of mozzarella. It adds creaminess and tang. Or, use a mix of cheeses for depth. Experiment and find your favorite combo!
Pro Tips
- Use Cold Ingredients: Ensure your butter and water are very cold to achieve a flaky crust.
- Choose Ripe Tomatoes: Opt for juicy, ripe tomatoes for the best flavor and texture in your galette.
- Customize the Cheese: Feel free to experiment with different cheeses like goat cheese or feta for a unique twist.
- Serve Warm: This galette is best enjoyed warm, straight from the oven, to savor the melty cheese and tender tomatoes.
Variations
Veggie Add-Ins
You can make your galette even better with veggie add-ins. Spinach or kale works great in this dish. Just sauté them lightly before adding. This adds a nice touch of green and nutrients. You can also use other seasonal veggies. Think zucchini, bell peppers, or even corn. These will add color and flavor to your galette.
Protein Options
Adding protein can make the galette heartier. Cooked bacon or sausage would work well. Just crumble them over the cheese before adding the tomatoes. You can also add grilled chicken for a different flavor. Slice it thin and layer it on top of the cheese with the tomatoes.
Cheese Alternatives
If you want a twist on cheese, try vegan options. There are many great choices now that melt well. You can also use other late summer cheese varieties. Goat cheese or feta can add a tangy flavor. Experimenting with cheese will give your galette a unique taste.
Storage Info
Refrigeration
To keep your Rustic Tomato Galette fresh, store it in the fridge. Place it in an airtight container or cover it tightly with plastic wrap. This helps to prevent it from drying out. Your galette will last for about 3 days in the fridge. After that, the crust may get soggy, and the flavors may not be as bright.
Freezing the Galette
If you want to freeze your galette, do it before baking. Follow these steps for best results:
- Assemble the galette as usual, but don’t bake it.
- Wrap it tightly in plastic wrap and then in foil. This prevents freezer burn.
- Place it in the freezer. It can stay there for up to 2 months.
When you're ready to bake, remove the galette from the freezer. Let it thaw in the fridge overnight. After thawing, bake it straight from the fridge. You may need to add a few extra minutes to the baking time. Check for a golden crust and tender tomatoes. Enjoy your delicious Rustic Tomato Galette even after freezing!
FAQs
What is a Rustic Tomato Galette?
A Rustic Tomato Galette is a free-form tart. It has a crust that is flaky and tender. The filling features fresh, ripe tomatoes. You can add cheese and herbs for more flavor. The beauty of a galette lies in its rustic look. You fold the edges over the filling, which gives it a charming appearance. It is easy to make and perfect for any meal.
Can I use different types of flour?
Yes, you can use different flours for your galette. If you want gluten-free, try almond flour or a gluten-free mix. Whole wheat flour is a good choice for a nutty flavor. Just keep in mind that different flours may change the texture. You may need to adjust the water in the dough. Experiment to find the blend you enjoy the most.
How do I know when the galette is done baking?
You will know the galette is done by looking for a golden crust. The tomatoes should be tender and juicy. You can poke the crust lightly; it should feel firm. The usual baking time is about 30-35 minutes at 400°F (200°C). Keep an eye on it in the last few minutes to avoid burning. Let it cool for a few minutes before serving for the best taste.
You now have a clear path to making a rustic tomato galette. We covered the essential ingredients and step-by-step instructions to prepare it. With tips on dough perfection and flavor enhancement, you can make this dish shine. Don't forget the tasty variations you can add. Whether you choose to refrigerate or freeze, storing your galette is simple. Embrace your creative side and enjoy each bite of your homemade galette. This dish brings joy to meals for any occasion.