If you love sushi but want an easier way to enjoy it, try this Salmon Sushi Bake! This quick and simple recipe combines the best flavors of sushi without the fuss. I’ll show you how to prepare delicious sushi rice and layer it with fresh salmon. Plus, I’ll share tips for making it your own and storing leftovers. Let’s dive into this tasty dish you can whip up in no time!
Why I Love This Recipe
- Delicious Flavor Combination: This recipe perfectly balances the rich taste of salmon with creamy avocado and spicy mayo, creating a delightful flavor explosion in each bite.
- Easy to Prepare: With straightforward steps and minimal ingredients, this sushi bake is accessible for both novice and experienced cooks.
- Great for Sharing: The generous portions make it an ideal dish for gatherings, allowing everyone to enjoy and share this delicious meal together.
- Customizable Toppings: You can easily modify or add toppings like cucumber or sesame seeds to suit your taste preferences, making it versatile for any occasion.
Ingredients
Detailed List of Ingredients
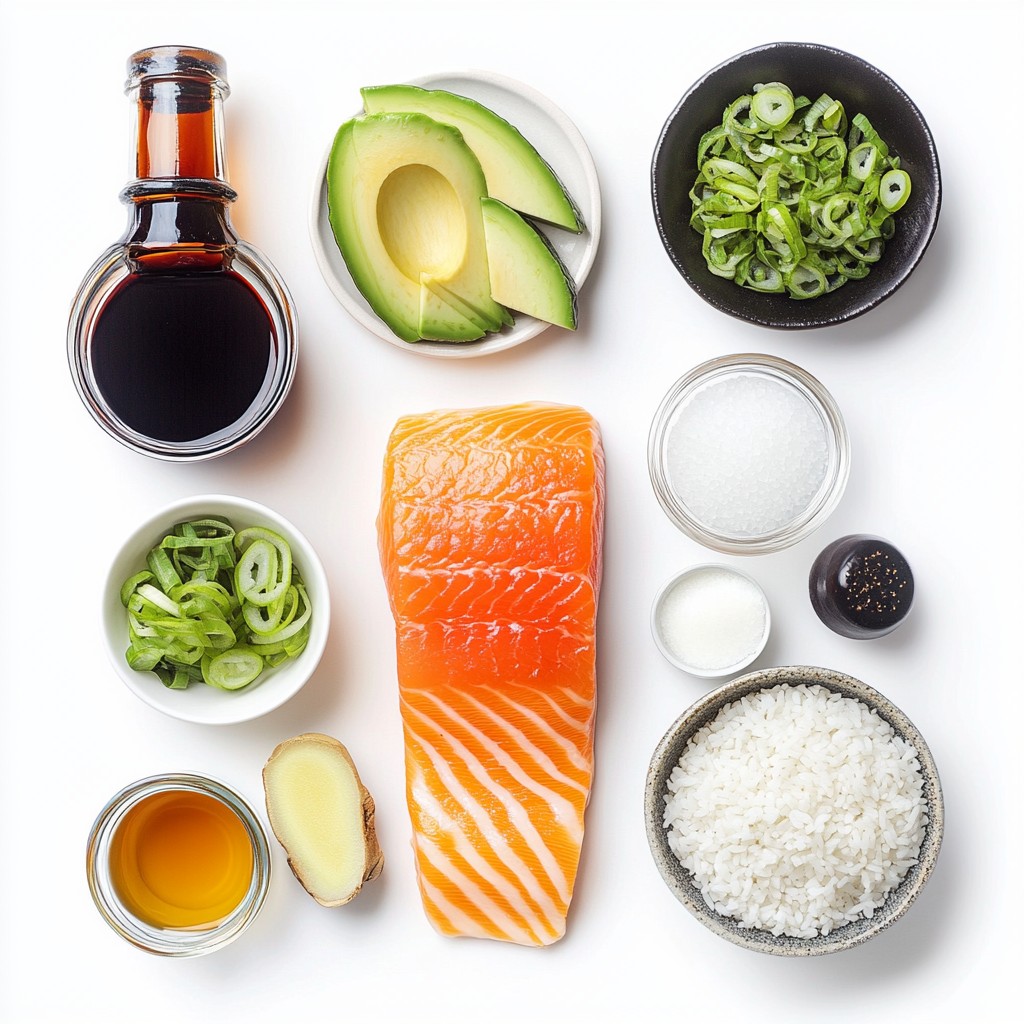
To make the savory salmon sushi bake, you will need these simple ingredients:
- 2 cups sushi rice
- 2 ½ cups water
- 1/3 cup rice vinegar
- 2 tablespoons sugar
- 1 teaspoon salt
- 1 pound fresh salmon fillet
- 1 tablespoon olive oil
- 1 tablespoon soy sauce
- 1 tablespoon sesame oil
- 1 avocado, sliced
- 1/4 cup mayonnaise (preferably Japanese Kewpie mayo)
- 2 teaspoons sriracha (adjust for spice)
- 1 sheet nori, cut into small strips
- Chopped green onions for garnish
- Pickled ginger for serving
Tips for Selecting Fresh Salmon
When choosing salmon, look for bright, shiny skin. The flesh should be firm and moist. Avoid salmon with dull skin or a strong fishy smell. Fresh salmon has a clean, ocean scent. If possible, buy from a trusted fishmonger or market. Always check for sustainability labels to support eco-friendly practices.
Alternatives for Special Diets
If you follow a special diet, there are tasty options. For gluten-free, use tamari instead of soy sauce. If you want a vegetarian meal, try using tofu or cooked mushrooms. Swap the mayonnaise for a plant-based version for vegan diets. You can also replace salmon with cooked shrimp or crab for a different taste.
Step-by-Step Instructions
Preparing the Sushi Rice
Start by rinsing the sushi rice under cold water. Rinse until the water runs clear. This step helps remove excess starch. Next, place the rice in a pot with 2 ½ cups of water. Bring it to a boil, then reduce the heat. Cover the pot and let it simmer on low for 18 to 20 minutes. After cooking, remove the pot from heat. Let it sit covered for an additional 10 minutes. This resting time allows the rice to finish cooking and become fluffy.
Seasoning the Rice
While your rice cools, prepare the seasoning. In a small saucepan, mix 1/3 cup of rice vinegar, 2 tablespoons of sugar, and 1 teaspoon of salt. Heat this mixture gently until the sugar dissolves. Once the rice has cooled a bit, drizzle the vinegar mixture over the rice. Use a spatula to fold the rice gently, so you don’t break the grains. Allow the seasoned rice to cool slightly before using it in your bake.
Baking and Assembling the Salmon Bake
Preheat your oven to 375°F (190°C). Take a baking dish and drizzle 1 tablespoon of olive oil in it. Place your 1-pound salmon fillet skin-side down in the dish. Brush the salmon with 1 tablespoon of soy sauce and 1 tablespoon of sesame oil. Bake the salmon for 15 to 20 minutes. It is done when it flakes easily with a fork. Once out of the oven, let it cool for a few minutes.
While the salmon cools, mix 1/4 cup of mayonnaise with 2 teaspoons of sriracha in a bowl. Flake the cooled salmon into large pieces and fold it into the spicy mayo. To assemble, spread the prepared sushi rice evenly at the bottom of your baking dish. Top the rice with the salmon and mayo mixture, spreading it out evenly.
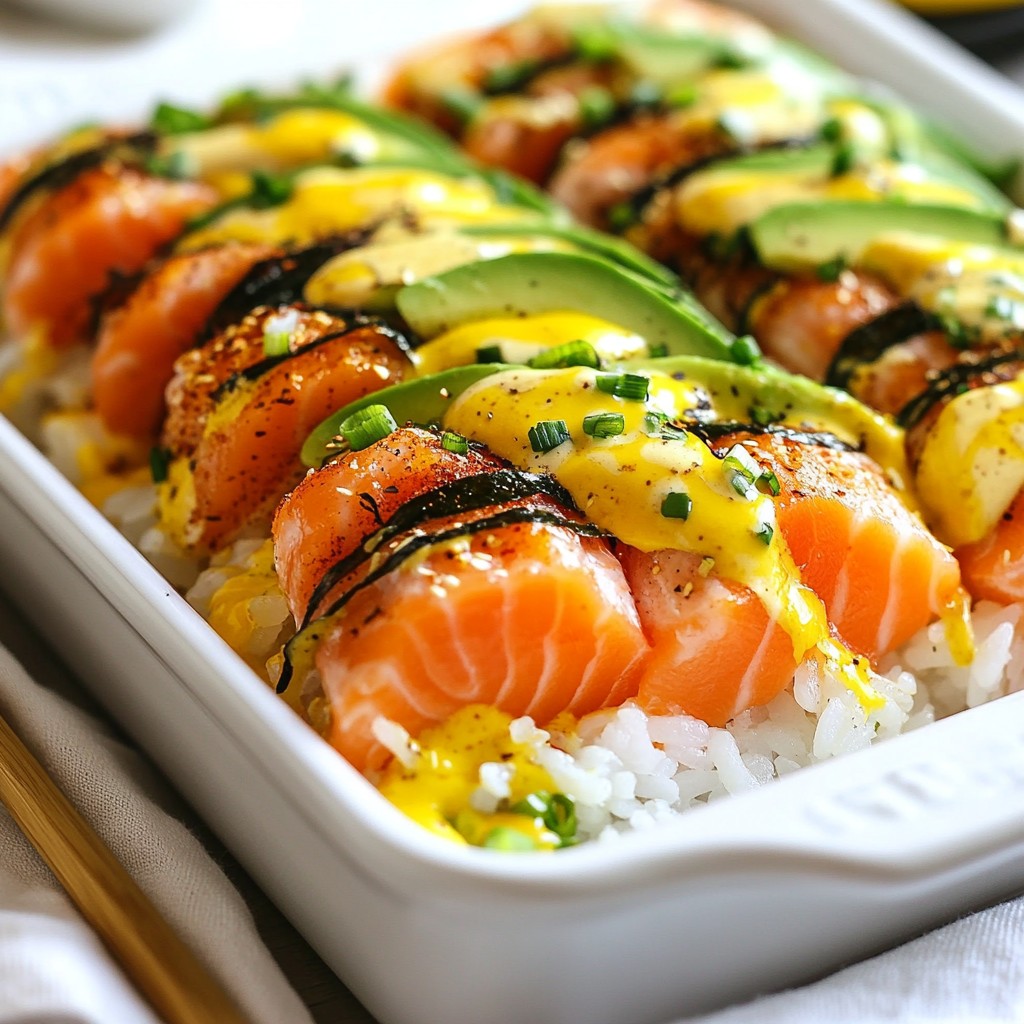
Finally, place the assembly back in the oven and bake for another 10 to 12 minutes. This final bake will heat it through and give it a lightly crisped top. Once done, remove it from the oven. Let it cool for a moment before adding sliced avocado, nori strips, and chopped green onions on top. Serve with pickled ginger on the side for a tasty finish.
Tips & Tricks
How to Perfect Your Sushi Rice
To make great sushi rice, start with high-quality sushi rice. Rinse the rice in cold water until the water runs clear. This step removes excess starch. It helps the rice become sticky but not too gummy. Next, combine the rinsed rice and water in a pot. Bring it to a boil, then lower the heat. Cover the pot and let it simmer for 18-20 minutes. After cooking, let the rice sit for 10 minutes, covered. This resting time allows the rice to finish cooking. Finally, season your rice with a mix of rice vinegar, sugar, and salt. This adds a tangy flavor. Gently fold the mixture into the rice. Avoid smashing the grains.
Customizing Flavor Profiles
You can adjust the flavors in your salmon sushi bake easily. For a richer taste, add more sesame oil or soy sauce. If you love heat, increase the sriracha in the spicy mayo. You can also mix in chopped herbs, like cilantro or basil. For a unique twist, consider adding citrus zest, like lime or lemon. This brightens up the dish. If you prefer a milder flavor, skip the sriracha. Instead, use plain mayonnaise or a mild aioli. This way, you can make a version that suits your taste.
Garnishing for Visual Appeal
Garnishing adds beauty to your sushi bake. After baking, slice an avocado and arrange the slices on top. This adds creaminess and a pop of color. Use nori strips for a crunchy contrast. Scatter chopped green onions over the top for freshness. You can also serve pickled ginger on the side. This gives a nice touch and adds some zing. Remember, a well-garnished dish is more inviting. It makes your meal more fun and tasty.
Pro Tips
- Rinse the Rice: Always rinse sushi rice thoroughly under cold water until the water runs clear. This removes excess starch, preventing the rice from becoming gummy.
- Check Salmon Freshness: Ensure your salmon is fresh by checking for a bright color and a clean smell. Fresh salmon will enhance the flavor of your sushi bake.
- Customize the Spice: Feel free to adjust the amount of sriracha in the mayo mixture according to your spice preference. You can also add a dash of soy sauce for extra depth.
- Use a Hot Baking Dish: Preheat your baking dish for a few minutes before adding the rice and salmon. This helps create a crispy bottom layer and enhances the overall texture.
Variations
Different Proteins to Use
You can swap salmon for other proteins. Tuna is a great choice. It has a rich flavor that works well. You can also use cooked shrimp for a sweet twist. Crab meat adds a nice touch too. If you prefer mild flavors, try using poached chicken. Each protein gives a different taste, so feel free to play around.
Vegetarian or Vegan Options
If you want a vegetarian or vegan sushi bake, you can easily adapt this dish. Replace the salmon with marinated tofu. Firm tofu works best as it holds its shape. You can also use mushrooms for their meaty texture. Try adding roasted sweet potatoes or eggplant for more depth. Use vegan mayo to keep everything plant-based.
Creative Toppings to Experiment With
Toppings can change the whole dish. Try adding spicy pickled vegetables for crunch. Sesame seeds sprinkled on top add a nice touch. You might like to mix in some chopped cilantro or basil for freshness. For a zesty kick, use lemon or lime zest. If you love avocado, try adding it before serving for creaminess. Each topping adds unique flavors and textures, so get creative!
Storage Info
Storing Leftovers Properly
After you enjoy your salmon sushi bake, store leftovers in an airtight container. This keeps the dish fresh. Let it cool to room temperature first. Then, cover it tightly and place it in the fridge. It will stay good for up to 3 days. If you want to keep it longer, consider freezing portions.
Reheating Guidelines
To reheat your salmon sushi bake, use the oven for the best results. Preheat the oven to 350°F (175°C). Place the leftovers in a baking dish and cover with foil. Heat for about 15-20 minutes. Check if it is warm throughout. You can also use the microwave, but this may not keep the texture as nice. Heat in short bursts, about 1-2 minutes, checking often.
Freezing for Future Meals
If you want to freeze your sushi bake, do it right after it cools. Cut it into portions and wrap each piece tightly in plastic wrap. Then, place the wrapped portions in a freezer bag. Label the bag with the date. You can freeze it for up to 2 months. To eat, simply thaw it overnight in the fridge before reheating.
FAQs
What is the best type of salmon for this recipe?
The best type of salmon for this recipe is fresh, high-quality salmon fillet. I recommend using sockeye or king salmon. They have a rich flavor and a nice texture. Wild-caught salmon is often better than farmed. It is fresher and has more nutrients. Look for bright, shiny skin and firm flesh. Avoid any salmon with a dull color or a fishy smell.
Can I make this dish ahead of time?
Yes, you can make this dish ahead of time! You can prepare the sushi rice and bake the salmon earlier in the day. Store them separately in airtight containers in the fridge. When you are ready to serve, mix the salmon with the spicy mayo. Spread the rice in your baking dish and top it with the salmon. Then, bake it right before serving. This helps keep everything fresh and tasty.
How can I make this recipe gluten-free?
To make this recipe gluten-free, use gluten-free soy sauce. Most regular soy sauce contains gluten, so check labels. You can also find tamari as a gluten-free option. Everything else in the recipe is naturally gluten-free. Just be sure to check any sauces or condiments you use to avoid gluten. With these swaps, you can enjoy a delicious gluten-free salmon sushi bake!
This post covered key ingredients, steps, and tips for making a delicious salmon bake. You learned how to choose fresh salmon and prepare perfect sushi rice. I shared fun variations and storage tips to keep meals fresh for days.
So, get creative with flavors! Your delicious salmon bake awaits. Enjoy making it your own!