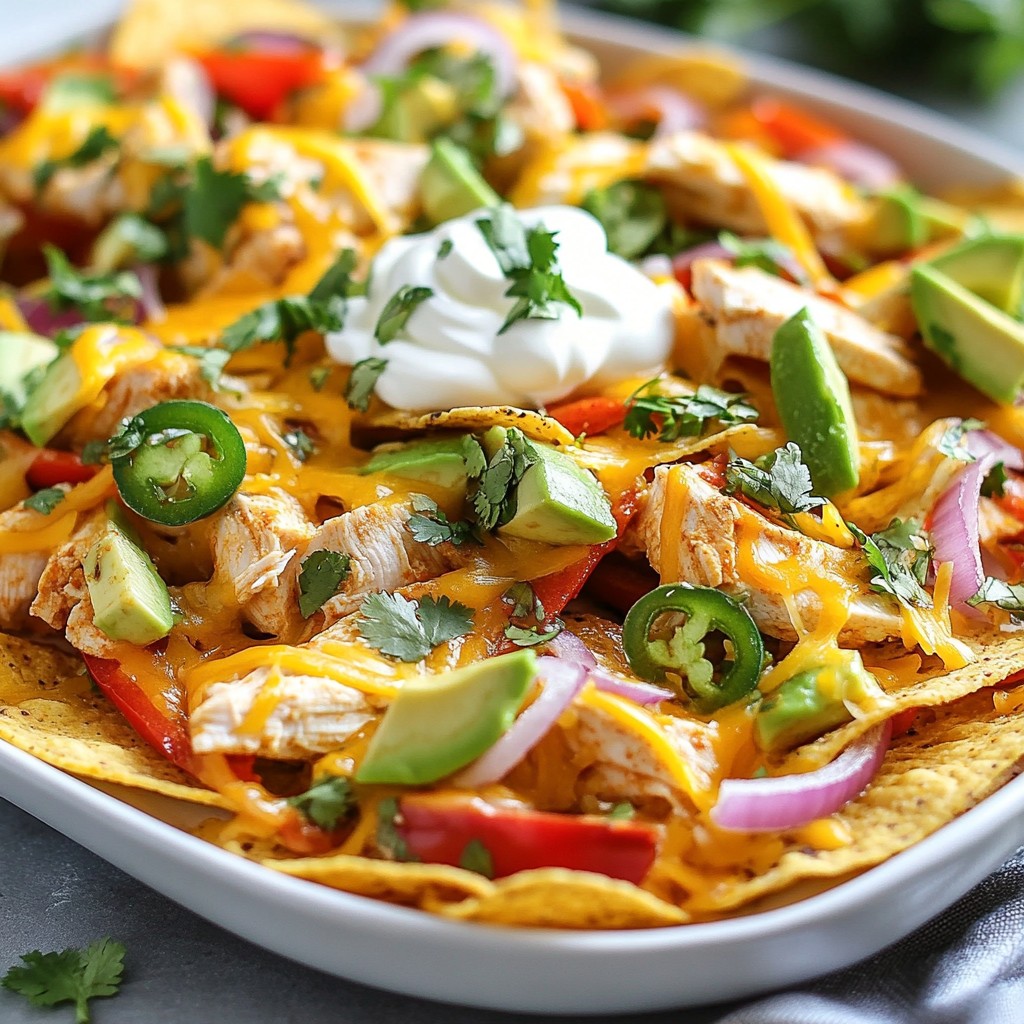
Looking for a fun meal that packs flavor and is oh-so-easy to make? You’ve found it! Sheet Pan Fajita Chicken Nachos are loaded with crispy chips, tender chicken, and vibrant veggies. This dish comes together quickly and is perfect for a weeknight dinner or game day snack. Let’s dive into this tasty recipe that will impress everyone at your table! Ready to make some nachos?
Why I Love This Recipe
- Quick and Easy: This recipe is a breeze to make, taking only 30 minutes from start to finish, perfect for busy weeknights.
- Flavorful Ingredients: Combining juicy chicken with vibrant peppers and spices creates a delicious flavor explosion that everyone will love.
- Customizable Toppings: You can easily personalize your nachos with your favorite toppings, from avocado to jalapeños.
- One-Pan Wonder: Cooking everything on a single sheet pan makes cleanup a breeze, allowing you to focus on enjoying your meal.
Ingredients
Main ingredients list
- 2 chicken breasts
- 1 red bell pepper, sliced
- 1 yellow bell pepper, sliced
- 1 red onion, sliced
- 8 ounces tortilla chips
Spices and seasonings
- 2 teaspoons chili powder
- 1 teaspoon cumin
- 1 teaspoon garlic powder
- Salt and pepper, to taste
Toppings
- 2 cups shredded cheddar cheese
- 1 avocado, diced
- 1 cup sour cream
- Fresh cilantro, for garnish
- Jalapeño slices (optional)
When making sheet pan fajita chicken nachos, start with fresh, quality ingredients. The chicken breasts give a great source of protein. I prefer using red and yellow bell peppers for their sweetness. They add color and crunch to the dish. The red onion adds a nice bite that balances the flavors.
For the spices, chili powder brings warmth and depth. Cumin adds an earthy note, while garlic powder infuses a rich flavor. A pinch of salt and pepper makes everything shine.
Don’t forget the toppings! Shredded cheddar cheese melts beautifully and creates that gooey texture we crave. The diced avocado adds creaminess, while sour cream brings coolness to each bite. Fresh cilantro is a must for that pop of flavor. If you like heat, jalapeño slices can kick things up a notch.
Gathering these ingredients will set you up for a fun and tasty meal.

Step-by-Step Instructions
Preparation of ingredients
Start by slicing the chicken and vegetables. Thinly cut 2 chicken breasts, 1 red bell pepper, 1 yellow bell pepper, and 1 red onion. Make sure your slices are even. This helps them cook at the same rate.
Next, combine everything in a large bowl. Add the sliced chicken and veggies together. Drizzle with 1 tablespoon of olive oil. Sprinkle in 2 teaspoons of chili powder, 1 teaspoon of cumin, and 1 teaspoon of garlic powder. Season with salt and pepper. Toss well until all pieces are coated in the spices.
Baking the chicken and vegetables
Preheat your oven to 400°F (200°C). This step is key for even cooking. Spread the chicken and vegetable mixture evenly on a large sheet pan. Bake in the preheated oven for 15-20 minutes. Check that the chicken is fully cooked and the veggies are slightly charred.
Broiling for cheese melt
After baking, remove the sheet pan from the oven. Now, set the oven to broil. Layer 8 ounces of tortilla chips over the cooked chicken and veggies. Make sure to cover the area well. Then, sprinkle 2 cups of shredded cheddar cheese on top.
Return the sheet pan to the oven and broil for 2-3 minutes. Watch closely to prevent burning. The cheese should melt and bubble nicely. Once done, take the pan out and let it cool for a minute. Top with diced avocado, a dollop of sour cream, and fresh cilantro. Add jalapeño slices for an extra kick, if you like. Enjoy!
Tips & Tricks
Perfecting the chicken and veggies
To keep your chicken moist, slice it thinly. Thinner pieces cook faster and stay juicy. Season well before cooking. This adds flavor and helps keep moisture in.
For your veggies, you want a good char. Spread them out on the pan. This helps them roast instead of steam. High heat helps too. Bake until they are soft and slightly browned.
Ensuring melted cheese
Broiling is key for melted cheese. After baking, switch your oven to broil. Watch closely as cheese melts quickly. It should be bubbly and golden brown.
If you want cheese alternatives, try pepper jack or a mix of cheeses. These options will add a different flavor and spice to your nachos.
Serving suggestions
Serve your nachos with sides like guacamole or salsa. These dips add freshness and flavor. For a pretty presentation, layer your toppings. Start with chips, then add chicken and cheese. Top with avocado and sour cream last. This makes each bite tasty and colorful.
Pro Tips
- Marinate the Chicken: For even more flavor, marinate the chicken in the spices and olive oil for at least 30 minutes or overnight before cooking.
- Use Fresh Veggies: Fresh vegetables yield the best flavor and texture. Try to use organic bell peppers and onions for a vibrant taste.
- Watch the Broiling: When broiling, keep a close eye on the nachos. They can go from perfectly melted to burnt in seconds!
- Customize Toppings: Feel free to add your favorite toppings like black olives, corn, or different types of cheese to personalize your nachos.
Variations
Different proteins
You can change the protein in these nachos. Shrimp or beef works great. Simply cook them like the chicken. For a vegetarian twist, use black beans or grilled tofu. Both options add protein and flavor.
Flavor enhancements
To boost flavor, add spices or fresh salsa. Try adding smoked paprika for a smoky taste. You can also mix in jalapeños for heat. Customize with toppings like corn or olives. Each layer adds a new taste.
Serving styles
Nachos can be a fun meal or a tasty snack. Serve them at parties or family dinners. You can also use different chips. Try blue corn tortilla chips for a unique look. Each chip type brings its own crunch and flavor.
Storage Info
Storing leftovers
To keep your nachos fresh, store them in an airtight container. Place them in the fridge right after cooling. The best practice is to separate the toppings, like avocado and sour cream, from the nachos. This keeps them from getting mushy. You can keep the nachos fresh for up to three days in the fridge.
Reheating instructions
When you are ready to enjoy leftovers, use the oven to crisp them up. Preheat your oven to 350°F (175°C). Spread the nachos on a baking sheet and heat for about 10 minutes. Keep an eye on them to avoid burning. If you have leftover chicken and veggies, you can reheat those too. Just warm them in a pan over medium heat until hot.
Freezing options
You can freeze nachos, but it is best to freeze the chicken and veggies separately. Place them in a freezer-safe bag or container. For the best flavor, use them within one month. To reheat after freezing, thaw in the fridge overnight. Then, bake in the oven at 350°F (175°C) until warm. This keeps your nachos tasty and enjoyable.
FAQs
Can I use pre-cooked chicken?
Yes, you can use pre-cooked chicken, like rotisserie chicken. This saves time and still gives great flavor. Just shred or chop the chicken into bite-sized pieces. Since it's already cooked, you only need to heat it through. Adjust your cooking time to about 10 minutes. This way, you avoid drying out the chicken.
What can I do if I don’t have a broiler?
If you lack a broiler, don't worry! You can bake the nachos instead. Set your oven to 400°F (200°C) after you layer the chips and cheese. Bake for about 5-10 minutes. Keep an eye on them to ensure the cheese melts nicely. You can also use a toaster oven if you have one.
How do I make these nachos spicier?
To spice up your nachos, add more jalapeños! Fresh slices will give a nice kick. You can also try spicy cheese options. Look for pepper jack cheese; it melts well and adds heat. Mix and match to find your perfect spice level. Enjoy the heat!
In this post, we explored how to make delicious chicken nachos. We covered essential ingredients, spices, and toppings. I also shared step-by-step instructions and helpful tips to ensure great results. Remember, you can customize your nachos with different proteins and flavors. Don’t forget to store and reheat leftovers properly for the best taste. Enjoy your nacho adventures and get creative with each batch!