
Do you love sweet and tangy treats? If so, you’ll adore these Strawberry Lemonade Scones! Bursting with fresh flavors, this easy recipe will have your taste buds jumping for joy. Whether you bake for breakfast or a fun snack, these scones are sure to impress. Join me as I take you through simple steps to create these tasty delights, plus tips to make them your own!
Why I Love This Recipe
- Bright Flavors: The combination of fresh strawberries and zesty lemon creates a refreshing taste that is perfect for any occasion.
- Easy to Make: This scone recipe is simple and quick, making it ideal for both novice bakers and experienced cooks.
- Perfect for Any Time: These scones are delightful for breakfast, brunch, or as an afternoon snack with tea.
- Customizable: You can easily tweak this recipe by adding other fruits or spices to suit your taste.
Ingredients
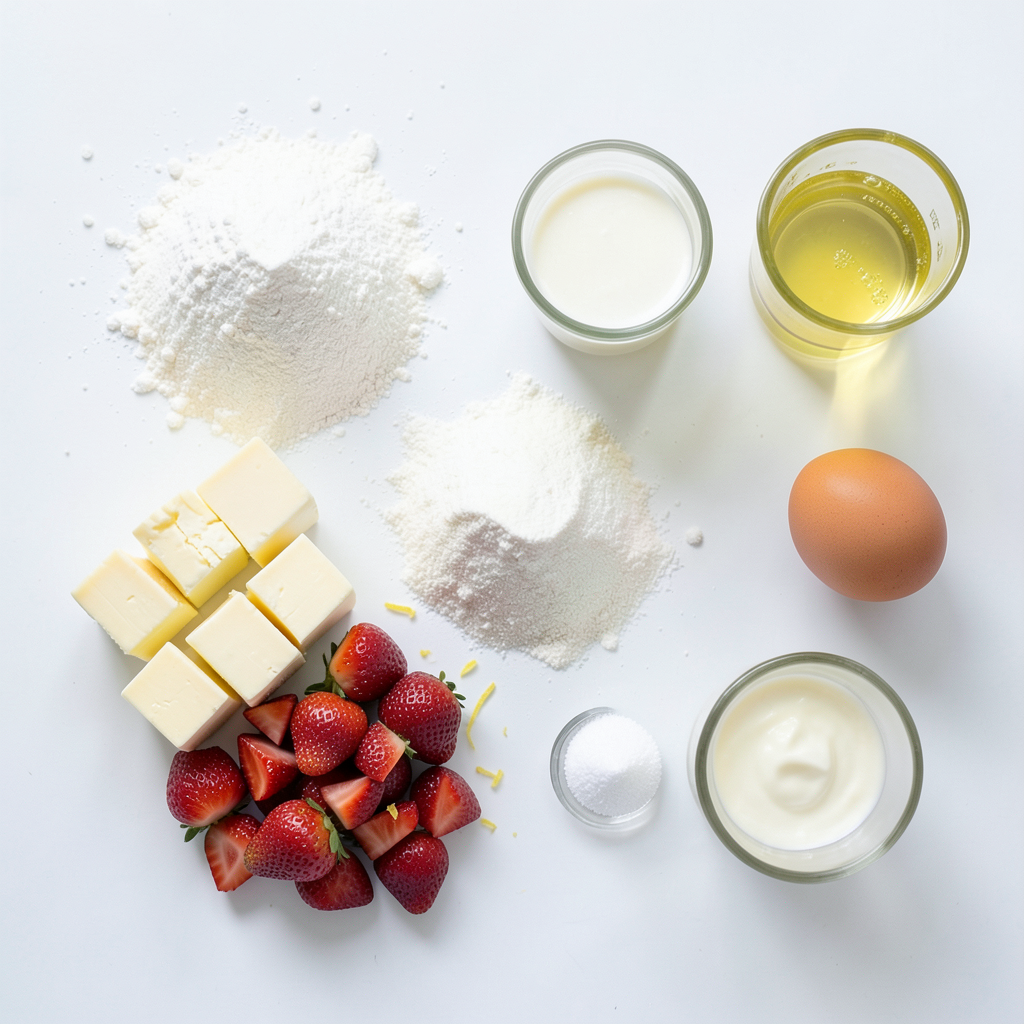
List of Ingredients
To make perfect strawberry lemonade scones, you will need:
- 2 cups all-purpose flour
- 1/4 cup granulated sugar
- 1 tablespoon baking powder
- 1/2 teaspoon salt
- 1/2 cup unsalted butter, cold and cubed
- 1/2 cup fresh strawberries, diced
- Zest of 1 lemon
- 1/2 cup heavy cream
- 1/4 cup lemonade (store-bought or homemade)
- 1 teaspoon vanilla extract
- 1 egg (for egg wash)
These ingredients come together to create a delightful treat that bursts with flavor.
Optional Ingredients for Variation
You can customize your scones with these optional ingredients:
- 1/2 cup chocolate chips for a sweeter twist
- 1/4 cup nuts like pecans or walnuts for crunch
- Fresh herbs like basil or mint for a unique taste
- A bit of almond extract for a different flavor profile
Adding these can make your scones even more fun!
Suggested Tools and Equipment
To bake these scones, gather the following tools:
- Mixing bowls for combining ingredients
- A whisk for blending dry ingredients
- A pastry cutter or your hands for mixing butter
- A rolling pin to shape the dough
- A sharp knife or pizza cutter for slicing
- A baking sheet lined with parchment paper
- A wire rack for cooling after baking
Having the right tools makes the baking process smoother and more enjoyable.
Step-by-Step Instructions
Preheating the Oven
Start by preheating your oven to 400°F (200°C). This temperature helps the scones rise and bake evenly. While the oven warms up, line a baking sheet with parchment paper. This keeps the scones from sticking and makes cleanup easier.
Preparing the Dry Ingredients
In a large bowl, whisk together the dry ingredients. Combine 2 cups of all-purpose flour, 1/4 cup of granulated sugar, 1 tablespoon of baking powder, and 1/2 teaspoon of salt. Mixing these together well is key. It ensures the baking powder and salt spread evenly throughout the dough.
Incorporating the Wet Ingredients
Next, add 1/2 cup of cold, cubed unsalted butter to the dry mix. Use a pastry cutter or your fingers to break the butter into smaller pieces. Aim for a crumbly texture. Now fold in 1/2 cup of diced fresh strawberries and the zest from 1 lemon.
In another bowl, mix together 1/2 cup of heavy cream, 1/4 cup of lemonade, and 1 teaspoon of vanilla extract. Slowly pour this into the dry ingredients. Stir gently until just combined. Be careful not to overmix, as this can make the scones tough.
Shaping and Cutting the Dough
Turn the dough out onto a lightly floured surface. Pat it down gently into a circle about 1-inch thick. Use a sharp knife or a pizza cutter to slice the dough into 8 equal wedges. Try to cut straight down to keep the edges sharp. This will help the scones rise nicely.
Baking the Scones
Transfer the scones to your prepared baking sheet. Beat 1 egg and brush this egg wash over the tops of the scones. This gives them a lovely golden color when baked. Place the baking sheet in the oven and bake for 15-20 minutes, until the scones are golden brown. Once done, allow them to cool on a wire rack before serving. Enjoy your tasty creation!
Tips & Tricks
Achieving the Perfect Texture
To get the best texture in your scones, use cold butter. This keeps the scones light and flaky. Cut the butter into the flour until it looks like small crumbs. Don't overwork the dough; mix just until it comes together. Gently fold in the strawberries to keep them whole.
Storing Leftover Scones
If you have any scones left, store them in an airtight container. They taste best when fresh but can last for 2-3 days at room temperature. To keep them longer, wrap them well and freeze them. They will stay good for up to a month.
Enhancing Flavor with Glazes
A simple glaze can take your scones up a notch. Mix powdered sugar with a little lemon juice or milk. Drizzle this over the cooled scones for extra sweetness. You can even add a bit of lemon zest to the glaze for more flavor.
Pro Tips
- Use Cold Ingredients: For the best texture, ensure that your butter and heavy cream are very cold. This helps create flaky layers in the scones.
- Don’t Overmix: Mix just until combined when adding wet ingredients to the dry. Overmixing can lead to tough scones.
- Fresh Strawberries: Use ripe, fresh strawberries for the best flavor. If using frozen, make sure to thaw and drain excess moisture.
- Experiment with Flavors: Feel free to add other mix-ins like blueberries, chocolate chips, or even herbs for a unique twist on these scones.
Variations
Substituting Different Fruits
You can switch out strawberries for other fruits. Blueberries, raspberries, or blackberries work great. Each fruit gives a unique taste. For example, blueberries add sweetness, while raspberries bring a tangy kick. Just make sure to keep the same amount of fruit. This way, your scones stay moist and delicious.
Making Lemonade Scones without Strawberries
If you want to skip strawberries, you can still make tasty scones. Just use the basic recipe without the berries. You can add more lemon zest for a bright flavor. Another option is to add dried fruits like cranberries or apricots. They will give your scones a chewy texture and a burst of sweetness.
Gluten-Free Option for Scones
You can make these scones gluten-free easily. Use a gluten-free all-purpose flour blend instead of regular flour. Be sure to check that the blend has xanthan gum. This helps keep your scones from being too crumbly. Follow the same steps in the recipe, and you’ll get light and fluffy scones that everyone can enjoy.
Storage Info
Room Temperature Storage
You can keep your scones at room temperature. Place them in an airtight container. They will stay fresh for about two days. Make sure to store them away from heat. Avoid sunlight to keep them tasty.
Refrigeration Tips
To store scones in the fridge, seal them in a zip-top bag. They will last for about four days. Refrigeration helps keep them moist but may change the texture slightly. Before serving, warm them in the oven for a few minutes.
Freezing Instructions
Freezing is a great option for longer storage. Wrap each scone tightly in plastic wrap. Then, place them in a freezer-safe bag. They can stay frozen for up to three months. To enjoy, thaw them in the fridge overnight. Reheat in the oven for a fresh taste!
FAQs
Can I use frozen strawberries?
Yes, you can use frozen strawberries. Just make sure to thaw them first. Pat them dry to remove extra moisture. This helps keep your scones from getting soggy. Frozen strawberries can add a nice touch of color and flavor.
How do I make scones less crumbly?
To make scones less crumbly, focus on mixing the dough gently. Overmixing can make them tough and dry. Use cold butter and cream for a tender texture. Be sure to add enough liquid to the dough. If it feels too dry, add a splash of cream.
What can I serve with Strawberry Lemonade Scones?
You can serve scones with clotted cream or butter. A light lemon glaze adds sweetness. Fresh strawberries on the side look pretty and taste great too. Pairing with tea or lemonade makes for a fun afternoon treat.
In this article, I covered the main steps to make delicious Strawberry Lemonade Scones. I shared tips for achieving the right texture and storing leftovers. I also showed how to adapt the recipe with different fruits and gluten-free options. Remember, baking is a fun adventure. Don’t be afraid to try new ideas! With these easy steps and tips, you can impress anyone with your scone-making skills. Enjoy the process and the tasty results of your baking!